
Popular categories
Looking for a yarn?


Comments / Questions (214)
![]() Ricarda Maria wrote:
Ricarda Maria wrote:
Nach wochenlanger Arbeit ist diese Jacke heute fertig geworden. Ein Traumteil, das die Nervenzusammenbrüche beim Stricken vergessen lässt :-) Sehr viel Arbeit und Improvisationstalent stecken drin, das Ergebnis ist wirklich unglaublich toll! Die Anleitung finde ich gut verständlich, ich hatte keine Probleme beim Umsetzen, wenn man genau liest und aufpasst ergibt sich alles von selbst beim Stricken. Für dieses Modell Note 1+.
17.08.2014 - 19:32
![]() Jana Gumpert wrote:
Jana Gumpert wrote:
Hallo, ich habe jetzt das linke Vorderteil Teil 1 gestrickt. Wenn ich mir das so ansehe stimmt das jetzt irgendwas nicht. Ich habe die Blende links gestrickt (auf der Rückseite sind die rechten Maschen) und den Rest kraus (als Hin und Rückreihen rechts). Stimmt das so? Die Blende rollt sich nämlich ein. Ich habe es so verstanden, das alles, bis auf die Ärmel kraus gestrickt wird. Die sind rechts und die Blende eben links. Bitte teilen sie mir mit, was da falsch ist. Vielen Dank!
25.04.2014 - 17:32DROPS Design answered:
Liebe Frau Gumpert, es ist richtig, dass die Jacke kraus rechts gestrickt wird. Die Blende müssen Sie jedoch kraus links, nicht glatt links stricken, also jede R links. Das ist in der Anleitung vielleicht etwas missverständlich und wird nun etwas eindeutiger formuliert. Die Ärmel stricken Sie nicht glatt rechts, sondern glatt links, also sozusagen als "Rückseite" von glatt rechts.
26.04.2014 - 11:22
![]() Zita Bernth wrote:
Zita Bernth wrote:
Brystvidde i str. s?
04.02.2014 - 13:14DROPS Design answered:
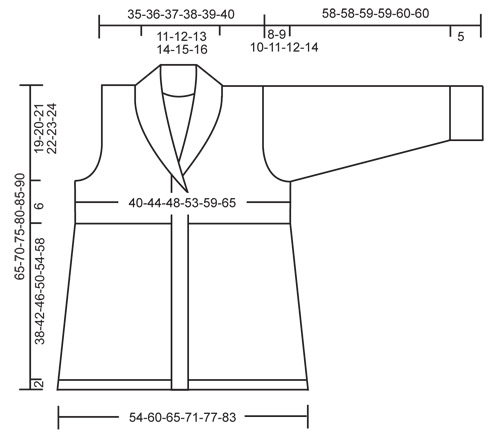
Hej Zita. Bredden er 40 cm (= brystvidde 80 cm) - se maalskitsen nederst paa mönstret.
04.02.2014 - 13:34
![]() Shanara wrote:
Shanara wrote:
Linkes Vorderteil Teil 1 Nur jede 4. Reihe Blendmaschen links???Ich habe gedacht alle Blendmaschen links bis zum Ende. Und für was ist der Markierungsfaden gut? Schöne Jacke, aber leider etwas kompliziert geschrieben für mich.
30.01.2014 - 16:01DROPS Design answered:
Liebe Shanara, dürfen wir Sie bitten, sich die Hilfe zur Umsetzung deses Modells in dem DROPS Laden zu holen, in dem Sie die Wolle gekauft haben. Dort hilft man Ihnen gerne weiter. Hier sind wir für die Korrektur von evtl. Fehlern zuständig und diese Anleitung wurde bereits mehrmals geprüft. Danke für Ihr Verständnis.
31.01.2014 - 08:26
![]() Lucy wrote:
Lucy wrote:
Een heel mooi vest maarrrrr.. ik heb het gebreid met het orginele dropsgaren en na eenmaal wassen is het vest twintig centimeter langer geworden. handwas 30 graden, licht gecentrifugeerd en liggend laten drogen!! dan mag er toch niks misgaan!!!! zonde van het werk en het geld!!!!!! grtjs Lucy
12.01.2014 - 18:30DROPS Design answered:
Hoi Lucy. Heb je de stekenverhouding aangehouden voor dit patroon? Een proeflapje maken is altijd belangrijk. Maar juist voor dit model is het heel belangrijk om de stekenverhouding goed te hebben of het model kan gaan "groeinen" tijdens het wassen! Brei altijd een proeflapje en het is ook een goed idee om deze te wassen.
13.01.2014 - 10:35
![]() Jutta Göttel wrote:
Jutta Göttel wrote:
Hab noch fragen zu der Anleitung. Wo bringe ich den Markierungsfaden an und was ist eine Blendmasche? Ist damit eine Randmasche gemeint? MfG Jutta Göttel
07.01.2014 - 09:34DROPS Design answered:
Liebe Jutta, eine Blendenmasche ist eine Masche an der Blende. Es sind mehere Maschen, je nachdem wie breit die Blende ist. Bitte schauen Sie sich auch unsere Videotutorials an, zu den meisten Fragen (auch zur Markierung mit einem Faden, Maschenmarkierer etc) gibt es Videos.
08.01.2014 - 09:04
![]() Jutta Göttel wrote:
Jutta Göttel wrote:
Hab noch eine Frage: Was sind denn Blendenmaschen und was ist der Hilfsfaden????
06.01.2014 - 10:49DROPS Design answered:
Liebe Jutta, die Blendenmaschen sind die Maschen an der vorderen Mitte (Blende). Maschen werden auf einen Hilfsfaden oder eine Hilfsnadel stillgelegt.
06.01.2014 - 11:54
![]() Jutta Göttel wrote:
Jutta Göttel wrote:
Was ist denn mit dem Markierungsfaden gemeint ? Wo soll der markiert werden. Das wurde nicht erwähnt. MfG Jutta Göttel
06.01.2014 - 10:46DROPS Design answered:
Liebe Jutta, Sie können eine Stelle entweder mit einem Maschenmarkierer oder einem Faden markieren, es ist nicht der Arbeitsfaden gemeint.
06.01.2014 - 11:53
![]() Eva Oimann wrote:
Eva Oimann wrote:
Das ist bei dieser Jacke im ersten Viereck schon nicht ganz klar ersichtlich! Bin schon gan z verzweifelt, ich möchte die mir unbedingt machen, hab schon die passender Wolle hier und kann nicht anfangen!
17.12.2013 - 21:55DROPS Design answered:
Liebe Eva, bezieht sich Ihre Frage auf das ganze Viereck? Dann steht bei RÜCKENTEIL/RECHTES VORDERTEIL TEIL 2 und bei RÜCKENTEIL/LINKES VORDERTEIL TEIL 2 wo der Markierungsfaden eingezogen wird (siehe erster Teil Ihrer Frage). Oder bezieht es sich auf teil 1 - das ist aber kein Viereck. Dürfen wir Sie bitten, sich für weitere Strickhilfe an den Laden zu wenden, in dem Sie die Wolle gekauft haben? Dort hilft man Ihnen gerne weiter.
18.12.2013 - 11:48
![]() Eva Oimann wrote:
Eva Oimann wrote:
Das ist eine tolle Jacke, wo muss ich denn den Markierungsfaden einziehen? Verstehe ich nicht so ganz"
17.12.2013 - 21:50
|
|
Domino Effect#dominoeffectjacket |
|
 |
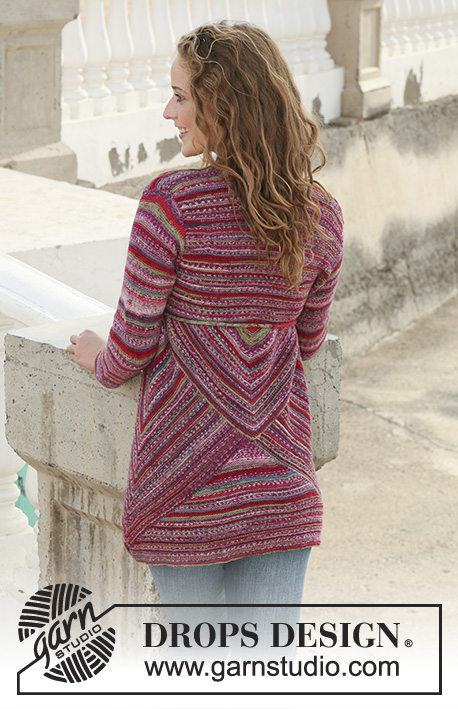 |
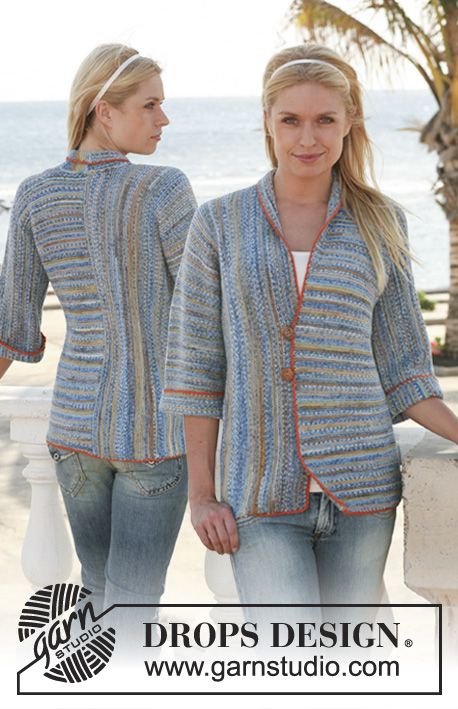
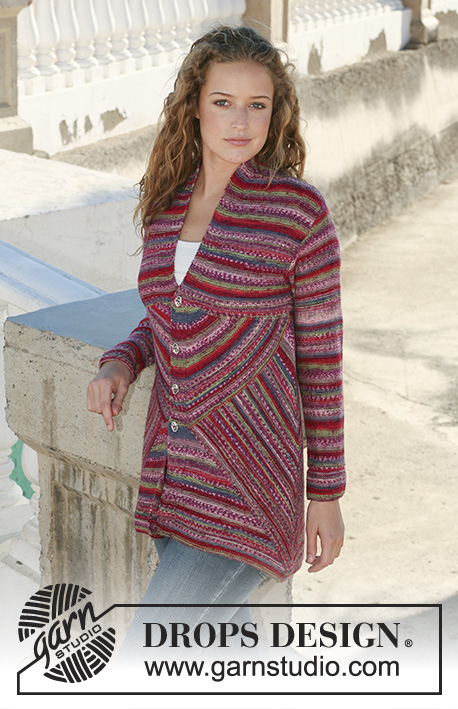
Knitted DROPS jacket with domino squares in ”Fabel”. Size S - XXXL.
DROPS 111-1 |
|
|
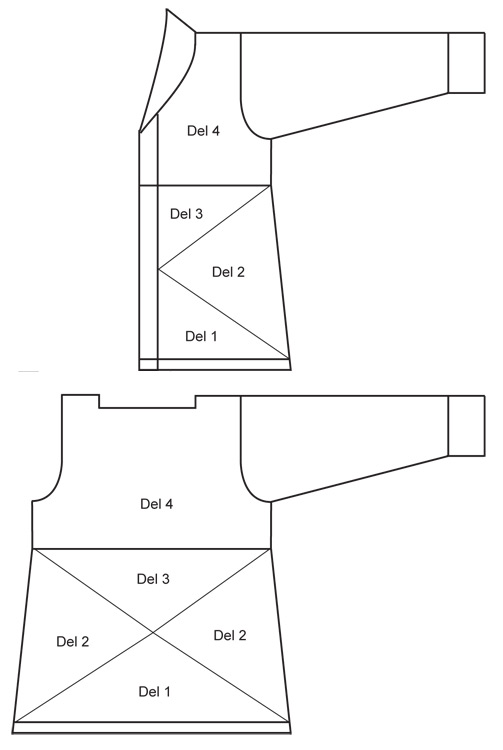
DOMINO SQUARE: 1 Domino square: (= 159-177-193-209-227-245sts): Row 1 (= WS): K all sts. Row 2 (= RS): work row until 1 st before marker, slip 1 st as if to K, K2 tog, psso, work remaining sts on row. Row 3: K all sts. Row 4: Like row 2. Row 5: Work row until 1 st before marker, K3 tog, work remaining sts on row. Row 6: Like row 2. Row 7: K all sts. Row 8: Like row 2. Row 9: K all sts. Row 10: Like row 2. Repeat row 1 to 10 until there is 1 st left on needle. Cut the thread and pull through remaining st. HALF DOMINO SQUARE: 1 Half Domino square (= 133-149-161-173-189-201 sts): Row 1 (= WS): Work row until 1 st remain, slip this st on stitch holder-1. Row 2 (= RS): Work row until 1 st before marker, slip 1 st as if to K, K2 tog, psso, work sts on row until 1 st remain, slip this st on stitch holder-2. Repeat row 1 and 2 until there is 1 st left on needle and 33-37-40-43-47-50 sts on each stitch holder. QUARTER DOMINO SQUARE: 1 quarter Domino square: Row 1 (= WS): K all sts, with 10 front band sts in P sts. Row 2 (= RS): P 10 front band sts, K2 tog, work row until 1 st remain, slip this st on stitch holder-1. Repeat row 1 and 2 until there are 11 sts left on needle (includes 10 front band sts) and 33-37-40-43-47-50 sts on stitch holder-1. BUTTONHOLES: Make buttonholes on right front band. 1 buttonhole = cast off 5th st from mid front and cast on 1 new st on return row. Make buttonholes when piece measures: SIZE S: 23, 28, 34 and 40 cm. SIZE M: 25, 31, 37 and 44 cm. SIZE L: 27, 34, 41 and 48 cm. SIZE XL: 29, 36, 44 and 52 cm. SIZE XXL: 31, 37, 43, 49 and 56 cm SIZE XXXL: 33, 39, 45, 51 and 58 cm -------------------------------------------------------- -------------------------------------------------------- BACK PIECE, PART 1: Worked in garter st throughout, i.e. K all rows. Cast on 129-143-157-171-185-199 sts on needle size 3 mm with Fabel. Work 2 cm garter st on all sts. Insert a marker in the middle st (= mid back). Continue in garter st, AT THE SAME TIME dec 1 st (by K2 tog) each side as follows: Row 1 (= RS): dec 1 st each side. Row 2 (= WS): K all sts. Row 3: dec 1 st each side. Row 4: dec 1 st each side. Row 5: dec 1 st each side. Row 6: K all sts. Row 7: dec 1 st each side. Row 8: dec 1 st each side. Row 9: dec 1 st each side. Row 10: K all sts. Repeat from row 1 to 10 a total of 9-10-11-12-13-14 times = 3 sts left on needle. Work next row from RS as follows: slip 1 st as if to K, K2 tog, psso = 1 st left on needle. Cut the thread and pull through remaining st. Piece now measures approx 21-23-25-27-29-31 cm from casting on row to the top of square. LEFT FRONT PIECE PART 1: Cast on 75-82-89-96-103-110 sts (includes 10 front band sts towards mid front) on needle size 3 mm with Fabel. Work 2 cm garter st with 10 front band sts in P sts towards mid front – P front band sts on every row throughout. Insert a marker inside the 10 front band sts. Continue in garter st, AT THE SAME TIME dec 1 st (by K2 tog) at the side as follows: Row 1 (= RS): dec 1 st at the side. Row 2 (= WS): K all sts (continue to P front band sts). Row 3: dec 1 st at the side. Row 4: dec 1 st at the side. Row 5: dec 1 st at the side. Row 6: K all sts (continue to P front band sts). Row 7: dec 1 st at the side. Row 8: dec 1 st at the side. Row 9: dec 1 st at the side. Row 10: K all sts (continue to P front band sts). Repeat from row 1 to 10 a total of 9-10-11-12-13-14 times = 12 sts left on needle. Work next row from RS as follows: K2 tog, cut thread and pull through st created by K2 tog, slip the remaining 10 front band sts on a stitch holder. Piece now measures approx 21-23-25-27-29-31 cm from cast on row to the top of square. RIGHT FRONT PIECE PART 1: Like left front piece, but mirrored. BACK PIECE/RIGHT FRONT PIECE PART 2: Pick up 79-88-96-104-113-122 sts along the side on right front piece (part 1), beg inside front band sts on stitch holder and pick up sts to where the dec at the side of Part 1 started (i.e. 2 cm at the bottom of front piece and back piece are left “open” and will be sewn tog later). Cast on 1 st between front piece and back piece, and pick up 79-88-96-104-113-122 sts along the right side on back piece (part 1) up to the point (= mid back) = a total of 159-177-193-209-227-245 sts on needle. Insert a marker in the middle st (= mid side). Now work Domino square, see above. BACK PIECE/LEFT FRONT PIECE PART 2: Beg at the point mid back on back piece. Pick up 79-88-96-104-113-122 sts along the side to where the dec at the side on Part 1 started (i.e. 2 cm at the bottom of front piece and back piece are left “open” and will be sewn tog later). Cast on 1 st between back piece and front piece, and pick up 79-88-96-104-113-122 sts along the side on front piece up to front band sts on stitch holder = a total of 159-177-193-209-227-245 sts on needle. Insert a marker in the middle st (= mid side). Now work Domino square. BACK PIECE PART 3: Pick up 66-74-80-86-94-100 sts (from RS) from the point at the top of Domino square at the right side and down along the edge to where the 2 Domino squares meet mid back, pick up 1 st between the 2 squares and pick up 66-74-80-86-94-100 sts along the side to the top of the Domino square on the left side = a total of 133-149-161-173-189-201 sts on needle. Insert a marker in the middle st. Now work Half Domino square – see above. BACK PIECE PART 4: Keep the 1 st on needle and slip sts from stitch holder-1 and stitch holder-2 back on needle. K 1 row, AT THE SAME TIME pick up 28-30-34-40-47-55 sts evenly among the sts slipped back on needle = 95-105-115-127-142-156 sts. Insert a marker in piece, now measure piece from here. Continue in garter st back and forth on needle on all sts. When piece measures approx 6 cm from marker cast off 3-3-3-4-4-4 sts each side for armhole and cast off to shape the armhole each side at the beg of every row: 3 sts 0-0-0-1-2-3 times, 2 sts 0-2-4-4-5-6 times and 1 st 2-2-2-3-4-5 times = 85-87-89-91-94-96 sts left on needle. Continue in garter st back and forth on needle until piece measures 23-24-25-26-27-28 cm from marker. Now cast off the middle 21-23-25-27-30-32 sts for neck and complete each shoulder separately. Cast off 1 st on neckline on every other row a total of 3 times = 29 sts left on shoulder. Cast off when piece measures 25-26-27-28-29-30 cm from marker, piece now measures a total of approx 65-70-75-80-85-90 cm. RIGHT FRONT PIECE PART 3: Remember BUTTONHOLES – see above. Slip 10 front band sts back on needle. Pick up (from RS) 1 st between front band and the point at the side of Domino square, then pick up 66-74-80-86-94-100 sts along the side of the Domino square up to the point at the side of jacket = 77-85-91-97-105-111 sts on needle. Insert a marker in the st between front band and Domino square. Continue to P front band sts on every row. Now work Quarter Domino square – see above. RIGHT FRONT PIECE PART 4: Keep the 11 sts on needle and slip sts from stitch holder back on needle. K 1 row, AT THE SAME TIME pick up 14-16-17-20-22-27 sts evenly among sts slipped back on needle = 58-64-68-74-80-88 sts (includes 10 front band sts). Insert a marker, and now measure piece from here. Continue in garter st back and forth on needle with front band sts as before. When piece measures approx 6 cm from marker cast off for armhole at the side as described for back piece = 53-55-55-56-56-58 sts. Continue until piece measures 25-26-27-28-29-30 cm from marker. Now cast off 29 sts from shoulder towards the neckline = 24-26-26-27-27-29 sts left on needle for collar. Continue in garter st back and forth on needle on collar sts with front band sts as before. When collar measures approx 6-7-7-8-9-9 cm from shoulder, cast off. LEFT FRONT PIECE PART 3 AND 4: Like right front piece, but mirrored and without buttonholes. SLEEVE: Worked back and forth on needle. Cast on 56-58-60-62-64-68 sts (includes 1 edge st each side) on needle size 3 mm with Fabel. Work garter st until piece measures approx 5 cm. Work 5 rows stocking st and now continue in reverse stocking st. When piece measures 8 cm inc 1 st each side and repeat the inc on every 3.5-3-2.5-2-1.5-1.5 cm a total of 12-14-15-18-21-22 times = 80-86-90-98-106-112 sts. When piece measures 50-49-49-48-48-46 cm (less for the larger sizes because of longer sleeve cap and wider shoulder) cast off for sleeve cap each side at the beg of every row: 3 sts 1 time, 2 sts 5-5-5-5-5-6 times and 1 st 1-2-4-6-7-7 times, then cast off 2 sts each side until piece measures approx 57-57-58-58-59-59 cm, now cast off 3 sts each side 1 time. Cast off remaining sts. Piece measures approx 58-58-59-59-60-60 cm. ASSEMBLY: Sew side seams and sew tog the edge (= 2 cm garter st) towards bottom edge each side. Sew in outer loops of sts. Sew sleeve seam inside 1 edge and set in sleeves. Sew collar tog mid back and sew to neckline. Sew on buttons. |
|
 |
|
 |
|
Have you finished this pattern?Tag your pictures with #dropspattern #dominoeffectjacket or submit them to the #dropsfan gallery. Do you need help with this pattern?You'll find 22 tutorial videos, a Comments/Questions area and more by visiting the pattern on garnstudio.com. © 1982-2026 DROPS Design A/S. We reserve all rights. This document, including all its sub-sections, has copyrights. Read more about what you can do with our patterns at the bottom of each pattern on our site. |
|


With over 40 years in knitting and crochet design, DROPS Design offers one of the most extensive collections of free patterns on the internet - translated to 17 languages. As of today we count 324 catalogues and 12291 patterns translated into English (UK/cm). 12291
We work hard to bring you the best knitting and crochet have to offer, inspiration and advice as well as great quality yarns at incredible prices! Would you like to use our patterns for other than personal use? You can read what you are allowed to do in the Copyright text at the bottom of all our patterns. Happy crafting!
Post a comment to pattern DROPS 111-1
We would love to hear what you have to say about this pattern!
If you want to leave a question, please make sure you select the correct category in the form below, to speed up the answering process. Required fields are marked *.