
Popular categories
Looking for a yarn?


Comments / Questions (68)
![]() Febe wrote:
Febe wrote:
Det står ett gammalt pris på Alpacan i beskrivningen!!
04.04.2018 - 13:30
![]() Ann-Mari Franzen wrote:
Ann-Mari Franzen wrote:
Modell 108-2. " Du öker 1 m til stolpen og samtidig strikker du 1 m glatstrik (fra forstykket) i rille. Dvs, stolpen bliver 2 m bredere - men du har kun öket 1 m i antal. = Ert svar. Varför blir det inte sammanlagt 2 maskors ökning "1 maska rätstickning stickas in på framkanten. Hur gör man?
24.01.2018 - 13:00DROPS Design answered:
Man ska endast öka 1 m åt gången, maskorna som stickas in i rätst på framkanten är inga ökningar, utan det är maskorna i slätstickning som läggs till i framkanten.
29.01.2018 - 14:19
![]() Bente Ebbesen wrote:
Bente Ebbesen wrote:
Jeg lurer på dette: "-Les hele avsnittet -: øk 1 m i den ytterste stolpem totalt 10-10-10-11-11-11 ganger samtidig som 1 m glstrikk strikkes inn i rillene på stolpen totalt 8-8-8-9-9-9 ganger." Betyr det at man øker to masker totalt?
02.07.2013 - 02:01DROPS Design answered:
Hej Bente. Du öker 1 m til stolpen og samtidig strikker du 1 m glatstrik (fra forstykket) i rille. Dvs, stolpen bliver 2 m bredere - men du har kun öket 1 m i antal.
02.07.2013 - 11:31
![]() DROPS Design NL wrote:
DROPS Design NL wrote:
Hoi. Klopt uw stekenverhouding wel. Dit vest is 59 cm breed langs de onderkant in maat XL (en 50 cm in maat M). Kijk op de maattekening onderaan en bepaal uw maat. Zorg dan ervoor dat de stekenverhouding voor het patroon klopt (17 st x 22 nld = 10 x 10 cm). Gr. Tine
28.12.2010 - 09:56
![]() A. Fekkes wrote:
A. Fekkes wrote:
Ik heb confectiemaat M. Maar maat M van dit patroon is veel te klein.Zelfs XL past niet. Wat nu te doen?
27.12.2010 - 23:34
![]() Caroline wrote:
Caroline wrote:
Hei, jeg lurer på om denne nydelige jakken er vanskelig å strikke?
05.02.2009 - 22:55
![]() Drops Design wrote:
Drops Design wrote:
Hej De 2 gange 2 ret sammen på hver side at de 4 omslag udligner omslagene, så du har samme antal masker på hver p. God fornøjelse!
22.10.2008 - 10:14
![]() Ane Karen wrote:
Ane Karen wrote:
Skal man strikke over alle masker på næste p eller skal man strikke nogle masker sammen for ikke at få for mange masker?. For ifølge *2rsm 2 gange er det jo minus 2 masker og kast, 1r, kast, 1 r, kast, 1r, kast, 1r* er det jo plus 4 masker. Altså 2 flere masker for hvert * *. Jeg er gået i stå pga forvirring med hulmønsteret :-(. Håber at finde svar på min forvirring
22.10.2008 - 05:11
![]() DROPS Design wrote:
DROPS Design wrote:
Omg strikkes slik: 2 r sm, 2 r sm, kast, 1 r, kast, 1 r, kast, 1 r, kast, 2 r sm, 2 r sm, dette gjentas hele omg. Dvs at det felles 4 m og økes 4 m for hver rapp. M-antallet vil derfor være det samme. På neste omg strikkes kastene som rette m.
01.10.2008 - 09:10
![]() DROPS Design wrote:
DROPS Design wrote:
The pattern is there - just click the link underneath the little picture.
30.09.2008 - 22:48
|
|||||||||||||
Svetlana |
|||||||||||||
 |
 |
||||||||||||
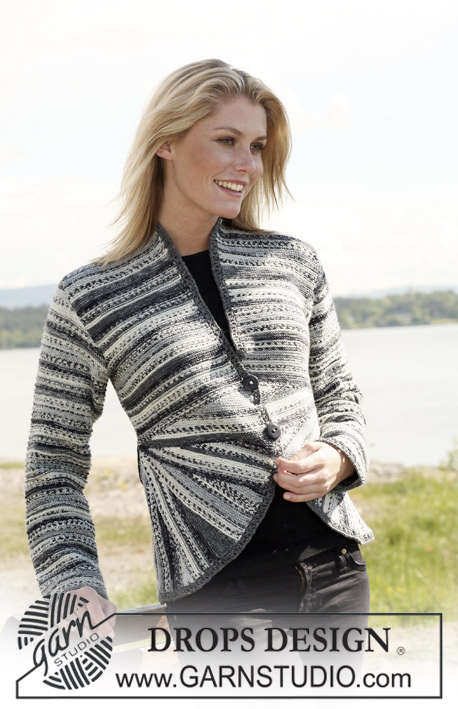
DROPS jacket in stocking st with sleeves in wavy pattern in ”Alpaca” and ”Kid Silk” . Size S - XXXL.
DROPS 108-2 |
|||||||||||||
|
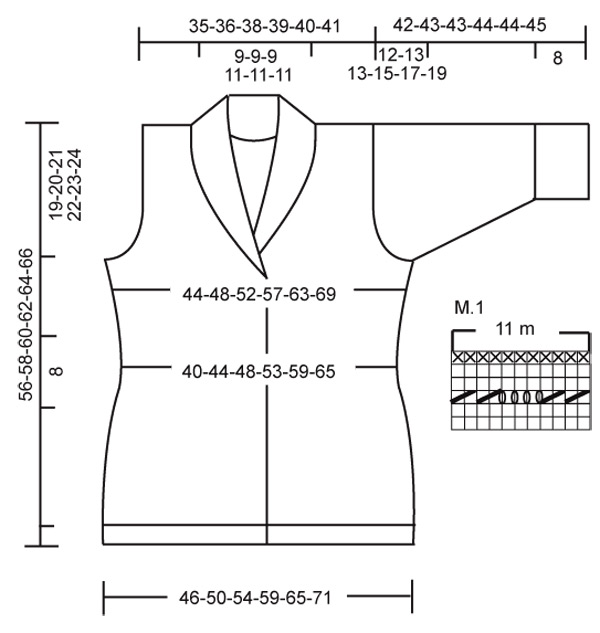
Wavy pattern: See diagram M.1. The diagram shows the pattern from the RS. Back piece: Cast on 112-120-128-140-156-168 sts (includes 1 edge st each side) on needle size 3 mm with 1 thread of each quality. P 1 row from WS and continue in rib as follows: 1 edge st, K2, * P2, K2 *, repeat from *-* and finish row with 1 edge st. Work 3 cm rib like this and change to needle size 4 mm. K 1 row from RS, at the same time dec 32-34-34-38-44-44 sts evenly on row = 80-86-94-102-112-124 sts. Now complete piece in stocking st. Remember the knitting tension! At the same time, on next row from RS, dec 1 st each side on every 3 cm a total of 5 times = 70-76-84-92-102-114 sts. When piece measures 26 cm inc 1 st each side on every 3-4-4-5-4-4 cm a total of 3-3-3-3-4-4 times = 76-82-90-98-110-122 sts. When piece measures 37-38-39-40-41-42 cm cast off 4 sts each side for armhole and cast off to shape the armhole each side at the beg of every row: 4 sts 0-0-0-1-1-1 times, 2 sts 1-2-4-4-6-8 times and 1 st 2-1-1-0-1-1 times = 60-64-64-66-68-72 sts. When piece measures 54-56-58-60-62-64 cm cast off the middle 14-14-14-16-16-16 sts for neck and dec 1 st on neckline on next row = 22-24-24-24-25-27 sts left on each shoulder. Cast off when piece measures 56-58-60-62-64-66 cm. Left front piece: Cast on 62-66-70-74-82-90 sts (includes 1 edge st at side and 5 front band sts towards mid front) on needle size 3 mm with 1 thread of each quality. P 1 row from WS and continue in rib as follows (from the side): 1 edge st, * P2, K2 *, repeat from *-* and finish row with 5 front band sts in garter st. When rib measures 3 cm change to needle size 4 mm and K 1 row from RS with front band sts in garter st, at the same time dec 17-18-18-18-21-23 sts evenly on row (do not dec on front band sts) = 45-48-52-56-61-67 sts. Now complete piece in stocking st with front band in garter st as before and dec 1 st at side as described for back piece = 40-43-47-51-56-62 sts. When piece measures 26 cm inc 1 st at side as described for back piece. When piece measures 31-33-35-36-38-40 cm inc for collar towards mid front on every other row as follows – read all of this section before continuing -: inc 1 st in the outermost front band st a total of 10-10-10-11-11-11 times, at the same time incl 1 stocking st from front piece in garter st on front band/collar a total of 8-8-8-9-9-9 times. At the same time when piece measures 37-38-39-40-41-42 cm cast off for armhole at side as described for back piece. After all inc for collar and dec for armhole are complete there are 45-47-47-49-50-52 sts on row (23-23-23-25-25-25 front band/collar garter sts and 22-24-24-24-25-27 stocking sts on shoulder). Continue until piece measures 56-58-60-62-64-66 cm and now cast off 22-24-24-24-25-27 sts on shoulder and work the remaining 23-23-23-25-25-25 garter sts on collar. Continue on collar sts with shortened rows as follows (1st row = WS): * Work 2 rows garter st on 12 sts towards mid front, work 2 rows garter sts on all *, repeat from *-* until collar measures 6-6-6-7-7-7 cm (measured on the shorter side) from shoulder. Cast off loosely. Right front piece: Like left front piece, but mirrored. Sleeve: Worked in the round on double pointed needles. Cast on 56-60-60-60-64-64 sts on needle size 3 mm with 1 thread of each quality. K 1 round, insert a Marking Thread at beg of round, and continue in rib, K2/P2. When piece measures 8 cm change to needle size 4 mm and K 1 round, at the same time inc 12-19-19-19-26-26 sts evenly = 68-79-79-79-90-90 sts. P 1 round and now continue in wavy pattern M.1 with 1 P st on both sides of MT (= P2 mid under sleeve). When piece measures 30-30-30-29-27-26 cm (Note! Less on the larger sizes because of longer sleeve cap and wider shoulders) cast off 3 sts on each side of MT (= 6 sts in total) for armhole and complete piece back and forth on needle. Cast off to shape the sleeve cap each side at the beg of every row: 2 sts 3 times and 1 st 3 times = 44-55-55-55-66-66 sts. Continue in pattern. When piece measures 42-43-43-44-44-45 cm work all sts tog 2 by 2 from RS = 22-27-27-27-33-33 sts. P 1 row from WS and cast of loosely. Assembly: Sew shoulder seams. Sew side seams inside 1 edge st and set in sleeves. Sew collar tog mid back and sew to back piece. Crochet border with button loops: Beg at bottom of right front piece, crochet round neckline and down left front piece, with crochet hook size 4 mm with 1 thread of each quality: * 1 ch, skip approx 1 cm, 1 dc in next st *, repeat from *-*. At the same time, approx 10 to 12 cm from bottom edge, crochet 5 ch in stead of 1 ch (= button loop). Continue and crochet a total of 4-4-4-4-5-5 button loops along right front piece with approx 7 to 8 cm between each (last button loop should sit where inc for collar beg). Sew on buttons in the last garter st towards left front piece. |
|||||||||||||
Diagram explanations |
|||||||||||||
|
|||||||||||||
 |
|||||||||||||
Have you finished this pattern?Tag your pictures with #dropspattern or submit them to the #dropsfan gallery. Do you need help with this pattern?You'll find 24 tutorial videos, a Comments/Questions area and more by visiting the pattern on garnstudio.com. © 1982-2026 DROPS Design A/S. We reserve all rights. This document, including all its sub-sections, has copyrights. Read more about what you can do with our patterns at the bottom of each pattern on our site. |
|||||||||||||


With over 40 years in knitting and crochet design, DROPS Design offers one of the most extensive collections of free patterns on the internet - translated to 17 languages. As of today we count 324 catalogues and 12290 patterns translated into English (UK/cm). 12290
We work hard to bring you the best knitting and crochet have to offer, inspiration and advice as well as great quality yarns at incredible prices! Would you like to use our patterns for other than personal use? You can read what you are allowed to do in the Copyright text at the bottom of all our patterns. Happy crafting!
Post a comment to pattern DROPS 108-2
We would love to hear what you have to say about this pattern!
If you want to leave a question, please make sure you select the correct category in the form below, to speed up the answering process. Required fields are marked *.