
Popular categories
Looking for a yarn?


Comments / Questions (40)
![]() Kathy De Witt wrote:
Kathy De Witt wrote:
Yes, I've seen you've made a change and it is coming out correctly now. Thank you very much. I am glad I persisted! Kathy
28.11.2012 - 00:24
![]() Kathy De Witt wrote:
Kathy De Witt wrote:
Hi: I have followed the pattern, but the outermost stitches are the wrong way around. Please can you examine the pattern closely. Thank you Kathy
21.11.2012 - 12:03DROPS Design answered:
Dear Mrs De Witt, pattern has been checked and diagram has been edited to match written pattern. Everything is now right. Happy Knitting !
27.11.2012 - 14:40
![]() Kathy De Witt wrote:
Kathy De Witt wrote:
Thank you for your quick reply. This clarifies the pattern. I will give it another try. My daughter loves this head band. Kathy
19.11.2012 - 12:44
![]() Kathy De Witt wrote:
Kathy De Witt wrote:
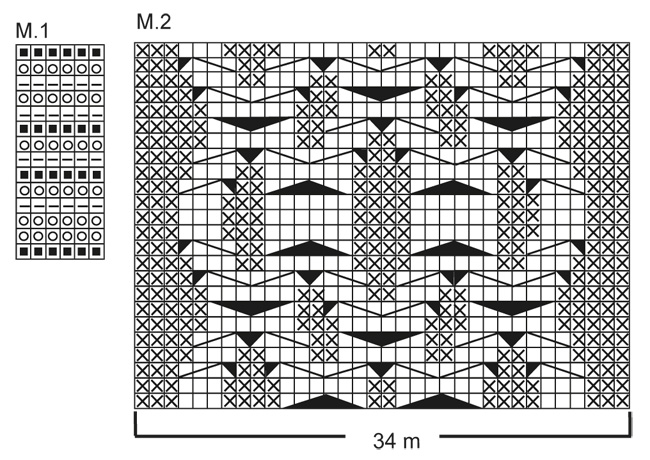
Headband: I am struggling with understanding the pattern: 1. do I start the first row bottom left or bottom right of M2 or does it not matter as it is symmetrical? 2.do I reverse K and P when I return on every other row? So, if it says to do a cable do I make the 3 K stitches and 1 P stitch into 3 P and 1 K? 3. the edge stitches - it says the first row you do is the WS but as they are K stitches it seems to me that it is the RS. Any explanation much appreciated. Kathy
18.11.2012 - 11:27DROPS Design answered:
Dear Mrs De Witt, 1. diagrams are read starting in the lower right-hand corner working towards the left and return rows from the left to the right, but in that case it's symetrical. 2. in M2, 1 square = 1 st x 1 row, so that all K from RS will be P from WS and all P from WS will be K from WS. 3.in M2 yes, first row is WS so that cables are on the RS. Happy knitting!
19.11.2012 - 09:47
![]() Maxant wrote:
Maxant wrote:
Bonjour, concernant ce modèle, je voudrais savoir si le diagramme montre uniquement les rangs sur l'endroit ou bien s'il montre les rangs endroits et envers ? merci
25.09.2012 - 14:33DROPS Design answered:
Bonjour Madame Maxant. En règle générale et sauf exception clairement indiqué, dans nos diagrammes 1 case = 1 m x 1 rang. Le diagramme représente le motif, vu sur l'endroit, on y lit les rangs sur l'endroit aussi bien que les rangs sur l'envers. Bon tricot !
25.09.2012 - 15:05
![]() Carro wrote:
Carro wrote:
Jeg synes dette skulderstykket er kjempefint, heklet det på 3 kvelder (i litt andre farger) og det ble utrolig fint. Varmt å godt å ha på seg. Takk for fin oppskrift!
13.11.2009 - 12:22
![]() Robin wrote:
Robin wrote:
Im sorry I'm still confused are you talking about the neck band? Cause the picture does not look like it has a band on each side. where are the 4 tr supposed to go? Thanks
09.01.2009 - 22:08
![]() DROPS Design wrote:
DROPS Design wrote:
No, it's the 4 outermost sts that are the band. the pattern just tells that these are the band sts, so that you know that. Just work the sts as explained in pattern, no inc or adding or nothing :-)
09.01.2009 - 17:36
![]() Robin wrote:
Robin wrote:
Does that mean 4 tr in one tr from previous row on each side
09.01.2009 - 16:27
![]() Robin wrote:
Robin wrote:
Does that mean 4 tr in one tr from previous row on each side
09.01.2009 - 16:27
|
||||||||||||||||||||||||||||
DROPS 98-32 |
||||||||||||||||||||||||||||
 |
 |
|||||||||||||||||||||||||||
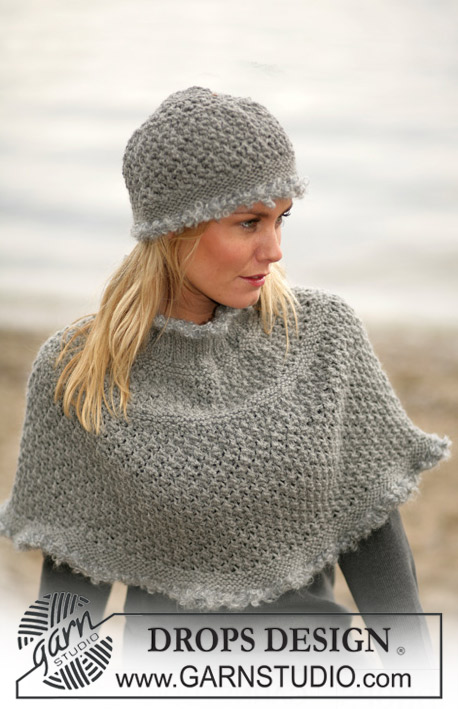
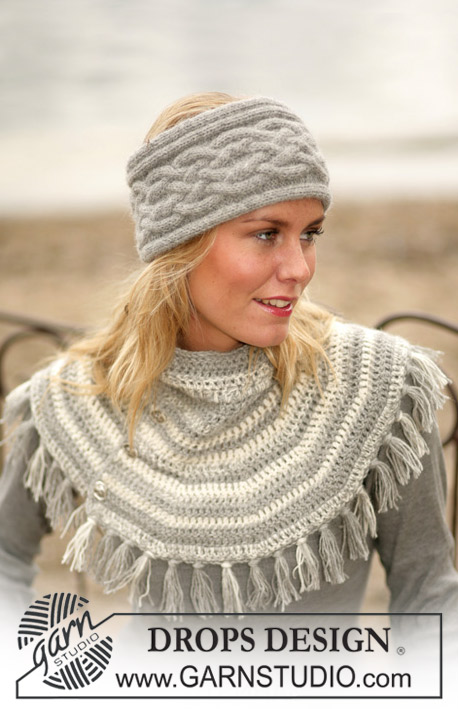
DROPS Cape and head band in Alpaca
DROPS 98-32 |
||||||||||||||||||||||||||||
|
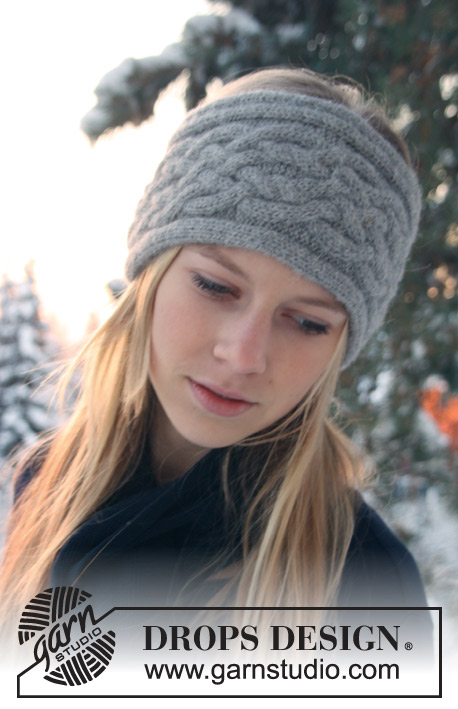
CAPE: Crochet Tension: 15 tr x 7 rows with 2 threads Alpaca = 10 x 10 cm. Stripe Pattern: See diagram M.1. Crochet info: Replace the first tr at the beg of row with 3 ch. Finish the row with 1 tr in the 3rd ch from beg of previous row. The cape is crochet from the top down. Loosely crochet 93 ch with crochet hook size 4.5 mm and 2 threads light grey Alpaca. Crochet first row as follows: 1 tr in the 4th ch from hook, 1 tr in next ch, *skip 1 ch, 1 tr in the next 3 ch*, repeat from *-* = 69 tr (incl 4 tr for front edge each side). Now crochet 1 tr in each tr – read Crochet info – at the same time crocheting stripes after M.1. After 5 rows of tr beg the inc (continue M.1 as before): 1st row: 1 tr in each of the first 9 tr, 2 tr in next tr, *1 tr in each of the next 4 tr, 2 tr in next tr*, repeat from *-* until there are 9 tr left on row and crochet 1 tr in each of these = 80 tr, turn the piece 2nd row: 1 tr in each of the first 10 tr, 2 tr in next tr, *1 tr in each of the next 5 tr, 2 tr in next tr*, repeat from *-* until there are 9 tr left on row and crochet 1 tr in each of these = 91 tr, turn the piece Continue the inc like this, i.e. 1 more tr between each inc on each row until there are 168 tr on row (= 14 rows with tr and 1 repeat of M.1). Cut the thread and sew. Border: Crochet a border round the whole cape (i.e. along bottom edge, front edges and the neck) with crochet hook size 4.5 mm and 2 threads light grey Alpaca as follows: 1 dc in first tr, *1 ch, skip approx 0.5-1 cm, 1 dc in next tr*, repeat from *-* and finish with 1 ch and 1 sl st in the first dc from beg of round. Tassels: Put tassels along the bottom edge of the cape with approx 4 tr in between each as follows: *2 light grey tassels, 1 light /off-white tassel*, repeat from *-* all the way round. 1 tassel: cut 8 threads of Alpaca measuring approx 15 cm each. Fold them double and pull the loop through the last row of tr, pull the ends through. Sew the buttons on left front edge, the top one approx 1 cm from the neck line and the bottom one approx 1 cm from the bottom. Use tr’s on the right front edge as button holes. HAIR BAND: Knitting Tension: 22 sts x 30 rows on needle size 3.5 mm with 2 threads Alpaca in stocking sts = 10 x 10 cm. Garter sts: Knit all rows. Pattern: See diagram M.2. The pattern in the diagram is seen from the RS. Cast on 52 sts on needle size 3.5 mm and 2 threads Alpaca. Knit as follows (from lower edge towards the top): 1 st in garter sts, K5, M.2 (= 34 sts), K3, P3, K5, 1 st in garter sts. Continue in pattern like this until piece measures approx 54-57 cm – adjust to after a full or half repeat of M.2. Cast off. Assembly: Sew tog the seam mid back. Fold the outermost 6 sts each side towards the WS and attach. |
||||||||||||||||||||||||||||
Diagram explanations |
||||||||||||||||||||||||||||
|
||||||||||||||||||||||||||||
 |
||||||||||||||||||||||||||||
Have you finished this pattern?Tag your pictures with #dropspattern or submit them to the #dropsfan gallery. Do you need help with this pattern?You'll find 15 tutorial videos, a Comments/Questions area and more by visiting the pattern on garnstudio.com. © 1982-2026 DROPS Design A/S. We reserve all rights. This document, including all its sub-sections, has copyrights. Read more about what you can do with our patterns at the bottom of each pattern on our site. |
||||||||||||||||||||||||||||


With over 40 years in knitting and crochet design, DROPS Design offers one of the most extensive collections of free patterns on the internet - translated to 17 languages. As of today we count 324 catalogues and 12290 patterns translated into English (UK/cm). 12290
We work hard to bring you the best knitting and crochet have to offer, inspiration and advice as well as great quality yarns at incredible prices! Would you like to use our patterns for other than personal use? You can read what you are allowed to do in the Copyright text at the bottom of all our patterns. Happy crafting!
Post a comment to pattern DROPS 98-32
We would love to hear what you have to say about this pattern!
If you want to leave a question, please make sure you select the correct category in the form below, to speed up the answering process. Required fields are marked *.