
Popular categories
Looking for a yarn?


Comments / Questions (19)
![]() Lisbeth wrote:
Lisbeth wrote:
Kan i lave opskriften i en str xxl/xxxl - tøj str 44-46?
03.05.2025 - 18:06DROPS Design answered:
Hej Lisbeth, det kan vi desværre ikke, men det kan være at du kan lægge en rapport til a 13masker = 6 cm på både for og bagstykket :)
08.05.2025 - 10:03
![]() Birthe Lydal wrote:
Birthe Lydal wrote:
Kan det passe at man skal lukke af til ærmer allerede efter 20 cm på bagstykket, det ser meget kort ud.
02.12.2024 - 09:43DROPS Design answered:
Hei Birthe. Ja, det stemmer på denne modellen. mvh DROPS Design
02.12.2024 - 13:23
![]() Judy wrote:
Judy wrote:
Hi, May i get the lace diagram/ chart/ as i better visual lerner... do you have this lace chart to make it more eazy for knitters like me? Wait your kind help Judy
16.06.2024 - 15:14DROPS Design answered:
Dear Judy, this is the only version of the pattern that we have available. You can ask us any questions regarding the written instructions and we will try to help the best we can. You can also ask for help at your closest DROPS store. Happy knitting!
16.06.2024 - 18:08
![]() CHARLOTTE wrote:
CHARLOTTE wrote:
I have completed all the knitting and now sewing up but unsure how the split should be done because of the middle stitches on the divide. it is a very pretty pattern-i find it is rolling up a bit at the edges-is there anything i could do about this please? thank you
28.03.2023 - 15:45DROPS Design answered:
Dear Charlotte, pick up approx. 18 sts along the vent on the left side of front piece and work the Edge (see at the very beg of the pattern); then cast off, fold double from WS and sew. Repeat along right front piece but with 2 buttohonles. Then pick up along whole neckline approx. 110 sts and work edge (with only 1 cm stocking st instead of 2). You can block piece before wearing it, so that the edge shouldn't roll anymore. Happy knitting!
29.03.2023 - 09:21
![]() Lena wrote:
Lena wrote:
Hallo, die Knöpfe, die auf dem Foto abgebildet sind, scheint es nicht mehr zu geben. Welche Knopfgröße wäre denn für die Knopflöcher geeignet? Vielen Dank!
06.01.2023 - 15:20DROPS Design answered:
Liebe Lena, hier brauchen Sie Knöpfe mit 20-25 mm im Durchmesser - für die Knopflöcher wird man 2 Maschen = 2 cm abketten. Viel Spaß beim stricken!
06.01.2023 - 15:34
![]() Ava wrote:
Ava wrote:
I’m finishing up the Anna Elise sweater, beautiful by the way. On the slit and neck edge what do you mean by fold down the edge and how is this done?
07.05.2022 - 16:08DROPS Design answered:
Dear Ava, you work the whole edge. Then you fold it double towards the inside. Then, with neat stitches, you sew the edge on the inside. It's like working a hem when sewing. Happy knitting!
08.05.2022 - 19:20
![]() Ava wrote:
Ava wrote:
Doing the sleeves for 21-9. How do I incorporate the increases into the pattern? The pattern rows are off when I do it. The instructions aren’t clear.
25.04.2022 - 02:43DROPS Design answered:
Dear Ava, when increasing on sleeve, work the new stitches in stocking stitch, not in the lace pattern. Make sure to line up the pattern as before to avoid displacing it. ie the Lace pattern should be always worked over the same stitches, but there will be then by and by more stitches before the first repeat and after the last repeat. Happy knitting!
25.04.2022 - 08:35
![]() Ava wrote:
Ava wrote:
For the front/back starting bottom decrease to shape armhole , it states when piece measures 8-10 cm start decrease. Does this apply from the start of the pattern on bottom or just from the beginning of the stockinet stitches
16.04.2022 - 12:19DROPS Design answered:
Dear Ava, the pattern states that you need to decrease when the piece measures 18-20 cm, that is, from the cast-on edge. Happy knitting!
17.04.2022 - 12:06
![]() Janet wrote:
Janet wrote:
When piece measures 18-20 cm cast off 2-3 sts each side for armhole and dec to shape the armhole on every other row: 2 sts 1-2 times, and then on every 4th row: 1 st 3 times = 97-100 sts. I am knitting the back piece of the pattern i have casted off 3 stitches each side for the armhole but its not very clear how i should dec the rest of the 14stitches, do i cast them off or k2tog ?
10.04.2022 - 13:36DROPS Design answered:
Dear Janet, you cast off the other stitches as well, you don't usually k2tog in the armhole, because the armhole will then look different. Happy knitting!
10.04.2022 - 20:36
![]() Ava wrote:
Ava wrote:
Thanks for your reply with last question. When doing increase for small size on lower back how many stitch increases should there be and how many times for small size?
09.04.2022 - 15:46DROPS Design answered:
Dear Ava, you need to increase 1 stitch on each side 9 times every 2nd row for size S/M. So, you increase 2 stitches in the first row, none in the second, 2 in the third... two in the 17th row and none in the 18th row. In total, you should have increased 18 stitches (9 on each side). Happy knitting!
09.04.2022 - 18:36
|
|
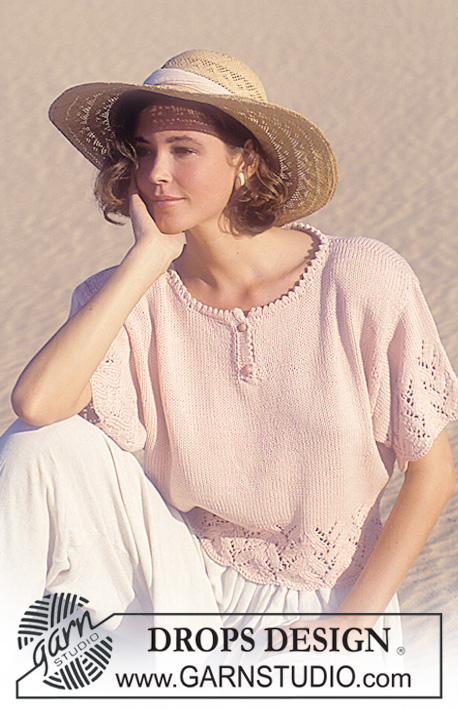
Anna Elise |
|
 |
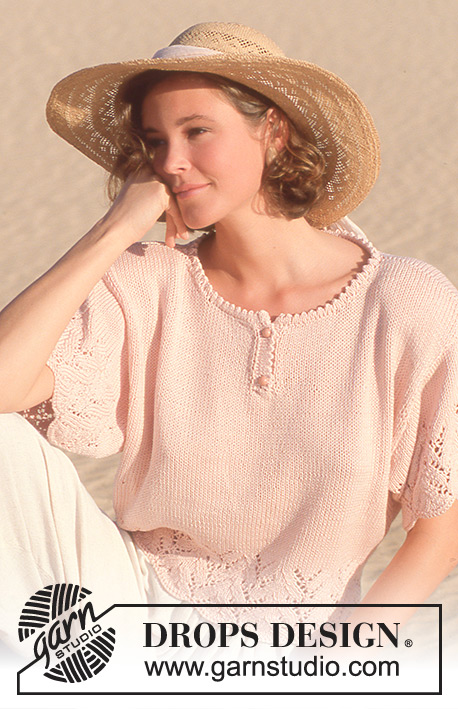 |
DROPS short-sleeved jumper with lace pattern in “Muskat”.
DROPS 21-9 |
|
|
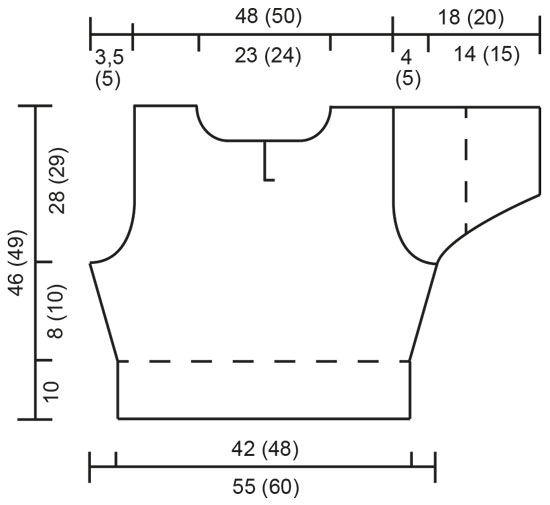
Edge: 2 cm stocking st, next row: *K2 tog, 1 YO*, repeat from *-*, (= folding edge), 2 cm stocking st. Pattern: pattern is dividable by 13 sts. Row 1 (from RS): *K2, slip 1 st as if to K, K1, psso, K4, K2 tog, K2, 1 YO, K1, 1 YO*, repeat from *-*. Row 2, and all even rows (from WS): P all sts. Row 3: *1YO, K2, slip 1 st as if to K, K1, psso, K2, K2 tog, K2, 1 YO, K3*, repeat from *-*: Row 5: *K1, 1YO, K2, slip 1 st as if to K, K1, psso, K2 tog, K2, 1 YO, K4*, repeat from *-*: Row 7: * 1YO, K1, 1 YO, K2, slip 1 st as if to K, K1, psso, K4, K2 tog, K2*, repeat from *-*: Row 9: *K3, 1YO, K2, slip 1 st as if to K, K1, psso, K2, K2 tog, K2, 1 YO*, repeat from *-*: Row 11: *K4, 1YO, K2, slip 1 st as if to K, K1, psso, K2 tog, K2, 1 YO, K1*, repeat from *-*: Repeat row 1-12. Back piece: Cast on 93-106 sts on needle size 4 mm and K 2 rows, change to needle size 3.5 mm and continue in Pattern (see above) with 1 edge st each side. When Pattern measures 10 cm (= 3 repeats) change to needle size 4 mm and complete piece in stocking st, at the same time inc 1 st each side a total of 9-7 times on every other row for size S/M and on every 3rd row for size M/L = 111-120 sts. When piece measures 18-20 cm cast off 2-3 sts each side for armhole and dec to shape the armhole on every other row: 2 sts 1-2 times, and then on every 4th row: 1 st 3 times = 97-100 sts. When piece measures 45-48 cm cast off the middle 45-46 sts for neck and dec 1 st on neckline on next row. Cast off remaining sts on shoulder when piece measures 46-49 cm. Front piece: Cast on and work like back piece, but when piece measures 31-34 cm cast off the middle 5-4 sts for split and complete each side separately. When split measures 9 cm cast off to shape the neckline on every other: 15-16 sts 1 time and 1 st 6 times. Cast off remaining sts on shoulder when piece measures 46-49 cm. Sleeve: Cast on 80-93 sts on needle size 4 mm and K 2 rows, change to needle size 3.5 mm and continue in Pattern with 1 edge st each side for 10 cm (3 repeats). At the same time inc 1 st each side inside the edge st a total of 16-12 times on every other row for size S + M, and on every 3rd row for size L = 112-117 sts (work inc sts in stocking st). At the same time after Pattern change to needle size 4 mm and complete piece in stocking st. When piece measures 14-15 cm cast off 3 sts each side for armhole and dec to shape the sleeve cap each side on every other row: 5 sts 4-5 times and 7 sts 1 time. Cast off remaining sts, piece measures 18-20 cm. Assembly: Sew the shoulder seams. Pick up approx 18 sts along split on left front piece on needle size 2.5 mm and work Edge, cast off. Fold edge double towards WS and fasten. Repeat along right front piece, but after 0.7 cm make 2 buttonholes, 1 buttonhole approx 1 cm from neckline and the other 5 cm further down. 1 buttonhole = cast off 2 sts and cast on 2 new sts on return row. Remember buttonholes on piece in stocking st to be folded towards WS! Pick up 110 sts round the neck on needle size 2.5 mm and work Edge, but with 1 cm stocking st instead of 2 cm. Fold Edge double towards WS and fasten. Set in sleeves and sew on buttons. |
|
 |
|
Have you finished this pattern?Tag your pictures with #dropspattern or submit them to the #dropsfan gallery. Do you need help with this pattern?You'll find 21 tutorial videos, a Comments/Questions area and more by visiting the pattern on garnstudio.com. © 1982-2026 DROPS Design A/S. We reserve all rights. This document, including all its sub-sections, has copyrights. Read more about what you can do with our patterns at the bottom of each pattern on our site. |
|


With over 40 years in knitting and crochet design, DROPS Design offers one of the most extensive collections of free patterns on the internet - translated to 17 languages. As of today we count 324 catalogues and 12290 patterns translated into English (UK/cm). 12290
We work hard to bring you the best knitting and crochet have to offer, inspiration and advice as well as great quality yarns at incredible prices! Would you like to use our patterns for other than personal use? You can read what you are allowed to do in the Copyright text at the bottom of all our patterns. Happy crafting!
Post a comment to pattern DROPS 21-9
We would love to hear what you have to say about this pattern!
If you want to leave a question, please make sure you select the correct category in the form below, to speed up the answering process. Required fields are marked *.