
Popular categories
Looking for a yarn?


Comments / Questions (7)
![]() Martha Winters-Limburg wrote:
Martha Winters-Limburg wrote:
Bedankt voor uw antwoord, ik begrijp wel dat dat wegvalt maar wáárom een Averechtse tricotsteek? 🤷♀️ Groetend Martha
12.04.2026 - 15:40DROPS Design answered:
Dag Martha,
Dit is waarschijnlijk om dat je het dan beter kunt onderscheiden van de rest van het breiwerk. Dus je zit dan duidelijk waar het beleg/ de naad begint en het breiwerk eindigt.
15.04.2026 - 11:51
![]() Martha Winters-Limburg wrote:
Martha Winters-Limburg wrote:
Goedemiddag, waarom moeten de 2 cm extra bij de mouwen in averechtse tricosteek? Met vriendelijke groet Martha
06.04.2026 - 16:00DROPS Design answered:
Dag Martha,
Deze 2 cm is de mouw aan het pand te kunnen naaien. Als het werkstuk in elkaar genaaid is valt uiteindelijk die 2 cm weg.
08.04.2026 - 21:24
![]() Åsa Eriksson wrote:
Åsa Eriksson wrote:
Hej! De maskor som jag lägger upp mitt fram och för att klippa upp för ärmen- ska de stickas i natur? Mvh Åsa
04.07.2025 - 07:03DROPS Design answered:
Hei Åsa. Du kan strikke den bare i naturhvit og/eller med mønsterfargene (da gjerne mønsterfargen i midten av oppklippsmaskene), slik at man ikke får lange trådsprang. Denne sårkanten kommer bak brettekanten så den vil ikke synes. mvh DROPS Design
07.07.2025 - 09:58
![]() Heidi wrote:
Heidi wrote:
Hi! I was reading the pattern and notice that the collar part is not mentionned. I figured it was like the button bands (knitting the ''edge''). Should I knit it before the button bands? How many stitches should I pick up? Thank you!
14.04.2025 - 21:36DROPS Design answered:
Dear Heidi, it seems the Edge is not correct. The edge is worked as: 3cm in stocking stitch; on the next row alternate between knit 2 together and 1 yarn over (= edge). Then work 3 cm in stocking stitch. We will correct it as soon as possible. The collar is explained at the end of the assembly section, when you pick up 120 sts around the neck. Happy knitting!
19.04.2025 - 19:59
![]() Sonia wrote:
Sonia wrote:
I have a question I don't understand this? I need to increase 4 sts on each side for armholes do I divide the piece into 3 parts? (back, left front, and right front) Do I include the sts that were increased at the beginning of the instruction or only the 232 sts for size S/M? Thanks
27.08.2021 - 19:29DROPS Design answered:
Dear Sonia, No, the peiece is knitted in one piece, on the round. The stitches you have to increase will form a "Steek", that acts as a kind of seam to sew the sleeves in, or add the buttonband too. You will have to cut up the piece at the middle of these stitches, thus will you get a (semi) separate front, back, front. Happy Stitching!
28.08.2021 - 02:44
![]() Sonia Morales wrote:
Sonia Morales wrote:
Hi! I am trying to do this pattern for my niece, but I have some questions about the pattern that I don't understand. The pattern says the jacket is worked in the round after the edge, now, do I leave the edge without folding the edge? Change to size 4,00mm needles work in the round increase 5 new sts in the mid-front plus inc 40 sts. Now can I do this differently? don't have a sewing machine. Can I do f,b,f Thanks
17.03.2021 - 21:03DROPS Design answered:
Dear Mrs Morales, this jacket is worked with the steek stitches technique - see this video explaining also how to work without sewing machine. You can also simply work without steek stitches with only one edge st on each side. Happy knitting!
18.03.2021 - 09:35
![]() Kirsten Karkov wrote:
Kirsten Karkov wrote:
Farve nr. 35 gul er det korretkt.\\r\\nNår jeg prøver og bestille den farve så er den ikke med i jeres sortiment.\\r\\nEr den udgået eller ????\\r\\nmed venlig hilsen \\r\\nKirsten Karkov
01.08.2018 - 14:04
|
|||||||||||||||||||
Strawberry Garden |
|||||||||||||||||||
 |
 |
||||||||||||||||||
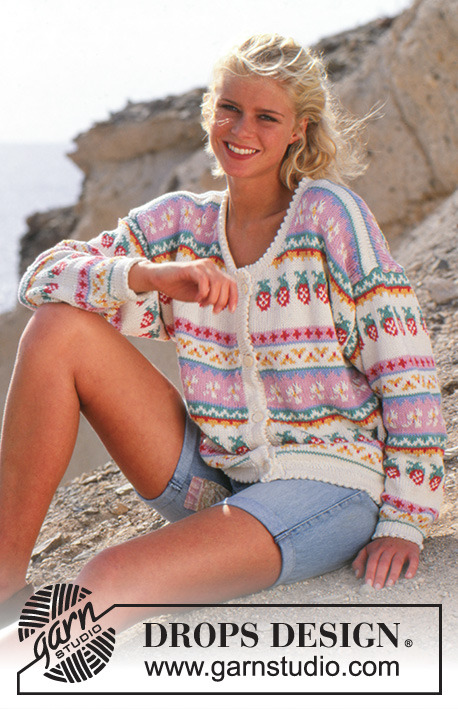
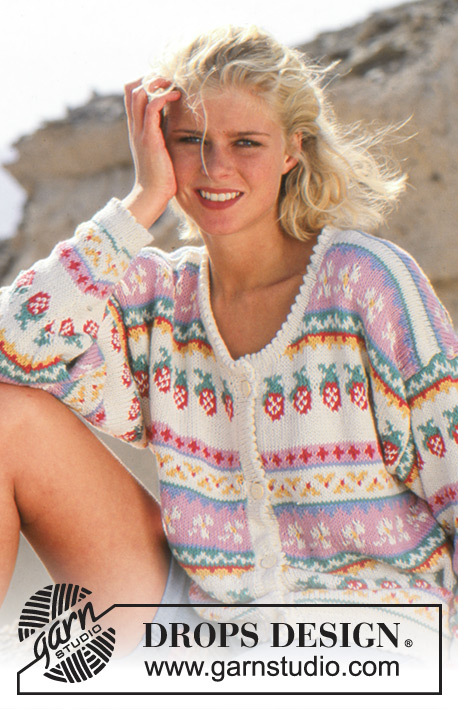
DROPS jacket with strawberry pattern in “Muskat Soft”. Size S – L.
DROPS 34-6 |
|||||||||||||||||||
|
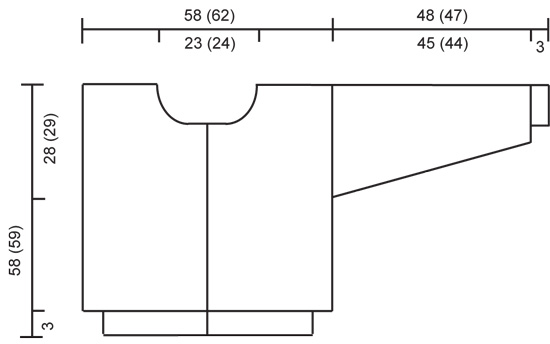
Knitting tension: 20 sts x 26 rows on needles size 4 mm in pattern and stocking st = 10 x 10 cm. Pattern: See diagram. The diagram is seen from the RS and the entire pattern is worked in stocking st. Edge: 3 cm stocking st, P 1 row (= folding edge, measure piece from here), 3 cm stocking st. Body: The jacket is worked in the round on circular needle after the Edge and cut for armholes and mid front afterwards. Cast on 192-200 sts on circular needles size 2.5 mm with off-white and work Edge back and forth on needle. Change to circular needles size 4 mm and continue in stocking st in the round, at the same time cast on 5 new sts mid front (to be cut afterwards and not included in pattern) and inc 40-48 sts evenly on round = 232-248 sts + 5 sts. When piece measures 6-7 cm continue in M.1. Remember the knitting tension! When piece measures 30-30 cm inc 4 sts each side (to be cut for armhole and not included in pattern). When piece measures 46-47 cm cast off the middle 10-12 sts + 5 sts on front piece and continue back and forth on needle. Cast off to shape the neckline at the beg of every row from mid front: 3 sts, 1 time, 2 sts 4 times, 1 st 7 times. After 2 vertical repeats of M.1 complete piece in off-white. When piece measures 56-57 cm cast off the middle 42-44 sts on back piece for neck and dec 2 sts on neckline on next row. Cast off remaining sts on shoulder when piece measures 58-59 cm. Sleeve: Cast on 44-46 sts on double pointed needles size 2.5 mm with off-white and work Edge. Change to double pointed needles size 4 mm and work 1 round stocking st, at the same time inc 10-10 sts evenly on first round = 54-56 sts. Continue in M.1 (make sure to place a pattern repeat mid upper sleeve). At the same time inc 2 sts mid under arm a total of 29-30 times on every * 3rd and 4th * round alternately = 112-116 sts. When piece measures 48-47 cm work 2 cm in reverse stocking sts (= edge for sewing on sleeves to body piece). Cast off. Assembly: Sew a marking thread in the centre of the inc sts each side of the body piece and mid front. Sew 2 seams on a sewing machine around the marking thread 1st seam = ½ st from the MT, 2nd seam = ½ st from the 1st seam. Cut up for armholes and mid front. Sew the shoulder seam. Pick up approx 100 sts along left front piece on needle size 2.5 mm with off-white and work Edge back and forth on needle, cast off. Fold edge double towards WS and fasten. Repeat along right front piece, but after 1 cm make 5 buttonholes evenly distributed. 1 buttonhole = cast off 2 sts and cast on 2 new sts in the same place on the return row – remember buttonholes on the piece in stocking sts to be folded towards WS! Pick up approx 120 sts round the neck on needle size 2.5 mm with off-white and work Edge back and forth on needle, cast off. Fold the edge double towards the WS and fasten. Sew the sleeves to the body from the RS as follows: Alternate between 1 st in the last row on the sleeve before the edge in reverse stocking sts and then 1 st in the body part after the machine sewn seam. Turn the jacket inside out and sew the purl seam from the sleeves over the cut edges on the body part. Sew on buttons. |
|||||||||||||||||||
Diagram explanations |
|||||||||||||||||||
|
|||||||||||||||||||
 |
|||||||||||||||||||
 |
|||||||||||||||||||
Have you finished this pattern?Tag your pictures with #dropspattern or submit them to the #dropsfan gallery. Do you need help with this pattern?You'll find 25 tutorial videos, a Comments/Questions area and more by visiting the pattern on garnstudio.com. © 1982-2026 DROPS Design A/S. We reserve all rights. This document, including all its sub-sections, has copyrights. Read more about what you can do with our patterns at the bottom of each pattern on our site. |
|||||||||||||||||||


With over 40 years in knitting and crochet design, DROPS Design offers one of the most extensive collections of free patterns on the internet - translated to 17 languages. As of today we count 324 catalogues and 12290 patterns translated into English (UK/cm). 12290
We work hard to bring you the best knitting and crochet have to offer, inspiration and advice as well as great quality yarns at incredible prices! Would you like to use our patterns for other than personal use? You can read what you are allowed to do in the Copyright text at the bottom of all our patterns. Happy crafting!
Post a comment to pattern DROPS 34-6
We would love to hear what you have to say about this pattern!
If you want to leave a question, please make sure you select the correct category in the form below, to speed up the answering process. Required fields are marked *.