
Popular categories
Looking for a yarn?


Comments / Questions (8)
![]() Maija Mummi wrote:
Maija Mummi wrote:
Onko totta, että helmaresoriin LISTÄÄN silmiä?
16.11.2025 - 06:37DROPS Design answered:
Kyllä, ennen joustinneuletta lisätään silmukoita, jotta resorista tulisi tarpeeksi joustava.
17.11.2025 - 17:58
![]() Giusy wrote:
Giusy wrote:
Buongiorno, non riesco a capire. Ho fatto il campione del maglione con i ferri circolari n.5 e, facendo le mie misurazioni ho visto che in larghezza le 17 maglie avviate misurano non 10 cm, ma 8.5 cm e in altezza 22 ferri misurano 8.5 cm. Mi dite per favore quante maglie in più avviare per arrivare a 10 cm? Oppure che numero di ferri usare? Grazie, mi è arrivata la lana e vorrei iniziare il maglione per mio nipote. Spero in una vostra risposta
22.05.2025 - 21:06DROPS Design answered:
Buonasera Giusy, deve rifare il campione fino ad utilizzare il numero di ferri che le permette di ottenere il campione indicato. Buon lavoro!
27.05.2025 - 19:31
![]() Giusy wrote:
Giusy wrote:
Buongiorno, non riesco a capire. Ho fatto il campione del maglione con i ferri circolari n.5 e, facendo le mie misurazioni ho visto che in larghezza le 17 maglie avviate misurano non 10 cm, ma 8.5 cm e in altezza 22 ferri misurano 8.5 cm. Mi dite per favore quante maglie in più avviare per arrivare a 10 cm? Oppure che numero di ferri usare? Grazie, mi è arrivata la lana e vorrei iniziare il maglione per mio nipote.
22.05.2025 - 10:27DROPS Design answered:
Buonasera Giusy, deve rifare il campione fino ad utilizzare il numero di ferri che le permette di ottenere il campione indicato. Buon lavoro!
27.05.2025 - 19:31
![]() Giusy wrote:
Giusy wrote:
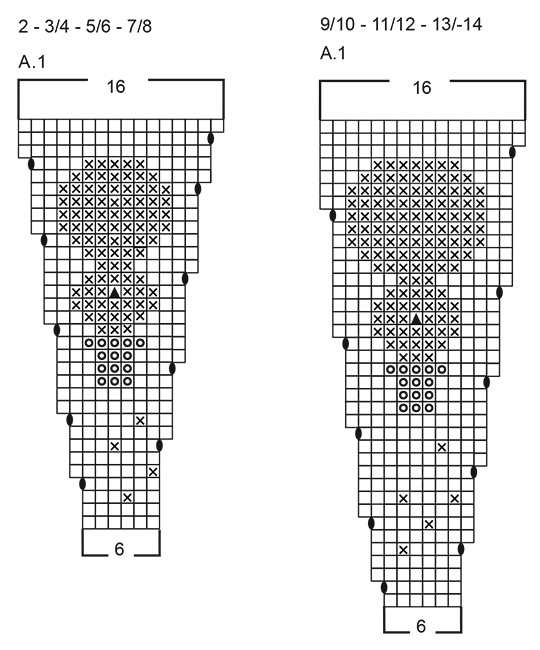
Buonasera, ho bisogno di un chiarimento. Nel diagramma 1 del maglione le maglie sono un multiplo di 6? Ho fatto il campione e per arrivare a 10 cm devo aumentare 3 maglie e fare 25 ferri. Grazie anticipatamente per la risposta.
18.05.2025 - 19:51DROPS Design answered:
Buonasera Giusy, il diagramma A.1 parte con 6 maglie. Se vuole apportare delle modifiche al modello deve ricalcolare le proporzioni. Buon lavoro!
27.05.2025 - 21:35
![]() Sajni wrote:
Sajni wrote:
Thankyou very much I made thi s for my grandson
27.01.2025 - 04:44
![]() Marcella wrote:
Marcella wrote:
Op de foto bestaat de sneeuwpop neus uit 2 steken. In het patroon staat maar 1 steek aangegeven.
17.11.2024 - 18:41
![]() Elsje wrote:
Elsje wrote:
Vertaling klopt niet. Zie bovenaan tip voor het breien. De laatste zin: Gebruik een naald in een maat groter wanneer u in patroon breit en het wordt wat te strak.
10.11.2024 - 10:51
![]() Barbro wrote:
Barbro wrote:
Hur får jag fram diagrammet ?
05.11.2024 - 14:58DROPS Design answered:
Hej Barbro - tack för info :) Nu ligger diagrammet nederst i opskriften :)
05.11.2024 - 15:03
|
||||||||||||||||
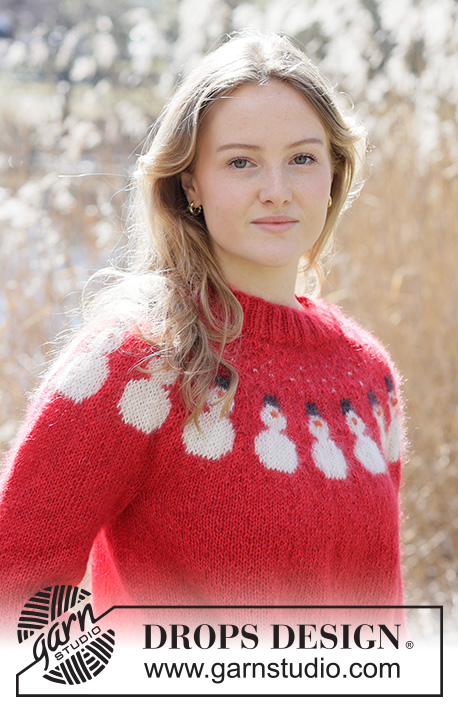
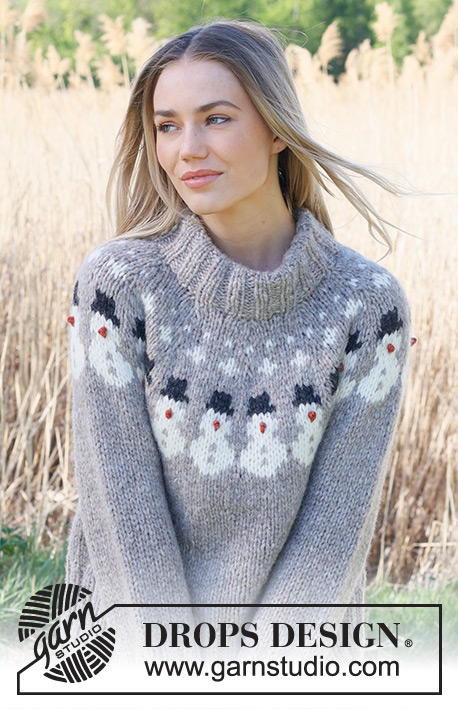
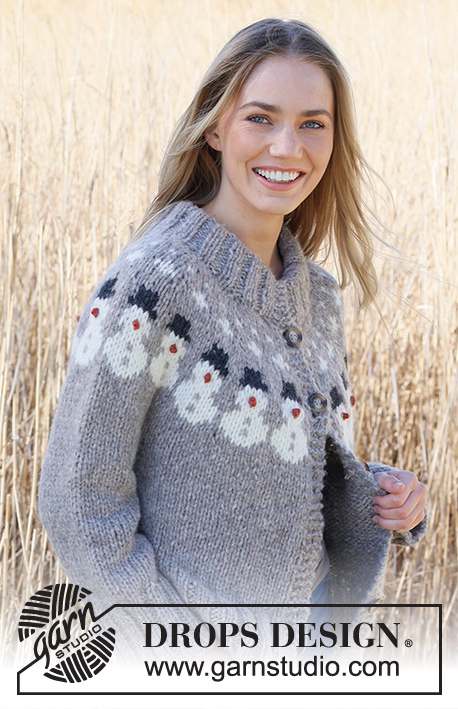
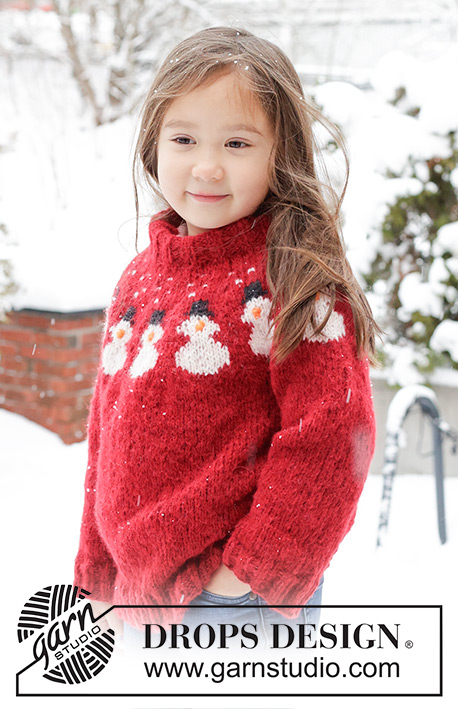
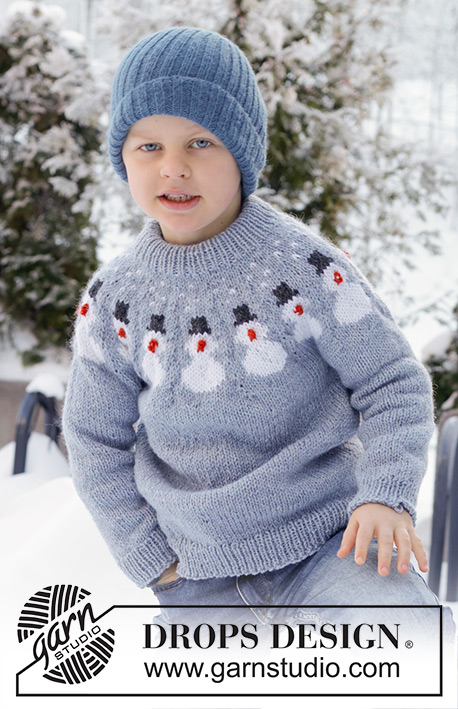
Snowman Magic#snowmanmagicsweater |
||||||||||||||||
 |
 |
|||||||||||||||
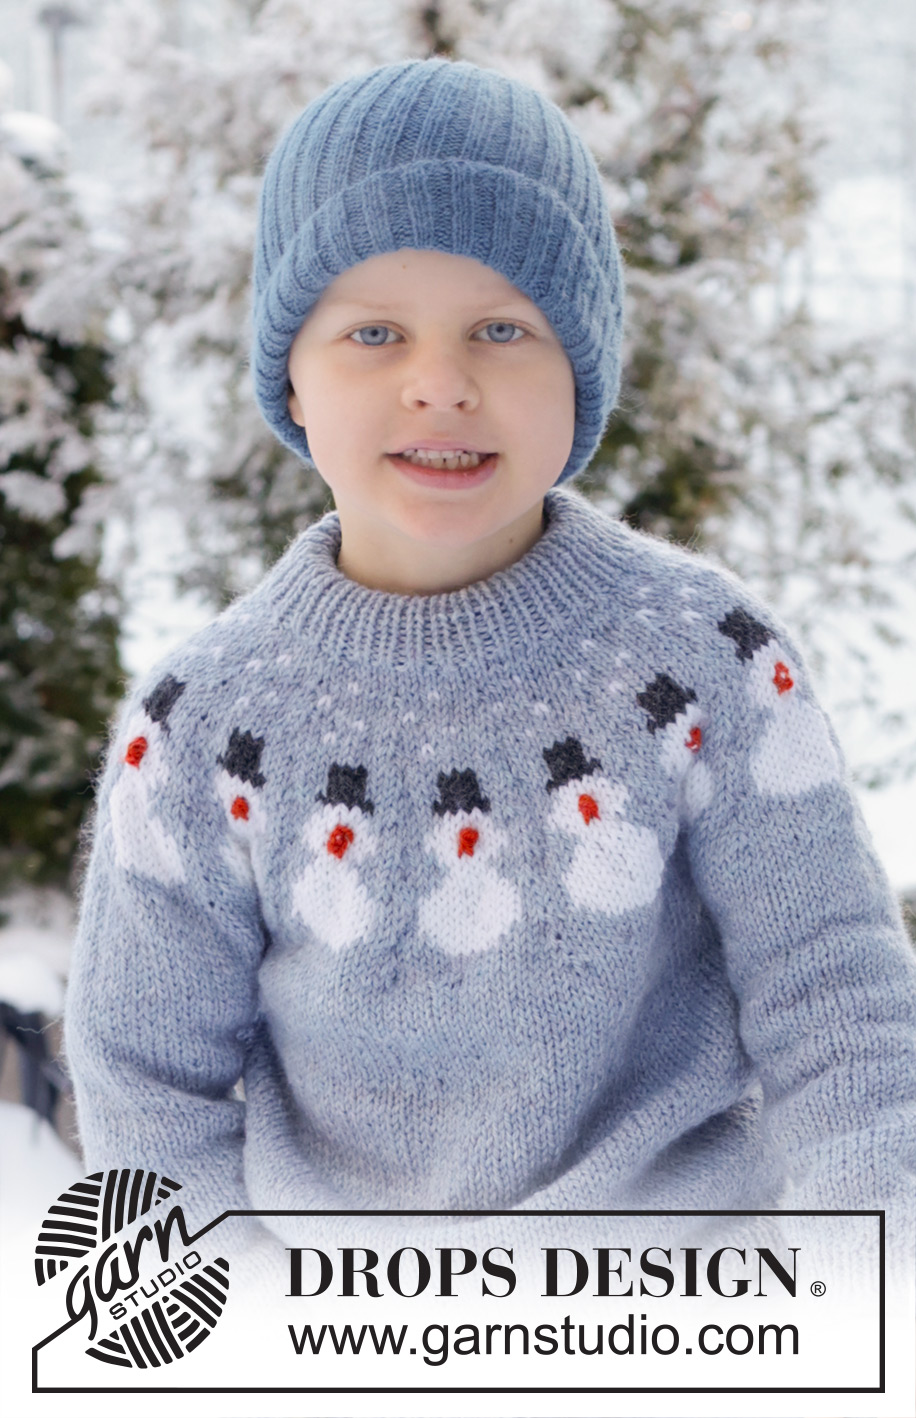
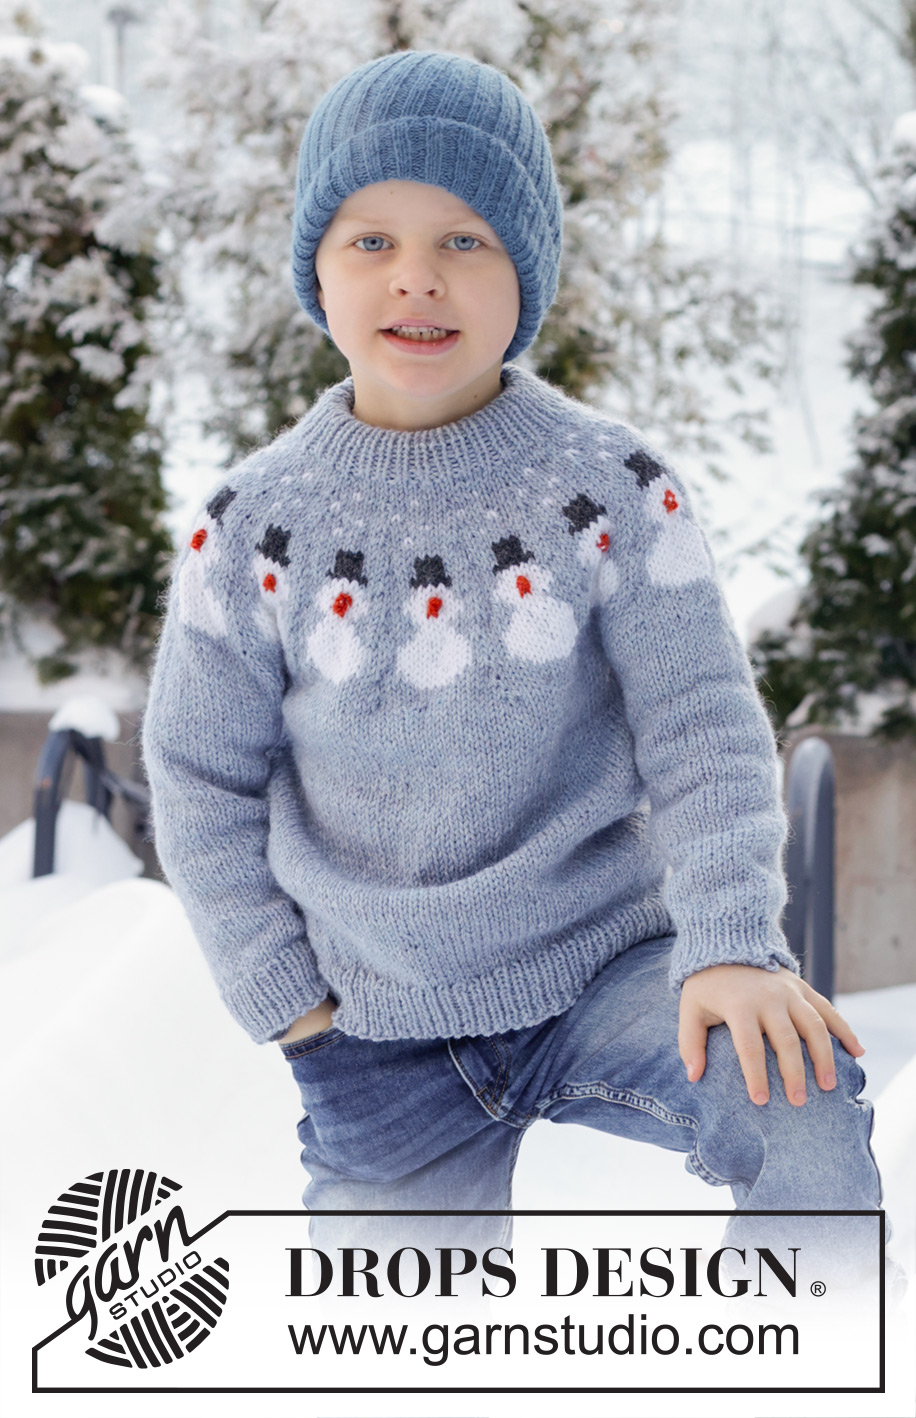
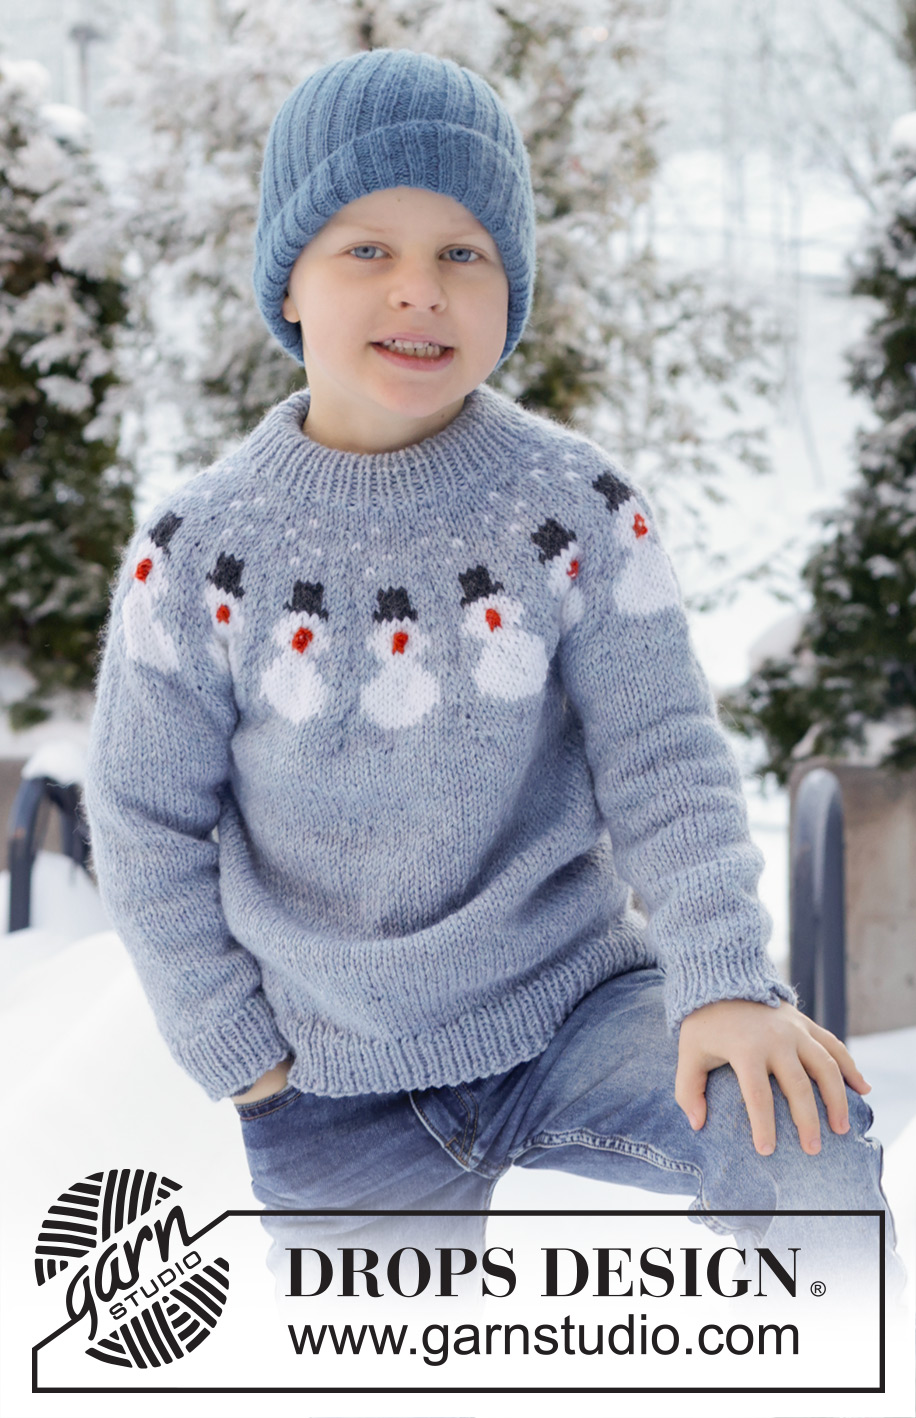
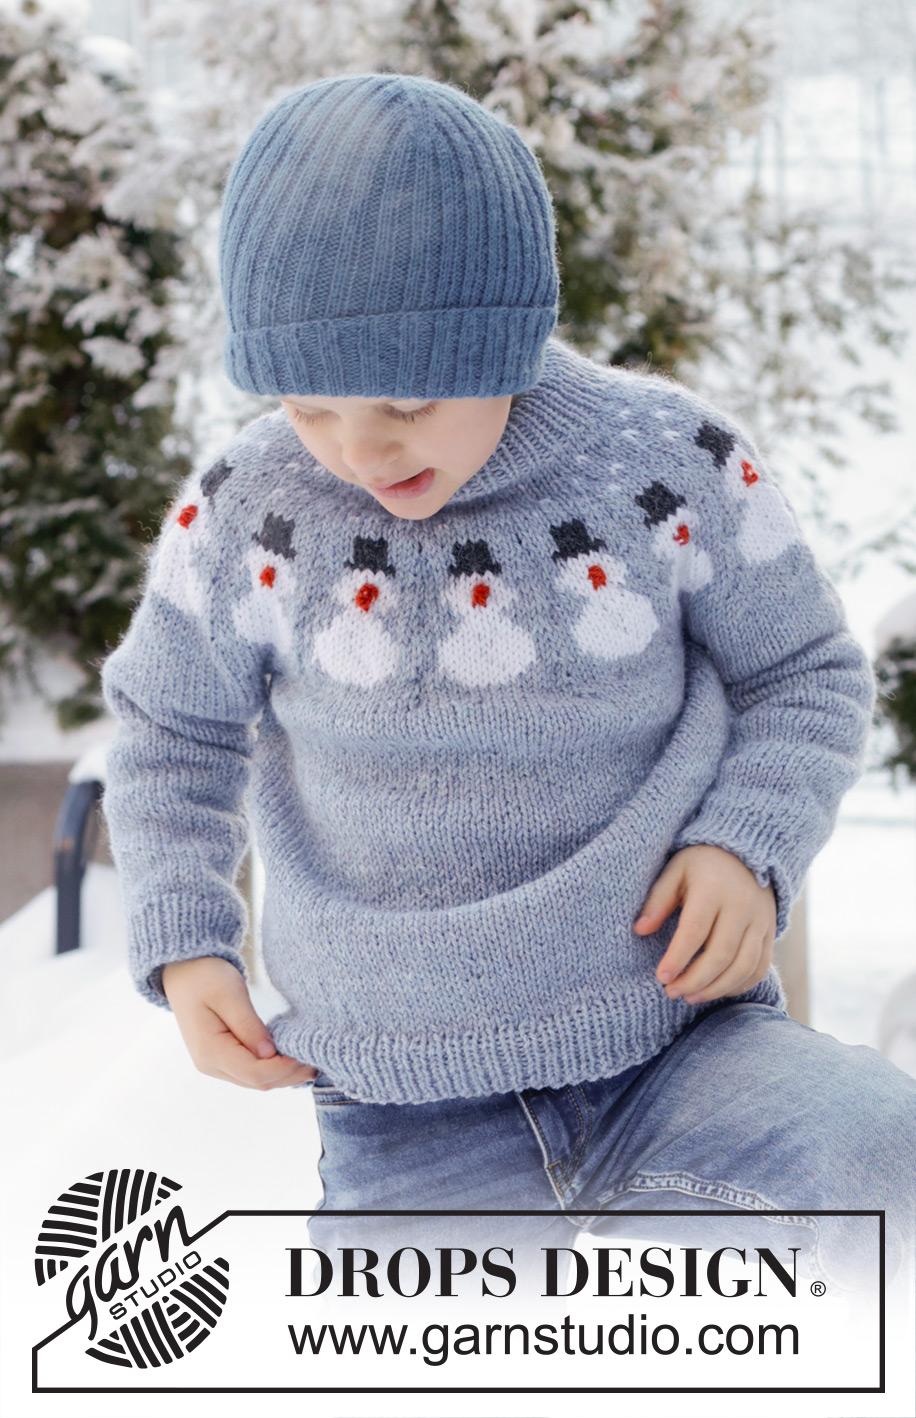
Knitted jumper for children in DROPS Nepal. The piece is worked top down with round yoke, snowman and double neck. Sizes 2 - 14 years. Theme: Christmas.
DROPS Children 48-14 |
||||||||||||||||
|
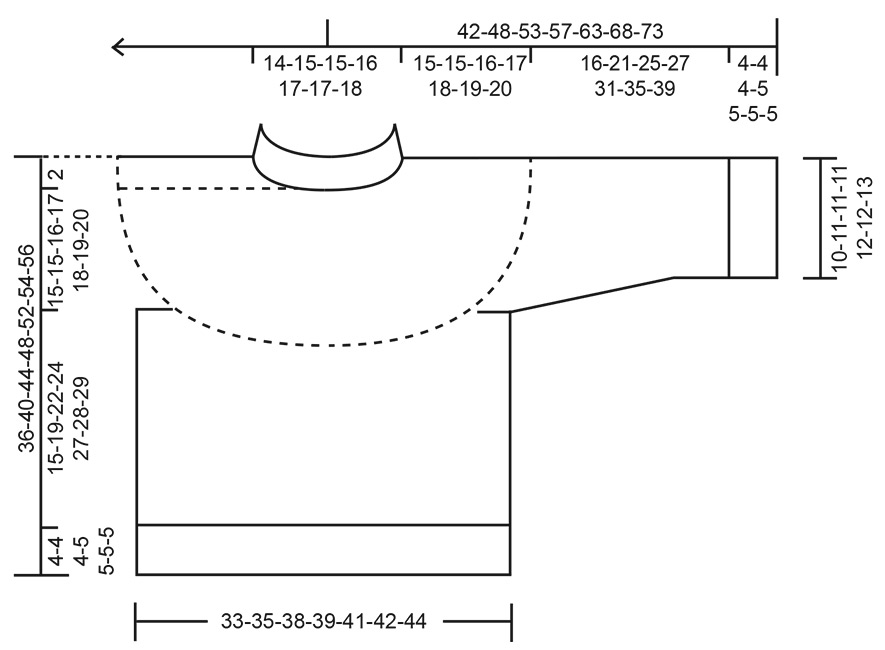
------------------------------------------------------- EXPLANATIONS FOR THE PATTERN: ------------------------------------------------------- PATTERN: See diagram A.1. Choose diagram for your size. The pattern is worked in stocking stitch. INCREASE TIP (evenly spaced): To work out how to increase evenly, count the total number of stitches on the needle (e.g., 68 stitches) and divide by the number of increases to be made (e.g., 10) = 6.8. In this example, increase by making 1 yarn over after approx. each 7th stitch. On the next round work the yarn overs twisted to avoid holes. KNITTING TIP: To avoid the knitting tension losing its elasticity when working pattern, it is important that the strands at the back are not tight. Use a size larger needle when working pattern if the piece becomes tight. DECREASE TIP-1 (evenly spaced): To work out how to decrease evenly, count the total number of stitches on needle (e.g., 208 stitches) and divide by number of decreases to be made (e.g., 12) = 17.3. In this example decrease by knitting together approx. each 16th and 17th stitch. DECREASE TIP-2 (for sleeves): Decrease 1 stitch on each side of the marker-thread as follows: Work until there are 3 stitches left before the marker-thread, knit 2 together, knit 2 (marker-thread sits between these 2 stitches), slip 1 stitch knit-wise, knit 1 and pass the slipped stitch over the knitted stitch (2 stitches decreased). ------------------------------------------------------- START THE PIECE HERE: ------------------------------------------------------- JUMPER – SHORT OVERVIEW OF THE PIECE: The pattern uses both long and short needles; start with the length which fits the number of stitches and change when necessary. The neck and yoke are worked in the round with circular needle, top down and from the right back shoulder. When the yoke is finished, it is divided for the body and sleeves and the body continued in the round, while the sleeves wait. The sleeves are worked top down, in the round. The neck is folded double and fastened to the inside. NECK: Cast on 64-68-68-72-76-76-80 stitches with circular needle size 5 mm and colour fog DROPS Nepal. Change to double pointed needles/circular needle size 3.5 mm (casting on with a larger needle-size makes the cast-on edge elastic). Work rib in the round (knit 1, purl 1) for 7-7-7-9-9-9-9 cm. The neck is later folded double, leaving a neck-height of approx. 3-3-3-4-4-4-4 cm. The round begins on the right back shoulder. Insert 1 marker after the first 21-23-23-24-25-25-27 stitches (approx. mid-front); the piece is measured from here. YOKE: Change to circular needle size 5 mm. Knit 1 round and increase 2-4-10-6-8-8-10 stitches evenly spaced – read INCREASE TIP = 66-72-78-78-84-84-90 stitches. Remember to maintain the knitting tension. Work A.1 a total of 11-12-13-13-14-14-15 times on the round – read KNITTING TIP and PATTERN in the explanations above. When A.1 is finished the piece measures approx. 15-15-15-15-18-18-18 cm from the marker = 176-192-208-208-224-224-240 stitches. Continue with stocking stitch and colour fog. AT THE SAME TIME on the first round, decrease 4-8-12-8-12-4-8 stitches evenly spaced - read DECREASE TIP-1 = 172-184-196-200-212-220-232 stitches. When the yoke measures 15-15-16-17-18-19-20 cm from the marker, divide for the body and sleeves. DIVIDE FOR BODY AND SLEEVES: Place the first 36-38-40-40-42-44-48 stitches on a thread for the sleeve, cast on 6 stitches (in side mid-under sleeve), knit 50-54-58-60-64-66-68 stitches (= front piece), place the next 36-38-40-40-42-44-48 stitches on a thread for the sleeve, cast on 6 stitches (in side mid-under sleeve), knit the last 50-54-58-60-64-66-68 stitches (= back piece). The body and sleeves are finished separately. The piece is now measured from here! BODY: = 112-120-128-132-140-144-148 stitches. Insert 1 marker in the middle of the 6 cast-on stitches under one sleeve. Work to the marker; the new round begins here. Work stocking stitch in the round for a further 15-19-22-24-27-28-29 cm. Change to circular needle size 3.5 mm. Work rib (knit 1, purl 1) AT THE SAME TIME increase 20-20-24-24-24-24-28 stitches evenly on round 1 = 132-140-152-156-164-168-176 stitches. When the rib measures 4-4-4-5-5-5-5 cm, cast off. The jumper measures approx. 36-40-44-48-52-54-56 cm from the shoulder. SLEEVES: Place the 36-38-40-40-42-44-48 sleeve-stitches from one thread on circular needle size 5 mm. Use colour fog and knit up 1 stitch in each of the 6 stitches cast on under the sleeve = 42-44-46-46-48-50-54 stitches. Insert a marker-thread in the middle of the 6 stitches under the sleeve. Start at the marker-thread and work stocking stitch in the round. When the sleeve measures 3 cm, decrease 2 stitches under the sleeve – read DECREASE TIP-2. Decrease like this every 3-5-6-7-8-9-8 cm a total of 4-4-4-4-4-4-5 times = 34-36-38-38-40-42-44 stitches. Continue working until the sleeve measures 16-21-25-27-31-35-39 cm from the division. Change to double pointed needles size 3.5 mm. Work rib (knit 1, purl 1), AT THE SAME TIME increase 6-8-6-6-8-6-8 stitches evenly on the first round = 40-44-44-44-48-48-52 stitches. When the rib measures 4-4-4-5-5-5-5 cm, cast off. The sleeve measures approx. 20-25-29-32-36-40-44 cm. ASSEMBLY: Fold the neck double to the inside and sew down. To avoid the neck being tight and rolling outwards, it is important that the seam is elastic. |
||||||||||||||||
Diagram explanations |
||||||||||||||||
|
||||||||||||||||
 |
||||||||||||||||
 |
||||||||||||||||
Have you finished this pattern?Tag your pictures with #dropspattern #snowmanmagicsweater or submit them to the #dropsfan gallery. Do you need help with this pattern?You'll find 31 tutorial videos, a Comments/Questions area and more by visiting the pattern on garnstudio.com. © 1982-2026 DROPS Design A/S. We reserve all rights. This document, including all its sub-sections, has copyrights. Read more about what you can do with our patterns at the bottom of each pattern on our site. |
||||||||||||||||


With over 40 years in knitting and crochet design, DROPS Design offers one of the most extensive collections of free patterns on the internet - translated to 17 languages. As of today we count 324 catalogues and 12291 patterns translated into English (UK/cm). 12291
We work hard to bring you the best knitting and crochet have to offer, inspiration and advice as well as great quality yarns at incredible prices! Would you like to use our patterns for other than personal use? You can read what you are allowed to do in the Copyright text at the bottom of all our patterns. Happy crafting!
Post a comment to pattern DROPS Children 48-14
We would love to hear what you have to say about this pattern!
If you want to leave a question, please make sure you select the correct category in the form below, to speed up the answering process. Required fields are marked *.