DROPS Children 49 · Lots of new kid designs!
Product image DROPS Nepal yarn
DROPS Nepal
65% Wool, 35% Alpaca
from 2.80 € /50g
Get the yarn to make this pattern from 28.00€.

The yarn cost is calculated from the pattern’s smallest size and the yarn’s cheapest product type. Looking for an even better price? You might find it on the DROPS Deals!

DROPS AW2425

Snow Drift

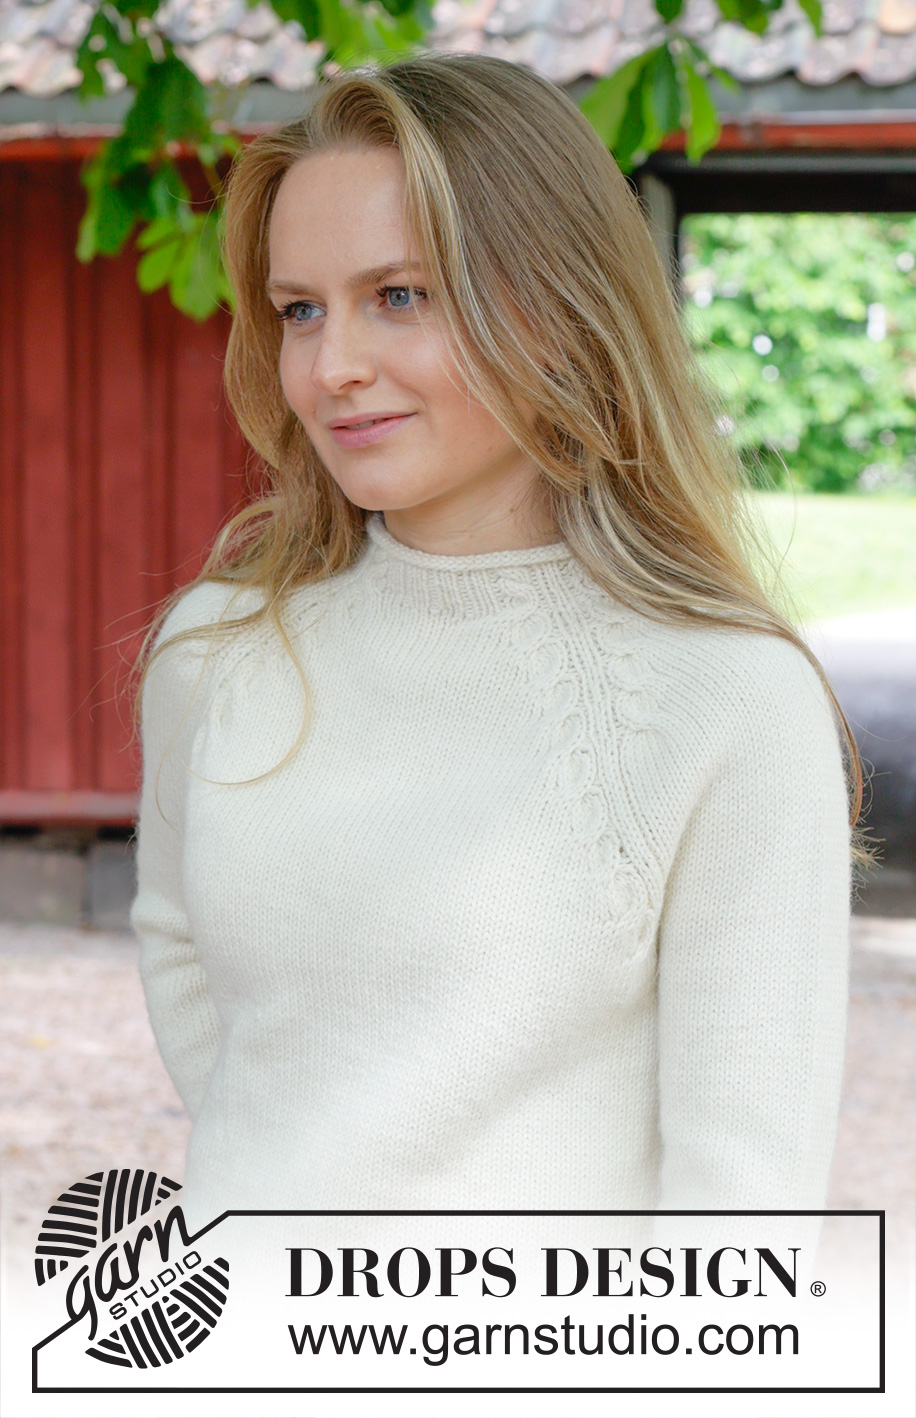
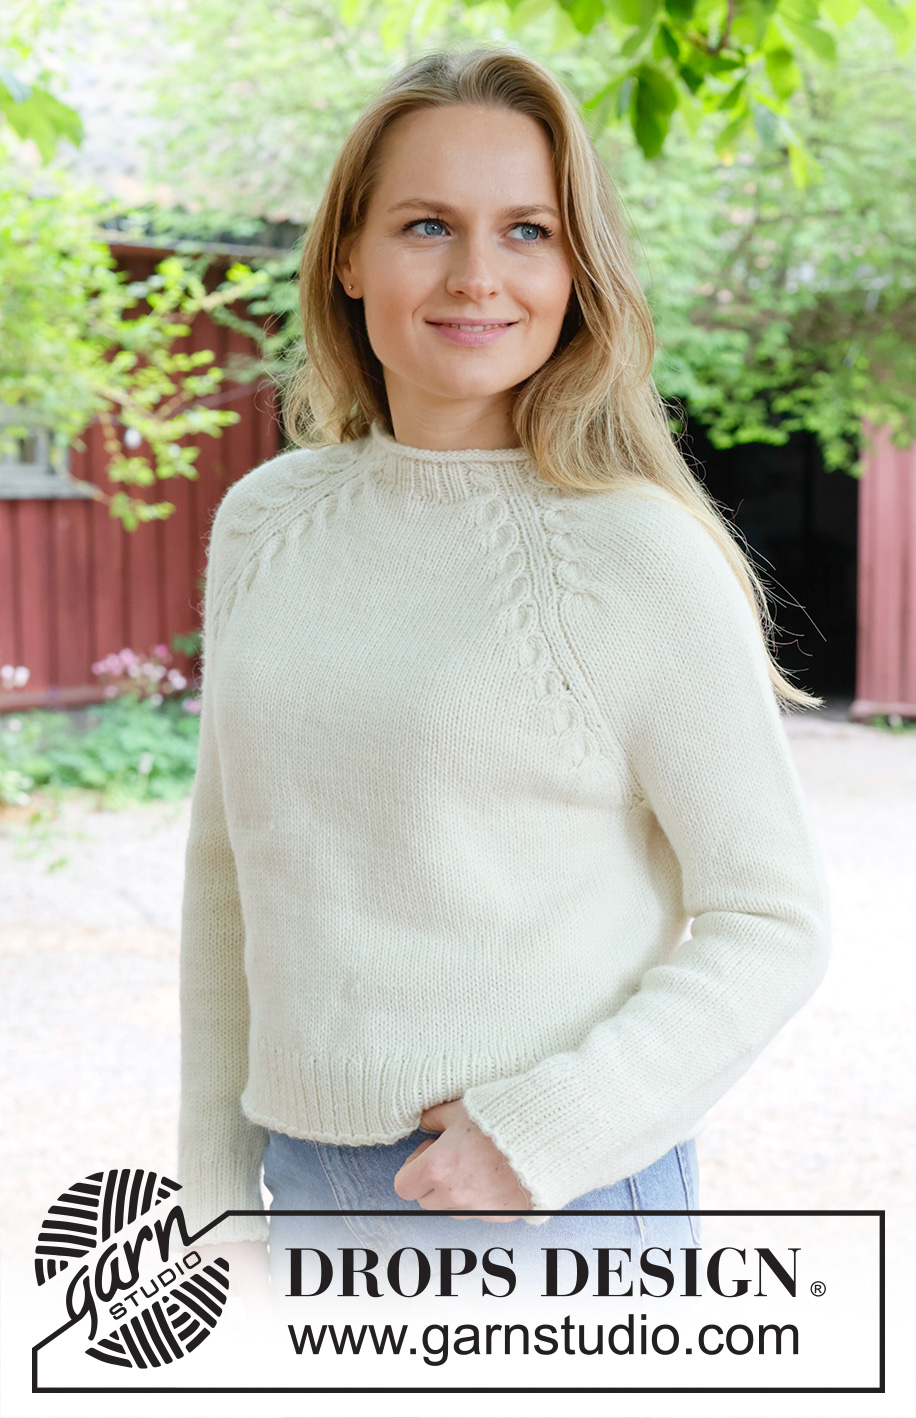
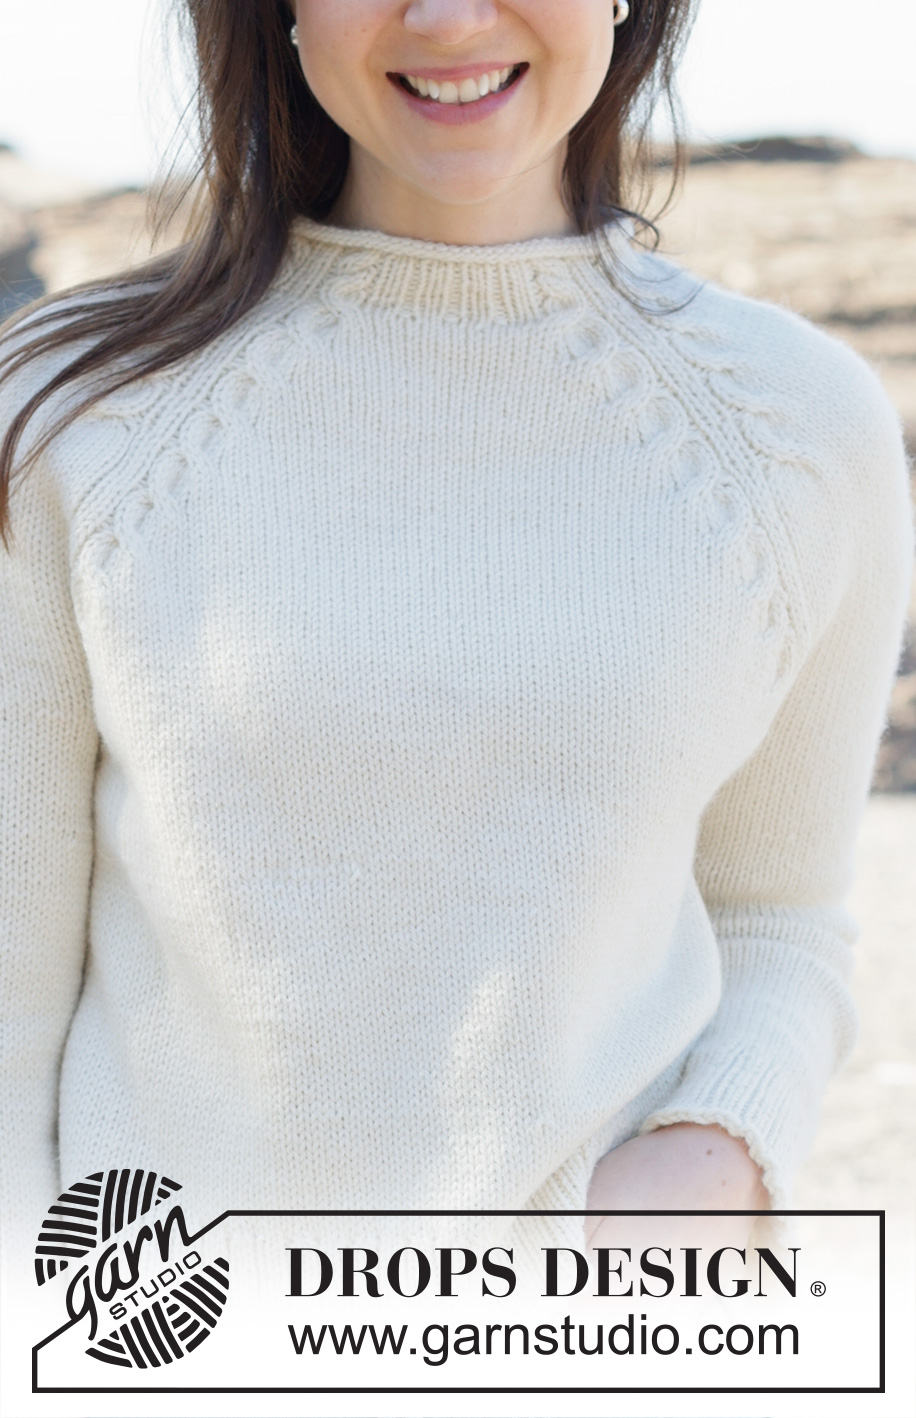
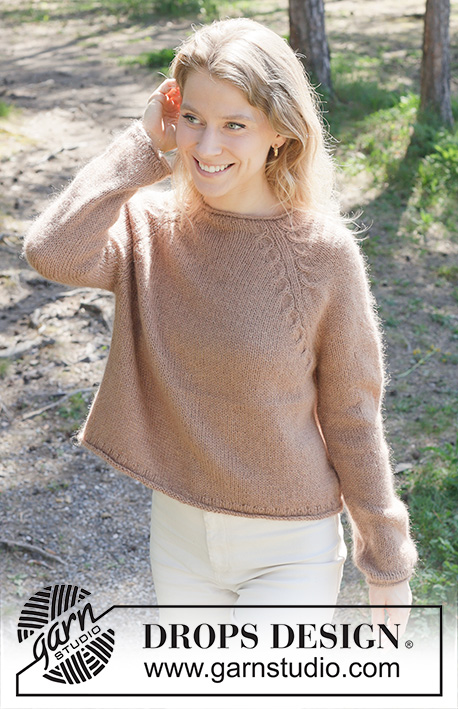
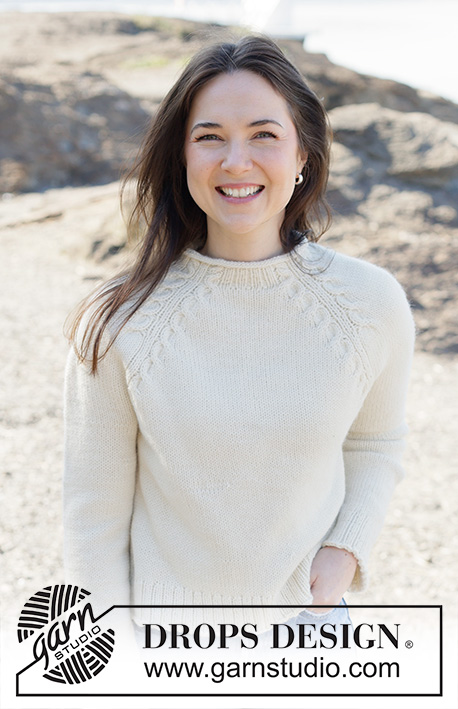
Knitted jumper in DROPS Nepal or DROPS Big Merino. Piece is knitted top down with raglan and cables. Size: S - XXXL

Highlight Size:
DROPS 255-19

#snowdriftsweater

DROPS design: Pattern ne-384
Yarn group C or A + A
----------------------------------------------------------

SIZE:
S - M - L - XL - XXL - XXXL

YARN:
DROPS NEPAL from Garnstudio (belongs to yarn group C)
500-550-600-650-700-800 colour 0100, off white
Or use:
DROPS BIG MERINO from Garnstudio (belongs to yarn group C)
500-550-600-650-700-800 g colour 01, off white

NEEDLES:
DROPS CIRCULAR NEEDLE SIZE 4.5 mm: Length 40 and 80 cm.
DROPS CIRCULAR NEEDLE SIZE 3.5 mm: Length 40 and 80 cm.
DROPS DOUBLE POINTED NEEDLES SIZE 4.5 mm
DROPS DOUBLE POINTED NEEDLES SIZE 3.5 mm
DROPS CABLE NEEDLE.
The technique MAGIC LOOP can be used – you then only need circular needle of 80 cm in each size.

KNITTING TENSION:
18 stitches in width and 24 rows vertically in stocking stitch on needle size 4.5 mm = 10 x 10 cm.
NOTE! Remember that needle size is only a suggestion. If you have too many stitches on 10 cm switch to larger needles. If you have too few stitches on 10 cm switch to smaller needles.

-------------------------------------------------------

Alternative Yarn – See how to change yarns here
Yarn Groups A to F – Use the same pattern and change the yarn here
Yarn usage using an alternative yarn – Use our yarn converter here

-------------------------------------------------------

You might also like...

Product image DROPS Nepal
DROPS Nepal
65% Wool, 35% Alpaca
from 2.80 € /50g
Get the yarn to make this pattern from 28.00€.

The yarn cost is calculated from the pattern’s smallest size and the yarn’s cheapest product type. Looking for an even better price? You might find it on the DROPS Deals!

Pattern instructions

----------------------------------------------------------

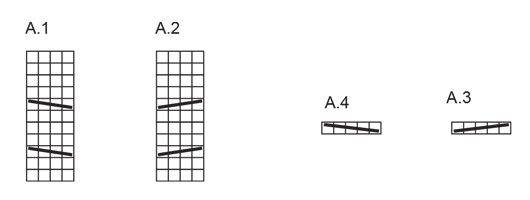
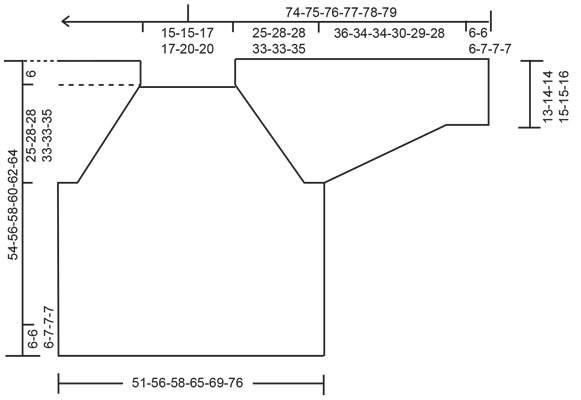
EXPLANATION FOR THE PATTERN:

----------------------------------------------------------

PATTERN:
See diagrams A.1 to A.4.
Diagrams show all rows in pattern seen from the right side.

DECREASE TIP:
Decrease 1 stitch on each side of marker thread as follows:
Work until 3 stitches remain before marker thread and knit 2 together, knit 2 (marker thread is in the middle of these 2 stitches), slip 1 stitch knitwise, knit 1, pass slipped stitch over stitch worked (= 2 stitches decreased).

----------------------------------------------------------

START THE PIECE HERE:

----------------------------------------------------------

JUMPER - SHORT OVERVIEW OF THE PIECE:
In this pattern needles of different length have been used, begin with fitting length for number of stitches and switch as needed.
Work neck edge and yoke in the round on circular needle from right shoulder back, and work top down. When yoke is done, divide piece for body and sleeves. Work body down wards in the round on circular needle while putting the sleeves aside. Then work sleeves downwards in the round on needle.

NECK EDGE:
Cast on 100-100-106-106-118-118 stitches on circular needle size 3.5 mm with DROPS Nepal. Beginning of round is at right shoulder at the back. Knit 4 rounds (= stocking stitch), then work rib as follows:
Knit 1, purl 1, A.2, * purl 1, knit 2 *, work from *-* over the next 9 stitches, purl 1, A.1, purl 1, knit 2, purl 1, A.2, * purl 1, knit 2 *, work from *-* over the next 15-15-18-18-24-24 stitches, purl 1, A.1, purl 1, knit 2, purl 1, A.2, * purl 1, knit 2 *, work from *-* over the next 9 stitches, purl 1, A.1, purl 1, knit 2, purl 1, A.2, * purl 1, knit 2 *, work from *-* over the next 15-15-18-18-24-24 stitches, purl 1, A.1, purl 1, knit 1.
Continue this pattern until A.1 and A.2 have been worked vertically.

YOKE:
Insert 1 marker after the first 36-36-37-37-40-40 stitches on round (= approx. mid front), measures piece from this marker. Switch to circular needle size 4.5 mm and work next round as follows:
Knit 1, purl 1, A.4, knit 8 (= sleeve), A.3, purl 1, knit 2, purl 1, A.4, knit 14-14-17-17-23-23 (= front piece), A.3, purl 1, knit 2, purl 1, A.4, knit 8 (= sleeve), A.3, purl 1, knit 2, purl 1, A.4, knit 14-14-17-17-23-23 (= back piece), A.3, purl 1, knit 1.

When this round has been worked, 3 stitches have been increased in each cable (24 stitches increased in total on round) = 124-124-130-130-142-142 stitches.

Work 5 rounds with knit over knit and purl over purl, knit yarn overs in A.3 and A.4 twisted. Remember to follow the knitting tension!

Then work as follows:
Knit 1, purl 1, A.4, knit 14, A.3, purl 1, knit 2, purl 1, A.4, knit 20-20-23-23-29-29, A.3, purl 1, knit 2, purl 1, A.4, knit 14, A.3, purl 1, knit 2, purl 1, A.4, knit 20-20-23-23-29-29, A.3, purl 1, knit 1.

When this round has been worked, 3 stitches have been increased in each cable (24 stitches increased in total on round) = 148-148-154-154-166-166 stitches.

Work 5 rounds with knit over knit and purl over purl, knit yarn overs in A.3 and A.4 twisted.

Continue pattern and increase this way until cable has been done 6-6-7-8-8-8 times in total, there are 244-244-274-298-310-310 stitches on needle.
Then continue with cables and increases on front piece and back piece but increases on sleeves are now done, work stocking stitch over these stitches (1 purl + 2 knit + 1 purl in every transition between body and sleeves continues as before).

Continue increase until cable has been done 10-11-11-13-13-14 times in total on body (and 6-6-7-8-8-8 times on sleeves), there are now 292-304-322-358-370-382 stitches on round. Work 3 rounds with pattern as before , without cable. Piece measures approx. 25-28-28-33-33-35 cm, measured from marker after neck edge.

DIVIDING FOR BODY AND SLEEVES:
AT THE SAME TIME as next round is worked divide yoke for body and sleeves as follows: Slip the first 58-58-64-70-70-70 stitches on a thread for sleeve, cast on 4-6-8-8-10-16 new stitches on needle (= in the side mid under sleeve), work 88-94-97-109-115-121 stitches in stocking stitch (= front piece), slip the next 58-58-64-70-70-70 stitches on a thread for sleeve, cast on 4-6-8-8-10-16 new stitches on needle (= in the side mid under sleeve), and work the last 88-94-97-109-115-121 stitches in stocking stitch (= back piece). Work body and sleeves separately and beginning of round is in the transition between body and sleeve.

BODY:
= 184-200-210-234-250-274 stitches. Work stocking stitch as before until piece measures 42-44-46-47-49-51 cm from marker mid front.
Switch to circular needles size 3.5 mm, work rib (= knit 2/purl 1) while AT THE SAME TIME increasing 20-22-21-24-26-29 stitches evenly on 1st round = 204-222-231-258-276-303 stitches. When rib measures 6-6-6-7-7-7 cm cast off.
Jumper measures 48-50-52-54-56-58 cm from marker mid front and approx. 54-56-58-60-62-64 cm from the top of shoulder.

SLEEVES:
Slip 58-58-64-70-70-70 sleeve stitches from one thread on to circular needle size 4.5 mm and pick in addition up 1 stitch in each of the 4-6-8-8-10-16 stitches cast on under sleeve = 62-64-72-78-80-86 stitches. Insert 1 marker thread in the middle of the 4-6-8-8-10-16 new stitches under sleeve - round begins at the marker thread.
Work in stocking stitch in the round on needle - AT THE SAME TIME when sleeve measures 3 cm from division, decrease mid under sleeve – read DECREASE TIP and decrease as follows: Decrease 2 stitches every 5-4½-3-2-2-1½ cm 7-7-10-12-12-14 times in total = 48-50-52-54-56-58 stitches.
Work until sleeve measures 36-34-34-30-29-28 cm from division. Switch to double pointed needles size 3.5 mm and work rib (= knit 2/purl 1) while AT THE SAME TIME increasing 6-7-5-6-7-5 stitches evenly on 1st round = 54-57-57-60-63-63 stitches.
When rib measures 6-6-6-7-7-7 cm cast off. Sleeve measures approx. 42-40-40-37-36-35 cm from division.

Diagram

slip 2 stitches on cable needle behind piece, knit 2, knit 2 from cable needle = slip 2 stitches on cable needle behind piece, knit 2, knit 2 from cable needle
slip 2 stitches on cable needle in front of piece, knit 2, knit 2 from cable needle = slip 2 stitches on cable needle in front of piece, knit 2, knit 2 from cable needle
slip 3 stitches on cable needle behind piece, work 2 stitches, make 1 yarn over, knit 1 from cable needle, make 1 yarn over, knit 1 from cable needle, make 1 yarn over, knit 1 from cable needle. = slip 3 stitches on cable needle behind piece, work 2 stitches, make 1 yarn over, knit 1 from cable needle, make 1 yarn over, knit 1 from cable needle, make 1 yarn over, knit 1 from cable needle.
slip 2 stitches on cable needle in front of piece, knit 1, 1 yarn over, knit 1, 1 yarn over, knit 1, 1 yarn over, knit 2 from cable needle. = slip 2 stitches on cable needle in front of piece, knit 1, 1 yarn over, knit 1, 1 yarn over, knit 1, 1 yarn over, knit 2 from cable needle.
Diagram for DROPS 255-19
Do you have a question? See a list of frequently asked questions (FAQ)

Knitting tension is what determines the final measurements of your work, and is usually measured per 10 x 10 cm. It is provided like so: number of stitches in width x number of rows in height - eg: 19 stitches x 26 rows = 10 x 10 cm.

The knitting tension is very individual; some people knit/crochet loosely while others work tightly. You adjust the knitting tension with the needle size, which is why the suggested needle size is only meant as a guide! You need to adjust this (up or down) to ensure that YOUR knitting tension matches the knitting tension provided in the pattern. If you work with a different knitting tension than provided you will have a different yarn consumption, and your work will have different measurements than what the pattern suggests.

The knitting tension also determines which yarns can replace each other. As long as you achieve the same knitting tension you can replace one yarn with another.

See DROPS lesson: How to measure your tension/gauge

See DROPS video: How to make a gauge tension swatch

The required amount of yarn is provided in grams, eg: 450 g. To calculate how many balls you’ll need you first need to know how many grams are in 1 ball (25g, 50g or 100g). This information is available if you click on the individual yarn quality on our pages. Divide the amount required with the amount of each ball. For example, if each ball is 50g (the most common amount), the calculation will be as follows: 450 / 50 = 9 balls.

The important thing when changing from one yarn to another is that the knitting/crochet tension remains the same. This is so that the measurements of the finished piece will be the same as on the sketch provided. It is easier to achieve the same knitting tension using yarns from the same yarn group. It is also possible to work with multiple strands of a thinner yarn to achieve the knitting tension of a thicker one. Please try our yarn converter. We recommend you to always work a test swatch.

Please NOTE: when changing yarn the garment might have a different look and feel to the garment in the photo, due to individual properties and qualities of each yarn.

See DROPS lesson: Can I use a different yarn than the one mentioned in the pattern?

All our yarns are categorised into yarn groups (from A to F) according to thickness and knitting tension – group A contains the thinnest yarns and group F the thickest. This makes it easier for you to find alternative yarns to our patterns, should you wish to switch yarn. All yarns within the same group have a similar knitting tension and can easily replace each other. However, different yarn qualities have different structures and properties which will give the finished work a unique look and feel.

Click here for an overview of the yarns in each yarn group

At the top of all our patterns you’ll find a link to our yarn calculator, which is a helpful tool should you wish to use a different yarn than suggested. By filling in the yarn quality you wish to replace, the amount (in your size) and number of strands, the calculator will present good alternative yarns with the same knitting tension. Additionally it will tell you how much you’ll require in the new qualities and whether you’ll need to work with multiple strands. Most skeins are 50g (some are 25g or 100g).

If the pattern is worked with multiple colours, every colour will have to be calculated separately. Similarly, if the pattern is worked with several strands of different yarns (for example 1 strand Alpaca and 1 strand Kid-Silk) you will have to find alternatives for each, individually.

Click here to see our yarn calculator

Since different yarns have different qualities and textures we have chosen to keep the original yarn in our patterns. However, you can easily find options among our available qualities by using our yarn calculator, or simply pick a yarn from the same yarn group.

It is possible that some retailers still have discontinued yarns in stock, or that someone has a few skeins at home that they would like to find patterns for.

The yarn calculator will provide both alternative yarn as well as required amount in the new quality.

If you think it's hard to decide what size to make, it can be a good idea to measure a garment you own already and like the size of. Then you can pick the size by comparing those measures with the ones available in the pattern's size chart.

You'll find the size chart at the bottom of the pattern.

See DROPS lesson: How to read size chart

The needle size provided in the pattern serves only as a guide, the important thing is to follow the knitting tension. And since knitting tension is very individual, you will have to adjust the needle size to ensure that YOUR tension is the same as in the pattern – maybe you’ll have to adjust 1, or even 2 needle sizes, up or down to achieve the correct tension. For this, we recommend that you work test swatches.

Should you work with a different knitting tension than the one provided, the measurements of the finished garment might deviate from the measurement sketch.

See DROPS lesson: How to measure your tension/gauge

See DROPS video: How to make a tension/gauge swatch

Working a garment top-down provides more flexibility and room for personal adjustment. For example it is easier to try the garment on while working, as well as making adjustments to length of yoke and shoulder caps.

The instructions are carefully explaining every step, in the correct order. Diagrams are adjusted to the knitting direction and are worked as usual.

The diagram depicts all rows/rounds, and every stitch seen from the right side. It is read from bottom to top, from right to left. 1 square = 1 stitch.

When working back and forth, every other row is worked from the right side and every other row is worked from the wrong side. When working from the wrong side, the diagram will have to be worked reversed: from left to right, knit stitches are purled, purl stitches are knit etc.

When working in the round every round is worked from the right side and the diagram are worked from right to left on all rounds.

See DROPS lesson: How to read knitting diagrams

The diagram depicts all rows/rounds, and every stitch seen from the right side. It is worked from bottom to top, from right to left.

When working back and forth every other row is worked from the right side: from right to left and every other row is worked from the wrong side: from left to right.

When working in the round, every row in the diagram are worked from the right side, from right to left.

When working a circular diagram you start in the middle and work your way outwards, counter clockwise, row by row.

The rows usually start with a given number of chain stitches (equivalent to the height of the following stitch), this will either be depicted in the diagram or explained in the pattern.

See DROPS lesson: How to read crochet diagrams

Instructions for working several diagrams after each other on the same row/round, will often be written like so: “work A.1, A.2, A.3 a total of 0-0-2-3-4 times". This means you work A.1 once, then A.2 is worked once, and A.3 is repeated (in width) the number of times provided for your size – in this case like so: S = 0 times, M = 0 times, L=2 times, XL= 3 times and XXL = 4 times.

The diagrams are worked as usual: begin with the first row in A.1, then work the first row in A.2 etc.

See DROPS lesson: How to read knitting diagrams

See DROPS lesson: How to read crochet diagrams

The total width of the garment (from wrist-to-wrist) will be larger in the larger sizes, despite the actual sleeves being shorter. The larger sizes have longer sleeve caps and wider shoulders, so there will be a good fit in all sizes.

The measurement sketch/schematic drawing provides information regarding the full length of the garment. If it’s a jumper or a jacket the length is measured from the highest point on the shoulder closest to the neckline, and straight down to the bottom of the garment. It is NOT measured from the tip of shoulder. Similarly, the length of yoke is measured from the highest point on the shoulder and down to where yoke is split into body and sleeves.

On a jacket measures are never taken along bands, unless specifically stated. Always measure inside band stitches when measuring the length.

See DROPS lesson: How to read a schematic drawing

Diagrams are often repeated on the round or in height. 1 repeat is the diagram the way it appears in the pattern. If it says to work 5 repeats of A.1 in the round, then you work A.1 a total of 5 times after/next to each other in the round. If it says to work 2 repeats of A.1 vertically/in height you work the entire diagram once, then begin again at the start and work the entire diagram one more time.

Chain stitches are slightly narrower than other stitches and to avoid working the cast-on edge too tight, we simply chain more stitches to begin with. The stitch count will be adjusted on the following row to fit the pattern and measurement sketch.

The rib edge is more elastic and will contract slightly compared to, for example, stocking stitch. By increasing before the rib edge, you avoid a visible difference in width between the rib edge and the rest of the body.

It’s very easy to cast off too tightly, and by making yarn overs while casting off (and simultaneously casting these off) you avoid a too tight cast off edge.

See DROPS video: How to bind off with yarn overs (yo)

To achieve an even increase (or decrease) you can increase on, for example: every 3rd and 4th row alternately, like so: work 2 rows and increase on the 3rd row, work 3 rows and increase on the 4th. Repeat this until the increase is complete.

See DROPS lesson: Increase or decrease 1 st on every 3rd and 4th row alternately

Should you prefer to work in the round instead of back and forth, you may of course adjust the pattern. You’ll need to add steeks mid-front (usually 5 stitches), and follow the instructions. When you would normally turn and work from the wrong side, simply work across the steek and continue in the round. At the end you’ll cut the piece open, pick up stitches to work bands, and cover the cut edges.

See DROPS video: How to knit steeks and cut open

Should you prefer to work back and forth instead of in the round, you may of course adjust the pattern so you work the pieces separately and then assemble them at the end. Divide the stitches for the body in 2, add 1 edge stitch in each side (for sewing) and work the front and back pieces separately.

See DROPS lesson: Can I adapt a pattern for circular needles into straight needles?

Pattern repeats can vary slightly in the different sizes, in order to get the correct proportions. If you’re not working the exact same size as the garment in the photo, yours might deviate slightly. This has been carefully developed and adjusted so that the complete impression of the garment is the same in all sizes.

Make sure to follow instructions and diagrams for your size!

If you have found a pattern you like which is available in women’s size it’s not very difficult to convert it to men’s size. The biggest difference will be the length of sleeves and body. Start working on the women size that you think would fit across the chest. The additional length will be worked right before you cast off for the armhole/sleeve cap. If the pattern is worked top-down you can add the length right after the armhole or before the first decrease on sleeve.

Regarding additional yarn amount, this will depend on how much length you add, but it is better with a skein too many than too few.

All yarns will have excess fibres (from production) that might come off as lint or shedding. Brushed yarns (ie hairier yarns) have more of these loose, excess fibres, causing more shedding.

Shedding also depends on what is worn under or over the garment, and whether this pulls at the yarn fibres. It’s therefore not possible to guarantee that there will be no shedding

Below are some tips on how to get the best result when working with hairier yarns:

1. When the garment is finished (before you wash it) shake it vigorously so the looser hairs come off. NOTE: do NOT use a lint roller, brush or any method that pulls at the yarn.

2. Place the garment in a plastic bag and put it in your freezer - the temperature will cause the fibres to become less attached to each other, and excess fibres will come off easier.

3. Leave in the freezer for a few hours before taking it out and shaking it again.

4. Wash the garment according to the instructions on the yarn label.

Pilling is a natural process that happens to even the most exclusive of fibers. It's a natural sign of wear and tear that is hard to avoid, and that is most visible in high friction areas of your garment like a sweater's arms and cuffs.

You can make your garment look as new by removing the pilling, using a fabric comb or a pill/lint remover.

Still can't find the answer you need? Then scroll down and leave your question so one of our experts can try to help you. This will be done normally within 5 to 10 working days.
In the meantime, you can read the questions and answers that others have left to this pattern or join the DROPS Workshop on Facebook to get help from fellow knitters/crocheters!
Have you finished this pattern?
Tag your pictures with #dropspattern #snowdriftsweater or submit them to the #dropsfan gallery.

Post a comment to pattern DROPS 255-19

We would love to hear what you have to say about this pattern!

If you want to leave a question, please make sure you select the correct category in the form below, to speed up the answering process. Required fields are marked *.

Comments / Questions (29)

country flag Lisa wrote:

Mi riferisco all’impostazione del lavoro del collo (con le trecce), dopo i ferri a maglia rasata. Alla fine del primo giro mi avanzano maglie. Grazie

22.01.2025 - 09:51

country flag Lisa wrote:

Le istruzioni del bordo del collo sono ancora sbagliate. L'ho fatto e disfatto più volte ... Volete controllare per favore? Grazie

21.01.2025 - 17:15

DROPS Design answered:

Buongiorno Lisa, le istruzioni per il bordo del collo sono corrette: sta facendo riferimento a quella parte? Buon lavoro!

21.01.2025 - 22:51

country flag Renate wrote:

Vraag over pas! Na het stukje brei 5 nld met recht boven recht en averecht boven averecht etc…komt brei dan als volgt: na de 3e keer A4 staat 1recht4??? Dat lijkt mij een tikfout in het patroon, maar ik kan er niet uitkomen wat dan de juiste aantallen moeten zijn voordat je weer met A3 verder moet gaan…ik hoop dat ik het zo duidelijk uitleg…kunnen jullie mij zsm helpen aub ik kom niet verder…

19.01.2025 - 12:48

DROPS Design answered:

Dag Renate,

Oeps.... ja, dat was inderdaad een typefout, het moet 14 recht zijn en het is nu aangepast.

20.01.2025 - 20:27

country flag Renate wrote:

Vraag over pas! Na het stukje brei 5 nld met recht boven recht en averecht boven averecht etc…komt brei dan als volgt: na de 3e keer A4 staat 1recht4??? Dat lijkt mij een tikfout in het patroon, maar ik kan er niet uitkomen wat dan de juiste aantallen moeten zijn voordat je weer met A3 verder moet gaan…ik hoop dat ik het zo duidelijk uitleg…kunnen jullie mij zsm helpen aub ik kom niet verder…

19.01.2025 - 12:47

country flag Vittoria Enimmi wrote:

Buonasera ho bisogno di avere due chiarimenti: 1. A3 e A4 sono trecce a sx e a dx ma sono lavorate in modo diverso. È corretto? 2. Quando dite " continuare ad aumentare in questo modo" riprendo da 1 maglia dritto ,1 rovescio....giusto? Grazie mille Vittoria Enimmi

06.01.2025 - 14:56

DROPS Design answered:

Buonasera Vittoria, si, i due diagrammi sono le trecce orientate a destra e sinistra. Per gli aumenti è corretto il suo procedimento. Buon lavoro!

07.01.2025 - 19:37

country flag Joëlle SABINE wrote:

Bonjour, je trouve le bord roulotté du col mal réussi, est-il possible de défaire ce bord ? Je préférerais faire un bord simple en côtes. Merci pour vos conseils. Joëlle

29.12.2024 - 14:39

DROPS Design answered:

Bonjour Mme Sabine, pour changer le col, et le reprendre pour le tricoter de bas en haut (au niveau qui vous convient), vous pouvez utiliser la technique pour allonger un tricot trop court. Bon tricot!

02.01.2025 - 14:17

country flag Rike wrote:

Hallo zusammen, mich würde interessieren wie ich in der passe weiter stricken soll. Es soll 6 mal verzopft werden und man hat vorher148 Maschen. Wenn ich im Muster 8 Zöpfe habe und drei Maschen zunehme pro Zopf , komme ich nicht auf 244 Maschen. Wo liegt der Fehler. Bei vier Zöpfen, mit 24 Maschen pro Zopf Zunahme, würde ich auf die 244 Maschen kommen. Wo liegt der Fehler, oder habe ich etwas falsch verstanden. Vielen Dank im voraus

12.12.2024 - 18:13

DROPS Design answered:

Liebe Rike, man muss insgesamt 6 Mal die Zöpfe stricken (in S und M) und 2 Zöpfe wurde schon gestrickt, so muss man noch 4 Mal die Zöpfe stricken; so sind es 148 M + '(24 Zunahmen x 4 weitere Mal) = 244 Maschen und insgesamt 6 Zöpfe in der Höhe. Viel Spaß beim Stricken!

13.12.2024 - 07:29

country flag Claire wrote:

Bonjour, Pour le modèle 255-19, quelle est votre suggestion pour rabattre souplement des côtes 2X1? Le vidéo disponible sur votre site concernant le rabattement des mailles ne porte pas sur ce type de côtes. Merci de votre aide

28.11.2024 - 03:03

DROPS Design answered:

Bonjour Claire, dans ce cas j'utilise CELUI-CI. Si le bord n'est toujours pas assez elastique, prenez les aiguilles plus grandes pour rabattres les mailles. Bon tricot!

28.11.2024 - 09:51

country flag Chris Sundblom wrote:

Jag försöker sticka er modell Snow Drift. Jag är van att sticka rätt avancerade modeller men här blir det stopp redan vid halskanten. Jag får inte ihop det med antalet upplagda maskor (100).

05.11.2024 - 21:04

DROPS Design answered:

Hei Chris. I str. S og M har du 100 masker, og etter 4 omganger med glattstrikk strikker du slik: 1 rett + 1 vrang + A.2 (= 4 masker) + 9 masker (1 vrang, 2 rett over 9 masker) + 1 vrang + A.1 (= 4 masker) + 1 vrang + 2 rett + 1 vrang + A.2(= 4 masker) + 15 masker ( 1 vrang, 2 rett over 15 masker) + 1 vrang + A.1 (= 4 masker) + 1 vrang + 2 rett + 1 vrang + A.2 (= 4 masker) + 9 masker (1 vrang, 2 rett over 9 masker) + 1 vrang + A.1 (= 4 masker) + 1 vrang + 2 rett + 1 vrang + A.2(= 4 masker) + 15 masker (1 vrang, 2 rett over 15 masker) + 1 vrang + A.1 (= 4 masker) + 1 vrang + 1 rett = 100 masker. Bare med tall: 1+1+4+9+1+4+1+2+1+4+15+1+4+1+2+1+4+9+1+4+1+2+1+4+15+1+4+1+1=100.

06.11.2024 - 06:57

country flag Michèle wrote:

Snow Drift, Medium. Halsrand . Welke van de blokjespatronen (balkjes van 4 blokjes) is A1 en A2? Telpatroon: is de eerste lijn (die uitgebreid beschreven staat) niet opgenomen in het telpatroon?

02.11.2024 - 13:38

DROPS Design answered:

Dag Michèle,

Je breit eerst 4 naalden recht in de rondte en daarna brei je boordsteek volgens de beschrijving, waarin ook A.2 en A.1 zijn opgenomen. Hierdoor ontstaan er patroontjes in de raglanlijnen. De telpatronen lees je van onder naar boven en A.1 en A.2 komen naast de raglanlijnen. Ik begrijp niet wat je bedoelt met de blokjespatronen.

02.11.2024 - 17:42