
Popular categories
Looking for a yarn?


Comments / Questions (32)
![]() Manon wrote:
Manon wrote:
Merci. .....je suis confuse , autre précision requise sur 252-1 svp: Comment dois-je lire A1 tout en complétant les dim. requise (soit 13 x 2 pour gr. L) et conserver le motif sous la manche ? Merci
03.04.2026 - 22:17DROPS Design answered:
Bonjour Manon, le motif sous la manche ne sera pas conservé justement à cause des diminutions, diminuez au début/à la fin des tours, mais tricotez bien les autres mailles pour continuer A.1 comme avant en hauteur. Bon tricot!
08.04.2026 - 08:41
![]() Manon wrote:
Manon wrote:
Bonjour Re:,252-1 (L) - , diminution manche, pour gr L = -13-fois tous les 2cm = 64 m., , ....ou doit-on débuter exactement ? Reduction a même le motif A1 qui seront reduit ou desynchronisé ensuite , non ? Pas certaine de comprendre, Merci de préciser svp
21.03.2026 - 22:51DROPS Design answered:
Bonjour Manon, commencez à diminuer au milieu sous la manche quand la manche mesure 1 cm depuis que vous avez repris les mailles de la manche, mais mesurez au milieu sous la manche (pas au milieu du dessus de la manche, autrement dit, sans les rangs raccourcis). A.1 sera automatiquement réduit en début/fin de tour en raison des diminutions, tricotez le simplement comme avant pour ne pas décaler les motifs. Bon tricot!
23.03.2026 - 08:48
![]() Manon wrote:
Manon wrote:
Bonjour , patron 252-1 (grandeur L) je reviens avec la même question de Anne-Christine plus bas qui es sans response: comment et où doit-on commencer le jacquard au début? (Je voudrais éviter erreur au debut et devoir recommencer), merci
05.01.2026 - 00:55DROPS Design answered:
Bonjour Manon, il semble que Marie-Christine ait trouvé seule la réponse à sa question. Lorsque vous tricotez le jacquard, vous lisez le diagramme de bas en haut, de droite à gauche sur l'endroit et de gauche à droite sur l'envers, puis, lorsque le diagramme est terminé, vous le reprenez au 1er rang. Bon tricot!
05.01.2026 - 11:30
![]() Anne-Christine wrote:
Anne-Christine wrote:
Je pense que j’ai compris la bêtise que j’ai faite dès le début, désolée. Je recommence!
01.05.2025 - 02:59
![]() Anne-Christine wrote:
Anne-Christine wrote:
Bonjour! Je suis arrivée au stade de la réunion du dos et du devant, et les motifs du jacquard ne tombent pas juste. J’ai sans doute fait une erreur dès le début : comment et où doit-on commencer le jacquard au début? Merci de votre réponse
01.05.2025 - 01:43
![]() Maria Tagliavia wrote:
Maria Tagliavia wrote:
È possibile realizzare questo modello 252-1 per un uomo? È possibile usare la lana baby merino? Quali modifiche devo fare?
03.02.2025 - 09:50DROPS Design answered:
Buonasera Maria, per un'assistenza così personalizzata può rivolgersi al suo rivenditore DROPS di fiducia. Buon lavoro!
03.02.2025 - 16:16
![]() Margherita Navarra wrote:
Margherita Navarra wrote:
Buongiorno, non riesco a capire come iniziare il MOTIVO da 10 m, avendo sui ferri 115 m., come devo gestire le 5 m. in più? Inizio e lavoro le prime 2 maglie con il colore marzapane, poi lavoro il MOTIVO di 10 maglie, ma la 1° maglia di A.1 la lavoro dopo il MOTIVO ed è la 13ma maglia? Poi riprendo con le ripetizioni di A.1 e le ultime 2 maglie le lavoro come le prime? Ringrazio e saluto
24.01.2025 - 12:57DROPS Design answered:
Buongiorno Margherita, le 5 maglie in più corrispondono alle 2 maglie a maglia rasata all'inizio di ogni ferro e la 1° maglia di A.1 che viene chiesto di lavorare prima delle ultime 2 maglie a maglia rasata. Buon lavoro!
25.01.2025 - 10:19
![]() Johanna wrote:
Johanna wrote:
Hallo! Ich verstehe noch nicht, wie der Rand am Rumpf gestrickt wird. Soll ich das Muster bis in die Randmaschen stricken, oder soll der Rand, 2 und drei Maschen, Marzipan bleiben?
24.01.2025 - 09:13DROPS Design answered:
Liebe Johanna, beim Rückenteil stricken Sie 2 M Marzipan, dann wiederholen Sie A.1 bis 3 Maschen ürbig sind, dann stricken Sie die 1. Masche A.1 und 2 Maschen Marzipan. So wird man immer 2 Maschen glattrechts im Marzipan stricken und dazwischen das Muster wie in A.1. Viel Spaß beim Stricken!
24.01.2025 - 09:59
![]() Andine wrote:
Andine wrote:
Hello, is it okay if I just get too many stitches on my needle? Mine is 21 sts and 29 rows. Thanks...
20.01.2025 - 04:11DROPS Design answered:
Dear Andine, tension to this pattern is 21 stitches for 10 cm, so it's correct, tension in height should be 29 rows, if you cannot get the 28 rows, then you might need somewhat more yarns than required because of this difference; then just measure piece as height is given here in cm. Happy knitting!
20.01.2025 - 08:54
![]() Jeannette wrote:
Jeannette wrote:
Hallo. Nach den 6 Reihen Marzipan am Rückenteil, mit dem Muster beginnen. Das Muster beginnt aber nochmal mit 4 Reihen Marzipan….oder dann sofort nach den 6 Reihen mit Reihe 5 im Muster starten? Bin verwirrt. Danke
12.11.2024 - 08:49DROPS Design answered:
Liebe Jeannette, so haben Sie 10 Reihen mit Marzipan vor der 1. Reihe mit 2 Farben, dh 6 Reihen nach der Markierung + die 4 ersten Reihen A.1. Viel Spaß beim Stricken!
12.11.2024 - 15:44
|
||||||||||
Crystal Rain#crystalrainsweater |
||||||||||
 |
 |
|||||||||
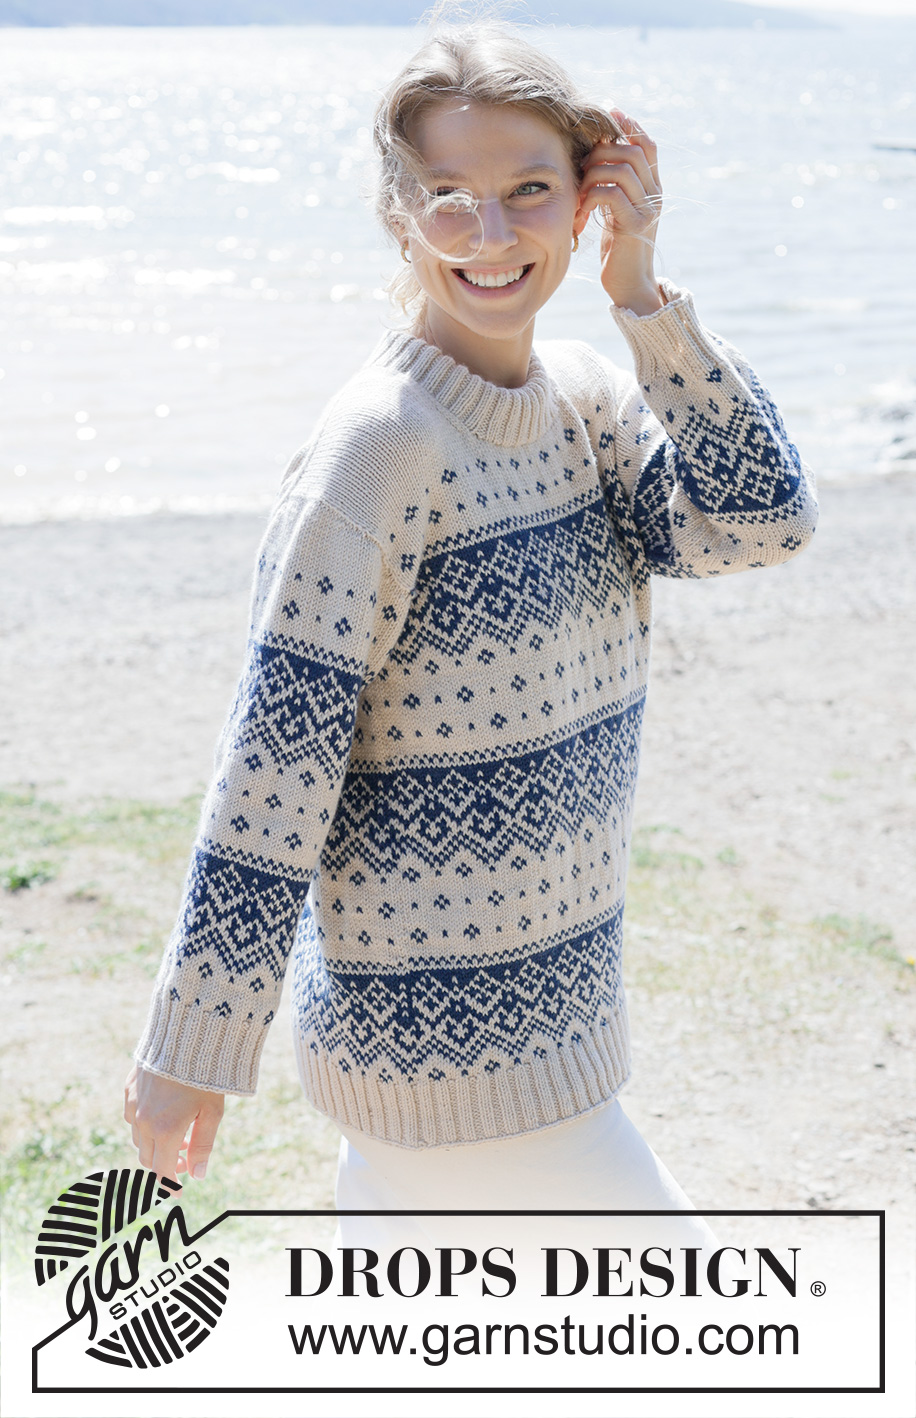
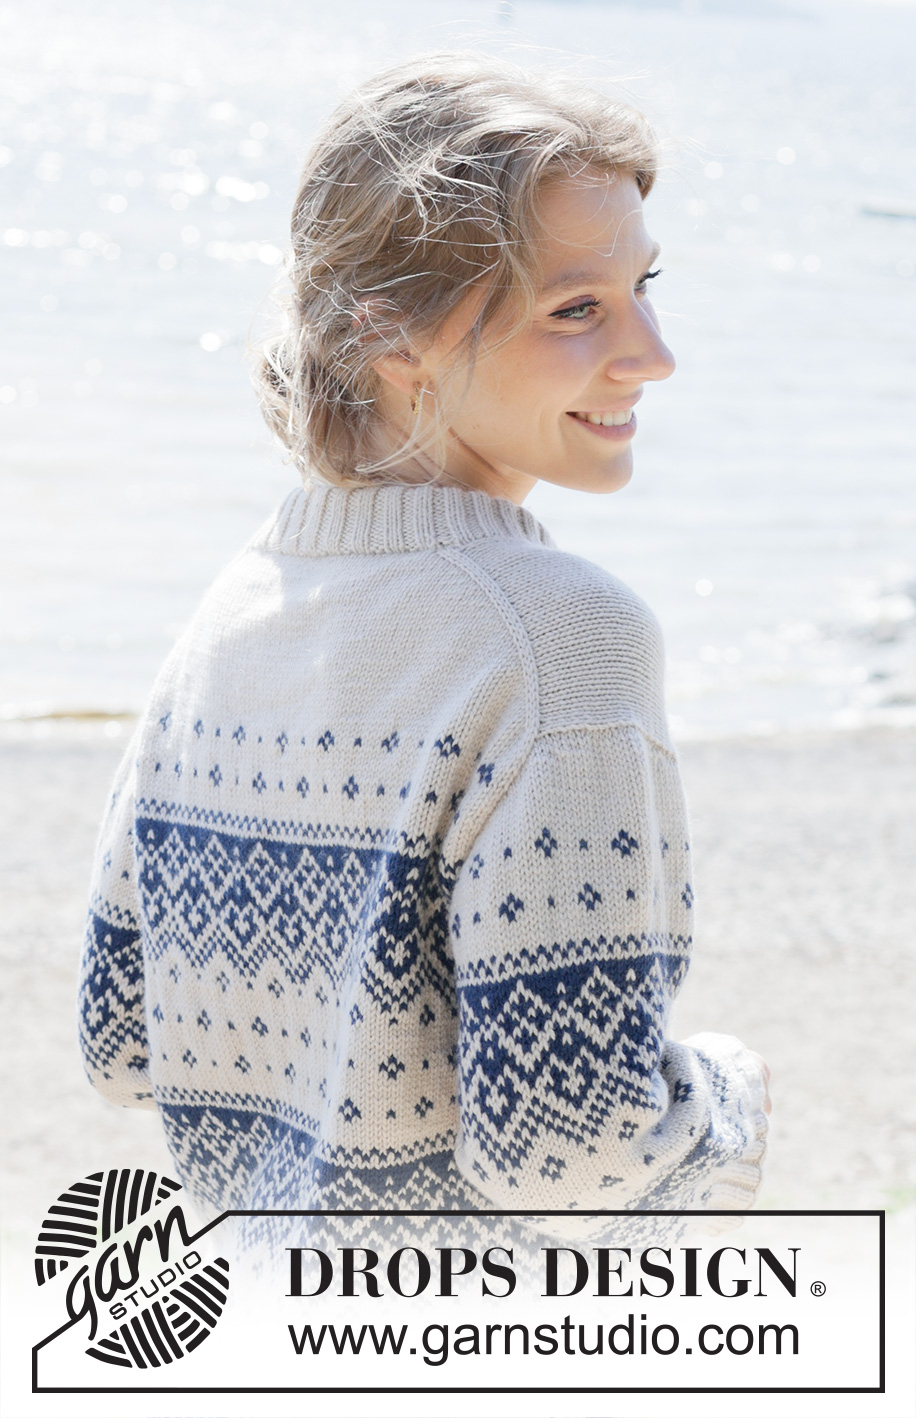
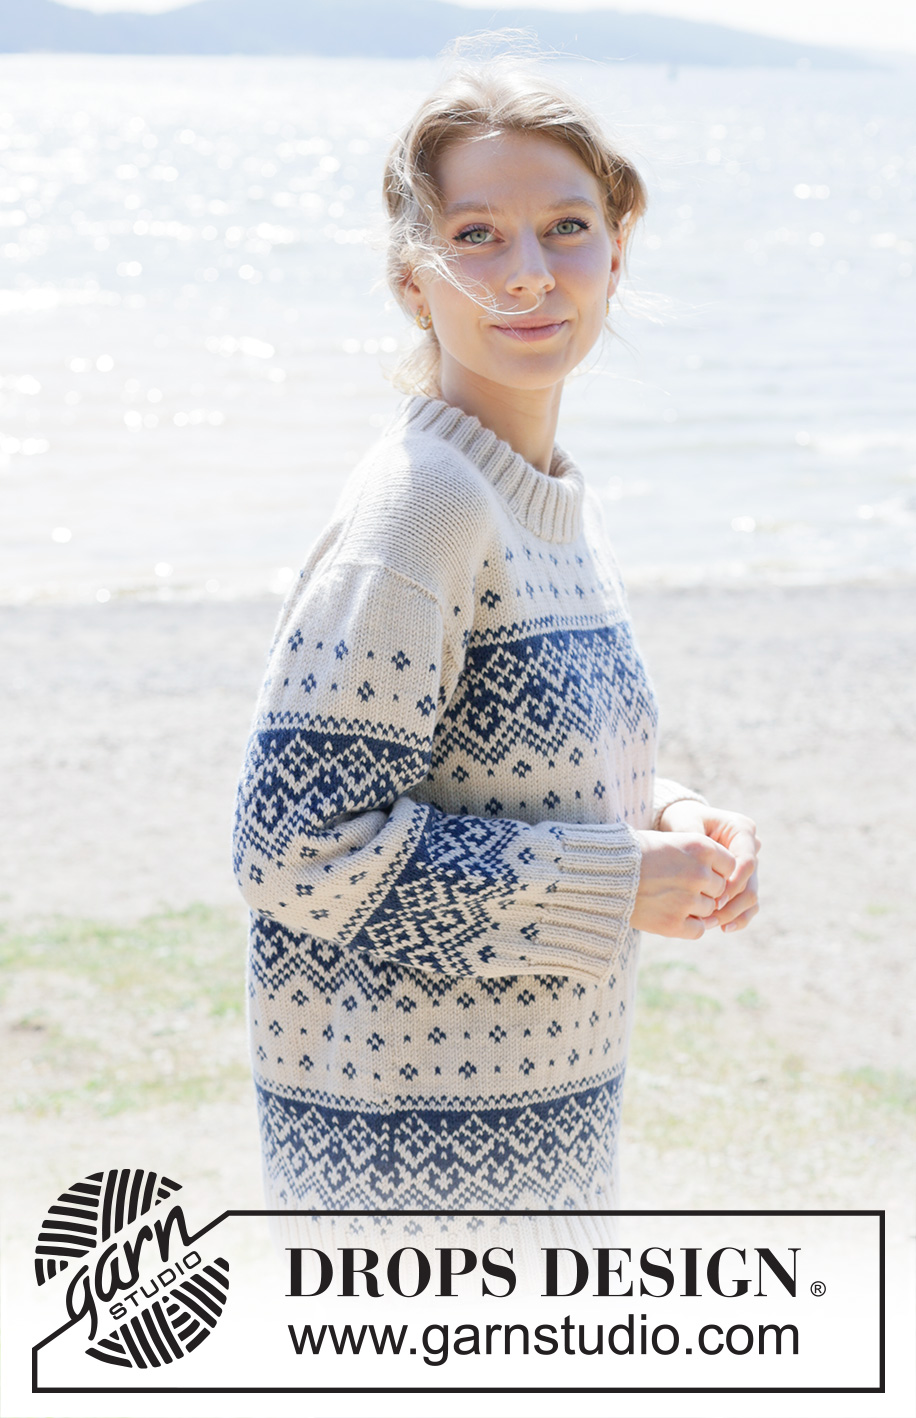
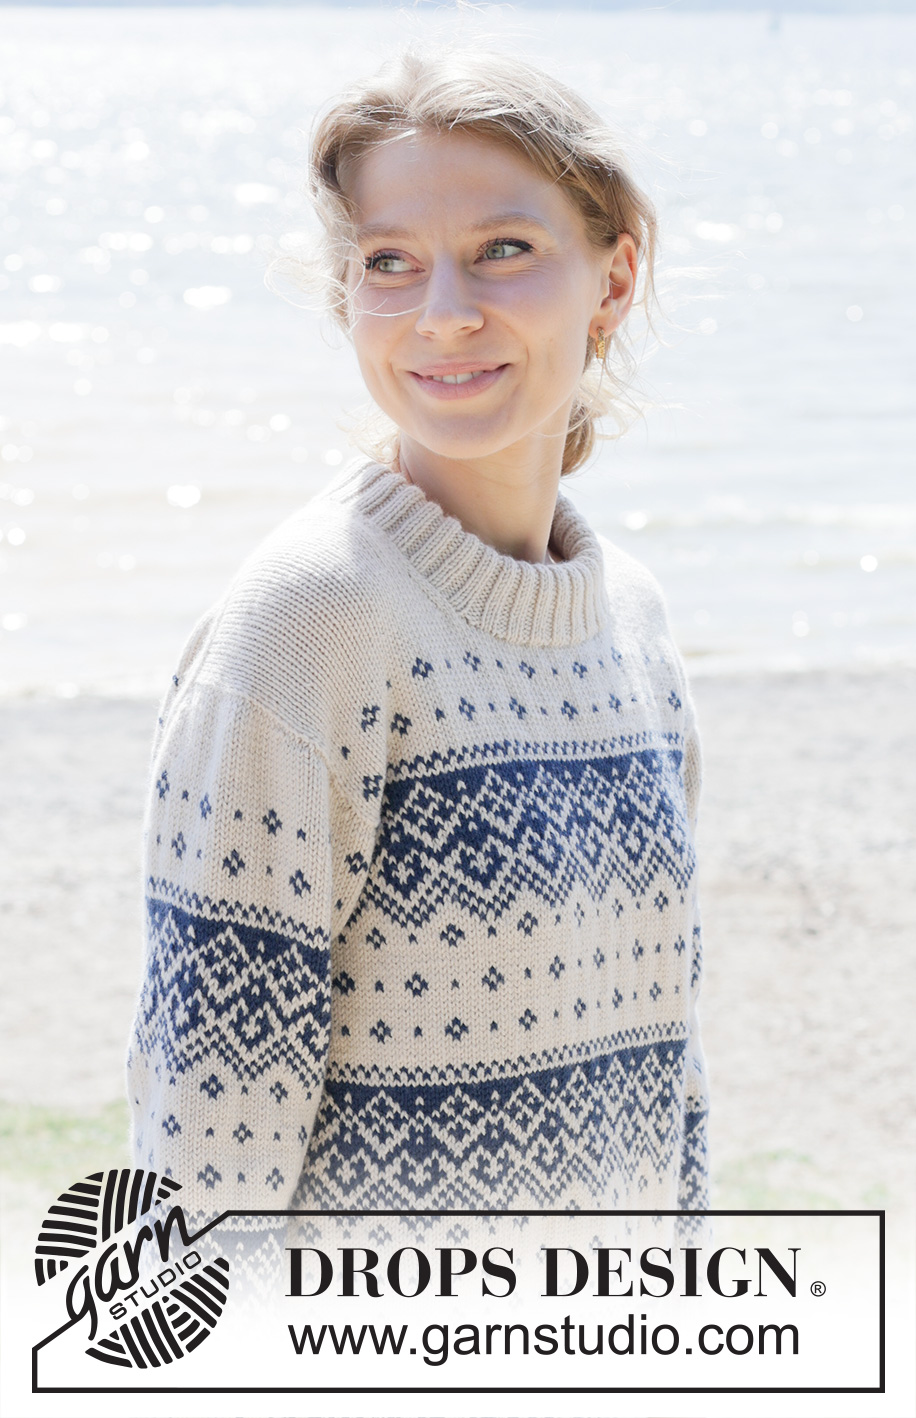
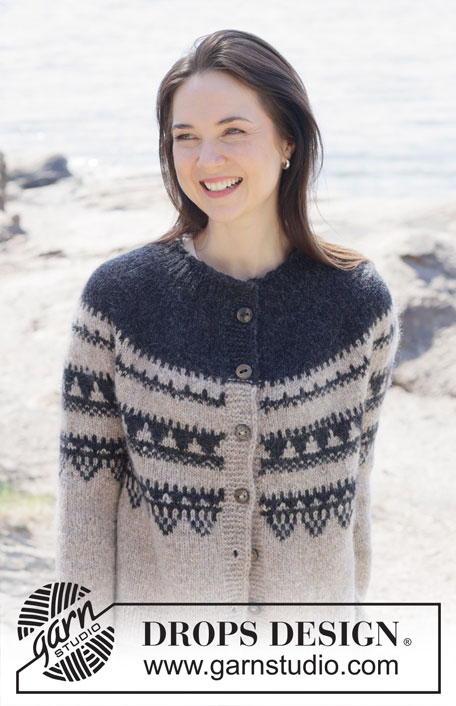
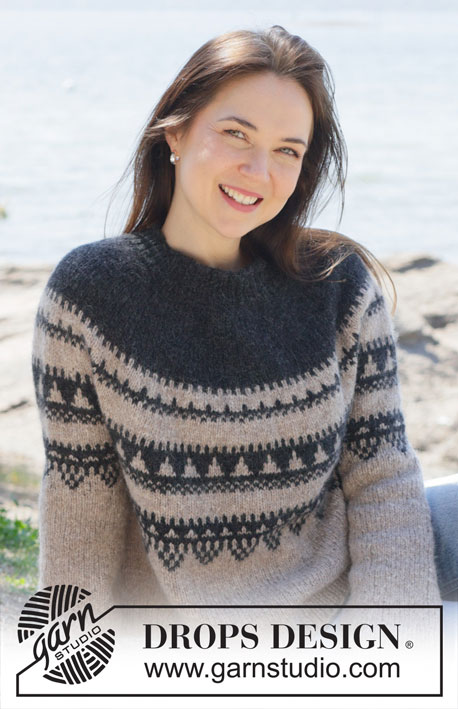
Knitted jumper in DROPS Daisy. The piece is worked top down with European/diagonal shoulders, Nordic pattern and double neck. Sizes S - XXXL.
DROPS 252-1 |
||||||||||
|
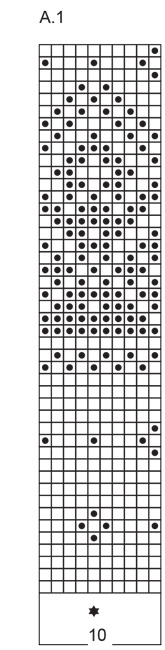
------------------------------------------------------- EXPLANATIONS FOR THE PATTERN: ------------------------------------------------------- PATTERN: See diagram A.1. The diagram shows the pattern from the right side and is worked in stocking stitch. To avoid the knitting tension losing its elasticity when working colour-pattern, it is important that the strands at the back are not tight. Use a size larger needle when working pattern if the piece becomes tight. INCREASE TIP-1: INCREASE 1 STITCH TOWARDS THE LEFT - from RIGHT SIDE: Use left needle to pick up yarn between 2 stitches from row below, pick up yarn from the front and knit in the stitch loop that is on the back of the needle. INCREASE 1 STITCH TOWARDS THE RIGHT - from RIGHT SIDE: Use left needle to pick up yarn between 2 stitches from row below, pick up yarn from the back and knit in the stitch loop that is on the front side of the needle. . INCREASE TIP-2: INCREASE 1 STITCH TOWARDS THE RIGHT - from WRONG SIDE: Use left needle to pick up yarn between 2 stitches from row below, pick up yarn from the back and purl in the stitch loop that is on the front side of the needle. INCREASE 1 STITCH TOWARDS THE LEFT - from WRONG SIDE: Use left needle to pick up yarn between 2 stitches from row below, pick up yarn from the front and purl in the stitch loop that is on the back side of the needle. DECREASE TIP (for sleeves): Decrease 1 stitch on each side of the marker-stitch as follows: Work until there are 2 stitches left before the marker-thread, knit 2 together, knit the marker-stitch, slip 1 stitch knit-wise, knit 1 and pass the slipped stitch over the knitted stitch (2 stitches decreased). KNITTING TIP: When working short rows, there will be a small hole after each turn. This hole can be closed by tightening the strand or using the technique German Short Rows as follows: Slip the first stitch purl-wise, take the strand over the right needle and tighten well from the back (2 loops on the needle). These loops are worked together on the next row. ------------------------------------------------------- START THE PIECE HERE: ------------------------------------------------------- JUMPER – SHORT OVERVIEW OF THE PIECE: The pattern uses both long and short needles; start with the length which fits the number of stitches and change when necessary. The piece is started back and forth, casting on stitches at the back of the neck and working the back piece top down with pattern, while increasing stitches on each side for the shoulders which become slightly diagonal. The back piece is worked as far as the armholes then set aside. The front piece is worked in 2 sections, knitting up stitches first along 1 back shoulder and increasing for the neckline. This is repeated on the other shoulder, the 2 front sections are joined when the neckline is finished and worked with pattern until the armholes are finished. The front and back pieces are joined on the same circular needle and the body worked in the round Stitches are knitted up around the armholes for the sleeves, which are started back and forth for the sleeve cap then finished in the round. Stitches are knitted up around the neckline and the neck worked in the round then folded double to the inside to finish. BACK PIECE: The piece is worked back and forth. Cast on 39-41-43-45-47-49 stitches with circular needle size 4 mm and colour marzipan DROPS Daisy. ROW 1 (wrong side): Purl. ROW 2 (right side): Read INCREASE TIP-1. Knit 3, increase 1 stitch towards the left, knit until there are 3 stitches left, increase 1 stitch towards the right, knit 3. ROW 3 (wrong side): Read INCREASE TIP-2. Purl 3, increase 1 stitch towards the right, purl until there are 3 stitches left, increase 1 stitch towards the left, purl 3. Work ROWS 2 and 3 a total of 14-16-18-20-22-24 times (28-32-36-40-44-48 rows worked). There are 95-105-115-125-135-145 stitches. Insert 1 marker outermost on one side. The piece is now measured from here! Work 6 rows with colour marzipan, without increasing. Continue as follows: 2 stocking stitches with colour marzipan, work PATTERN– read explanation above – as shown in A.1 (9-10-11-12-13-14 repeats in width), work the first stitch in A.1 (so the pattern is symmetrical on both sides), 2 stocking stitches with colour marzipan. Continue this pattern until the piece measures 11-12-13-13-14-15 cm from the marker and finishing with a row from the wrong side. Note which row this is in the pattern. Now increase for the armholes. INCREASE FOR ARMHOLES: ROW 1 (right side): Remember INCREASE TIP-1. Knit 2 with colour marzipan, increase 1 stitch towards the left, work A.1 until there are 2 stitches left, increase 1 stitch towards the right, knit 2 with colour marzipan. ROW 2 (wrong side): Purl and continue A.1; the increased stitches are worked into A.1. Work ROWS 1 and 2 a total of 4 times = 103-113-123-133-143-153 stitches. Continue the pattern until the piece measures 14-15-16-16-17-18 cm, noting which row this is in the pattern. Cut the strand, place the stitches on a stitch holder and work the left front piece. LEFT FRONT PIECE: Find the left back shoulder as follows: Lay the back piece flat, right side up, with the stitch holder towards you; left side of piece = left shoulder. Start from the right side by the neck with colour marzipan and knit up 1 stitch in each worked row on the left back shoulder (inside the outermost stitch) to the shoulder = 28-32-36-40-44-48 stitches. All measurements on the front piece are taken from this knitted-up row. Work stocking stitch (first row from wrong side). When the piece measures 9 cm, increase for the neck as follows: ROW 1 (right side): Remember INCREASE TIP-1. Knit 3, increase 1 stitch towards the left, work to end of row. ROW 2 (wrong side): Purl. Work ROWS 1 and 2 a total of 4 times (8 worked rows) = 32-36-40-44-48-52 stitches (last row from the wrong side). Cut the strand, place the stitches on a stitch holder and work the right front piece. RIGHT FRONT PIECE: Start from the right side, outermost on the shoulder with colour marzipan and knit up 1 stitch in each worked row on the right back shoulder (inside the outermost stitch) to the neckline = 28-32-36-40-44-48 stitches. All measurements on the front piece are taken from this knitted-up row. Work stocking stitch (first row from wrong side). When the piece measures 9 cm, increase for the neck as follows: ROW 1 (right side): Remember INCREASE TIP-1. Work until there are 3 stitches left on the row, increase 1 stitch towards the right, knit 3. ROW 2 (wrong side): Purl. Work ROWS 1 and 2 a total of 4 times (8 worked rows) = 32-36-40-44-48-52 stitches (last row from the wrong side). Now join the 2 front pieces. FRONT PIECE: From the right side, work the 32-36-40-44-48-52 stitches on the right front piece, cast on 31-33-35-37-39-41 stitches for the neckline, work the 32-36-40-44-48-52 stitches on the left front piece = 95-105-115-125-135-145 stitches. Continue back and forth with stocking stitch and colour marzipan until the piece measures 14-14-14-16-16-16 cm from the knitted-up row. Continue as follows: 2 stocking stitches with colour marzipan, work A.1 (9-10-11-12-13-14 repeats in width), work the first stitch in A.1 (so the pattern is symmetrical) and 2 stocking stitches with colour marzipan. Work until the piece measures 23-24-25-27-28-29 cm from the knitted-up row. Make sure the last row is the same row as on the back piece before increasing for the armholes. INCREASE FOR ARMHOLES: ROW 1 (right side): Remember INCREASE TIP-1. Knit 2 with colour marzipan, increase 1 stitch towards the left, work A.1 until there are 2 stitches left, increase 1 stitch towards the right, knit 2 with colour marzipan. ROW 2 (wrong side): Purl and continue A.1; the increased stitches are worked into A.1. Work ROWS 1 and 2 a total of 4 times = 103-113-123-133-143-153 stitches. Continue the pattern until the piece measures 26-27-28-30-31-32 cm, finishing on the same row as the back piece. Now join the front and back pieces. BODY: Continue A.1 across the 103-113-123-133-143-153 stitches on the front piece. The 2 stitches in colour marzipan are now worked into A.1. Cast on 7 stitches (in side mid-under sleeve), continue A.1 across the 103-113-123-133-143-153 stitches on the back piece, the 2 stitches in colour marzipan are now worked into A.1, cast on 7 stitches (in side mid-under sleeve) = 220-240-260-280-300-320 stitches. Continue in the round, working A.1 across all stitches, with 22-24-26-28-30-32 repeats of A.1 in width. Work until the front piece measures 63-65-67-68-70-72 cm. Change to circular needle size 3 mm. Work rib (knit 2, purl 2), increasing 20-24-24-28-28-32 stitches evenly on the first round = 240-264-284-308-328-352 stitches. Work until the rib measures 6-6-6-7-7-7 cm. Cast off with knit. The front piece measures 69-71-73-75-77-79 cm from the knitted-up row. It is 3 cm longer than the finished length, as the knitted-up row is not on the shoulder but slightly down the back piece. The jumper measures approx. 66-68-70-72-74-76 cm. SLEEVES: The sleeve is worked top down. Lay the piece flat and insert 1 marker at the top of the armhole (NOTE! This is not in the knitted-up row on the front piece but approx. 6 cm down the front piece). Use circular needle size 3 mm and colour marzipan. Start in the middle of the cast-on stitches under the sleeve, knit up 88-92-98-102-106-110 stitches around the armhole, with equal numbers of stitches on both sides of the marker. Change to circular needle size 4 mm. Insert 1 marker in the middle cast-on stitch and move the marker on top of the armhole to the middle stitch on the round – with equal numbers of stitches on each side. Work stocking stitch back and forth with short rows for the sleeve cap, starting mid-under the sleeve as follows: ROW 1 (right side): Knit to 10-10-12-12-12-14 stitches past the marker-stitch on top of the armhole, turn – read KNITTING TIP. ROW 2 (wrong side): Purl to 10-10-12-12-12-14 stitches past the marker-stitch, turn. ROW 3 (right side): Knit to 4 stitches past the previous turn, turn. ROW 4 (wrong side): Purl to 4 stitches past the previous turn, turn. Repeat ROWS 3 and 4 until you have turned a total of 14 times (7 times on each side, with the last row from the wrong side). AFTER THE LAST TURN: Knit back to the beginning of the round (mid-under sleeve). Work A.1 in the round across all stitches; the pattern will not fit under the sleeve. Count out from the marker-stitch on the sleeve to determine where the pattern should start under the sleeve – the marker-stitch should match the mid-stitch in A.1. AT THE SAME TIME, when the sleeve measures 1 cm from the join, decrease 2 stitches on each side of the marker-stitch under the sleeve - read DECREASE TIP. Decrease like this every 2nd round 4 times, then every 3-2½-2-2-2-1½ cm 11-12-13-14-15-16 times = 58-60-64-66-68-70 stitches Continue working until the sleeve measures 46-44-43-41-39-38 cm from the shoulder. Change to double pointed needles size 3 mm. Work rib (knit 2, purl 2), AT THE SAME TIME increase 6-8-4-6-4-8 stitches evenly on round 1 = 64-68-68-72-72-78 stitches. When the rib measures 6-6-6-7-7-7 cm, cast off. The sleeve measures approx. 52-50-49-48-46-45 cm from top of shoulder. NECK: Use circular needle size 3 mm and colour marzipan. Start from the right side on one shoulder-line and knit up 112 to 136 stitches inside 1 stitch – the stitch count should be divisible by 4. Work rib in the round (knit 2, purl 2) for 9-9-9-10-10-10 cm. Change to circular needle size 4 mm and cast off a little loosely. Fold the neck double to the inside and fasten down with a couple of stitches by each shoulder. |
||||||||||
Diagram explanations |
||||||||||
|
||||||||||
 |
||||||||||
 |
||||||||||
Have you finished this pattern?Tag your pictures with #dropspattern #crystalrainsweater or submit them to the #dropsfan gallery. Do you need help with this pattern?You'll find 34 tutorial videos, a Comments/Questions area and more by visiting the pattern on garnstudio.com. © 1982-2026 DROPS Design A/S. We reserve all rights. This document, including all its sub-sections, has copyrights. Read more about what you can do with our patterns at the bottom of each pattern on our site. |
||||||||||


With over 40 years in knitting and crochet design, DROPS Design offers one of the most extensive collections of free patterns on the internet - translated to 17 languages. As of today we count 324 catalogues and 12290 patterns translated into English (UK/cm). 12290
We work hard to bring you the best knitting and crochet have to offer, inspiration and advice as well as great quality yarns at incredible prices! Would you like to use our patterns for other than personal use? You can read what you are allowed to do in the Copyright text at the bottom of all our patterns. Happy crafting!
Post a comment to pattern DROPS 252-1
We would love to hear what you have to say about this pattern!
If you want to leave a question, please make sure you select the correct category in the form below, to speed up the answering process. Required fields are marked *.