
Popular categories
Looking for a yarn?


Comments / Questions (36)
![]() Erna Meijer wrote:
Erna Meijer wrote:
Wat betekent dit? op welke wije aan welke kan moet ik 14 en welke kan 18 steken meerderen? "meerder voor de RAGLAN aan elke kant van de raglansteken – (de markeerdraad zit tussen deze 2 steken), 14-14-18-18-14-14 recht (mouw), meerder voor de raglan aan elke kant van de raglansteken, 18-18-18-18-26-26 recht en meerder 2-2-4-6-0-2 steken verdeeld over deze steken (= 20-20-22-24-26-28 gebreide steken)"
31.07.2025 - 15:37DROPS Design answered:
Dag Erna,
Als je bij de eerste raglanlijn bent, dan meerder je aan elke kant van die raglanlijn, daarna brei je 14 steken recht (dit is de mouw, dan ben je weer bij de raglijnlijn en meerder je aan elke kant van de raglan, daarna brei je 18 steken recht waarbij je 2 steken meerdert over die 18 steken, waardoor er daarna 20 steken zijn.
03.08.2025 - 18:34
![]() Cheryl wrote:
Cheryl wrote:
I’m wondering why in the raglan portion rows 1-4 the increases are only on one arm? It says increase on 1 & 2 and 3 & 4. Also the yo increases are on the same side.
14.07.2025 - 00:33DROPS Design answered:
Dear Cheryl, the raglan increases are worked on each side of each marker. The increases over the sleeves are apart from them. Afterwards, you sometimes only increase in the body sections (before marker 1, after marker 2, before marker 3 and after marker 4) so you are not increasing on any of the sleeves. The yarn overs are worked from the right side and then the yarn over is purled twisted to avoid making a hole. Happy knitting!
14.07.2025 - 00:36
![]() Breige wrote:
Breige wrote:
Hello, I wish to knit this with Melody yarn in size Large. Can you teil me how much wool I will need. I tried to use the wool converter but with two yarn of different yarn groups it is quite difficult to calculate. Thank you
02.06.2025 - 01:04DROPS Design answered:
Hi Breige, Drops Melody belongs to yarn group D and will have the same width as the 2 yarns suggested in the pattern (group C and A). You therefore use the same weight of wool for Melody as the 2 other yarns added together. For size L this will be 175 + 300 g = 475 g of Melody. Regards, Drops team.
02.06.2025 - 06:35
![]() Aida wrote:
Aida wrote:
Non riesco a capire come il numero di maglie nel collo da 96 per la taglia L diventano 104 . Non leggo aumenti. Grazie
16.03.2025 - 01:36DROPS Design answered:
Buongiorno Aida, sul terzo ferro di A.1 ci sono 4 gettati, le ripetizioni di A.1 sono 2, per cui sono 8 aumenti. Buon lavoro!
16.03.2025 - 14:58
![]() Brigitte Chrestels wrote:
Brigitte Chrestels wrote:
Zu vorheriger Frage: es könnten auch 22 cm sein, wenn ich etwas glatt streiche.
13.03.2025 - 19:48
![]() Brigitte Chrestels wrote:
Brigitte Chrestels wrote:
Hallo, ich habe in Alpaka Silk die Jacke in Größe XL mit Raglanzunahmen nun fertig, habe die 286 Maschen aber nur 20 cm ab Markierer. Was kann ich machen um die Länge von 26 cm zu bekommen? Oder kann ich schon die Aufteilung für Rumpf und Ärmel vornehmen? Wird das obere Teil dann nicht zu kurz? Danke für eine RM, Grüße Brigitte
13.03.2025 - 19:37DROPS Design answered:
Liebe Brigitte, stimmt Ihre Maschenprobe in der Höhe? Mit 14 Reihen (bis 178 M) + 36 Reihen (bis 286 M), sind es ca 25 cm, so man muss nur noch 1 cm stricken; wenn Ihre Maschanzahl stimmt, dann stricken Sie einfach noch 6 weitere cm wie zuvor aber ohne weitere Zunahmen; beachten Sie nur, daß Sie vielleicht mehr Garn brauchen (wegen Maschenprobe in der Höhe). Viel Spaß beim Stricken!
14.03.2025 - 07:35
![]() Myriam wrote:
Myriam wrote:
Si sigo el patrón tal y como indica, el ojal se me queda pegado a la trenza, no en medio del punto de musgo como se ve en la foto del patrón. Me podríais indicar como hacerlos? Gracias
13.03.2025 - 02:13DROPS Design answered:
Hola Myriam, tienes 7 puntos de la cenefa. Los 2 puntos más externos (en el borde) son para el i-cord y se trabajan según este. Así que te quedan 5 puntos para trabajar el ojal. Los dos primeros puntos de la cenefa también se han trabajado ya (las instrucciones para los ojales te indican que empiezas el ojal cuando queden 5 puntos, incluyendo los del i-cord). Así que el ojal se trabaja sobre los puntos centrales restantes de la cenefa, con 1 hebra, 2 puntos juntos de derecho y 1 derecho (y los dos de i-cord).
16.03.2025 - 18:20
![]() Kini wrote:
Kini wrote:
Fikk først til flettene da jeg bare tok av masker foran arbeidet! Det ser ihvertfall rett ut nå sånn som jeg gjorde det..
04.03.2025 - 11:01
![]() Sy wrote:
Sy wrote:
Bonjour , j’ai un problème avec les mesures que vous donnez. Avant la division dos/devant et manches l’ouvrage mesure 20 cm et non 26 cm depuis le marqueur. J’ai pourtant le bon nombre de mailles. Merci.
08.01.2025 - 22:48DROPS Design answered:
Bonjour Mme Sy, avez-vous aussi bien les 20 rangs = 10 cm de l'échantillon? Car en taille XL, on a tricoté 14+36 rangs=50 rangs au total, ce qui doit donner 25 cm de hauteur à partir du marqueur, si vous n'avez que 20 cm, continuez simplement à tricoter comme avant jusqu'à ce que l'ouvrage mesure 26 cm - notez que vous pourriez avoir besoin de davantage de laine pour terminer le gilet. Bon tricot!
09.01.2025 - 10:28
![]() Catherine wrote:
Catherine wrote:
Bonjour! Auriez-vous une vidéo explicative pour rabattre avec bordure I-CORD-2 pour le bas des manches? Je vous remercie par avance.
25.11.2024 - 21:26DROPS Design answered:
Bonjour Catherine, et tout à fait, retrouvez cette technique dans cette vidéo. Bon tricot!
26.11.2024 - 09:46
|
||||||||||||||||||||||
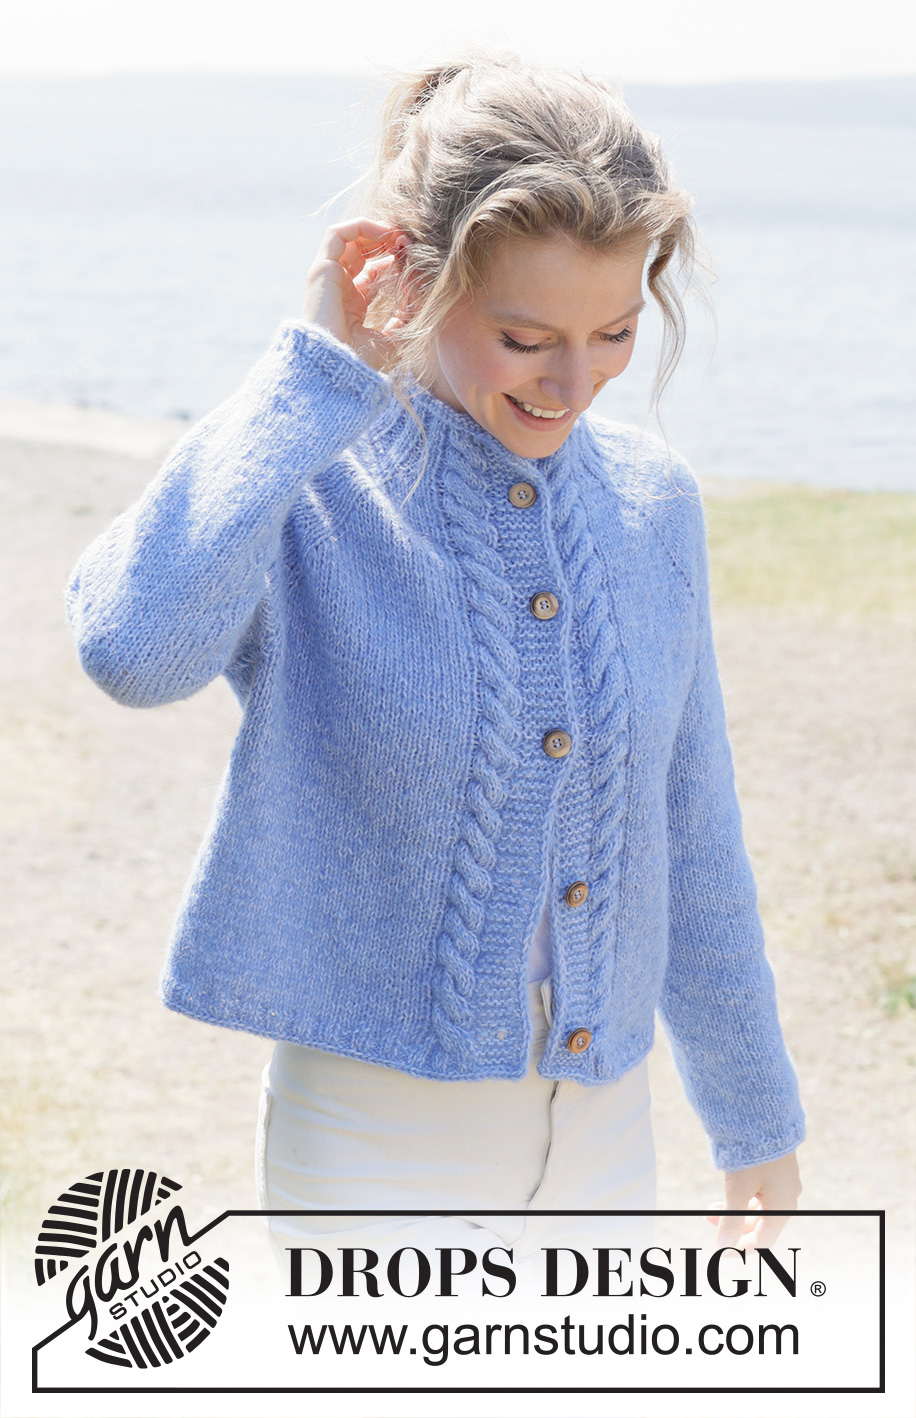
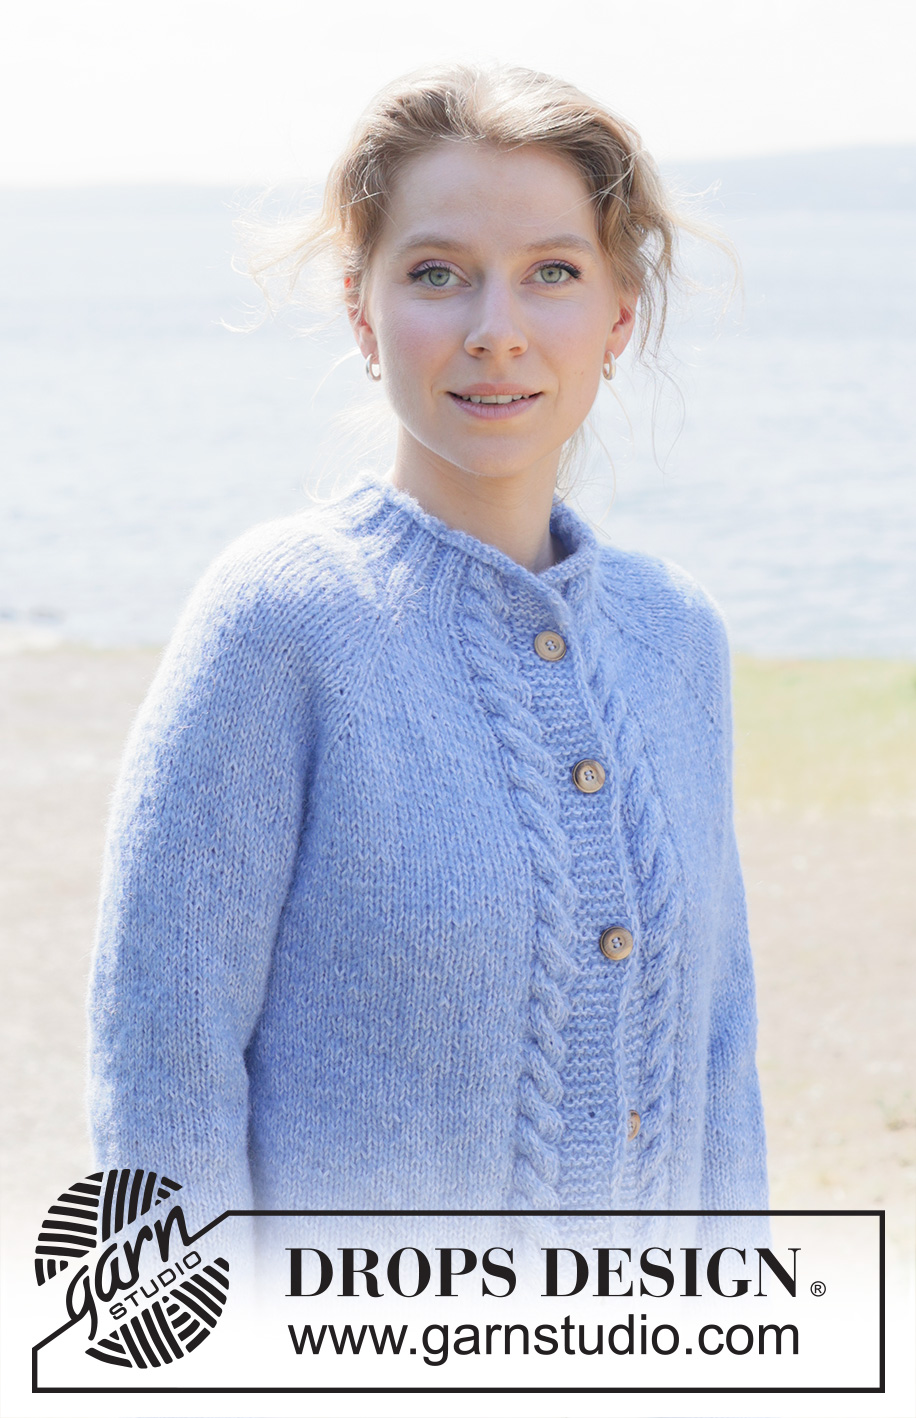
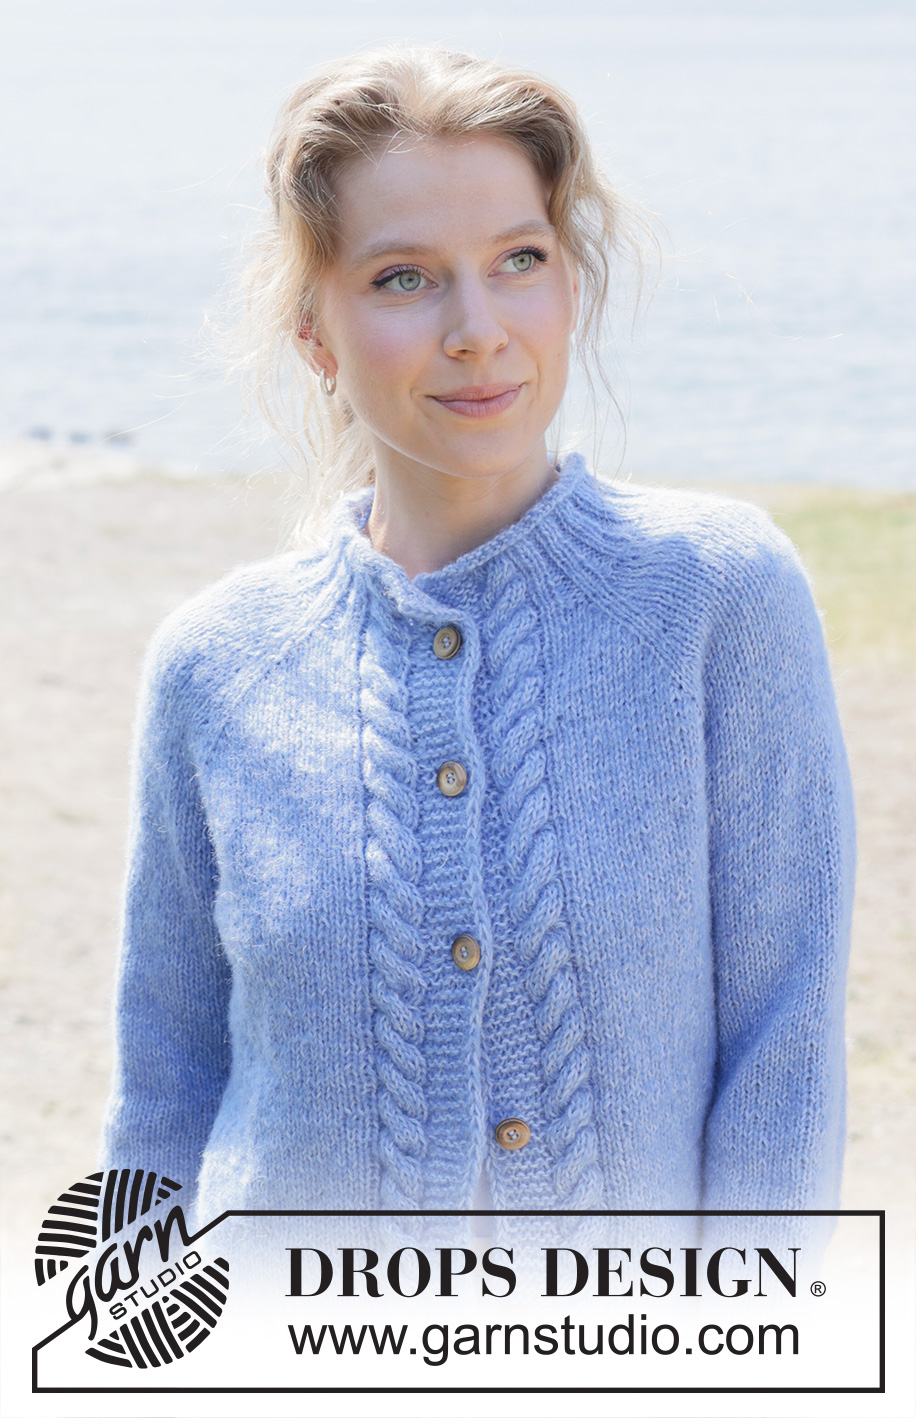
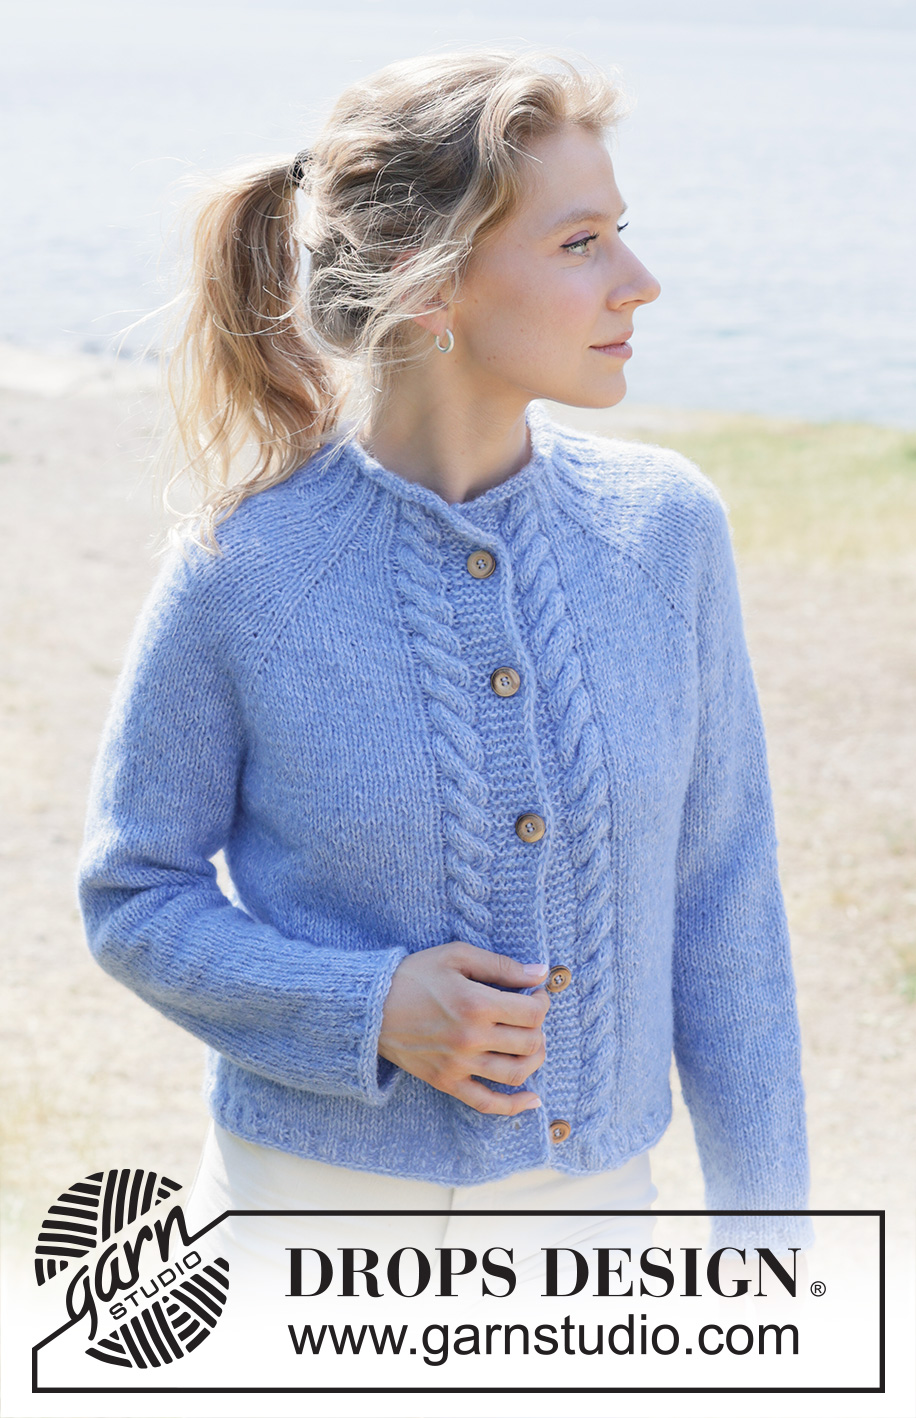
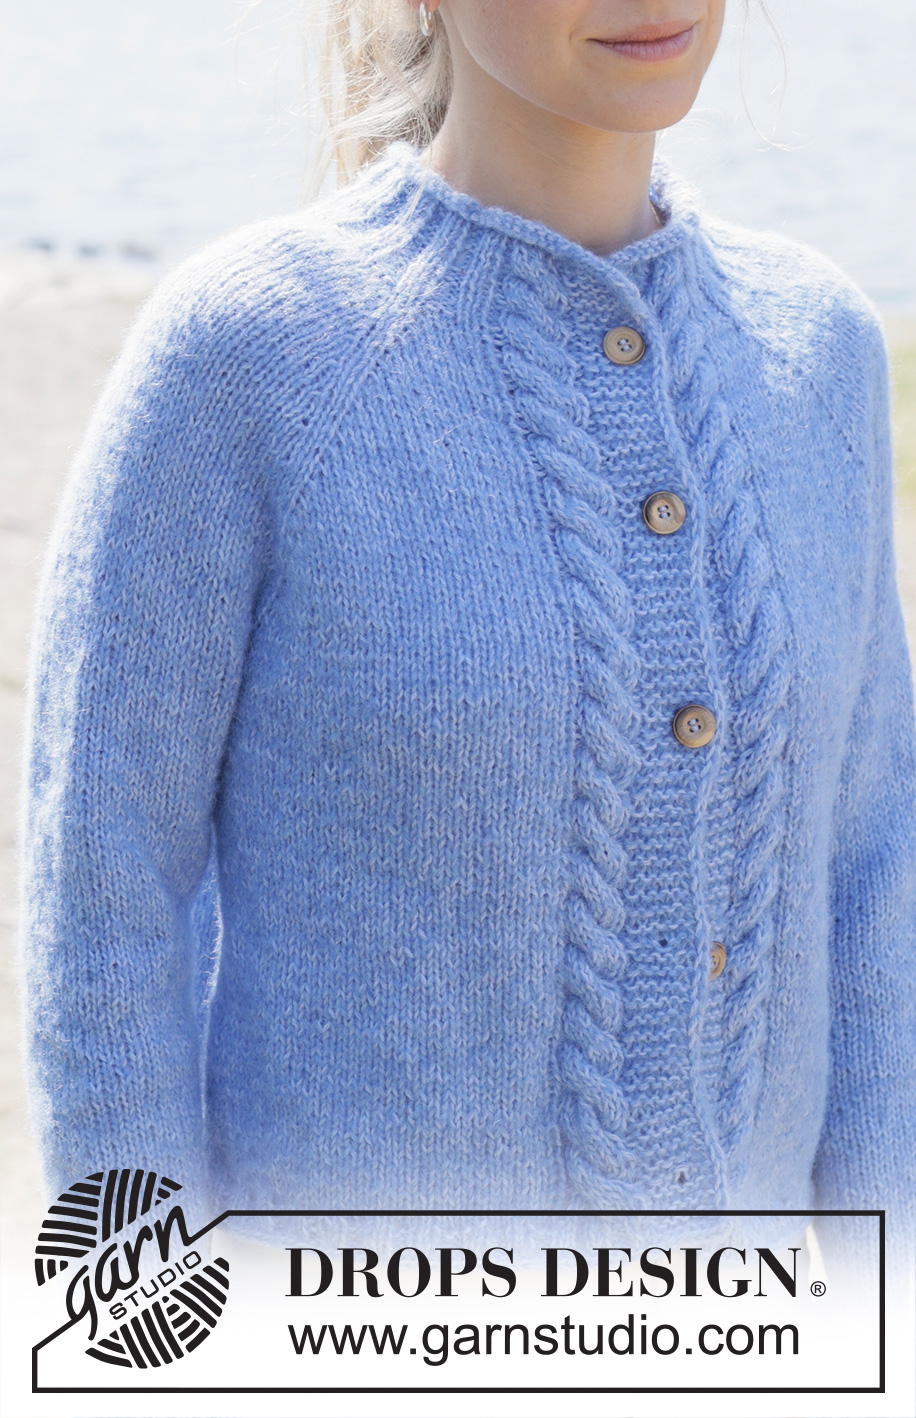
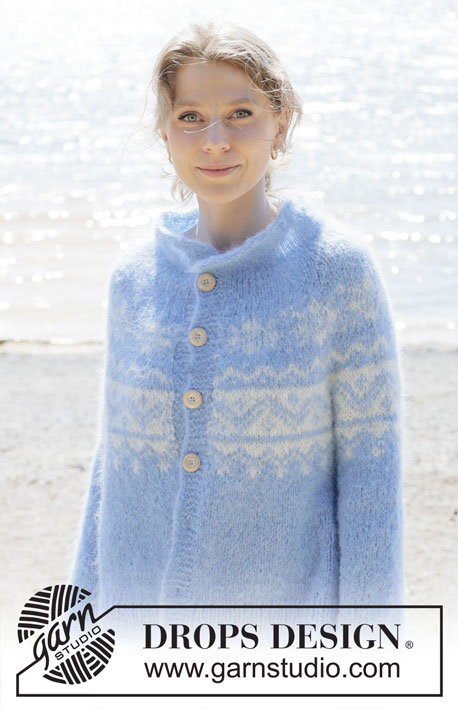
Skyfall Road Cardigan#skyfallroadcardigan |
||||||||||||||||||||||
 |
 |
|||||||||||||||||||||
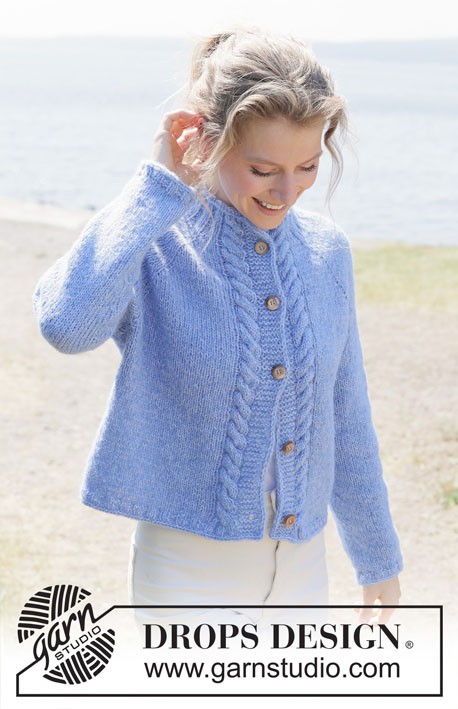
Knitted jacket in DROPS Brushed Alpaca Silk and DROPS Alpaca. The piece is worked top down with raglan, cables, rolled neckline and I-cord. Sizes S - XXXL.
DROPS 254-9 |
||||||||||||||||||||||
|
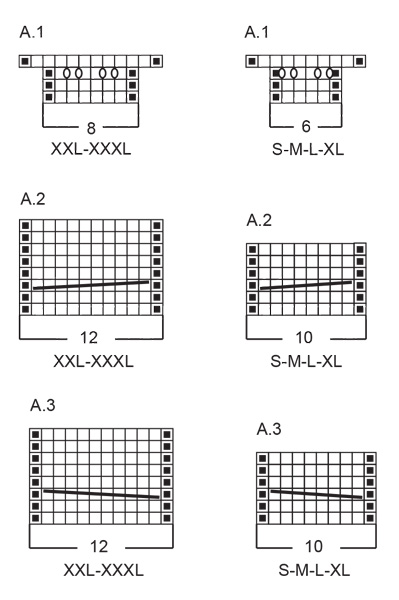
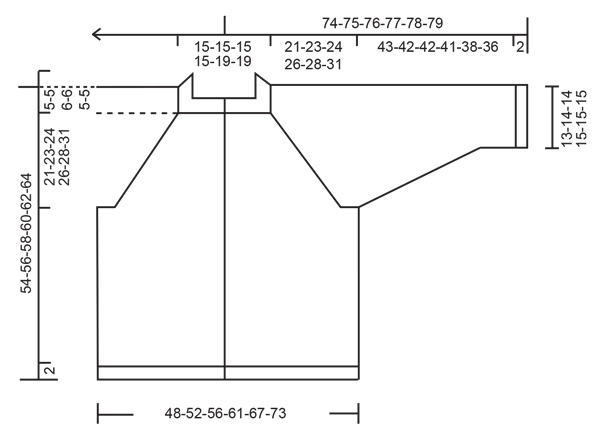
------------------------------------------------------- EXPLANATIONS FOR THE PATTERN: ------------------------------------------------------- GARTER STITCH (worked back and forth): Knit all rows, from both the right and wrong side. 1 ridge in height = knit 2 rows. PATTERN: See diagrams A.1 to A.3. Choose diagram for your size. The diagrams show the pattern from the right side. BANDS WITH I-CORD BEGINNING OF ROW: Slip 1 stitch purl-wise with strand in front, knit 1, work 5 garter stitches. END OF ROW: Work until there are 7 stitches left on the row, work 5 garter stitches, slip 1 stitch purl-wise with strand in front, knit 1. Work like this from both the right and wrong side. RAGLAN: INCREASE ONE STITCH TOWARDS THE RIGHT BEFORE MARKER-THREAD: Make 1 yarn over the right needle by taking the strand from the back and in front of the needle. On the next row purl the front loop of the yarn over. Then work the new stitch in stocking stitch. INCREASE ONE STITCH TOWARDS THE LEFT AFTER MARKER-THREAD: Make 1 yarn over the right needle by taking the strand in front of the needle and backwards. On the next row purl the back loop of the yarn over. Then work the new stitch in stocking stitch. DECREASE TIP: Decrease 1 stitch on each side of the marker-thread as follows: Work until there are 3 stitches left before the marker-thread, knit 2 together, knit 2 (marker-thread sits between these 2 stitches), slip 1 stitch knit-wise, knit 1 and pass the slipped stitch over the knitted stitch (2 stitches decreased). I-CORD CAST-OFF-1 (after rib on body): Cast on 2 stitches on the right needle, slip these stitches onto the left needle with the working strand inside the 2 stitches (when worked the strand tightens the piece into a small tube). ROW 1 (right side): Knit 1, knit 2 twisted together. ROW 2 (right side): Slip the 2 stitches from the right needle onto the left needle, knit 1, knit 2 twisted together. Repeat ROW 2 until there are 2 stitches left on the right needle. Slip these 2 stitches from the right needle onto the left needle. Cast off. Sew a small stitch to close the beginning and end of the I-cord to the garment on each side. I-CORD CAST-OFF-2 (after rib on sleeves): After the last stitch has been worked on the last round: Cast on 3 stitches from the right side on the right needle. Slip these stitches onto the left needle with the working strand inside the 3 stitches (when worked the strand tightens the piece into a small tube). ROW 1 (right side): Knit 2, knit 2 twisted together. ROW 2 (right side): Slip the 3 stitches from the right needle back onto the left needle, knit 2, knit 2 twisted together. Repeat ROW 2 until there are 3 stitches left on the right needle. Slip these 3 stitches from the right needle onto the left needle. Cast off. Sew a small stitch joining the beginning and end of the I-cord. BUTTONHOLES: Work the buttonholes from the right side, when there are 5 stitches left on the row. ROW 1 (right side): Make 1 yarn over, knit 2 together, knit 1, slip 1 purl-wise with strand in front, knit 1. ROW 2 (wrong side): Work the band as before, knit the yarn over to leave a hole. The first buttonhole is worked on the first row from the right side after the neck is finished. Then work the other 4-4-5-5-6-6 buttonholes with 11½-12-10-10-9-9½ cm between each one. The bottom buttonhole is worked in the transition between the stocking stitch and rib. ------------------------------------------------------- START THE PIECE HERE: ------------------------------------------------------- JACKET – SHORT OVERVIEW OF THE PIECE. The pattern uses both long and short needles; start with the length which fits the number of stitches and change when necessary. The neck and yoke are worked back and forth with circular needle, from mid front and top down. When the yoke is finished, it is divided for body and sleeves and the body continued back and forth with circular needle, while the sleeves wait. The sleeves are worked in the round. If there is a «0» in your chosen size, skip the information and go straight to the next instruction. NECK: Cast on 88-88-96-96-100-100 stitches with circular needle size 5.5 mm, 1 strand DROPS Brushed Alpaca Silk and 1 strand DROPS Alpaca (2 strands). Change to circular needle size 4.5 mm. ROW 1 (wrong side): Work 7 stitches according to BANDS WITH I-CORD – read description above, purl until there are 7 stitches left, 7 stitches according to bands with I-cord. ROW 2 (right side): Work 7 band-stitches with I-cord, knit until there are 7 stitches left, 7 band-stitches with I-cord. ROW 3 (wrong side): Work 7 band-stitches with I-cord, purl until there are 7 stitches left, 7 band-stitches with I-cord. ROW 4 (right side): Work 7 band-stitches with I-cord, work A.1, rib (knit 2, purl 2) until there are 13-13-13-13-15-15 stitches left, work A.1 and 7 band-stitches with I-cord. ROWS 5-7: Continue the bands, A.1 and rib until A.1 is completed in height = 96-96-104-104-108-108 stitches. ROW 8 (right side): Work 7 band-stitches with I-cord, work A.2 across the stitches in A.1, continue the rib until there are 17-17-17-17-19-19 stitches left, work A.3 across A.1, 7 band-stitches with I-cord. Continue the bands, A.2/A.3 and rib until A.2/A.3 are completed in height – the neck measures approx. 6-6-6-6-7-7 cm and the next row is from the right side. Insert 1 marker inside one band; the yoke is measured from here. YOKE: Change to circular needle size 5.5 mm. Insert 4 marker-threads without working the stitches, each thread inserted between 2 stitches - these 2 stitches are the raglan-stitches and are worked in stocking stitch (you increase for raglan on each side of these 2 raglan-stitches). Count 22-22-22-22-24-24 stitches (= left front piece), insert 1 marker-thread before the next stitch, count 16-16-20-20-16-16 stitches (= sleeve), insert 1 marker-thread before the next stitch, count 20-20-20-20-28-28 stitches (= back piece), insert 1 marker-thread before the next stitch, count 16-16-20-20-16-16 stitches (= sleeve), insert 1 marker-thread before the next stitch, there are 22-22-22-22-24-24 stitches left after the last marker-thread (= right front piece). Now work PATTERN and increase for RAGLAN – read description above, as follows: ROW 1 (right side): Work 7 band-stitches, A.2, knit 4 and increase 0-0-1-2-1-2 stitches evenly over these stitches (4-4-5-6-5-6 knitted stitches), increase for RAGLAN on each side of the raglan-stitches – (marker-thread sits between these 2 stitches), knit 14-14-18-18-14-14 (sleeve), increase for raglan on each side of the raglan-stitches, knit 18-18-18-18-26-26 and increase 2-2-4-6-0-2 stitches evenly over these stitches (= 20-20-22-24-26-28 knitted stitches), increase for raglan on each side of the raglan-stitches, knit 14-14-18-18-14-14 (sleeve), increase for raglan on each side of the raglan-stitches, knit 4 and increase 0-0-1-2-1-2 stitches evenly over these stitches (= 4-4-5-6-5-6 knitted stitches), work A.3 and 7 band-stitches– remember the BUTTONHOLES – read description above = 106-106-118-122-118-122 stitches. ROW 2 (wrong side): 7 band-stitches, A.3, purl until there are 17-17-17-17-19-19 stitches (remember to work the yarn overs as described under RAGLAN), work A.2 and 7 band-stitches. ROW 3 (right side): Work the bands, A.2/A.3 and stocking stitch and increase for raglan on each side of the raglan-stitches (= 8 increased stitches). Work ROWS 2 and 3 a total of 6-6-5-7-9-8 times (12-12-10-14-18-16 worked rows) = 154-154-158-178-190-186 stitches. Remember to maintain the knitting tension. Continue working and increasing as follows: ROW 1 (wrong side): 7 band-stitches, A.3, purl until there are 17-17-17-17-19-19 stitches left (remember to work the yarn overs as described under raglan), work A.2 and 7 band-stitches. ROW 2 (right side): Work the bands, A.2/A.3 and stocking stitch and increase for raglan on each side of the raglan-stitches (= 8 increased stitches). ROW 3 (wrong side): 7 band-stitches, A.3, purl until there are 17-17-17-17-19-19 stitches left (remember to work the yarn overs as described under raglan), work A.2 and 7 band-stitches. ROW 4 (right side): Work the bands, A.2/A.3 and stocking stitch and increase for raglan BEFORE marker-threads 1 and 3 and AFTER marker-threads 2 and 4 (4 increased stitches). Work ROWS 1 to 4 a total of 7-8-9-9-9-11 times (28-32-36-36-36-44 worked rows). Then work ROW 1 one more time. All increases for raglan are finished (a total of 21-23-24-26-28-31 times on the front and back pieces and 14-15-15-17-19-20 times on the sleeves) = 238-250-266-286-298-318 stitches. The yoke measures approx. 21-23-24-26-28-31 cm from the marker mid-front. Now divide for the body and sleeves. DIVIDE FOR BODY AND SLEEVES: Work 44-46-48-51-54-58 stitches as before (= front piece), place the next 42-44-48-52-52-54 stitches on a thread for the sleeve, cast on 6-8-10-12-14-16 stitches (in side mid-under sleeve), work 66-70-74-80-86-94 stocking stitches (= back piece), place the next 42-44-48-52-52-54 stitches on a thread for the sleeve, cast on 6-8-10-12-14-16 stitches (in side mid-under sleeve), work the last 44-46-48-51-54-58 stitches as before (= front piece). The body and sleeves are finished separately. BODY: = 166-178-190-206-222-242 stitches. Continue the bands, A.2/A.3 and stocking stitch until the piece measures 47-49-50-52-55-57 cm from the marker mid-front – make sure you have worked at least 3 rows after the last cable. On the next row from the right side, work rib AT THE SAME TIME increase 18-22-22-22-26-30 stitches evenly on the first round (do not increase across the bands) = 184-200-212-228-248-272 stitches, as follows: Change to circular needle size 4.5 mm. Work the band-stitches, rib (knit 2, purl 2 – remember to increase) until there are 9 stitches left, knit 2 and work the band-stitches. When the rib measures 2 cm work I-CORD CAST-OFF-1 – read description above. The jacket measures approx. 49-51-52-54-57-59 cm from the marker and 54-56-58-60-62-64 cm from the shoulder. SLEEVES: Place the 42-44-48-52-52-54 sleeve-stitches from the thread on one side of the piece on circular needle size 5.5 mm and knit up 1 stitch in each of the 6-8-10-12-14-16 stitches cast on under the sleeve = 48-52-58-64-66-70 stitches. Insert a marker-thread in the middle of the 6-8-10-12-14-16 stitches under the sleeve. Start at the marker-thread and work stocking stitch in the round. When the sleeve measures 4-4-4-3-3-2 cm, decrease 2 stitches under the sleeve – read DECREASE TIP. Decrease like this every 10-7-4-3-3-2½ cm a total of 4-5-8-10-10-12 times = 40-42-42-44-46-46 stitches. Continue working until the sleeve measures 43-42-42-41-38-36 cm from the division. Change to double pointed needles size 4.5 mm. Work rib (knit 2, purl 2), AT THE SAME TIME increase 4-6-6-4-6-6 stitches evenly on the first round = 44-48-48-48-52-52 stitches. When the rib measures 2 cm, work I-CORD CAST-OFF-2. The sleeve measures approx. 45-44-44-43-40-38 cm. ASSEMBLY: Sew the buttons onto the left band. |
||||||||||||||||||||||
Diagram explanations |
||||||||||||||||||||||
|
||||||||||||||||||||||
 |
||||||||||||||||||||||
 |
||||||||||||||||||||||
Have you finished this pattern?Tag your pictures with #dropspattern #skyfallroadcardigan or submit them to the #dropsfan gallery. Do you need help with this pattern?You'll find 30 tutorial videos, a Comments/Questions area and more by visiting the pattern on garnstudio.com. © 1982-2026 DROPS Design A/S. We reserve all rights. This document, including all its sub-sections, has copyrights. Read more about what you can do with our patterns at the bottom of each pattern on our site. |
||||||||||||||||||||||


With over 40 years in knitting and crochet design, DROPS Design offers one of the most extensive collections of free patterns on the internet - translated to 17 languages. As of today we count 324 catalogues and 12290 patterns translated into English (UK/cm). 12290
We work hard to bring you the best knitting and crochet have to offer, inspiration and advice as well as great quality yarns at incredible prices! Would you like to use our patterns for other than personal use? You can read what you are allowed to do in the Copyright text at the bottom of all our patterns. Happy crafting!
Post a comment to pattern DROPS 254-9
We would love to hear what you have to say about this pattern!
If you want to leave a question, please make sure you select the correct category in the form below, to speed up the answering process. Required fields are marked *.