
Popular categories
Looking for a yarn?


Comments / Questions (167)
![]() Anne wrote:
Anne wrote:
Voisinko saada kaaviona miten silmukat menee kainalosta alkaen. Mitkä silmukat neulotaan oikein, missä hihan reunassa? 61 silmukkaa: 6s/kuvio=60 silmukkaa. Kysyin tätä jo aikaisemmin, vastaus oli sama mikä ohjeessa on, ei avautunut.
03.05.2026 - 11:06
![]() Martha Angel wrote:
Martha Angel wrote:
Muchas gracias por su respuesta me queda muy claro la distribución
27.04.2026 - 02:01
![]() Anne wrote:
Anne wrote:
Hihojen kuvion kulku, 61s+10s=71s kohdasta: missä kohtaa kuviota pitäisi olla ja miten se jatkuu hihan alla?
26.04.2026 - 13:13DROPS Design answered:
Hei, jatka mallineuletta niillä hihan silmukoilla, joilla neuloit mallineuletta jo aiemmin. Keskellä hihan alla olevilla 10 silmukalla + niillä silmukoilla, joilla ei voida neuloa kokonaista kuviota, neulotaan sileää neuletta.
28.04.2026 - 16:34
![]() Martha Cecilia Angel wrote:
Martha Cecilia Angel wrote:
Tengo una duda con respecto a los puntos de la manga se dejan para la primera medida 19 puntos y señala que en doce puntos iniciar con la figura A y B que suman 9 puntos donde quedan los 3 puntos restantes? . Lo mismo pasa con la figura C que tiene 3 puntos y donde dejo los 4 restantes?
10.04.2026 - 15:16DROPS Design answered:
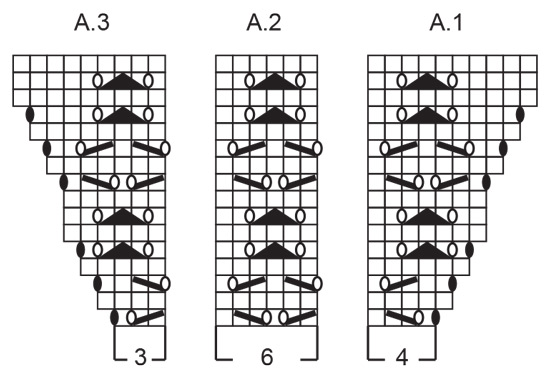
Hola Martha, en la manga tienes 19 pts. Sobre los pts de la manga trabajas A.1 (= 4 pts), A.2 sobre 12 pts (= A.2 2 veces, 6x2=12 pts) y A.3 (=3 pts). 4+12+3 = 19 pts.
27.04.2026 - 00:34
![]() Eszter wrote:
Eszter wrote:
Az e lenne a kérdésem, hogy elértem a kötésemben a megadott minta tetejét és onnan hogyan kell tovabb követni a mintát? Továbbra is szaporítunk? És hogyan? És ha az ujjánál mondjuk megvan a 17 szaporítás akkor hogy eljussak a testén a 22 szaporításhoz akkor az ujjánál már nem kell többet szaporítani és az csak sima szem lesz?
30.03.2026 - 07:40
![]() Annie Thiffault wrote:
Annie Thiffault wrote:
Bonjour je suis rendue à reprendre le tricot des manches j’ai 69 mailles plus les 14 mailles sous la manche, ma question: il faut faire le points ajouré sans faire les jetés noires mais est-ce que je doit commencer mon point ajouré au fil marqueur du centre des 14 mailles avec A1, et A2 autant de fois que je suis capable et terminer par A3 et si reste des mailles je les tricote en jersey
26.03.2026 - 17:24DROPS Design answered:
Bonjour Mme Thiffault, effectivement, vous allez tricoter en jersey les mailles au début/à la fin du tour que vous ne pouvez pas tricoter dans le point ajouré. Calculez combien de mailles vous pouvez tricoter avant la 1ère des 69 m et notez dans le diagramme à quelle maille cela correspond, et de même après les 69 mailles. Tricotez ensuite le point ajouré comme indiqué, mais si vous n'avez pas suffisamment de mailles au début/à la fin du tour pour 1 diminution et son jeté, tricotez ces mailles en jersey. Alignez bien le A.2 de l'empiècement pour commencer au bon endroit et ne pas "contrarier" le point ajouré. Bon tricot!
27.03.2026 - 07:12
![]() Toulemonde Brigitte wrote:
Toulemonde Brigitte wrote:
Bonjour Je fais le modèle 250_1 A la fin de mes 16 premiers rangs de mon point fantaisie est ce que je dois tricoter A2 une troisième fois entre A1 et A3 Merci pour me répondre Cordialement Mme Toulemonde
13.03.2026 - 15:28DROPS Design answered:
Bonjour Mme Toulemonde, quand les diagrammes ont été tricotés 1 x en hauteur, vous les recommencez au début ainsi: A.1 (= 4 m), répétez ensuite les 6 m de A.2 jusqu'à ce qu'il reste 3 m (vous aurez 2 motifs de A.2 en plus en largeur par rapport à la 1ère fois) et terminez par A.3 (3 m). Continuez ainsi jusqu'à ce que vous ayez augmenté le nombre de fois indiqué pour votre taille. Bon tricot!
13.03.2026 - 15:51
![]() Eva Tuninger wrote:
Eva Tuninger wrote:
Diagrammet till tröjan har ett fel. Tröjan har raglanärm och uttag görs varannan varv. I diagrammet på v 8 nerifrån räknat ska det vara en ruta till på vardera sidan och därmed fattas också rutorna i de följande varven. På diagrammet ser det ut som om man skulle hoppa över en raglanökning. Det tog en stund innan jag såg vad som var fel.
08.03.2026 - 16:14
![]() TOULEMONDE Brigitte wrote:
TOULEMONDE Brigitte wrote:
Merci beaucoup pour vos explications je vais pouvoir continuer mon tricot Cordialement
05.03.2026 - 23:45
![]() TOULEMONDE Brigitte wrote:
TOULEMONDE Brigitte wrote:
Bonjour Je fais le modèle 250-1 et je ne comprends pas le point fantaisie car on a 19 m pour la manche et on me dit de tricoter les 12 m de A1 et A2 alors qu il n y a que 10 m et après faire A3 et donc je n aurai que 15 m . Pouvez vous m expliquer Merci de votre réponse Cordialement Mme TOULEMONDE
05.03.2026 - 10:48DROPS Design answered:
Bonjour Mme Toulemonde, les 19 mailles des manches ainsi: commencez par les 4 mailles de A.1, puis tricotez 2 fois les 6 mailles de A.2 et terminez par les 3 mailles de A.3 soit 4+12+3=19 mailles, en même temps, augmentez comme indiqué dans les diagrammes au début de A.1 et à la fin de A.3 = vous augmentez ainsi 2 mailles tous les 2 tours (sauf aux tours 7 et 15 de A.1 et A.3). Bon tricot!
05.03.2026 - 16:44
|
|||||||||||||||||||
Remembering Spring#rememberingspringsweater |
|||||||||||||||||||
 |
 |
||||||||||||||||||
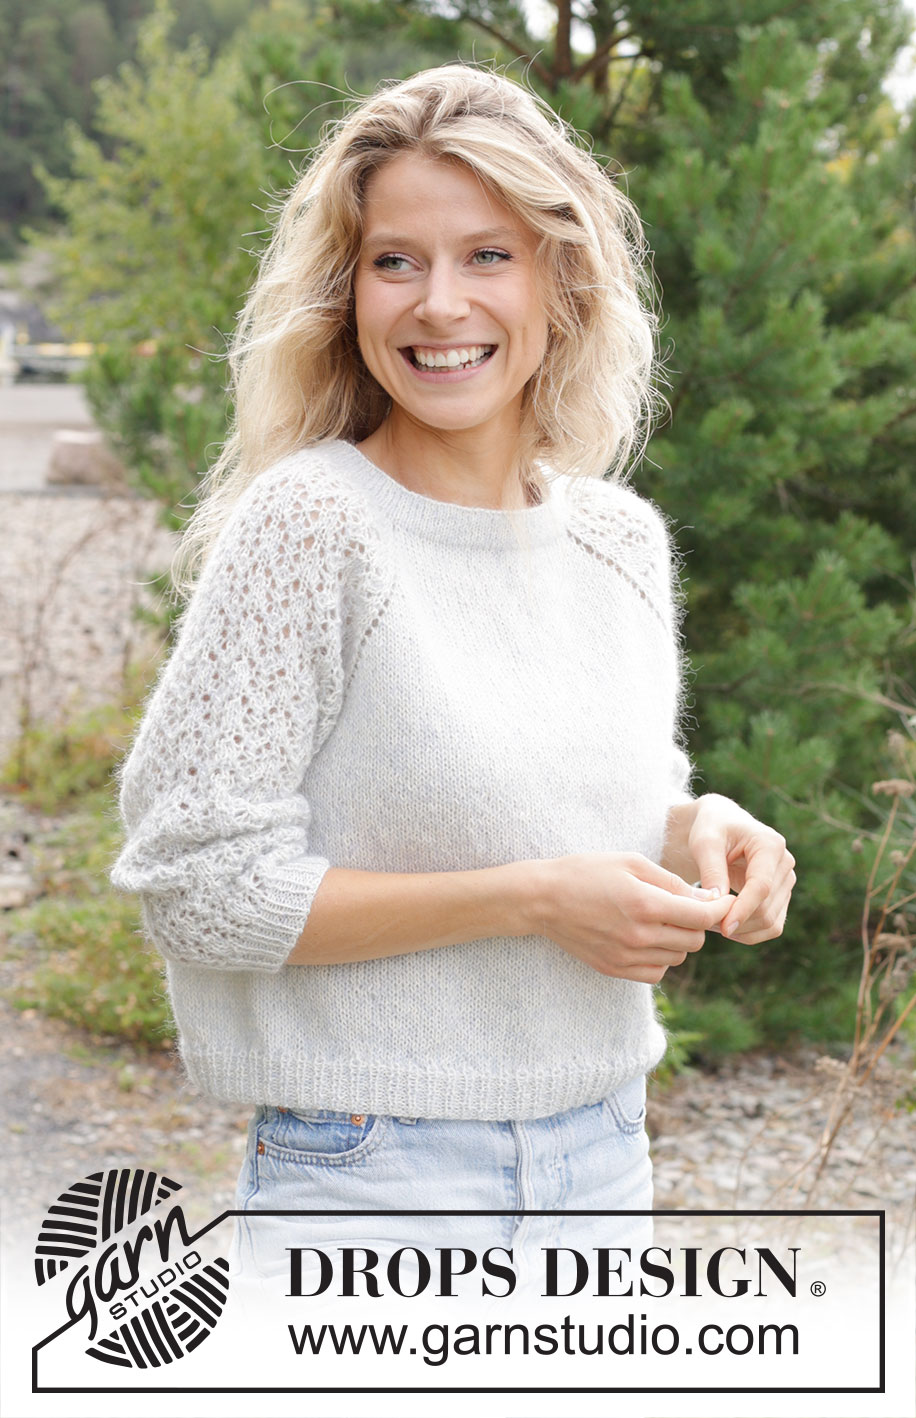
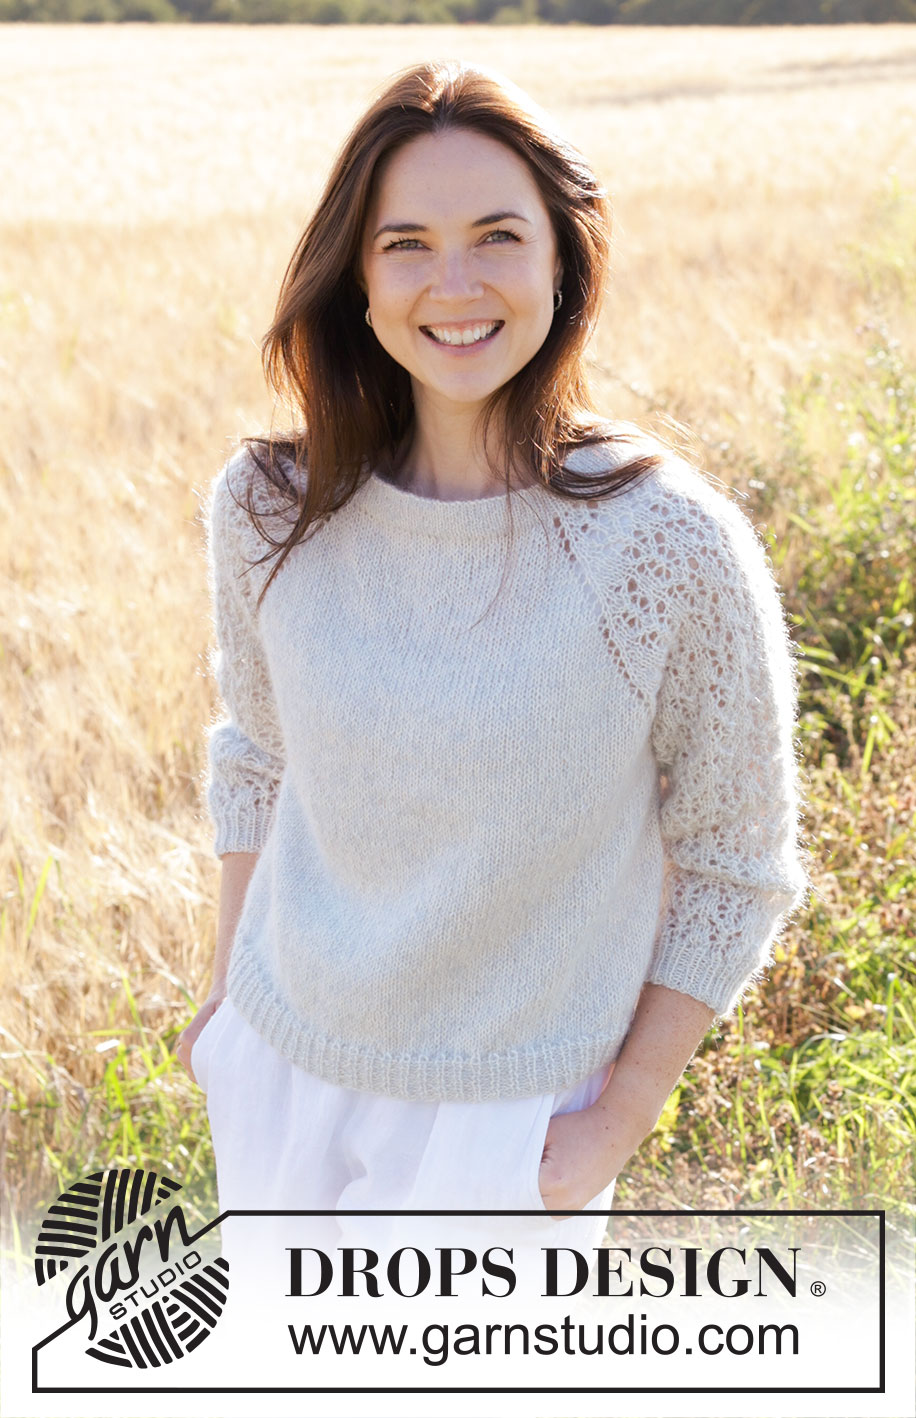
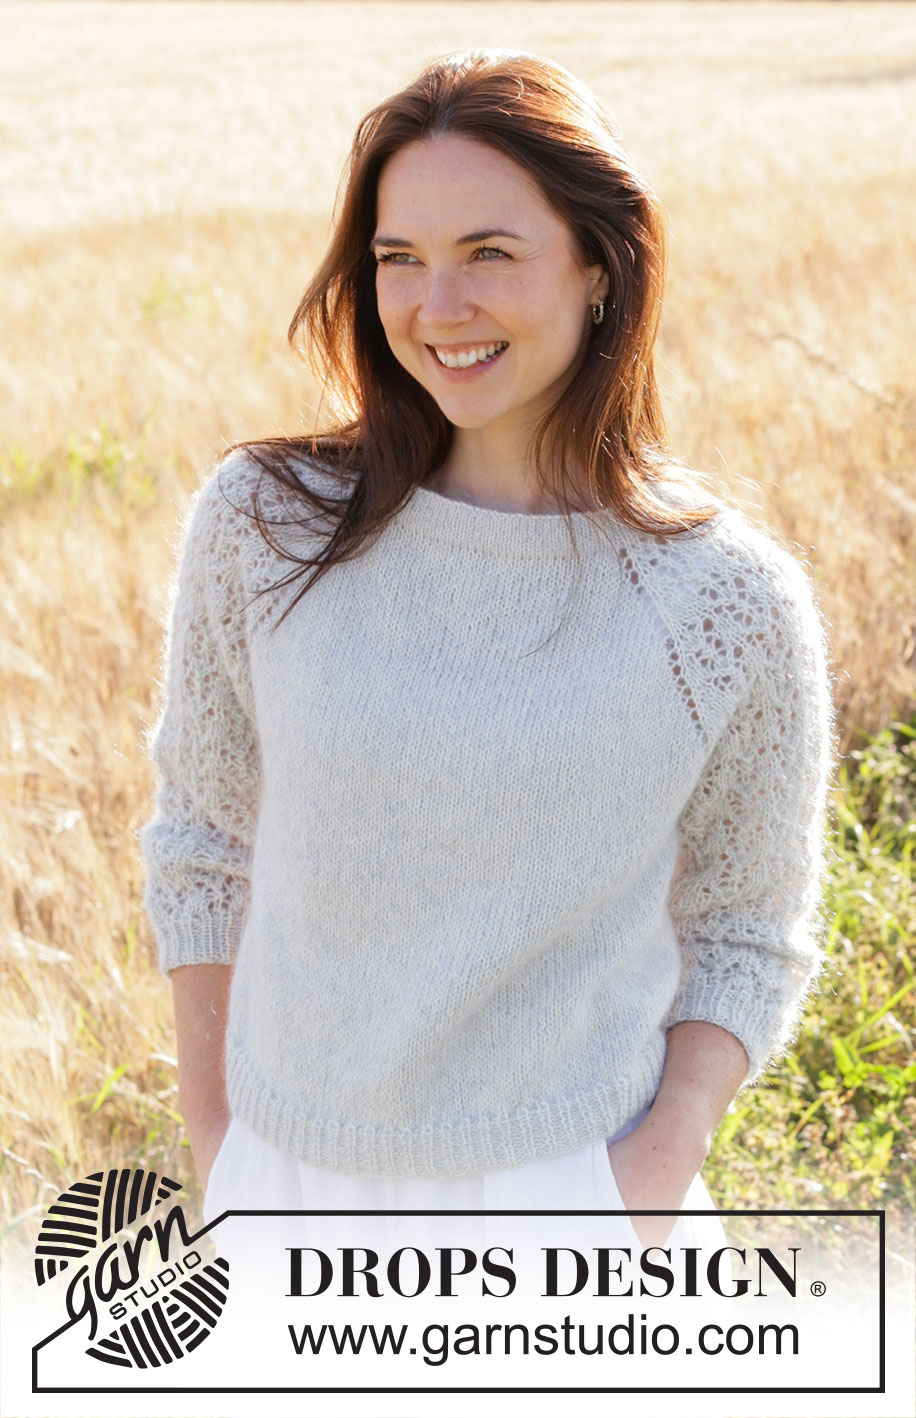
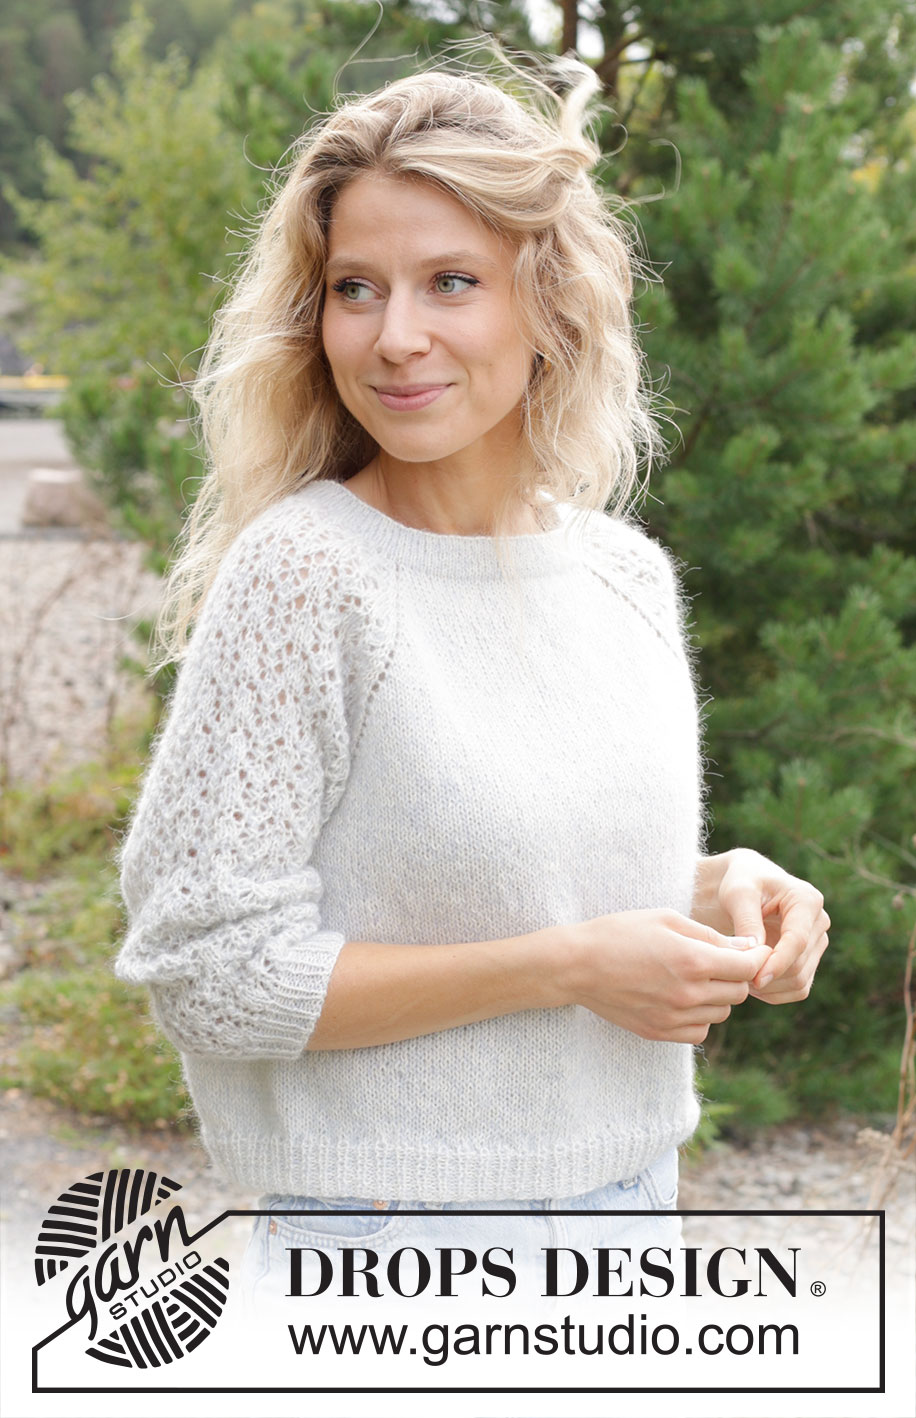
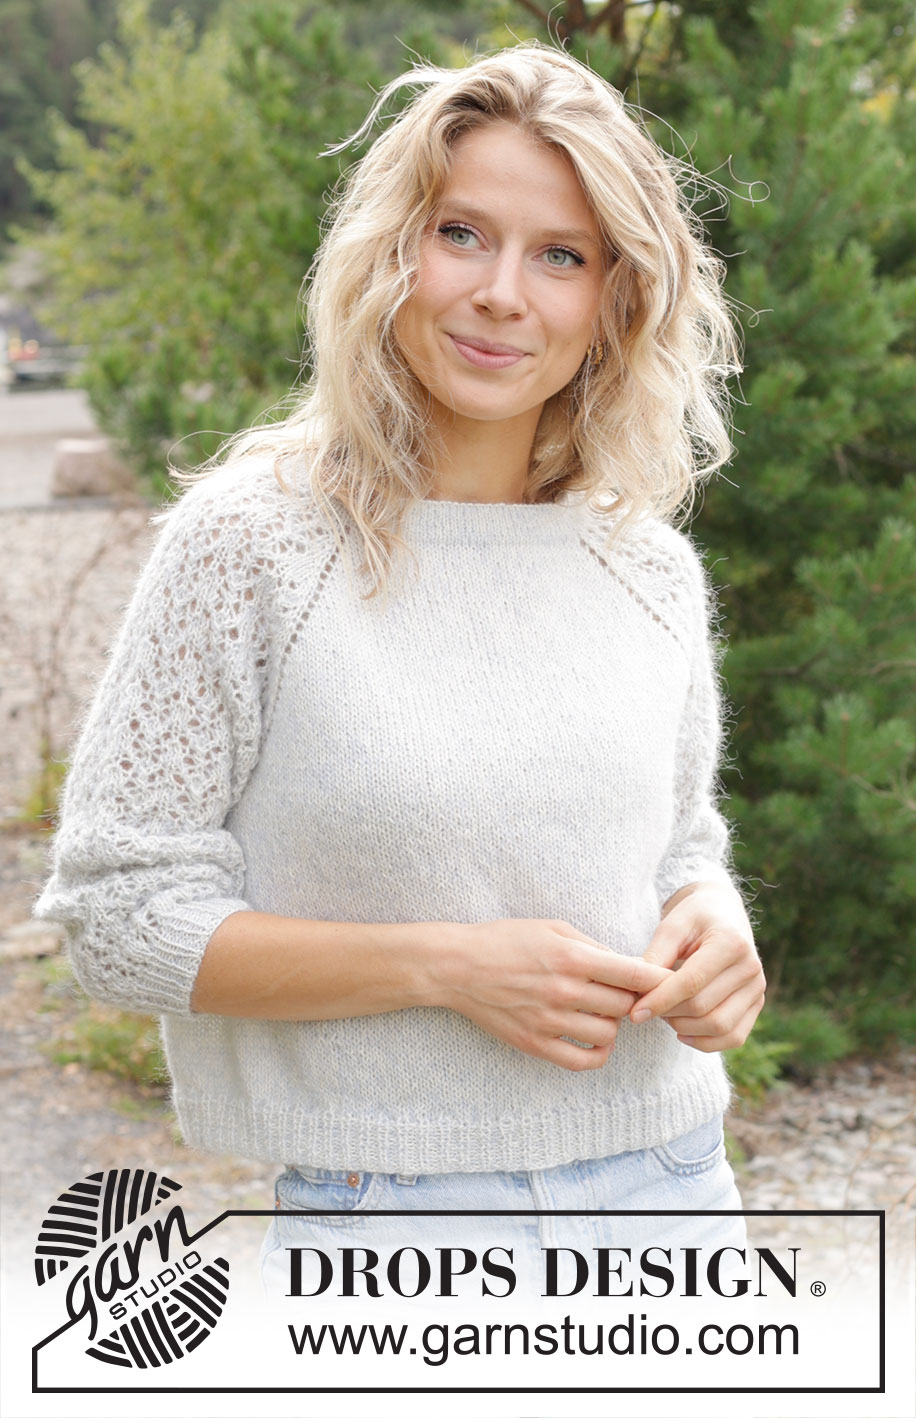
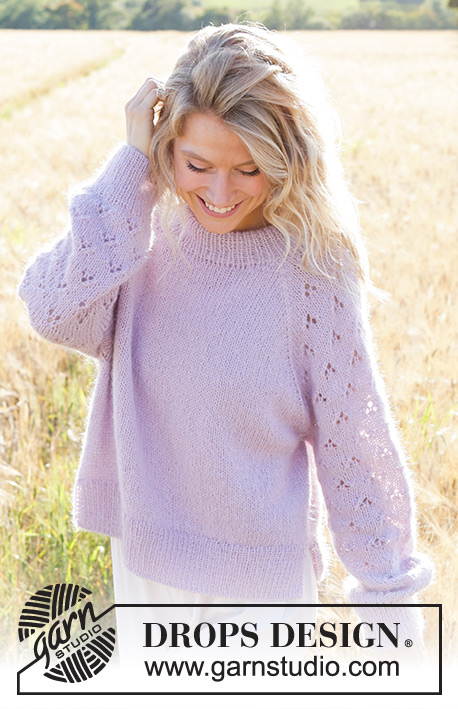
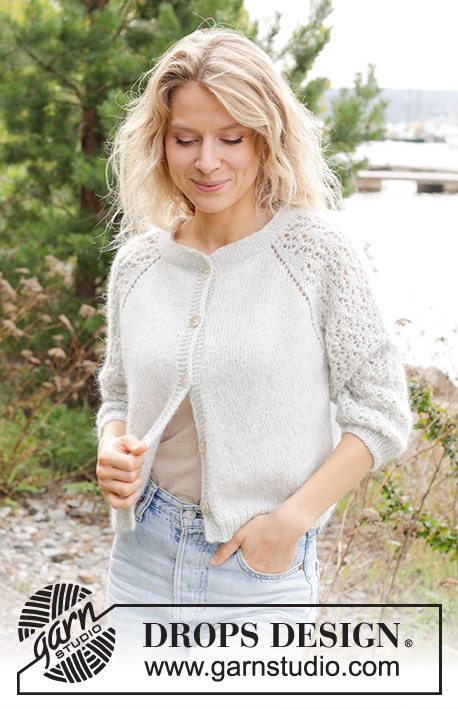
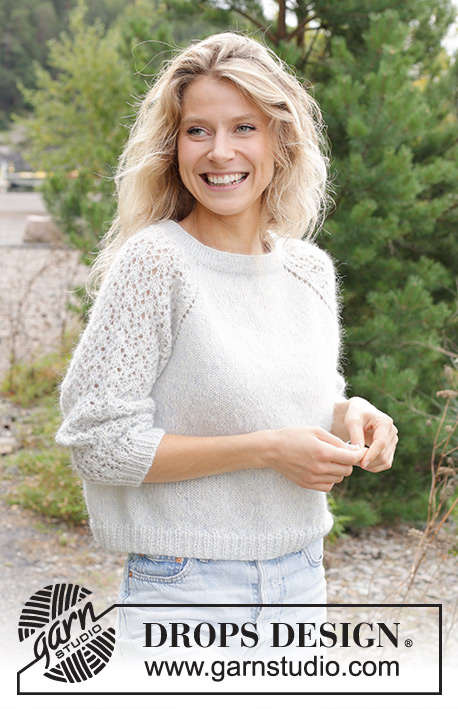
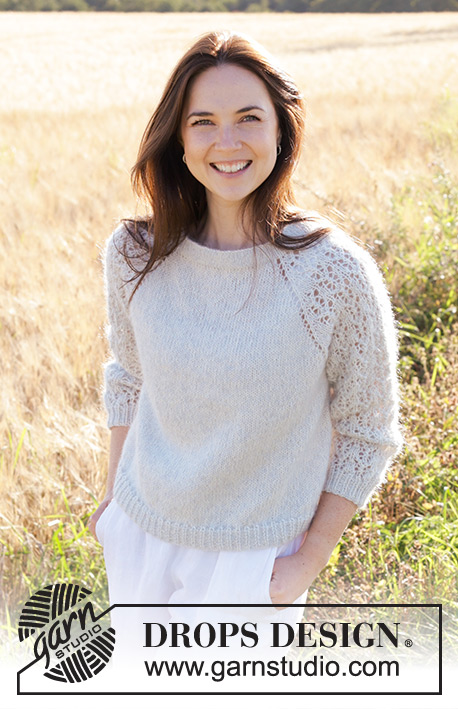
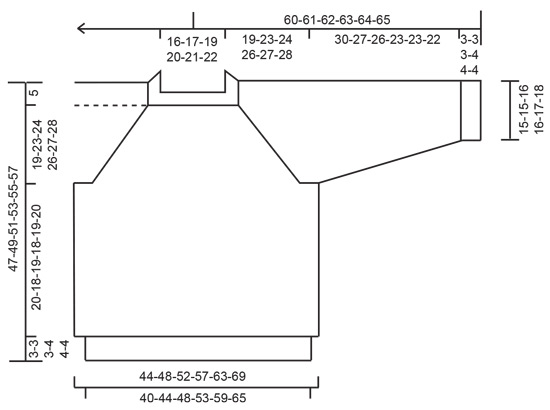
Knitted jumper in DROPS Alpaca and DROPS Kid-Silk. The piece is worked top down with double neck, raglan, lace pattern and ¾-length sleeves. Sizes S - XXXL.
DROPS 250-1 |
|||||||||||||||||||
|
------------------------------------------------------- EXPLANATIONS FOR THE PATTERN: ------------------------------------------------------- PATTERN: See diagrams A.1 to A.3. RAGLAN: Increase 1 stitch by making 1 yarn over before/after each marker-stitch. On the next round knit the yarn overs on the front and back pieces – leaving holes. The yarn overs on the sleeves are knitted twisted – no holes. Work the new stitches in stocking stitch on the front and back pieces and into the pattern on the sleeves. DECREASE TIP (for sleeves): Decrease 1 stitch on each side of the marker-thread as follows: Work until there are 3 stitches left before the marker-thread, knit 2 together, knit 2 (marker-thread sits between these 2 stitches), slip 1 stitch knit-wise, knit 1 and pass the slipped stitch over the knitted stitch (2 stitches decreased). ------------------------------------------------------- START THE PIECE HERE: ------------------------------------------------------- JUMPER – SHORT OVERVIEW OF THE PIECE: The pattern uses both long and short needles; start with the length which fits the number of stitches and change when necessary. The double neck and yoke are worked in the round with circular needle, top down. When the yoke is finished, it is divided for body and sleeves and the body is continued in the round, while the sleeves wait. The sleeves are worked in the round, top down. The neck is folded to the inside and sewn down. If there is a «0» in your chosen size, skip the information and go straight to the next instruction. DOUBLE NECK: Cast on 104-108-114-118-122-126 stitches with circular needle size 4.5 mm, 1 strand DROPS Alpaca and 1 strand DROPS Kid-Silk (= 2 strands). Change to circular needle size 3.5 mm (casting on with a larger needle size gives and elastic cast-on edge). Work stocking stitch in the round for 2½ to 3 cm. Purl 1 round, the neck is later folded along this round. Continue with stocking stitch until the neck measures 6 cm. It will be approx. 3 cm when folded double. Insert 1 marker at the beginning of the round (= mid-back), the yoke is measured from here. YOKE: Change to circular needle size 4.5 mm. Knit 1 round and decrease 10-10-12-12-12-12 stitches evenly spaced = 94-98-102-106-110-114 stitches. Insert 4 markers without working the stitches (these are used when increasing for raglan) as follows: Count 13-14-15-16-17-18 stitches (= half back piece), insert 1 marker in the next stitch, count 19 stitches (= sleeve), insert 1 marker in the next stitch, count 26-28-30-32-34-36 stitches (= front piece), insert 1 marker in the next stitch, count 19 stitches (= sleeve), insert 1 marker in the next stitch, there are 13-14-15-16-17-18 stitches left after the last marker (= half back piece). On the next round, work PATTERN and increase for RAGLAN – read description above, as follows: Knit 13-14-15-16-17-18 (= half back piece), increase 1 stitch for raglan, knit 1 (first marker sits in this stitch), work A.1, A.2 over the next 12 stitches, work A.3, knit 1 (second marker sits in this stitch) (= sleeve), increase 1 stitch for raglan, knit 26-28-30-32-34-36, increase 1 stitch for raglan (= front piece), knit 1 (third marker sits in this stitch), work A.1, A.2 over the next 12 stitches, work A.3, knit 1 (fourth marker sits in this stitch) (= sleeve),increase 1 stitch for raglan, knit 13-14-15-16-17-18 (= half back piece). REMEMBER THE KNITTING TENSION! Continue this pattern but note that the increases are different on the front/back pieces and the sleeves – read INCREASES FOR SLEEVES and INCREASES FOR FRONT/BACK PIECES before continuing! INCREASES FOR SLEEVES: On the sleeves you increase 17-20-21-23-24-25 times on each side (including the first increase described above). The sleeve increases are drawn into diagrams A.1 and A.3. Each time A.1, A.2 and A.3 are finished in height, there is room for 2 more repeats of A.2 between A.1 and A.3. The stitches which do not fit into the pattern on each side of the sleeve are worked in stocking stitch. INCREASES FOR FRONT/BACK PIECES: On the front and back pieces, you increase 22-24-26-29-33-36 times (including the first increase described above), as follows: Increase on each round 0-0-0-0-4-6 times, then every 2nd round 22-24-26-29-29-30 times. AFTER THE LAST INCREASE: When all the increases are finished there are 250-274-290-314-338-358 stitches (70-76-82-90-100-108 stitches on the front/back pieces and 55-61-63-67-69-71 stitches on each sleeve (including the marker-stitches on each side of the sleeves). Continue with pattern and stocking stitch but without further increases. The stitches which do not fit into the pattern on each side of the sleeve are worked in stocking stitch. Work until the yoke measures 19-23-24-26-27-28 cm from the marker. DIVIDE FOR BODY AND SLEEVES: Now divide for the body and sleeves as follows: Knit 35-38-41-45-50-54 (= half back piece), place the next 55-61-63-67-69-71 stitches on a thread for the sleeve, cast on 10-10-12-12-14-16 stitches (in side under sleeve), knit 70-76-82-90-100-108 (= front piece), place the next 55-61-63-67-69-71 stitches on a thread for the sleeve, cast on 10-10-12-12-14-16 stitches (in side under sleeve), knit the last 35-38-41-45-50-54 stitches (= half back piece). The body and sleeves are finished separately. The piece is now measured from here! BODY: = 160-172-188-204-228-248 stitches. Continue with stocking stitch in the round until the body measures 20-18-19-18-19-20 cm from the division. On the next round begin working rib, AT THE SAME TIME on the first round increase 0-4-4-8-8-12 stitches evenly spaced = 160-176-192-212-236-260 stitches, as follows: Change to circular needle size 3.5 mm, work rib (knit 1, purl 1 – remember the increases). When the rib measures 3-3-3-4-4-4 cm, cast off a little loosely with rib. The jumper measures approx. 47-49-51-53-55-57 cm from the shoulder. SLEEVES: Place the 55-61-63-67-69-71 stitches from the thread on the one side of the piece on circular needle size 4.5 mm and knit up 1 stitch in each of the 10-10-12-12-14-16 stitches cast on under the sleeve = 65-71-75-79-83-87 stitches. Insert a marker-thread in the middle of the 10-10-12-12-14-16 stitches under the sleeve. Start at the marker-thread and continue the pattern in the round. The stitches which do not fit into the pattern under the sleeve are worked in stocking stitch. AT THE SAME TIME when the sleeve measures 3-3-3-4-4-4 cm from the division, decrease 2 stitches under the sleeve – read DECREASE TIP. Decrease like this every 4-2½-2-1½-1½-1 cm a total of 6-8-9-10-11-12 times = 53-55-57-59-61-63 stitches. Continue working until the sleeve measures 30-27-26-23-23-22 cm from the division. Change to double pointed needles size 3.5 mm and work rib (knit 1, purl 1). AT THE SAME TIME on the first round increase 1-1-3-3-5-7 stitches evenly spaced = 54-56-60-62-66-70 stitches. When the rib measures 3-3-3-4-4-4 cm, cast off a little loosely with rib. The sleeve measures approx. 33-30-29-27-27-26 cm from the division. ASSEMBLY: Fold the neck double to the inside and sew down. To avoid the neck being tight and rolling outwards, it is important that the seam is elastic. |
|||||||||||||||||||
Diagram explanations |
|||||||||||||||||||
|
|||||||||||||||||||
 |
|||||||||||||||||||
 |
|||||||||||||||||||
Have you finished this pattern?Tag your pictures with #dropspattern #rememberingspringsweater or submit them to the #dropsfan gallery. Do you need help with this pattern?You'll find 30 tutorial videos, a Comments/Questions area and more by visiting the pattern on garnstudio.com. © 1982-2026 DROPS Design A/S. We reserve all rights. This document, including all its sub-sections, has copyrights. Read more about what you can do with our patterns at the bottom of each pattern on our site. |
|||||||||||||||||||


With over 40 years in knitting and crochet design, DROPS Design offers one of the most extensive collections of free patterns on the internet - translated to 17 languages. As of today we count 324 catalogues and 12290 patterns translated into English (UK/cm). 12290
We work hard to bring you the best knitting and crochet have to offer, inspiration and advice as well as great quality yarns at incredible prices! Would you like to use our patterns for other than personal use? You can read what you are allowed to do in the Copyright text at the bottom of all our patterns. Happy crafting!
Post a comment to pattern DROPS 250-1
We would love to hear what you have to say about this pattern!
If you want to leave a question, please make sure you select the correct category in the form below, to speed up the answering process. Required fields are marked *.