
Popular categories
Looking for a yarn?


Comments / Questions (35)
![]() Decocq Daniele wrote:
Decocq Daniele wrote:
BoJe travaille en taille M. Pour les diminutions après les cotes. Je n'obtiens pas le même nombre de mailles que vous et je ne vois pas qu'il faut diminuer aussi dans les diagrammes. Pour les diagrammes, ne faut-il pas en avoir 5: A6 A2 A7 A2 A6? Mais je n'en vois que 3. Pouvez-vous m'éclairer. Merci
28.12.2025 - 19:14DROPS Design answered:
Bonjour Daniele, 244 mailles au debut. Continuer les côtes ainsi, en répétant en même temps le premier tour de A.1, A.2, A.3 et A.4, jusqu'à ce que l'ouvrage mesure 5 cm (244 mailles). Maintenant vous diminuez: regulierement 5+5+10=20 mailles, et dans le deuxieme tour des diagrammes: A.2 - 2 mailles (2x2 places=4 mailles) et A.4 - 2 mailles (2x2 places=4 mailles). 244-20-4-4=216 mailles. Dans le modele il y a 7 diagrammes: de A.1-A.7. Bon tricot!
28.12.2025 - 19:41
![]() Decocq wrote:
Decocq wrote:
Bonjour. Dans les explications dos et devant du modele woven willows, est-ce qu´il ne manque pas une partie pour faire les côtes ? On dirait qu´on commence directement le point fantaisie. Merci beaucoup. Danièle
13.12.2025 - 09:23DROPS Design answered:
Bonjour Mme Decoq, le bas du pull = les côtes, se tricotent en suivant les diagrammes A.1, A.2, A.3 et A.4 en même temps que l'on tricote les côtes 2 m env/2 m end comme indiqué; les diagrammes ont des côtes différentes et permettent de préparer les points fantaisie suivants. Bon tricot!
15.12.2025 - 11:39
![]() Ursula Kühnen wrote:
Ursula Kühnen wrote:
Ich verstehe die Abnahmen zu Beginn des Musterteils nicht. Ich habe 8 Maschen mehr als in der Anleitung beschrieben, da nach meiner Rechnung nur 20 Maschen abgenommen werden. Für eine Erklärung wäre ich sehr dankbar. Ulla Kühnen
10.12.2025 - 22:43DROPS Design answered:
Liebe Frau Kühnen, haben Sie auch die Abnahmen der 2. Reihe A.2 und A.4 gestrickt? Die kommen extra zu den Abnahmen, die regelmäßig verteilt gestrickt werden. Viel Spaß beim Stricken!
11.12.2025 - 09:21
![]() Helle wrote:
Helle wrote:
Hej jeg skal til at igang med denne trøje, og undre mig over starten, på billedet ser det ud som alm rib, men mønstret siger 2 vrang sammen mønster A4. og tæller man antal masker i rib mønster dækker den over 68 masker men vælger jeg str. L er der kun 60 masker? hvad gør jeg mvh Helle
14.10.2025 - 14:21DROPS Design answered:
Hej Helle. Strik rib og mønster som første omgang i A.1, A.2, A.3 og A.4 til arbejdet måler 5-5-5-6-6-6 cm. Du strikker alltså andre omgang i diagrammen först når arbejdet måler 5 cm (str L). Mvh DROPS Design
14.10.2025 - 15:05
![]() Joce wrote:
Joce wrote:
Hi there! Ive decided on this project for my first cable sweater! However, I find myself having difficulty beginning the first round. I am making a size small, the indicated cast on is 228 stitches, however the total amount of stiches included in row 1 comes to 240. I have restarted multiple times and continue to run into this issue:(
09.08.2025 - 07:29DROPS Design answered:
Dear Joce, for size S you work as follows: Knit 1, * purl 2, knit 2 *, work from *-* over 20 stitches in total, purl 2, work A.1 once (=10), A.2 once (=13), A.3 once (=22), A.4 once (=13), A.1 once (=10), * purl 2, knit 2 *, work from *-* over 44 stitches in total, purl 2, work A.1 once (=10), A.2 once (=13), A.3 once (=22), A.4 once (=13), A.1 once (=10), * purl 2, knit 2 *, over 20 stitches in total, purl 2 and knit 1. = 1+(rib over 20 stitches)+2+10+13+22+13+10+(rib over 44 stitches)+2+10+13+22+13+10+(rib over 20 stitches) +2+1 = 228 stitches. The first time that the rib is written doesn't count; only the stitches over which you work afterwards. Happy knitting!
10.08.2025 - 17:48
![]() Steph wrote:
Steph wrote:
Hi! I'm working on the front piece: "On the next row place the middle 18-18-20-20-22-22 stitches on 1 thread for the neckline and finish each shoulder separately. Continue casting off on each row from the neck: 2 stitches 1 time and 1 stitch 3 times = 31-33-34-38-41-45 stitches." - I'm slightly confused. Could you explain this section in more detail?
11.02.2025 - 01:50DROPS Design answered:
Hi Steph, After placing the middle stitches on a thread for the front neckline, each shoulder is finished separately. On each row starting from the neckline (every 2nd row), you cast off for the neckline. First cast off 2 stitches at the beginning of the row, work to end of row, turn and work back. On the next row cast off 1 stitch from the neckline, work to end of row, turn and work back. Then repeat, casting-off 1 stitch 2 more times. Hope this helps and happy knitting!
11.02.2025 - 06:49
![]() Maria wrote:
Maria wrote:
Hej, er det snoningerne der trækker trøjen så meget sammen? For ellers kan 204 masker med en strikkefasthed på 17m/10cm da aldrig kun give 102 i omkreds?
15.01.2025 - 17:46DROPS Design answered:
Hej Maria, ja det stemmer, snoninger trækker arbejdet sammen ca en halv gang :)
16.01.2025 - 14:37
![]() Tilde Ritosa wrote:
Tilde Ritosa wrote:
Hej! Jag är på det sista steget innan man ska dela upp framstycke och bakstycke. I beskrivningen står det att man ska anpassa så att nästa varv har ett ojämnt antal i mönstret så att flätmönstret blir rätt när man stickar fram och tillbaka. Jag har 204 maskor på stickorna. Jag undrar vad som menas med ojämnt antal, för skulle jag vara på det varv där man minskar för a6, minskas totalt 4 maskor på varvet och då blir det totalt 200 maskor men det är fortfarande delbart på 2?
13.01.2025 - 21:02DROPS Design answered:
Hej Tilde, du skal bara se till att flätorna i diagrammet kommer från rätsidan :)
15.01.2025 - 07:15
![]() Katie B wrote:
Katie B wrote:
Hi, I believe the cables in chart A.7 are incorrect based on the photos of the pattern. They appear to be reversed, the first cable should have the first 6 stitches held at the back, then the second cable should have the first 6 stitches in front of the work.
25.11.2024 - 04:54DROPS Design answered:
Dear Katie B, diagram A.7 has now been fixed, thanks for noticing. Happy knitting!
25.11.2024 - 13:36
![]() Julia wrote:
Julia wrote:
Good evening,\\r\\nthank you for the nice pattern! \\r\\nAt the body section, where we are to work A5, A6, A7, A6, A5 etc., since we are working in rounds, what is meant by \\\"with the next round an odd round in the pattern\\\"? Could you please explain how this sections are to be knitted? \\r\\nThank you very much for your kind help!
18.11.2024 - 20:59DROPS Design answered:
Dear Julia, when working diagrams in the round read all rows from the right towards the left; then when you will divide piece for armhole, just make sure that the cable rows will be still from right side after division, ie the dividing round should be an uneven numbered round in diagram so that next row = even numbered row is worked from WS. Happy knitting!
19.11.2024 - 07:57
|
|||||||||||||||||||||||||||||||
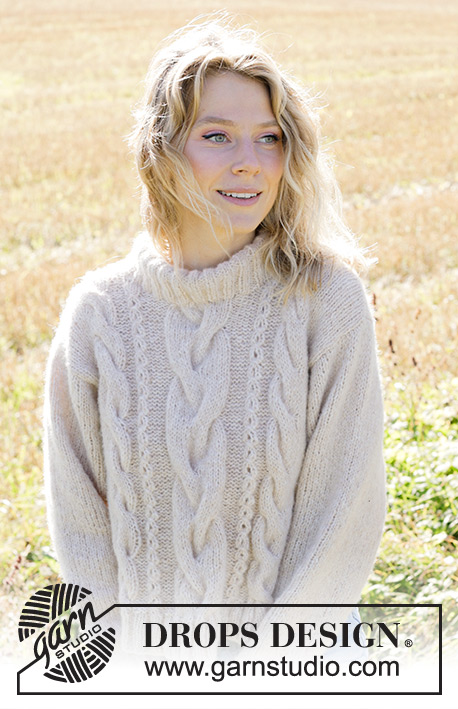
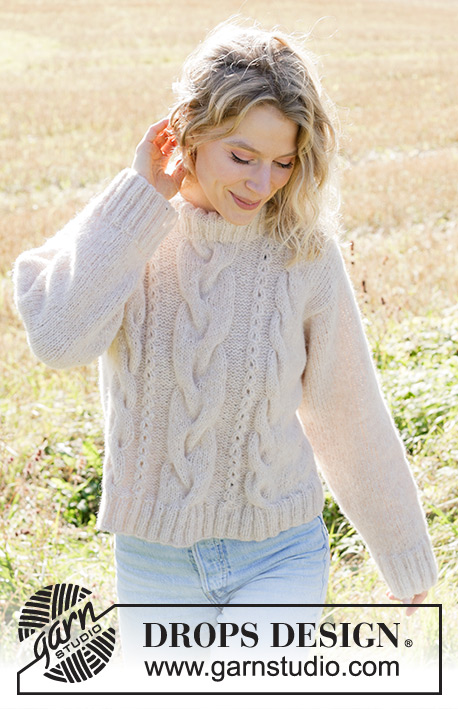
Woven Willows#wovenwillowssweater |
|||||||||||||||||||||||||||||||
 |
 |
||||||||||||||||||||||||||||||
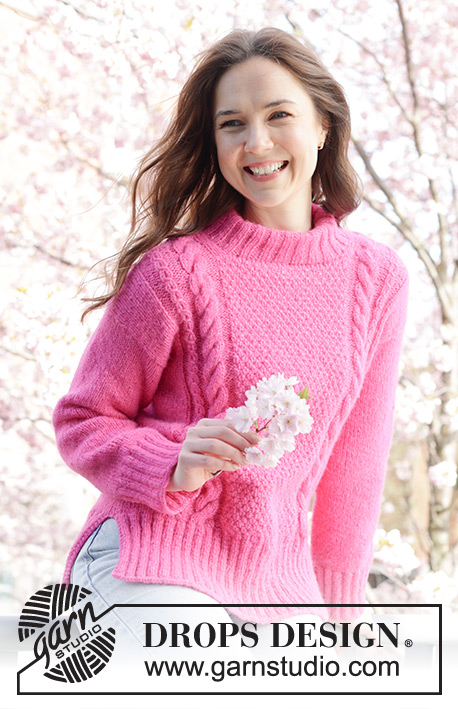
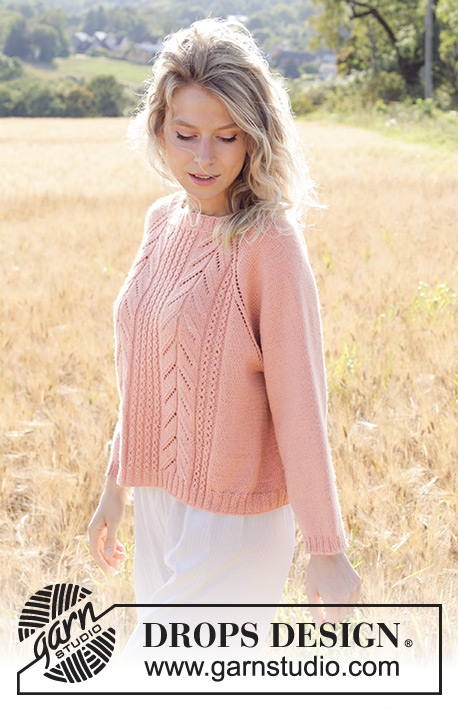
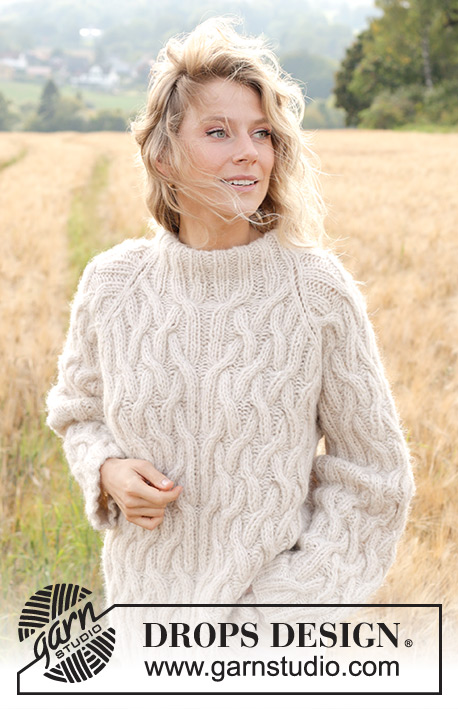
Knitted jumper in DROPS Air. The piece is worked bottom up with sewn-in sleeves, cables and double neck. Sizes S - XXXL.
DROPS 248-17 |
|||||||||||||||||||||||||||||||
|
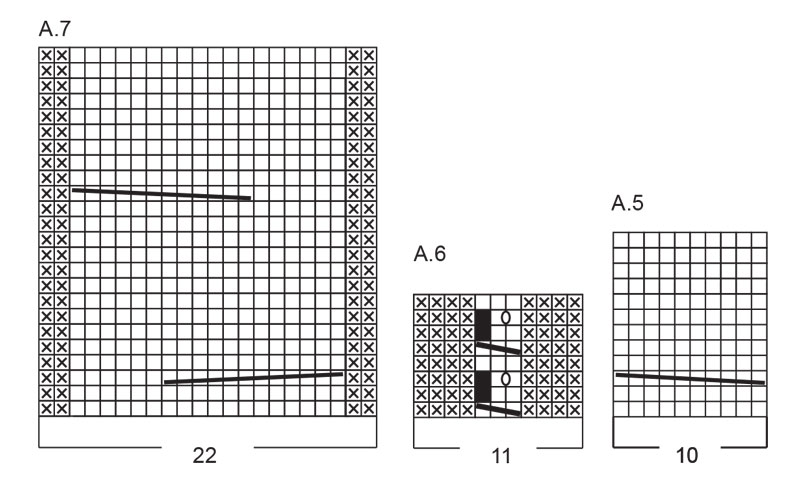
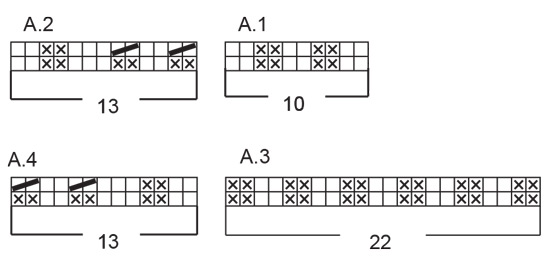
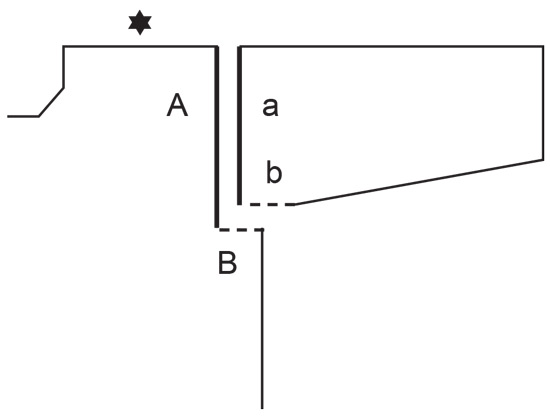
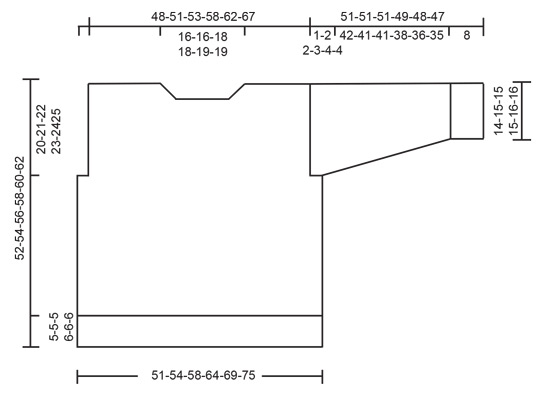
------------------------------------------------------- EXPLANATIONS FOR THE PATTERN: ------------------------------------------------------- PATTERN: See diagrams A.1 to A.7. The diagrams show the pattern from the right side. INCREASE TIP (for sleeves): Start 1 stitch before the marker-thread, make 1 yarn over, knit 2 (marker-thread sits between these 2 stitches), 1 yarn over. On the next round knit the yarn overs twisted to avoid holes (2 increased stitches). Then work the new stitches in stocking stitch. ------------------------------------------------------- START THE PIECE HERE: ------------------------------------------------------- JUMPER - SHORT OVERVIEW OF THE PIECE: The body is worked in the round with circular needle, bottom up as far as the armholes. The front and back pieces are then finished separately, back and forth. The sleeves are worked in the round with double pointed needles/short circular needle, bottom up as far as the sleeve cap, then finished back and forth. The piece is sewn together. Stitches are knitted up around the neckline and the neck worked in the round, then folded double. BODY: Cast on 228-244-260-276-292-308 stitches with circular needle size 3.5 mm and DROPS Air. Work in the round as follows: Knit 1, * purl 2, knit 2 *, work from *-* over the next 20-24-28-32-36-40 stitches, purl 2, work A.1, A.2, A.3, A.4, A.1, * purl 2, knit 2 *, work from *-* over the next 44-52-60-68-76-84 stitches, purl 2, work A.1, A.2, A.3, A.4, A.1, * purl 2, knit 2 *, work from *-* over the next 20-24-28-32-36-40 stitches, purl 2 and knit 1. Continue the rib, repeating round 1 in A.1, A.2, A.3 and A.4, until the piece measures 5-5-5-6-6-6 cm. Switch to circular needle size 5 mm. Work the next round as follows: Knit 23-27-31-35-39-43 and decrease 4-5-6-5-4-3 stitches evenly over these stitches, work round 2 in A.1, A.2, A.3, A.4, A.1, knit 46-54-62-70-78-86 and decrease 8-10-12-10-8-6 stitches evenly over these stitches, work round 2 in A.1, A.2, A.3, A.4, A.1, knit 23-27-31-35-39-43 stitches and decrease 4-5-6-5-4-3 stitches evenly over these stitches. There are 204-216-228-248-268-288 stitches. Insert 1 marker-thread in each side, 1 at the beginning of the round and 1 after 102-108-114-124-134-144 stitches. Continue as follows: * Work 19-22-25-30-35-40 stocking stitches, A.5, A.6, A.7, A.6, A.5, 19-22-25-30-35-40 stocking stitches *, work from *-* one more time. REMEMBER THE KNITTING TENSION! Work until the body measures 32-33-34-35-36-37 cm – with the next round an odd round in the patterns (so you continue cabling from the right side when working back and forth). DIVIDE FOR FRONT AND BACK PIECES: Start 2-3-4-5-6-7 stitches before the first marker-thread, cast off 4-6-8-10-12-14 stitches for the armhole, continue the pattern until, there are 2-3-4-5-6-7 stitches left before the second marker-thread, cast off 4-6-8-10-12-14 stitches for the armhole, continue the pattern to the end of the round. The front and back pieces are finished separately. FRONT PIECE: = 98-102-106-114-122-130 stitches. Start from the wrong side and continue the pattern back and forth with 1 edge stitch on each side. When the piece measures 44-46-48-50-52-54 cm, and the next row is from the right side, decrease 8 stitches evenly over the stitches in A.7 = 90-94-98-106-114-122 stitches. On the next row place the middle 18-18-20-20-22-22 stitches on 1 thread for the neckline and finish each shoulder separately. Continue casting off on each row from the neck: 2 stitches 1 time and 1 stitch 3 times = 31-33-34-38-41-45 stitches. When the piece measures 51-53-55-57-59-61 cm, decrease 4 stitches over the cable in A.5 = 27-29-30-34-37-41 stitches. Cast off on the next row. Work the other shoulder in the same way. BACK PIECE: = 98-102-106-114-122-130 stitches. Start from the wrong side and continue the pattern back and forth with 1 edge stitch on each side. When the piece measures 49-51-53-55-57-59 cm, and the next row is from the right side, decrease 8 stitches evenly over the stitches in A.7 = 90-94-98-106-114-122 stitches. On the next row cast off the middle 26-26-28-28-30-30 stitches for the neckline and finish each shoulder separately. On the next row cast off 1 stitch from the neck = 31-33-34-38-41-45 stitches. When the piece measures 51-53-55-57-59-61 cm, decrease 4 stitches over the cable in A.5 = 27-29-30-34-37-41 stitches. Cast off on the next row. Work the other shoulder in the same way. SLEEVES: Cast on 64-68-68-68-72-72 stitches with double pointed needles size 3.5 mm and DROPS Air. Knit 1 round. Work rib in the round (knit 2, purl 2) for 8 cm. Change to double pointed needles size 5 mm. Knit 1 round and decrease 16-18-18-16-18-16 stitches evenly spaced = 48-50-50-52-54-56 stitches. Insert 1 marker-thread at the beginning of the round and allow it to follow your work onwards; it is used when increasing under the sleeve. When the sleeve measures 10-10-12-12-10-13 cm, increase 2 stitches under the sleeve – read INCREASE TIP. Increase like this every 4-3½-3-2½-2½-2 cm a total of 10-11-12-13-14-14 times = 68-72-74-78-82-84 stitches. Work until the sleeve measures 50-49-49-46-44-43 cm from the cast-on edge. Continue with stocking stitch, back and forth from the marker-thread, until the sleeve measures 51-51-51-49-48-47 cm, a split of 1-2-2-3-4-4 cm at the top of the sleeve. Cast off. ASSEMBLY: Sew the shoulder seams inside the cast-off edge. Sew the sleeve cap to the armhole, then the split to the bottom of the armhole – see sketch. NECK: Use short circular needle size 3.5 mm and DROPS Air. Start at one shoulder seam and knit up from the right side 100 to 116 stitches around the neck (including the stitches on the thread) – stitch count must be divisible by 4. Work rib (knit 2, purl 2) in the round for 10 cm. Cast off a little loosely. Fold the neck double to the inside and sew down. To avoid the neck being tight and rolling outwards, it is important that the seam is elastic. |
|||||||||||||||||||||||||||||||
Diagram explanations |
|||||||||||||||||||||||||||||||
|
|||||||||||||||||||||||||||||||
 |
|||||||||||||||||||||||||||||||
 |
|||||||||||||||||||||||||||||||
 |
|||||||||||||||||||||||||||||||
 |
|||||||||||||||||||||||||||||||
Have you finished this pattern?Tag your pictures with #dropspattern #wovenwillowssweater or submit them to the #dropsfan gallery. Do you need help with this pattern?You'll find 31 tutorial videos, a Comments/Questions area and more by visiting the pattern on garnstudio.com. © 1982-2026 DROPS Design A/S. We reserve all rights. This document, including all its sub-sections, has copyrights. Read more about what you can do with our patterns at the bottom of each pattern on our site. |
|||||||||||||||||||||||||||||||


With over 40 years in knitting and crochet design, DROPS Design offers one of the most extensive collections of free patterns on the internet - translated to 17 languages. As of today we count 324 catalogues and 12290 patterns translated into English (UK/cm). 12290
We work hard to bring you the best knitting and crochet have to offer, inspiration and advice as well as great quality yarns at incredible prices! Would you like to use our patterns for other than personal use? You can read what you are allowed to do in the Copyright text at the bottom of all our patterns. Happy crafting!
Post a comment to pattern DROPS 248-17
We would love to hear what you have to say about this pattern!
If you want to leave a question, please make sure you select the correct category in the form below, to speed up the answering process. Required fields are marked *.