
Popular categories
Looking for a yarn?


Comments / Questions (29)
![]() Karine wrote:
Karine wrote:
Tere. Võta 5,5 mm ringvardad. Jätka parempidises koes naturaalvalge lõngaga 4 cm. Kas ei peaks olema kaamelivärv?
06.02.2026 - 09:14DROPS Design answered:
Tere Karine! Viga parandatud, tänan teatamast!
10.02.2026 - 18:57
![]() Coko wrote:
Coko wrote:
Hallo, müsste die angegebene Farbe "graugrün" nicht "hellblau" heißen? Auf dem Foto sieht die Farbe blau aus.
02.12.2025 - 12:13DROPS Design answered:
Liebe Coko, hier wird ja die Farbe 7139, graugrünn gestrickt - siehe Farbkarte. Viel Spaß beim Stricken!
02.12.2025 - 17:17
![]() Dara wrote:
Dara wrote:
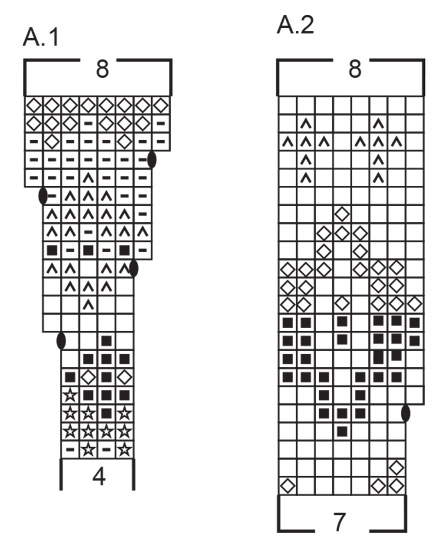
Is there a chart missing for the first few rows of the colorwork?
10.11.2025 - 05:42DROPS Design answered:
Hi Dara, the diagram A.1 is right. Happy knitting!
30.11.2025 - 20:31
![]() Barbara wrote:
Barbara wrote:
Bonjour, Je tricote la taille S. Faire acheter 100-100-100-150-150-150 g coloris 0618, chameau est inutile. Quelque soit la taille, il n'y a que 6 rangs à tricoter dans cette couleur. Une pelote de 50g est suffisante. Vous pourriez aussi indiquer aiguilles circulaires OU à double pointes.,Il faudrait penser à corriger la liste des fournitures. Bien à vous.
05.09.2025 - 15:14DROPS Design answered:
Bonjour Barbara, on tricote plus que 6 rangs en coloris chameau car le col se tricote également avec cette couleur; pour les fournitures, on a bien besoin des aiguilles circulaires et des doubles pointes car à la fin des manches, l'aiguille circulaire de 40 cm serait trop longue. Bon tricot!
05.09.2025 - 16:58
![]() Anni wrote:
Anni wrote:
Danke für die Antwort! Noch eine Frage habe ich: Warum soll mal vor dem Bündchen unten am Rumpf und am Schluss der Ärmel Maschen zunehmen? Damit die Bündchen nicht zu eng werden? Danke, lg.
05.02.2025 - 20:01DROPS Design answered:
Liebe Anni, ja genau deshalb. Viel Spaß beim Stricken!
06.02.2025 - 09:13
![]() Anni wrote:
Anni wrote:
Danke für die Antwort! Noch eine Frage habe ich: Warum soll mal vor dem Bündchen unten am Rumpf und am Schluss der Ärmel Maschen zunehmen? Damit die Bündchen nicht zu eng werden? Danke, lg.
04.02.2025 - 17:03DROPS Design answered:
Liebe Anni, ja genau, für den gleichen Umfang braucht man mehr Maschen für Bündchen mit kleineren Nadeln als für Glattrechts mit grösseren Nadeln, deshalb wird man vor Bündchen zunehmen. Viel Spaß beim Stricken!
05.02.2025 - 07:43
![]() Anni wrote:
Anni wrote:
Hallo! Bei mir ist es ähnlich wie bei Yvonne. Nach A2 bin ich schon bei 29cm. Man soll ja in der Passe etwas lockerer stricken, damit es nicht spannt. Dadurch weicht es natürlich auch etwas von der Maschenprobe ab. Aber rein rechnerisch sind es 2- cm mehr und nicht 5-6 cm ? Durch das lockerere Stricken in der Passe wellt sich diese auch bei mir. Gibt es dafür/ dagegen Empfehlungen oder Tipps? Danke. LG Anni
04.02.2025 - 11:45DROPS Design answered:
Liebe Anni, sollten Sie die fertige Länge (nach der Halsblende) schon vor Ende A.2 erreichen, dann teilen Sie die Arbeit bei der angegebenen Länge, und A.2 stricken Sie separat beim Rumpf/Ärmel fertig. Sollte das Muster an den Seiten/unter die Ärmel nicht passen, dann beachten Sie nur, daß das Muster in der Höhe stimmt/weiter von der Passe forsetzt. Viel Spaß beim Stricken!
04.02.2025 - 15:18
![]() Yvonne wrote:
Yvonne wrote:
Ich bin am Ende von A2 angekommen. Dort steht nun ich soll in der Hauptfarbe weiter stricken bis ich 25cm messe. Ich bin aber am Ende von A2 schon bei 28cm. Ist das ein Tippfehler, oder habe ich deutlich zu groß gestrickt? Von wo genau muss ich das messen?
27.01.2025 - 18:43DROPS Design answered:
Liebe Yvonne, diese 25 cm messen Sie nach Bündchen/Halsblende, dh ab 1. Reihe der Passe - beachten Sie, daß Ihre Maschenprobe auch in der Höhe (20 Reihen = 10 cm) stimmt. Viel Spaß beim Stricken!
28.01.2025 - 09:07
![]() Anke Keil wrote:
Anke Keil wrote:
Hallo nettes Team, der Pullover ist wunderbar geworden. Meine Mutter trägt ihn so gerne, ist richtig verliebt. Danke, danke ! L. G....Anke Keil
23.01.2025 - 18:42
![]() Angela Botham wrote:
Angela Botham wrote:
Can you please verify jumper sizes? What is large in cms or inches and medium and large please
11.12.2024 - 18:01
|
||||||||||||||||||||||
Autumn Reflections Sweater#autumnreflectionssweater |
||||||||||||||||||||||
 |
 |
|||||||||||||||||||||
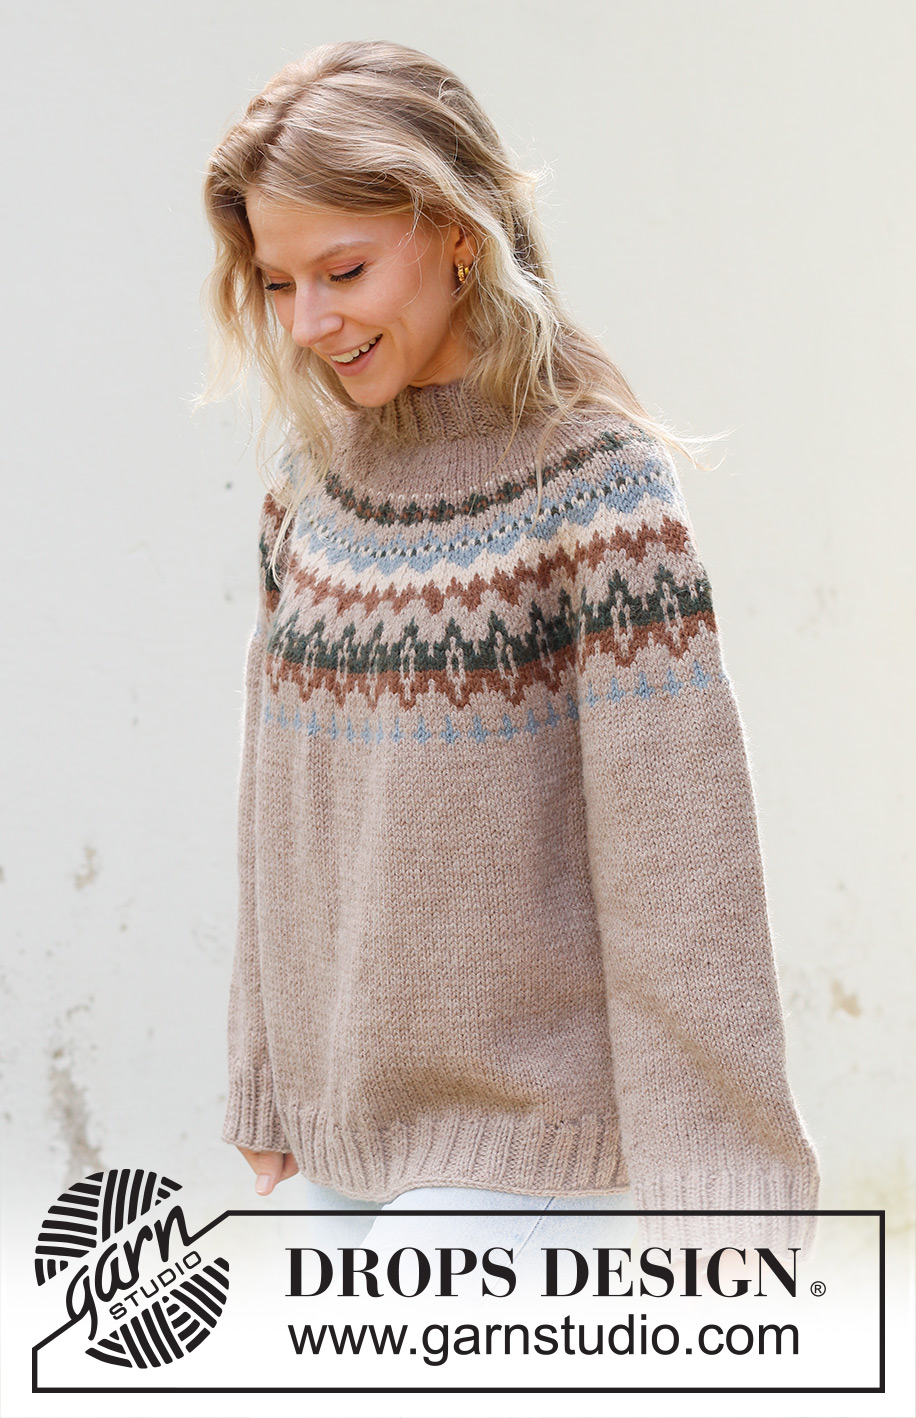
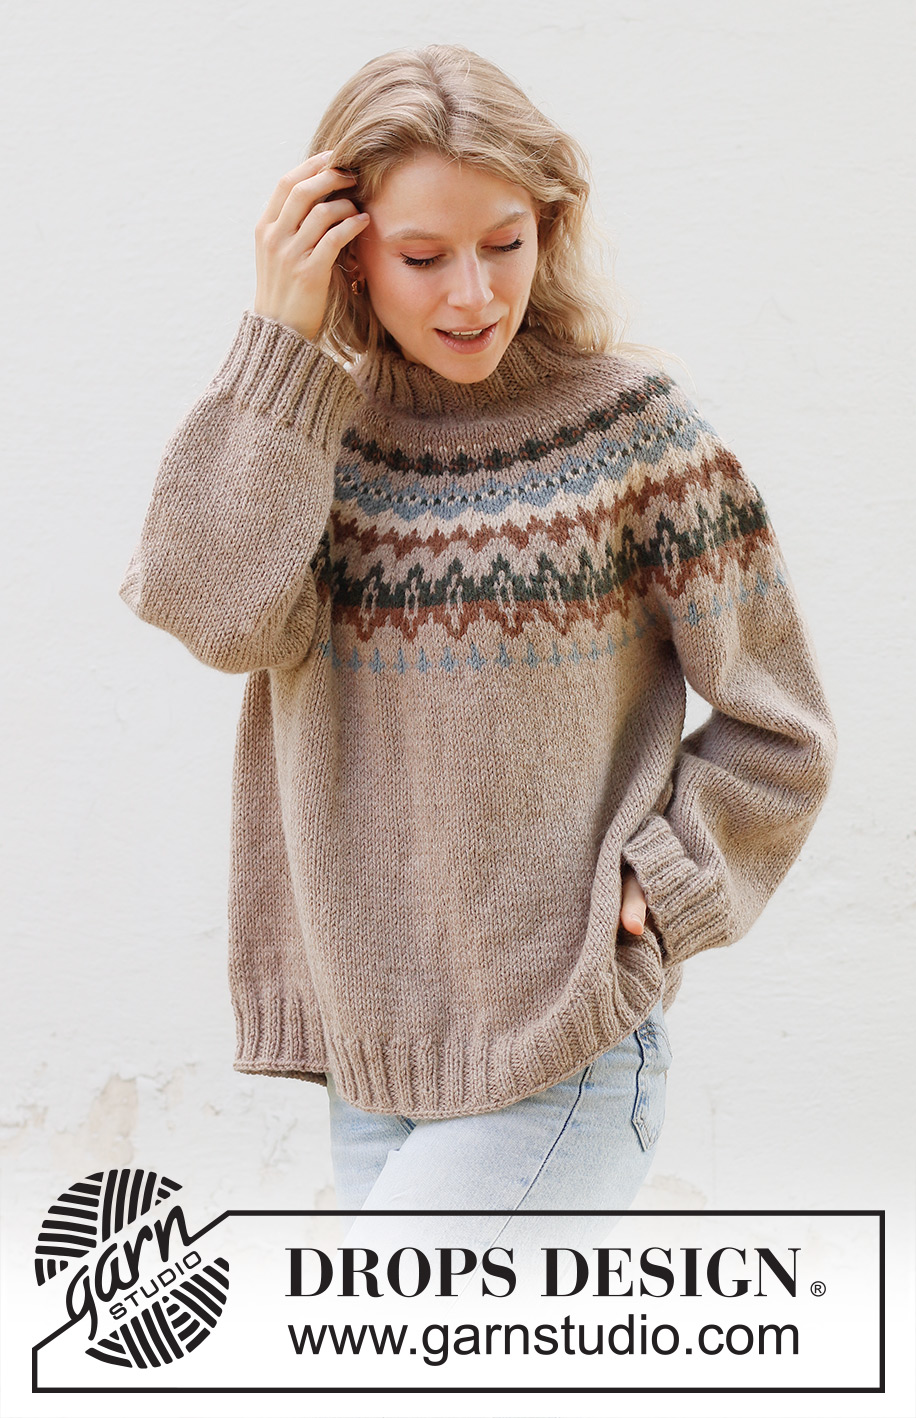
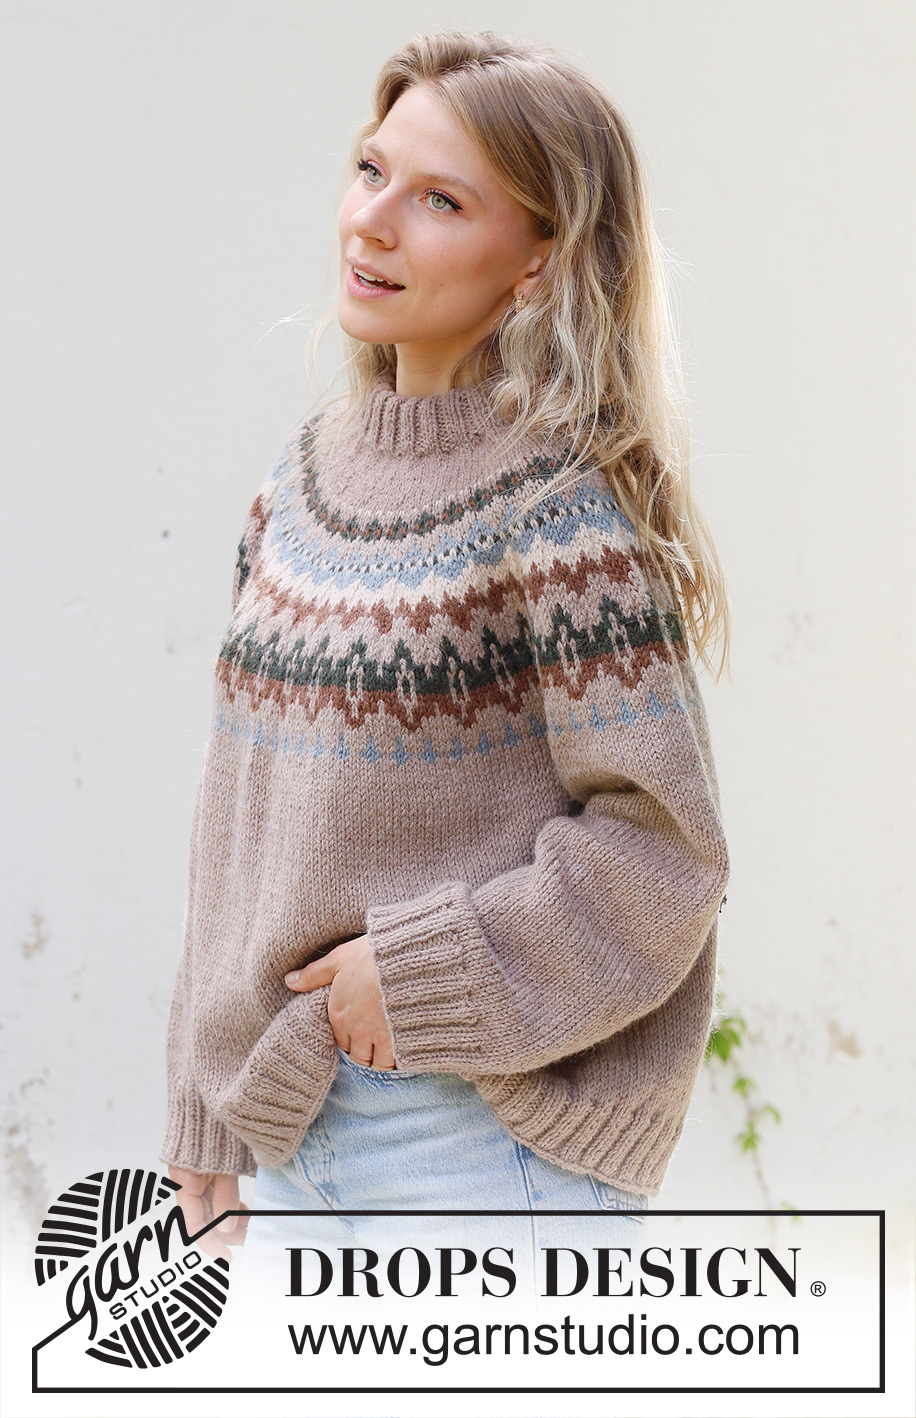
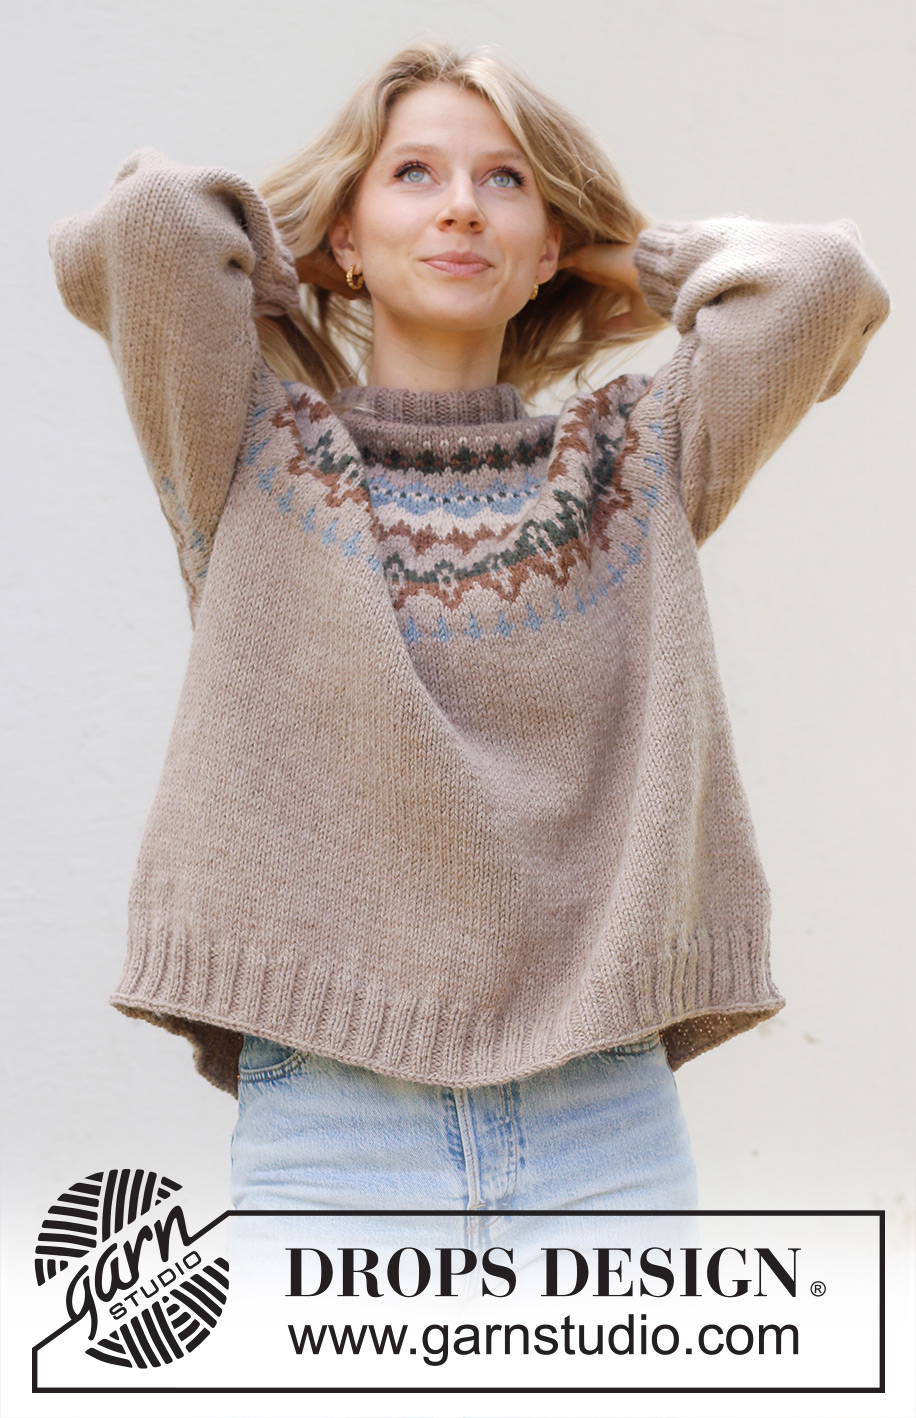
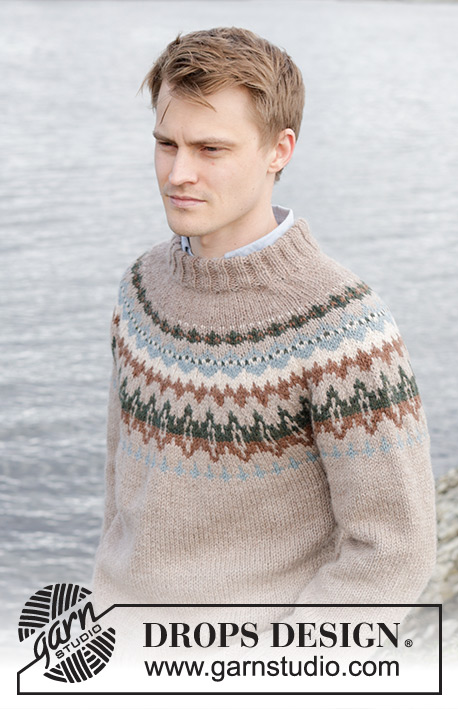
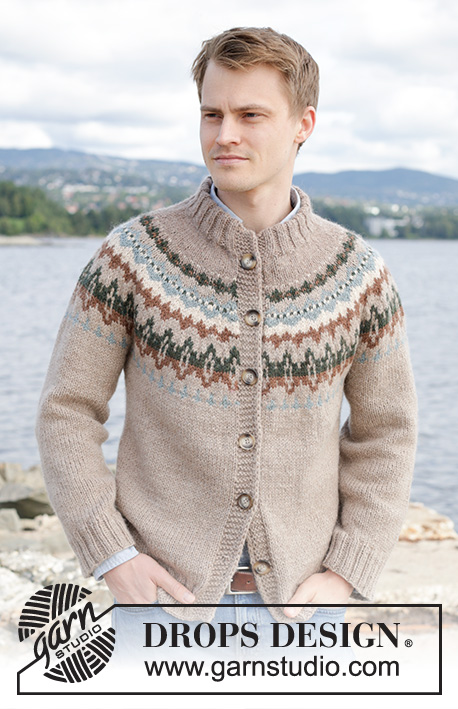
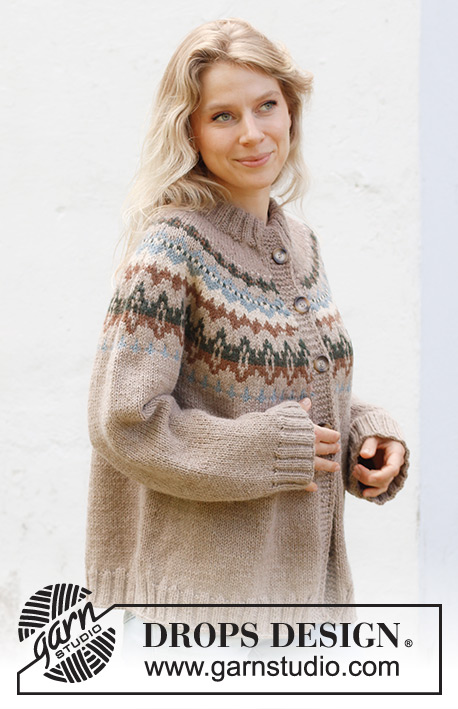
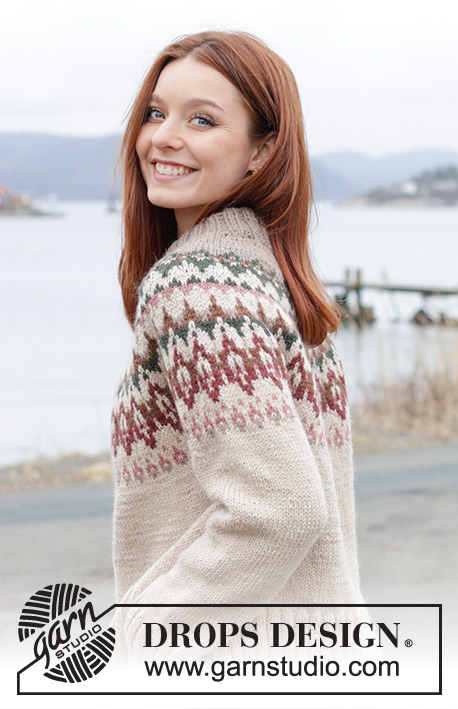
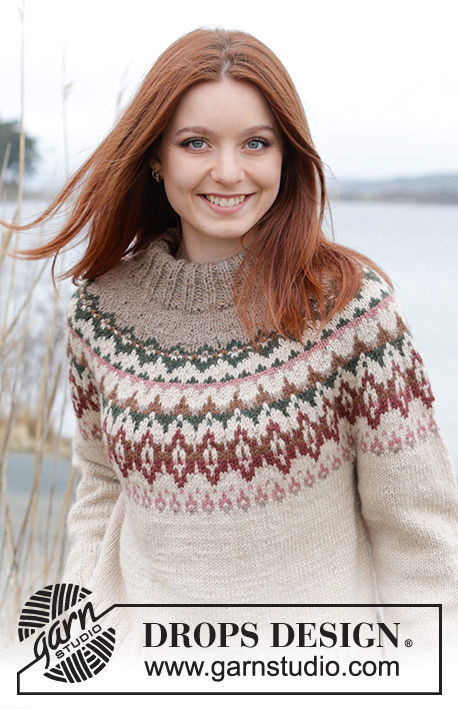
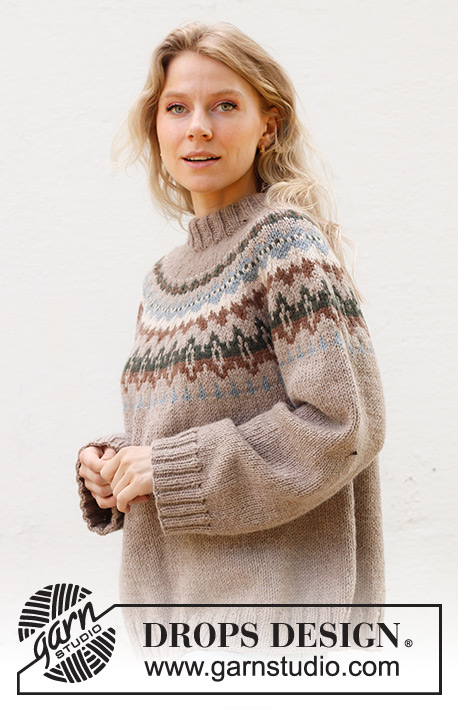
Knitted jumper in DROPS Nepal. The piece is worked top down with round yoke, multi-coloured pattern and double neck. Sizes S - XXXL.
DROPS 244-24 |
||||||||||||||||||||||
|
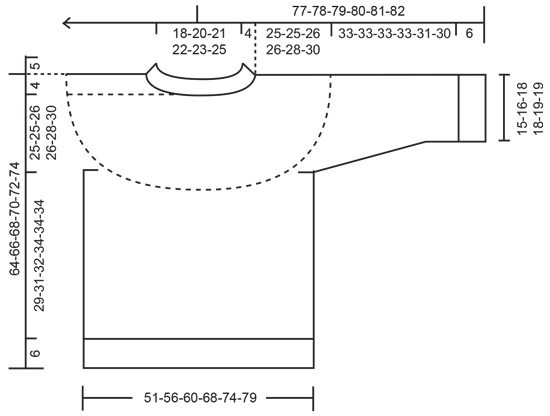
------------------------------------------------------- EXPLANATIONS FOR THE PATTERN: ------------------------------------------------------- PATTERN: See diagrams A.1 and A.2. The whole pattern is worked in stocking stitch. INCREASE TIP-1 (evenly spaced): To work out how to increase evenly, count the total number of stitches on the needle (e.g., 84 stitches) and divide by the number of increases to be made (e.g., 12) = 7. In this example, increase by making 1 yarn over after each 7th stitch. On the next round knit the yarn overs twisted to avoid holes. KNITTING TIP: To avoid the knitting tension losing its elasticity when working pattern, it is important that the strands at the back are not tight. Use a size larger needle when working pattern if the piece becomes tight. DECREASE TIP (for sleeves): Decrease 1 stitch on each side of the marker-thread as follows: Work until there are 3 stitches left before the marker-thread, knit 2 together, knit 2 (marker-thread sits between these 2 stitches), slip 1 stitch knit-wise, knit 1 and pass the slipped stitch over the knitted stitch. ------------------------------------------------------- START THE PIECE HERE: ------------------------------------------------------- JUMPER – SHORT OVERVIEW OF THE PIECE: The neck and yoke are worked in the round, from mid back and top down. The yoke is divided for body and sleeves and the body is continued in the round. The sleeves are worked in the round with short circular needle/double pointed needles. DOUBLE NECK: Cast on 84-88-92-96-100-104 stitches with colour camel DROPS Nepal, using short circular needles size 4.5 and 5.5 mm held together. Remove the needle size 5.5 mm keeping stitches on needle size 4.5 mm (this gives you an elastic cast-on edge). Knit 1 round, then work rib in the round (knit 2, purl 2) for 10 cm. Knit 1 round and increase 12-16-18-22-24-26 stitches evenly spaced – read INCREASE TIP = 96-104-110-118-124-130 stitches. YOKE: Change to short circular needle size 5.5 mm. Continue with stocking stitch and colour camel for 4 cm. On the next round increase 12-16-18-22-24-26 stitches evenly spaced = 108-120-128-140-148-156 stitches. Knit 1 round. Read KNITTING TIP. Work A.1 over all stitches. REMEMBER THE KNITTING TENSION! On the last round in A.1 increase 1-5-3-7-5-3 stitches evenly spaced = 217-245-259-287-301-315 stitches. Work A.2 over all stitches. When A.2 is finished in height, there are 248-280-296-328-344-360 stitches. Continue with stocking stitch and colour beige until the piece measures 25-25-26-26-28-30 cm (from the neck). Now divide for the body and sleeves on the next round as follows: Knit 38-42-44-50-54-57 (half back piece), place the next 48-56-60-64-64-66 stitches on 1 thread for the sleeve, cast on 6-6-8-8-10-12 stitches (in side under sleeve), knit 76-84-88-100-108-114 (front piece), place the next 48-56-60-64-64-66 stitches on 1 thread for the sleeve, cast on 6-6-8-8-10-12 stitches (in side under sleeve), knit the remaining 38-42-44-50-54-57 stitches (half back piece). The body and sleeves are finished separately. The piece is now measured from here! BODY: = 164-180-192-216-236-252 stitches. Continue with stocking stitch and colour beige in the round for a further 29-31-32-34-34-34 cm. Knit 1 round and increase 24-24-24-28-32-32 stitches evenly spaced = 188-204-216-244-268-284 stitches. Change to circular needle size 4.5 mm and work rib (knit 2, purl 2) for 6 cm. Cast off a little loosely. The jumper measures approx. 64-66-68-70-72-74 cm from the shoulder. SLEEVES: Place the 48-56-60-64-64-66 stitches from the thread on the one side of the piece on short circular needle/double pointed needles size 5,5 mm and knit up 1 stitch in each of the 6-6-8-8-10-12 stitches cast on under the sleeve = 54-62-68-72-74-78 stitches. Insert a marker-thread in the middle of the new stitches under the sleeve. Start at the marker-thread and work stocking stitch in the round with colour beige. When the sleeve measures 3 cm, decrease 2 stitches under the sleeve – read DECREASE TIP. Decrease like this every 14-6½-5-3½-3½-2½ cm a total of 3-5-6-8-7-9 times = 48-52-56-56-60-60 stitches. Continue working until the sleeve measures 33-33-33-33-31-30 cm from the division (or to desired length. There is approx. 6 cm left). Knit 1 round and increase 8-8-8-8-8-8-8 stitches evenly spaced = 56-60-64-64-68-68 stitches. Change to double pointed needles size 4.5 mm and work rib (knit 2, purl 2) for 6 cm. Cast off a little loosely. The sleeve measures approx. 39-39-39-39-37-36 cm. Work the other sleeve in the same way. ASSEMBLY: Fold the neck double to the inside and sew down. To avoid the neck being tight and rolling outwards, it is important that the seam is elastic. |
||||||||||||||||||||||
Diagram explanations |
||||||||||||||||||||||
|
||||||||||||||||||||||
 |
||||||||||||||||||||||
 |
||||||||||||||||||||||
Have you finished this pattern?Tag your pictures with #dropspattern #autumnreflectionssweater or submit them to the #dropsfan gallery. Do you need help with this pattern?You'll find 26 tutorial videos, a Comments/Questions area and more by visiting the pattern on garnstudio.com. © 1982-2026 DROPS Design A/S. We reserve all rights. This document, including all its sub-sections, has copyrights. Read more about what you can do with our patterns at the bottom of each pattern on our site. |
||||||||||||||||||||||


With over 40 years in knitting and crochet design, DROPS Design offers one of the most extensive collections of free patterns on the internet - translated to 17 languages. As of today we count 324 catalogues and 12290 patterns translated into English (UK/cm). 12290
We work hard to bring you the best knitting and crochet have to offer, inspiration and advice as well as great quality yarns at incredible prices! Would you like to use our patterns for other than personal use? You can read what you are allowed to do in the Copyright text at the bottom of all our patterns. Happy crafting!
Post a comment to pattern DROPS 244-24
We would love to hear what you have to say about this pattern!
If you want to leave a question, please make sure you select the correct category in the form below, to speed up the answering process. Required fields are marked *.