
Popular categories
Looking for a yarn?


Comments / Questions (56)
![]() Jacqueline wrote:
Jacqueline wrote:
Hallo Drops-Team, ich habe eine Frage bzgl. der Maschen, die man kurz vor Ende der Raglan-Abnahmen in der vorderen Mitte auffassen soll. Aus 6 Maschen sollen Maschen aufgefasst werden. Was passiert mit den 6 Maschen, die auf der Nadel waren, werden die übergehoben oder gestrickt? Im letzteren Fall würde ich dann also eine Masche auffassen, dann die Masche abstricken usw. immer abwechselnd. Ist das so richtig? Vielen Dank vorab!
26.04.2026 - 17:26DROPS Design answered:
Liebe Jacqueline, die Idée ist hier 6 neuen Maschen hinter die mittleren Maschen aufzunehmen um den Schlitz für den Halsauschnitt zu bilden; dann strickt man weiter mit je 5 Maschen kraus rechts beidseitig so hat man eine überlappende Blende. Kann das helfen? Viel Spaß beim Stricken!
27.04.2026 - 10:57
![]() Hilly wrote:
Hilly wrote:
DROPS Design antwoorde: Dag Kathalijne, Bij midden voor neem je aan het begin en aan het eind steken op in dezelfde 6 steken van de halsrand zodat je een overlap hebt. Vervolgens brei je de capuchon heen en weer van midden voor tot midden voor. 30.10.2022 - 17:14 Bovenstaand las ik, maar dan nog snap ik het niet. Ik vind het ook jammer dat juist dit niet even is opgenomen bij de video-instructies. Misschien dom van mij, maar ik blijf het niet snappen.
18.03.2026 - 12:30DROPS Design answered:
Dag Hilly,
Op de tweede foto kun je zien dat de rand met ribbelsteken in een overlap aan de hals zit. Dus de rechter rand valt over de linker rand. Door aan het eind van de naald 6 steken op te nemen in dezelfde steken als waar je de eerste 6 steken hebt opgenomen, zorg je ervoor dat er een overlap gecreëerd wordt.
22.03.2026 - 10:19
![]() Hilly wrote:
Hilly wrote:
Ik snap niet het onderdeel bij de pas, waarbij ik ben uitgekomen na 19x minderen op 84 steken. Ik snap de stekenmarkeerders, maar dat ik dan bij naald 1 moet breien tot 3 steken voor de markeerdraad en dan……. neem 1 steek op achter elk van de volgende 6 steken. De laatste zin snap ik niet en chatgpt geeft zes keer een uitleg die sowieso niet klopt. Graag hier de goede uitleg. Soms zijn de drops patronen te steno uitgelegd.
18.03.2026 - 12:23
![]() Sissel wrote:
Sissel wrote:
Videoen det er lenket til i spørsmålet om hvordan strikke opp masker på baksiden ser ut til å være feil. Det skulle vel vært den som heter Overlappende krave/hals strik op bagved i maskerne
28.02.2026 - 18:23
![]() Sissel wrote:
Sissel wrote:
Synes det er veldig rart at halsåpningen er så dårlig beskrevet i oppskriften. Videoen er jo oppklarende, men det er jo så mye mer enn å "strikke opp 1 maske på baksiden av de 6 neste maskene"..
28.02.2026 - 17:40
![]() Sigrid wrote:
Sigrid wrote:
Hej, Kan det virkelig passe, at man kun skal strikke ærmet 40 cm til en str m? Er det ærmets fulde længde eller fra ribben i måler 40 cm? Alle mine andre sweatre i str m er 10 cm længere i ærmerne? Synes ikke rigtigt det giver mening? Vh Sigrid
26.02.2026 - 17:12DROPS Design answered:
Hei Sigrid. Det er lengden fra under ermet og ut til oppleggskanten til ermet (10 + 30 cm). Ved thighte gensere kan ermlengden være lengre, men når bolen er litt vid er ermlengden noe kortere. Men sammenlign målene med en genser du allerede har og se om du syns ermene blir for korte. Har du nok garn, strikk de lengre, men 50 cm (mål fra under ermet) hørtes ut som veldig lange ermer. mvh DROPS Design
09.03.2026 - 14:45
![]() Elin wrote:
Elin wrote:
Hei! Kehaosa pikkus on juhendis kirjas et peaks kõikidel suurusel olema 31 cm. Joonisel on aga teistsugused mõõdud. Suurus M peaks olema keha hoopis 58 cm. Milline on õige?
30.01.2026 - 10:59DROPS Design answered:
Tere Elin! Joonisel näidatud 58 cm on terve kampsuni pikkus, õlast allääreni. 31 cm on alläärest (koos soonikuga) kuni käeaugu alguseni. Siis tuleb veel passe kõrgus ja kaelaauk. Head kudumist!
10.02.2026 - 21:20
![]() Marita wrote:
Marita wrote:
Hei, jeg forstår ikke hva jeg skal gjøre når jeg skal "strikke opp 1 maske på baksiden av hver av de 6 neste maskene".
22.01.2026 - 21:55DROPS Design answered:
Hei Marita, Du strikker opp masker gjennom maskeløkken som ligger bak på pinnen (ikke løkken som ligger foran på pinnen som er den vanlige metoden). Hilsen Drops Team.
23.01.2026 - 07:37
![]() Noël wrote:
Noël wrote:
Bonjour je voudrais faire ce modèle mais ma laine est moins épaisse aiguilles numéro 4 et 5 Comment faire le mettre à ma grosseur de fille merci
15.10.2025 - 18:12DROPS Design answered:
Bonjour Noël, vous pouvez vous aider et vous inspirer d'un modèle avec la tension souhaitée pour faire les ajustements nécessaires, retrouvez par ex ici les pulls à capuche avec 17 m pour 10 cm. Bon tricot!
16.10.2025 - 17:22
![]() Annie wrote:
Annie wrote:
Hello. do you have a size chart available so I can determine which size pattern is best for my purposes? I can't seem to find any information anywhere. Can you please advise? Thank you
22.09.2025 - 13:14DROPS Design answered:
Hi Annie, There is a size chart at the bottom of the pattern. Regards, Drops Team.
23.09.2025 - 06:49
|
|
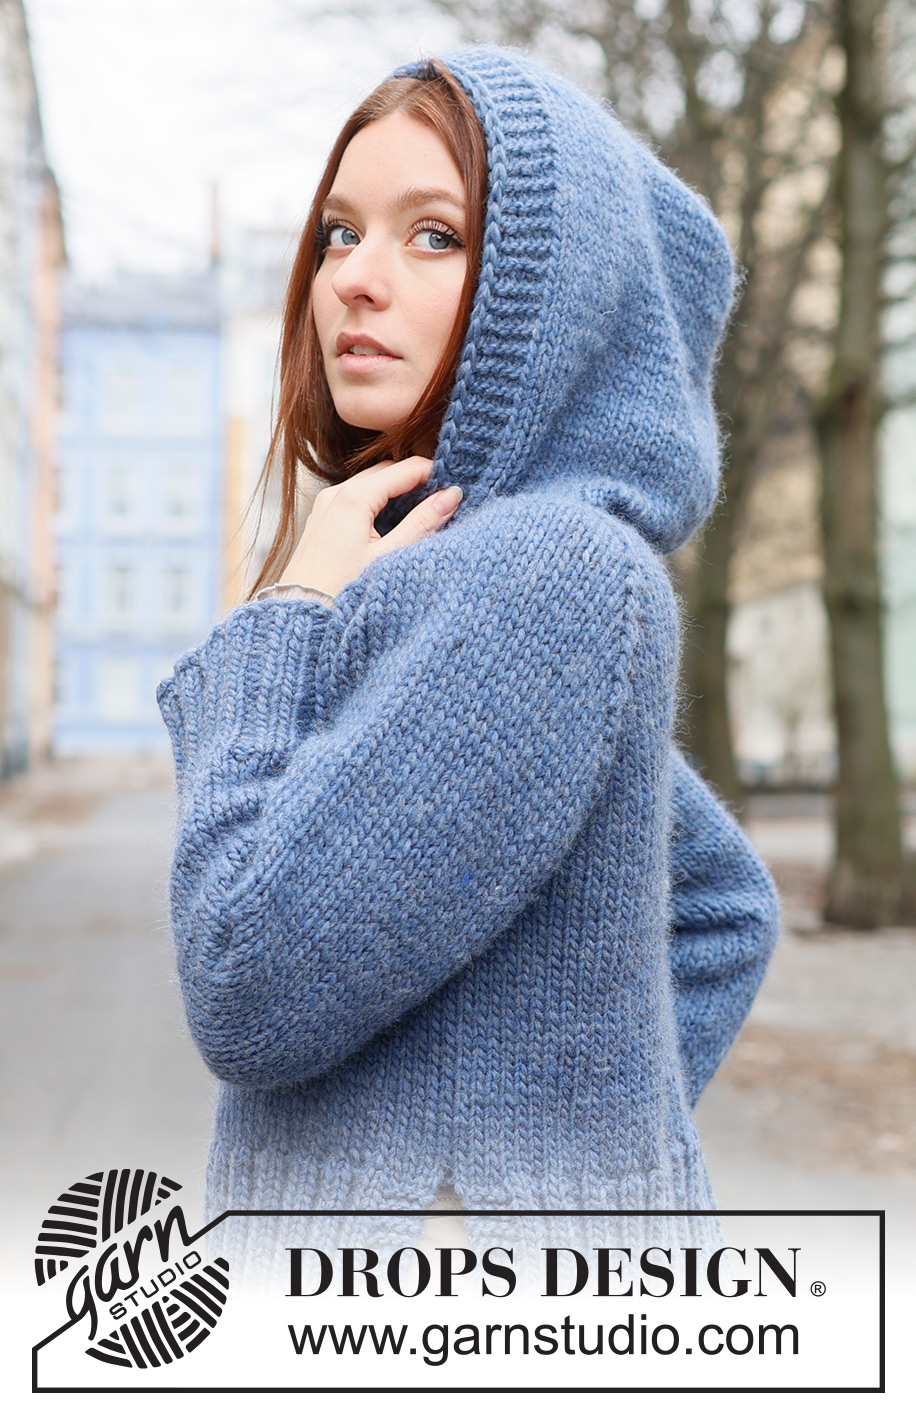
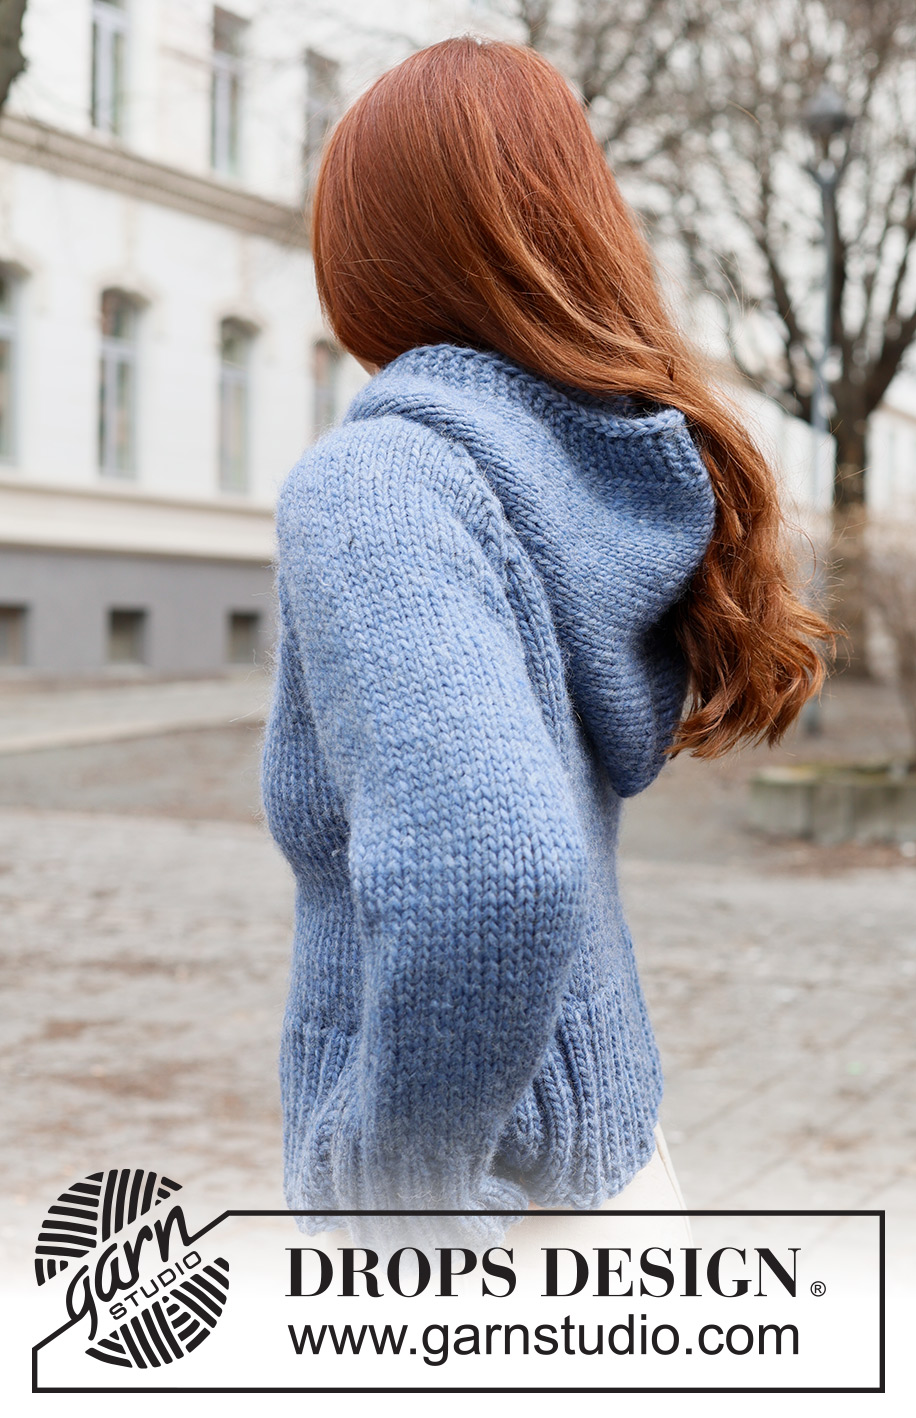
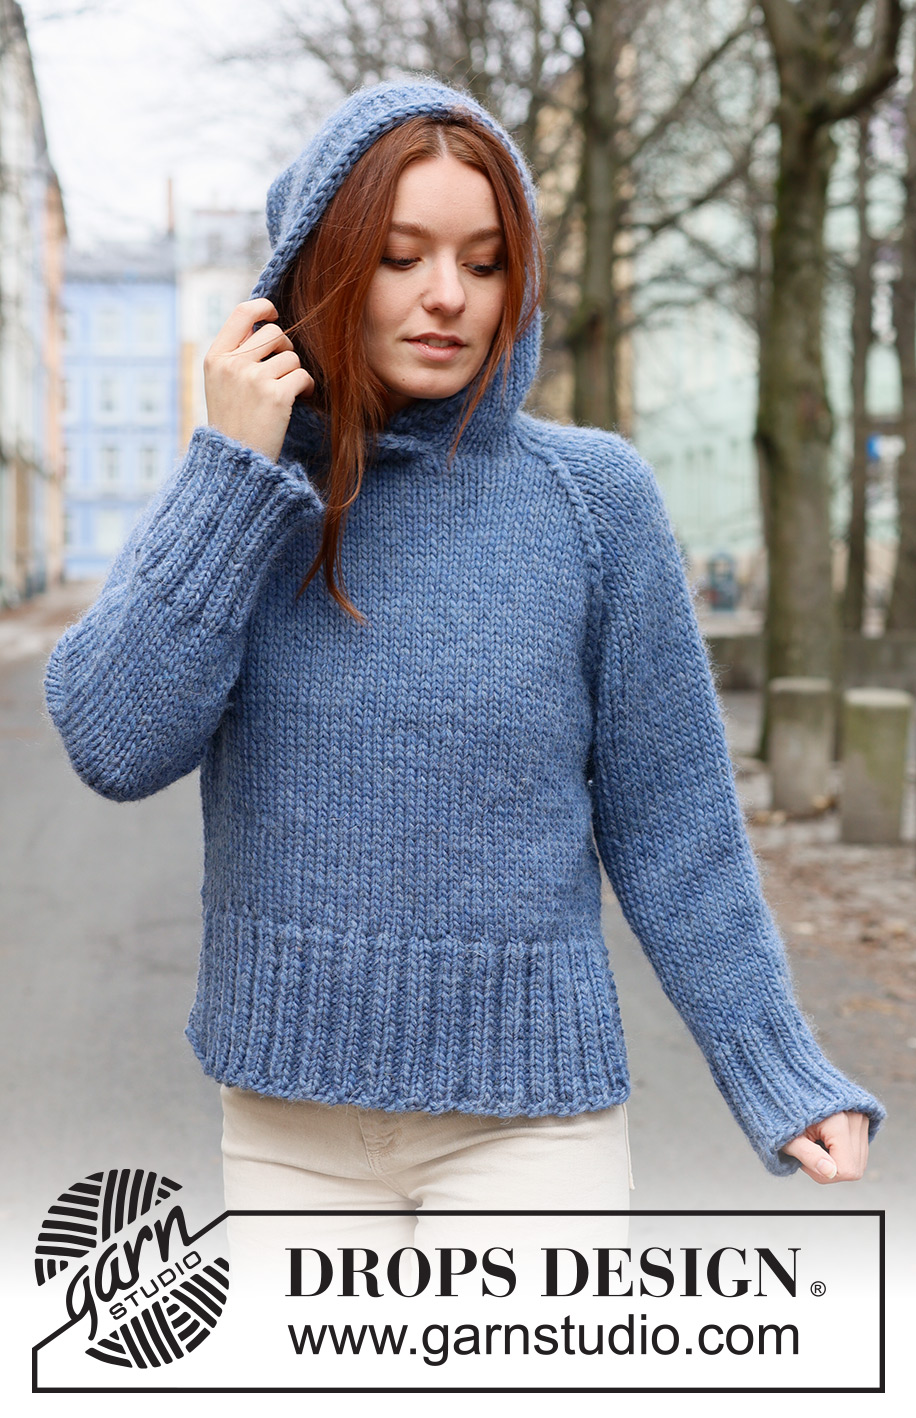
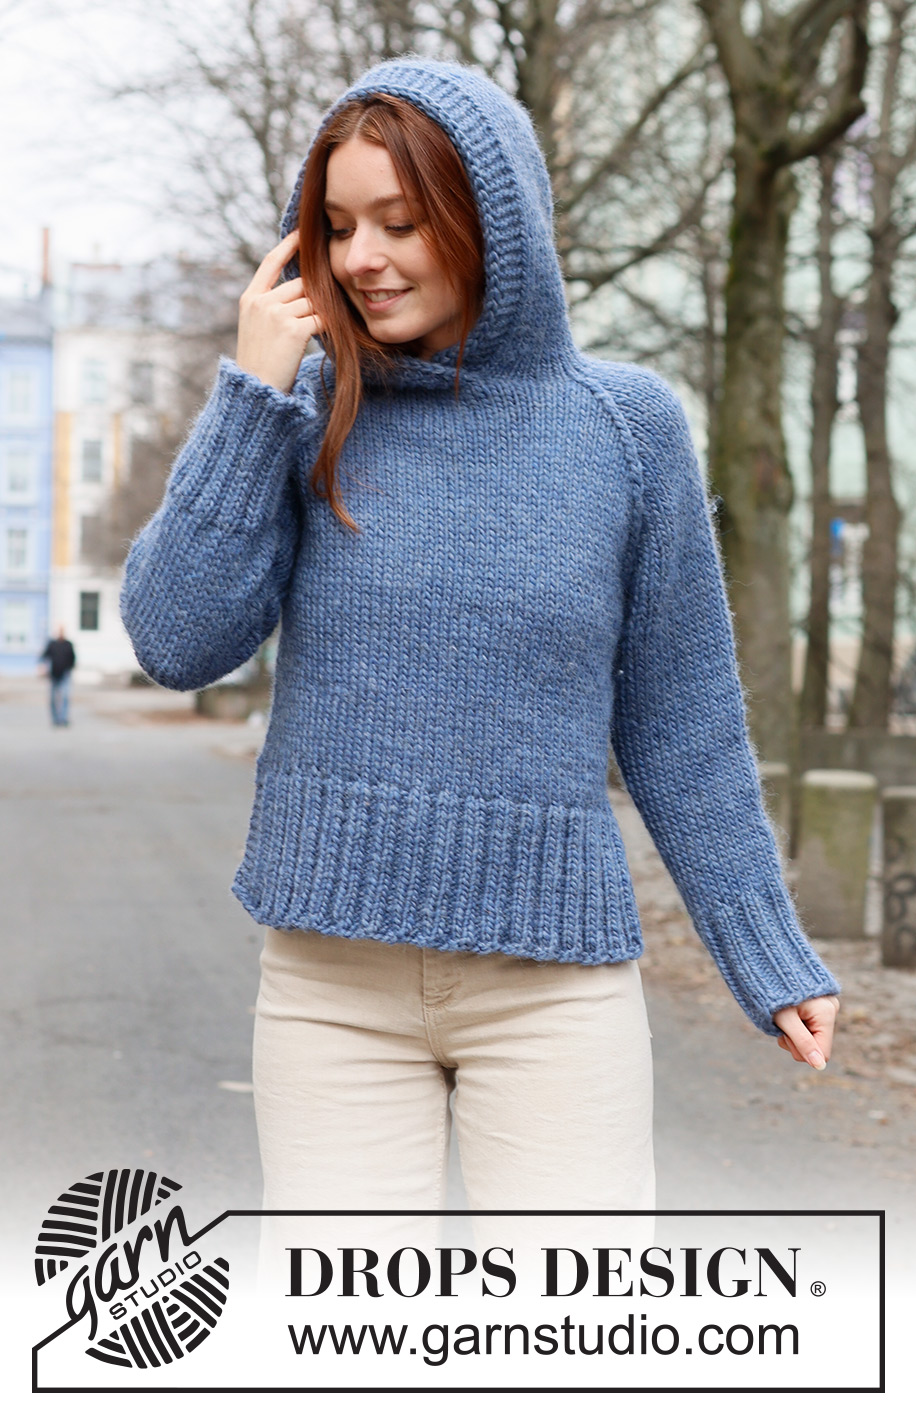
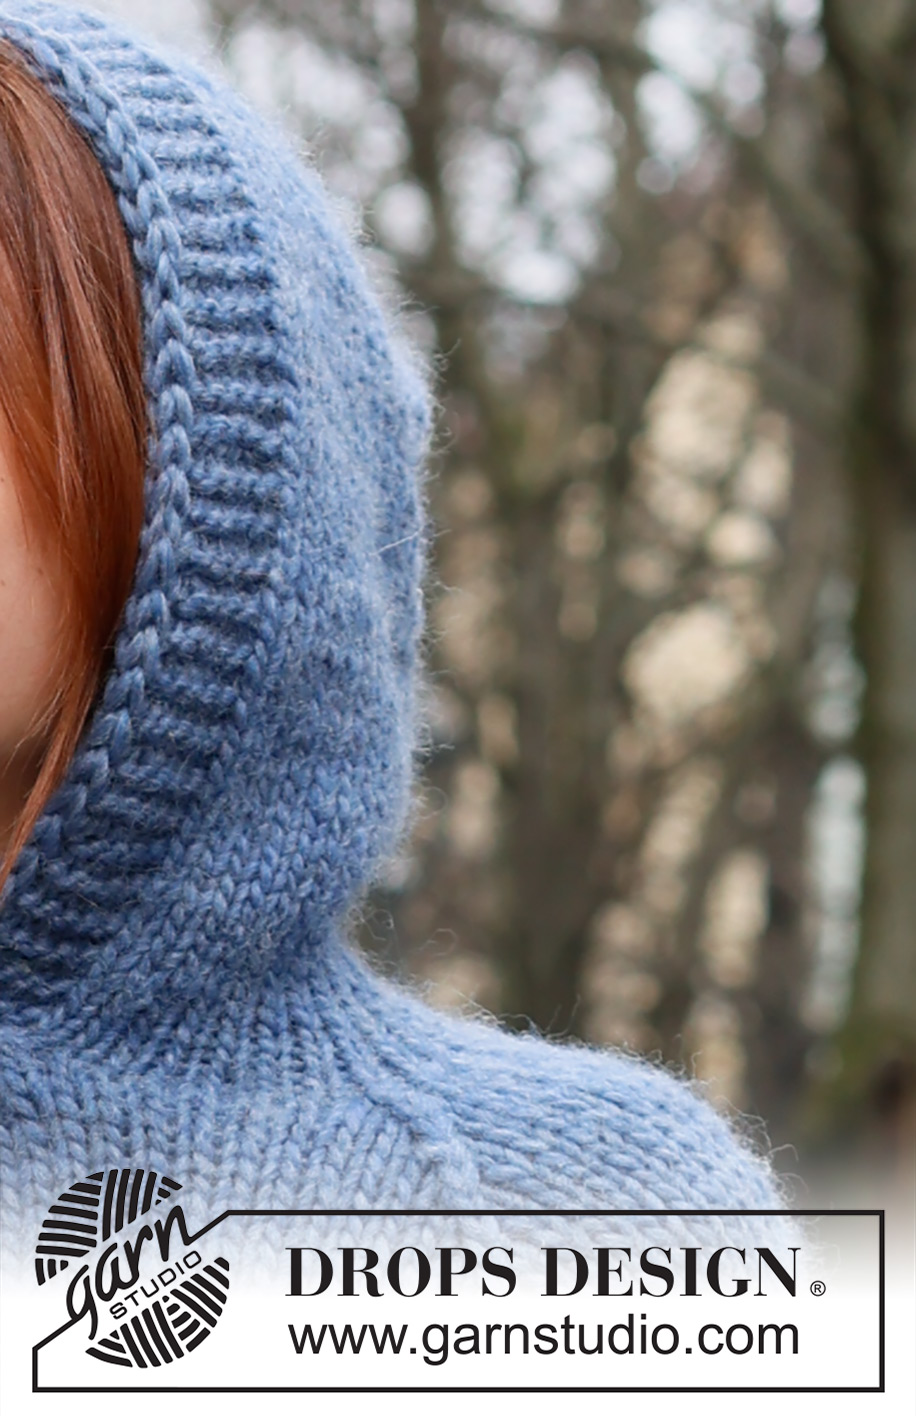
Chaperon Bleu#chaperonbleusweater |
|
 |
 |
Knitted jumper in DROPS Snow. The piece is worked bottom up in stocking stitch with raglan and a hood. Sizes S - XXXL.
DROPS 236-4 |
|
|
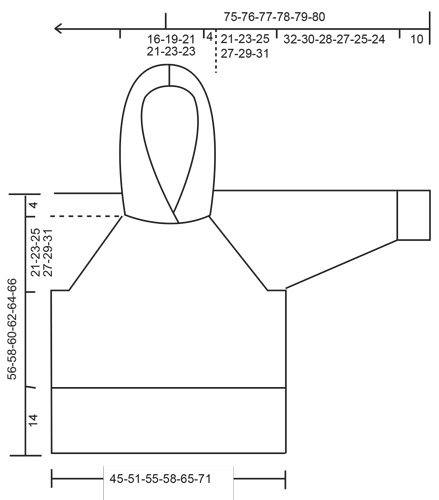
------------------------------------------------------- EXPLANATIONS FOR THE PATTERN: ------------------------------------------------------- RIDGE/GARTER STITCH (worked back and forth): Knit all rows. 1 ridge = knit 2 rows. INCREASE TIP-1 (for sleeves): Work until there are 2 stitches left before the marker, 1 yarn over, knit 4 (marker sits between these 4 stitches), 1 yarn over. On the next round knit the yarn overs twisted to avoid holes. Then work the new stitches in stocking stitch. INCREASE TIP-2 (for hood): Work until there are 2 stitches left before the marker thread, 1 yarn over, knit 4 (marker thread sits between these 4 stitches), 1 yarn over. On the next row work the yarn overs twisted to avoid holes. Then work the new stitches in stocking stitch. RAGLAN: Decrease to raglan in each transition between body and sleeves as follows: Work until there is 1 stitch left before marker-stitch, slip 2 stitches as if to knit together, knit 1, pass the slipped stitches over the knitted stitch. Repeat at each marker (8 stitches decreased on the row). ------------------------------------------------------- START THE PIECE HERE: ------------------------------------------------------- JUMPER - SHORT OVERVIEW OF THE PIECE: The front and back pieces are worked separately, back and forth, bottom up until the split is finished. Both pieces are placed on the same circular needle and the piece is continued in the round as far as the armholes. The sleeves are worked in the round with double pointed needles/short circular needle, bottom up, then placed on the same circular needle as the body. The yoke is continued in the round. The hood is worked back and forth to finish. BACK PIECE: Cast on 62-70-74-78-86-94 stitches with circular needle size 7 mm and DROPS Snow. Purl 1 row from the wrong side. Then work rib as follows: 4 stitches in GARTER STITCH – read description above, * knit 2, purl 2 *, work from *-* until there are 6 stitches left, knit 2 and 4 stitches in garter stitch. Work this rib back and forth for 14 cm, finishing after a row from the wrong side. Lay the piece to one side. FRONT PIECE: Cast on and work in the same way as the back piece. BODY: Place the front and back pieces on the same circular needle size 8 mm and knit 1 round where you decrease 24-28-28-28-28-32 stitches evenly spaced = 100-112-120-128-144-156 stitches. Insert 1 marker at the beginning of the round and 1 marker after 50-56-60-64-72-78 stitches (sides). Work stocking stitch in the round. REMEMBER THE KNITTING TENSION! When the piece measures 31 cm, cast off 6-6-6-8-8-10 stitches for the armholes on each side (cast off 3-3-3-4-4-5 stitches on each side of each marker) = 44-50-54-56-64-68 stitches on the front and back pieces. Lay the piece to one side and work the sleeves. SLEEVES: Cast on 32-32-36-36-40-40 stitches with double pointed needles size 7 mm and DROPS Snow. Knit 1 round, then work rib (knit 2, purl 2) in the round for 10 cm. Change to double pointed needles size 8 mm. Insert 1 marker at the beginning of the round (mid-under sleeve). Allow the marker to follow your work onwards; it is used when increasing under the sleeve. Work stocking stitch in the round. When the sleeve measures 12 cm from the cast-on edge, increase 1 stitch on each side of the marker – read INCREASE TIP. Increase like this every 8-6-7-4-3-2 cm a total of 4-5-4-6-7-10 times = 40-42-44-48-54-60 stitches. When the sleeve measures 42-40-38-37-35-34 cm, cast off 6-6-6-8-8-10 stitches under the sleeve (3-3-3-4-4-5 stitches on each side of the marker) = 34-36-38-40-46-50 stitches. Lay the piece to one side and work the other sleeve in the same way. YOKE: Place the sleeves onto the same circular needle as the body, where stitches were cast off for the armholes = 156-172-184-192-220-236 stitches. Insert 2 markers in the outermost stitch on each side of both the front and back pieces (4 markers). These are used when decreasing for raglan. Start at the transition between the back piece and the right sleeve and work stocking stitch in the round. When the yoke measures 3-4-5-5-4-3 cm, begin to decrease for RAGLAN – read description above. Decrease like this every 2nd round a total of 11-12-13-14-17-19 times = 68-76-80-80-84-84 stitches. Insert 1 marker-thread mid-front and 1 marker-thread mid-back. Cut the strand. Start 3 stitches before the marker-thread mid-front – the piece is now finished back and forth. ROW 1 (right side): Knit and decrease for raglan until there are 3 stitches left before the marker-thread mid-front. Knit up 1 stitch behind each of the next 6 stitches. Turn. ROW 2 (wrong side): Knit 5, purl until there are 5 stitches left, knit 5. On the next row from the right side decrease for raglan for the last time (you have decreased a total of 13-14-15-16-19-21 times) and there are 58-66-70-70-74-74 stitches. The yoke measures approx. 21-23-25-27-29-31 cm. HOOD: Work stocking stitch with 5 stitches in garter stitch on each side, AT THE SAME TIME increase 1 stitch on each side of the marker-thread mid-back and 1 stitch on each side of both raglan-lines on the front piece (6 stitches increased) – read INCREASE TIP-2. Increase like this 1 more time on the next row from the right side = 70-78-82-82-86-86 stitches. Continue with stocking stitch and garter stitch until the hood measures 37-38-39-40-41-42 cm. Cast off. Fold the hood and sew it together at the top. I-CORD EDGE: Work an edge around the hood as follows: Use 2 double pointed needles size 8 mm and cast on 2 stitches, knit up 1 stitch in the outermost loop of the bottom ridge on the right side of the hood (when the garment is worn) = 3 stitches on the needle. *Push the stitches back to the beginning of the needle and work again from the right side without turning. Knit 2, slip the next stitch as if to knit, knit up a new stitch in the next ridge on the hood, pass the slipped stitch over the knitted-up stitch *, work from *-* until an edge has been worked around the hood. NOTE! Knit up 1 stitch in each ridge, if this makes the edge tight, knit up 1 more stitch evenly along the hood. Knit together the last 3 stitches on the row, cut the strand, pull it through the remaining stitch and fasten. ASSEMBLY: Sew the openings under the sleeves. |
|
 |
|
Have you finished this pattern?Tag your pictures with #dropspattern #chaperonbleusweater or submit them to the #dropsfan gallery. Do you need help with this pattern?You'll find 29 tutorial videos, a Comments/Questions area and more by visiting the pattern on garnstudio.com. © 1982-2026 DROPS Design A/S. We reserve all rights. This document, including all its sub-sections, has copyrights. Read more about what you can do with our patterns at the bottom of each pattern on our site. |
|


With over 40 years in knitting and crochet design, DROPS Design offers one of the most extensive collections of free patterns on the internet - translated to 17 languages. As of today we count 324 catalogues and 12290 patterns translated into English (UK/cm). 12290
We work hard to bring you the best knitting and crochet have to offer, inspiration and advice as well as great quality yarns at incredible prices! Would you like to use our patterns for other than personal use? You can read what you are allowed to do in the Copyright text at the bottom of all our patterns. Happy crafting!
Post a comment to pattern DROPS 236-4
We would love to hear what you have to say about this pattern!
If you want to leave a question, please make sure you select the correct category in the form below, to speed up the answering process. Required fields are marked *.