Comments / Questions (30)
![]() Blanca wrote:
Blanca wrote:
Querría saber a que se refiere y como se trabajan los 2 pliegues de las sisas. Gracias anticipadas.
08.12.2023 - 14:09DROPS Design answered:
Hola Blanca, 1 pliegue = 2 filas de derecho. 2 pliegues = 4 filas de derecho. Es decir, trabajar todos los puntos de derecho 4 filas.
10.12.2023 - 18:33
![]() Blanca wrote:
Blanca wrote:
Hola . Recién empiezo con este patrón y en las explicaciones dice 1 pliegue en vertical ,y en la sisa dice también de trabajar 2 pliegues y no se como se hacen ni como trabajarlo. Gracias anticipadas.
08.12.2023 - 14:06DROPS Design answered:
Hola Blanca, puedes ver la explicación del pliegue en PUNTO MUSGO en EXPLICACIONES PARA REALIZAR LA LABOR. 1 pliegue en vertical = 2 filas de derecho.
10.12.2023 - 18:30
![]() Blanca wrote:
Blanca wrote:
Ya compre los hilos y voy a comenzar la labor ,y donde pone delantero dicho a continuación y entre paréntesis ,pone ,con la prenda puesta ...y no se que significa . Podría decírmelo. Gracias de antemano.
01.12.2023 - 21:54DROPS Design answered:
Hola Blanca, cuando dice DELANTERO DERECHO (con la prenda puesta) significa que estás trabajando lo que va a ser el delantero derecho (la parte del delantero a mano derecha) cuando montes y te pongas la prenda al final. Es decir, ahora no importa para trabajar, es para que sepas que pieza está a cada lado cuando montes la labor.
03.12.2023 - 19:54
![]() Juanita Garcia wrote:
Juanita Garcia wrote:
Sorry to bother you again. Firstly thank you for answering my last question. I'm now at the point where I start to decrease for the v neck. Whilst decreasing I still follow the chart correct? If so how do I do that if there are less stitches for that section?
30.11.2022 - 17:29DROPS Design answered:
Dear Mrs Garcia, correct, you will continue to work the diagram at the same time as you decrease for neck; just work all stitches as before but when there is not enough stitches to work a cable or the decrease+ yarn over in the lace pattern, just work these stitches in stocking stitch. Happy knitting!
01.12.2022 - 11:01
![]() Juanita Garcia wrote:
Juanita Garcia wrote:
I'm new to chart reading. What do I do when I get to the end of chart A2... chart A1 has 10 rows but chart A2 only has 9 so the next row would be a wrong side row. Do I just start the chart at the bottom but in reverse? And if so does that mean that all the rows would be done in reverse too?
28.11.2022 - 00:28DROPS Design answered:
Dear Juanita Garcia, it looks llike one row is missing in A.2/A.3 sorry for that, work them over 10 rows so that there will be always 4 rows stocking stitch between the rows with the purled sts, and repeat these 10 rows in height - at the same time, continue working A.1 over 8 rows as before. Happy knitting!
28.11.2022 - 10:25
![]() Emma wrote:
Emma wrote:
Can i please get help in understanding this instruction? "Knit 1 row from right side while decreasing the stitches in cable towards the neck by knitting together 2 by 2 = 24-25-26-27-29-31 stitches remain". How do I decrease 2 by 2? Thank you.
19.08.2022 - 04:17DROPS Design answered:
Hi Emma, You decrease over the cable by the neck by knitting the first 2 stitches together then knitting the second 2 stitches together. Happy crafting!
19.08.2022 - 06:47
![]() May wrote:
May wrote:
For the armhole, do i cast off at the right side or wrong side?
18.08.2022 - 09:23DROPS Design answered:
Dear May, see previous answer and let us know if you need more clarification. Happy knitting!
18.08.2022 - 09:27
![]() May wrote:
May wrote:
So when do i do the decrease for the armhole? is it once I start doing the ridges or after i cast off? thanks.
18.08.2022 - 09:10DROPS Design answered:
Dear May, you first work 2 ridges over the 6-6-7-9-11-13 sts towards the side (end of row, seen from RS on right front piece), then cast off the first 3-3-4-6-8-10 stitches at the beginning of row from the side (= beg of row from WS, on right front piece), and now decrease on every row from RS (= at the end of the row on right front piece). Happy knitting!
18.08.2022 - 09:26
![]() Jasmine wrote:
Jasmine wrote:
Hi, I don't quite understand the instruction for the armhole. I saw that the instruction says 1 ridge vertically = knit 2 rows, but I still don't understand what it means when the pattern says 'work 2 ridges over the outermost 6-6-7-9-11-13 stitches towards the side'. Does it mean that knit these outermost stitches for 2 rows? thank you.
03.08.2022 - 00:39DROPS Design answered:
Dear Jasmine, you have to knit the 6-6-7-9-11-13 stitches towards the side for 4 rows (= 2 ridges = 4 rows) while working the remaining stitches as before. Happy knitting!
03.08.2022 - 10:19
![]() Gerda Verheecke wrote:
Gerda Verheecke wrote:
Met veel plezier heb ik dit model nagebreid: iets langer, de averechtse tricotstreek in het motief van de 30 steken vervangen door een gaatje, bij de 6 steken aan de zijkant ook kabelmotief gebreid en het geheel met naalden nummer 3, daar ik nog 6 bollen witte katoen had liggen om met naald nr 3 te breien! Al meer dan 200 ‘👍’ op FB bij verschillende breigroepen!
30.04.2022 - 10:26
Doves Bay Vest#dovesbayvest |
|||||||||||||||||||||||||
 |
 |
||||||||||||||||||||||||
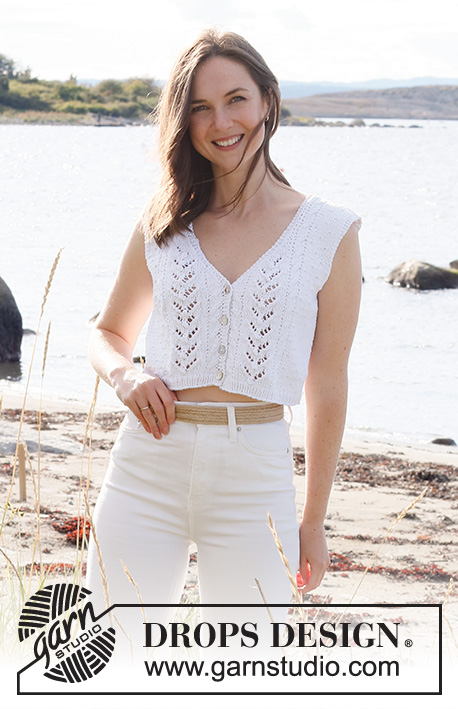
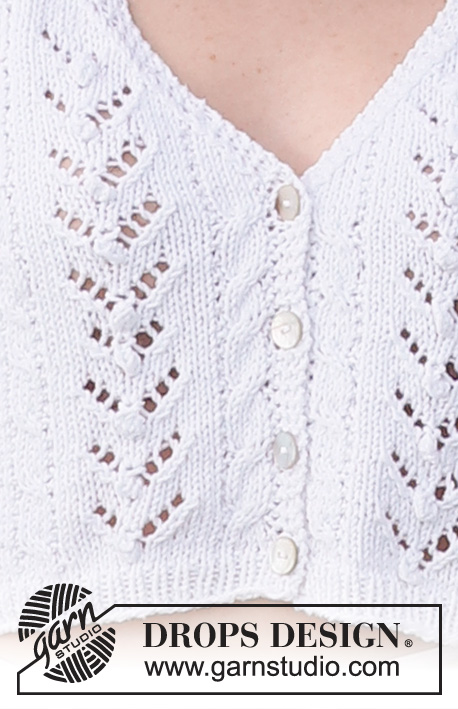
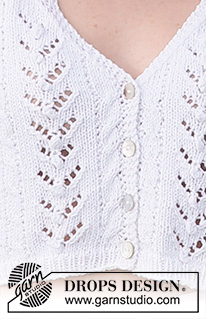
Knitted top in DROPS Cotton Light. Piece is knitted with lace pattern, cables, V-neck and closure at the front. Size: S - XXXL
DROPS 221-18 |
|||||||||||||||||||||||||
|
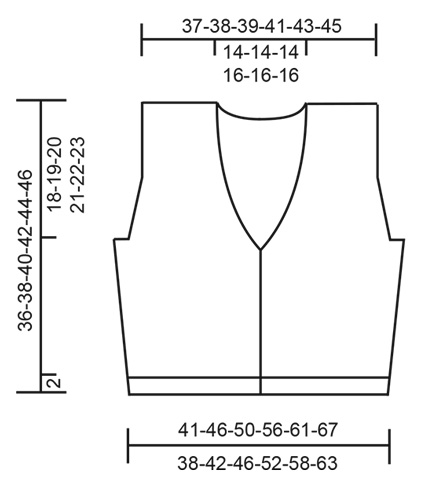
------------------------------------------------------- EXPLANATION FOR THE PATTERN: ------------------------------------------------------- GARTER STITCH (back and forth): Knit all rows. 1 ridge vertically = knit 2 rows. PATTERN: See diagrams A.1 to A.4. Choose diagram for your size (applies to A.2 and A.4). Diagrams show all rows in pattern seen from the right side. INCREASE TIP: Increase inside 1 edge stitch in garter stitch. All increases are done from the right side. Increase 1 stitch by making 1 yarn over, on next row work yarn over twisted to avoid holes. Work the new stitches in stocking stitch. DECREASE TIP (applies to the armholes and V-neck): Decrease inside 3 edge stitches in garter stitch. All decreases are done from the right side! DECREASE AS FOLLOWS AFTER 3 EDGE STITCHES IN GARTER STITCH: Slip 1 stitch knitwise, knit 1, pass slipped stitch over stitch worked. DECREASE AS FOLLOWS BEFORE 3 EDGE STITCHES IN GARTER STITCH: Work until 2 stitches remain before the 3 edge stitches, knit these 2 together. BUTTONHOLES: Cast off for buttonholes on right front band from right side. 1 BUTTONHOLE = knit second and third stitch from edge together and make 1 yarn over. On next row (wrong side) knit the yarn over to make a hole. Decrease for buttonholes when piece measures: S: 2, 6, 10 and 14 cm M: 1, 6, 11 and 16 cm L: 2, 7, 12 and 17 cm XL: 1, 7, 13 and 19 cm XXL: 1, 7, 13 and 19 cm XXXL: 2, 8, 14 and 20 cm ------------------------------------------------------- START THE PIECE HERE: ------------------------------------------------------- TOP - SHORT OVERVIEW OF THE PIECE: Work front pieces and back piece back and forth on circular needle separately. Sew piece together on the shoulders and in the sides. RIGHT FRONT PIECE (when garment is worn): Cast on 48-54-58-64-70-76 stitches (including 3 band stitches towards mid front and 1 edge stitch in the side) on circular needle size 3 mm with Cotton Light. Purl 1 row (= wrong side). Work next row as follows from right side: 3 band stitches in GARTER STITCH - read explanation above - * knit 1, purl 1 *, repeat from *-* until 1 stitch remains on needle, and finish with 1 edge stitch in garter stitch. Continue rib back and forth for 2 cm – finish after a row from wrong side. Switch to circular needle size 4 mm. Work 2 rows in stocking stitch with 3 band stitches in garter stitch towards mid front and 1 edge stitch in garter stitch towards the side - AT THE SAME TIME on first row decrease 0-1-1-1-1-1 stitch in approx. the middle of row = 48-53-57-63-69-75 stitches. Then work as follows (1st row = right side): 3 band stitches in garter stitch, work A.1 (= 25-25-25-29-29-29 stitches), work A.2 over the next 12-18-24-24-30-36 stitches (= 2-3-4-4-5-6 repetitions of 6 stitches), work 7-6-4-6-6-6 stitches in stocking stitch, and finish with 1 edge stitch in garter stitch towards the side. Continue pattern back and forth like this. REMEMBER THE KNITTING TENSION and remember BUTTONHOLES on band - see explanation above. Then increase in the side, decrease for V-neck towards mid front and decrease for armholes towards the side. This happens at the same time and is explained below: INCREASE IN THE SIDE: When piece measures 4-4-4-5-5-5 cm, increase 1 stitch in the side – read INCREASE TIP. Increase like this every 3½-4-4-4½-4½-4½ cm 4 times in total. V-NECK: When piece measures 15-17-18-20-20-21 cm (approx. 1 cm after last buttonhole on band), decrease 1 stitch for V-neck – read DECREASE TIP. Decrease for V-neck on every other row (i.e. every row from right side) 17-17-16-18-17-16 times in total, and then every 4th row (i.e. every other row from right side) 3-3-4-4-5-6 times in total. ARMHOLE: When piece measures 17-18-19-20-21-22 cm, work 2 ridges over the outermost 6-6-7-9-11-13 stitches towards the side (work first row from right side and the other stitches as before). After the 2 ridges cast off 3-3-4-6-8-10 stitches for armhole at beginning of the next row from the side. Continue pattern back and forth as before with 3 band stitches in garter stitch towards mid front and 3 edge stitches in garter stitch towards the armhole. AT THE SAME TIME on next row from right side decrease 1 stitch in towards the side for armhole - read DECREASE TIP. Decrease for armhole like this every other row 3-7-9-10-12-14 times in total. After all increases and decreases, there are 26-27-28-29-31-33 stitches on needle. Work until 2 rows remain before piece measures 36-38-40-42-44-46 cm. Knit 1 row from right side while decreasing the stitches in cable towards the neck by knitting together 2 by 2 = 24-25-26-27-29-31 stitches remain. Knit 1 row from wrong side. Cast off knitting from right side. Front piece measures approx. 36-38-40-42-44-46 cm from shoulder and down. LEFT FRONT PIECE (when garment is worn): Cast on 48-54-58-64-70-76 stitches (including 1 edge stitch in side and 3 band stitches towards mid front) on circular needle size 3 mm with Cotton Light. Purl 1 row (= wrong side). Work next row as follows from right side: 1 edge stitch in garter stitch, * purl 1, knit 1 *, repeat from *-* until 3 stitches remain on needle, and finish with 3 band stitches in garter stitch towards mid front. Continue rib back and forth for 2 cm – finish after a row from wrong side. Switch to circular needle size 4 mm. Work 2 rows in stocking stitch with 1 edge stitch in garter stitch towards the side and 3 band stitches in garter stitch towards mid front - AT THE SAME TIME on first row decrease 0-1-1-1-1-1 stitch in approx. the middle of row = 48-53-57-63-69-75 stitches. Then work as follows (1st row = right side): 1 edge stitch in garter stitch, work 7-6-4-6-6-6 stitches in stocking stitch, A.3 over the next 12-18-24-24-30-36 stitches (= 2-3-4-4-5-6 repetitions of 6 stitches), work A.1 (= 25-25-25-29-29-29 stitches), and finish with 3 band stitches in garter stitch towards mid front. Continue pattern back and forth like this. Then increase in the side, decrease for V-neck towards mid front and decrease for armholes towards the side. This happens at the same time and is explained below: INCREASE IN THE SIDE: When piece measures 4-4-4-5-5-5 cm, increase 1 stitch in the side – read INCREASE TIP. Increase like this every 3½-4-4-4½-4½-4½ cm 4 times in total. V-NECK: When piece measures 15-17-18-20-20-21 cm, decrease 1 stitch for V-neck – read DECREASE TIP. Decrease for V-neck every other row 17-17-16-18-17-16 times in total, and then every 4th row 3-3-4-4-5-6 times in total. ARMHOLE: When piece measures 17-18-19-20-21-22 cm, work 2 ridges over the outermost 6-6-7-9-11-13 stitches towards the side (work first row from right side and the other stitches as before). After the 2 ridges cast off 3-3-4-6-8-10 stitches for armhole at beginning of the next row from the side. Continue pattern back and forth as before with 3 band stitches in garter stitch towards armhole and 3 band stitches in garter stitch towards mid front. AT THE SAME TIME on next row from right side decrease 1 stitch in towards the side for armhole - read DECREASE TIP. Decrease for armhole like this every other row 3-7-9-10-12-14 times in total. After all increases and decreases, there are 26-27-28-29-31-33 stitches on needle. Work until 2 rows remain before piece measures 36-38-40-42-44-46 cm. Knit 1 row from right side while decreasing the stitches in cable towards the neck by knitting together 2 by 2 = 24-25-26-27-29-31 stitches remain. Knit 1 row from wrong side. Cast off knitting from right side. Front piece measures approx. 36-38-40-42-44-46 cm from shoulder and down. BACK PIECE: Cast on 89-99-107-119-131-143 stitches (including 1 edge stitch in each side) on circular needle size 3 mm with Cotton Light. Purl 1 row (= wrong side). Work next row as follows from right side: 1 edge stitch in garter stitch, * knit 1, purl 1 *, repeat from *-* until 2 stitches remain on needle, knit 1, and finish with 1 edge stitch in garter stitch. Continue rib back and forth for 2 cm – finish after a row from wrong side. Switch to circular needle size 4 mm. Work 2 rows in stocking stitch with 1 edge stitch in garter stitch in each side. Then work as follows (1st row = right side): 1 edge stitch in garter stitch, work 7-6-4-6-6-6 stitches in stocking stitch, work A.3 over the next 12-18-24-24-30-36 stitches (= 2-3-4-4-5-6 repetitions of 6 stitches), work A.4 (= 49-49-49-57-57-57 stitches), work A.2 over the next 12-18-24-24-30-36 stitches (= 2-3-4-4-5-6 repetitions of 6 stitches), work 7-6-4-6-6-6 stitches in stocking stitch, and finish with 1 edge stitch in garter stitch. Continue pattern back and forth like this. When piece measures 4-4-4-5-5-5 cm, increase 1 stitch in each side – read INCREASE TIP. Increase like this every 3½-4-4-4½-4½-4½ cm 4 times in total in each side = 97-107-115-127-139-151 stitches. When piece measures 17-18-19-20-21-22 cm, work 2 ridges over the outermost 6-6-7-9-11-13 stitches in each side (work first row from right side and the other stitches as before). After the 2 ridges cast off 3-3-4-6-8-10 stitches for armholes at the beginning of the next 2 rows = 91-101-107-115-123-131 stitches. Continue pattern back and forth as before with 3 edge stitches in garter stitch in each side towards armholes. AT THE SAME TIME on next row from right side decrease 1 stitch in each side for armholes - read DECREASE TIP. Decrease for armholes like this on every other row from right side 3-7-9-10-12-14 times in total in each side = 85-87-89-95-99-103 stitches. When piece measures 32-34-36-38-40-42 cm, decrease 4 stitches mid back by knitting the two cables mid back together 2 by 2 (= 4 stitches decreased) = 81-83-85-91-95-99 stitches. Then work 2 ridges over the middle 33-33-33-37-37-37 stitches (work the other stitches as before). After the 2 ridges cast off the middle 27-27-27-31-31-31 stitches for neck and finish each shoulder separately. Then work as before and cast off 1 stitch for neck on next row from right side – remember DECREASE TIP = 26-27-28-29-31-33 stitches remain on shoulder. Work until 2 rows remain before piece measures 36-38-40-42-44-46 cm. Knit 1 row from right side while decreasing the stitches in cable towards the neck by knitting together 2 by 2 (= 2 stitches decreased) = 24-25-26-27-29-31 stitches. Knit 1 row from wrong side. Cast off knitting from right side. Work the other shoulder the same way. Back piece measures approx. 36-38-40-42-44-46 cm from shoulder and down. ASSEMBLY: Sew shoulder seams inside cast-off edge. Sew side seams inside 1 edge stitch in garter stitch. Sew the buttons on to the left band. |
|||||||||||||||||||||||||
Diagram explanations |
|||||||||||||||||||||||||
|
|||||||||||||||||||||||||
 |
|||||||||||||||||||||||||
 |
|||||||||||||||||||||||||
 |
|||||||||||||||||||||||||
Have you finished this pattern?Tag your pictures with #dropspattern #dovesbayvest or submit them to the #dropsfan gallery. Do you need help with this pattern?You'll find 25 tutorial videos, a Comments/Questions area and more by visiting the pattern on garnstudio.com. © 1982-2026 DROPS Design A/S. We reserve all rights. This document, including all its sub-sections, has copyrights. Read more about what you can do with our patterns at the bottom of each pattern on our site. |
|||||||||||||||||||||||||






Post a comment to pattern DROPS 221-18
We would love to hear what you have to say about this pattern!
If you want to leave a question, please make sure you select the correct category in the form below, to speed up the answering process. Required fields are marked *.