
Popular categories
Looking for a yarn?


Comments / Questions (42)
![]() Lena wrote:
Lena wrote:
How much positive ease do you recommend for the bust of approx. 100 cm?
06.06.2026 - 22:30DROPS Design answered:
Dear Lena, read more about sizing and ease here. Happy knitting!
08.06.2026 - 09:12
![]() ELSA wrote:
ELSA wrote:
Om jag har ett byst mått på 93 vad ska jag välja för storlek?
22.04.2026 - 20:55DROPS Design answered:
Hej Elsa, storlek L har ett byst mått på 96 cm :)
23.04.2026 - 14:23
![]() Yvonne Obernier wrote:
Yvonne Obernier wrote:
Vielen Dank für die Antwort, die ich nicht lesen kann. Ich habe die Lösung selbst herausgefunden.
25.03.2026 - 10:24
![]() Yvonne Obernier wrote:
Yvonne Obernier wrote:
Wie strickt man die 7Maschen in der Passe Muster A2 wieder ab?
24.03.2026 - 21:00DROPS Design answered:
Liebe Frau Obernier, in diesem Video zeigen wir, wie man A.2 strickt, es kann Ihnen sicher helfen. Viel Spaß beim Stricken!
25.03.2026 - 07:31
![]() Yvonne wrote:
Yvonne wrote:
1. Is this pattern suitable for someone who is not a beginner but definitely not advanced. I just knitted Moon Valley dress, pattern u-776 and that was fine. Is this dress a lot more difficult than that? 2. I wanted something lacy that would be cool to wear on warm days but as this is for Yarn group B will it be a warm dress?
30.01.2026 - 22:42DROPS Design answered:
Hi Yvonne, This dress should be possible for an intermediate knitter. Drops belle from yarn group B is one of our thinner yarns, so should not be too warm. Regards, Drops Team.
03.02.2026 - 07:49
![]() Narcissa wrote:
Narcissa wrote:
Hi! I’ve reached A.2 row 18 and proceeded to count my stitches which were supposed to be 250, but they’re 243 😥 any advice on what to do? I don’t know where I went wrong and I cannot tell whether I made mistakes by missing stitches on the previous 2 rounds (I didn’t count my stitches for the previous 2 rounds) and now I’m stuck with this. I’d be thankful if you saved me 😩😩
12.12.2024 - 22:37DROPS Design answered:
Dear Narcissa, as you are referring to a middle point in A.2 (without indicating your size) and it's difficult to know where the mistakes may be located you should remake the previous 2 rounds. After frogging the 2 rounds, count that the number of stitches match the number you need. The best tip is to place markers in the piece to indicate each repeat so that, if you miss any stitches, it will be easier to see them (because the repeat will be different). Also, check the black square (from 1 stitch obtain 7 stitches), you may have missed one in one repeat of A.2. Happy knitting!
15.12.2024 - 22:34
![]() Sabrina wrote:
Sabrina wrote:
Hejsa Jeg er i tvivl om, hvor meget ease kjolen skal have, så hvis jeg har et brystmål på 89, skal jeg så lave en str. M eller L?
07.07.2024 - 23:24DROPS Design answered:
Hei Sabrina. Det kommer an på om du ønsker å ha den tight over brystet eller ikke. Har du en kjole fra før som du liker passformen på, ta mål av den og sammenlign med målene i målskissen til "Swing by Spring " kjolen. mvh DROPS Design
09.07.2024 - 12:57
![]() Yulia wrote:
Yulia wrote:
Hi, a question on the body section. What does it mean by increase alternately before and after every marker on every 6th round? Is it right if I do 1 row increase before marker (i.e. 8 sts increase) and 1 row increase after marker? Also is the count of every 6th round include the 2 rounds which I have increase of 8 sts each i.e. work in stockinette 4 rounds before the next increase?
03.07.2023 - 15:55DROPS Design answered:
Dear Yulia, correct, the first time you will increase before each marker (increasing 8 sts on the round); then the next time you will increase after each marker (increasing 8 sts on the round) and repeat these, alternately before and after each marker. Increase like this: *Work 1 round with increase, 5 rounds without increase*, and repeat these 6 rounds. Happy knitting!
03.07.2023 - 16:03
![]() Yulia wrote:
Yulia wrote:
Hi, do you have a video to work on dividing body and sleeve?
29.05.2023 - 16:35DROPS Design answered:
Dear Yulia, sure, in this video we show from time code approx. 06:52 how to divide body and how to cast on new stitches for sleeve - and this lesson shows also from picture 9 how you will divide piece - both are for a raglan, but the same technique will be used with a circular yoke. Happy knitting!
30.05.2023 - 11:14
![]() Yulia wrote:
Yulia wrote:
Hi, I am working on Yoke section up to the point dividing body and sleeves. After slipping stitches for sleeve, there are numbers of cast on on needle. Which needle does this refer to? The stitch holder for sleeve or needle on body? Thanks.
28.05.2023 - 16:45DROPS Design answered:
Dear Yulia, you cast on stitches for the side under the sleeve, so they are in the needle for the body and used as a placeholder for the location of the sleeves while you work the body. Happy knitting!
28.05.2023 - 18:58
|
||||||||||||||||||||||||||||
Swing by Spring#swingbyspringdress |
||||||||||||||||||||||||||||
 |
 |
|||||||||||||||||||||||||||
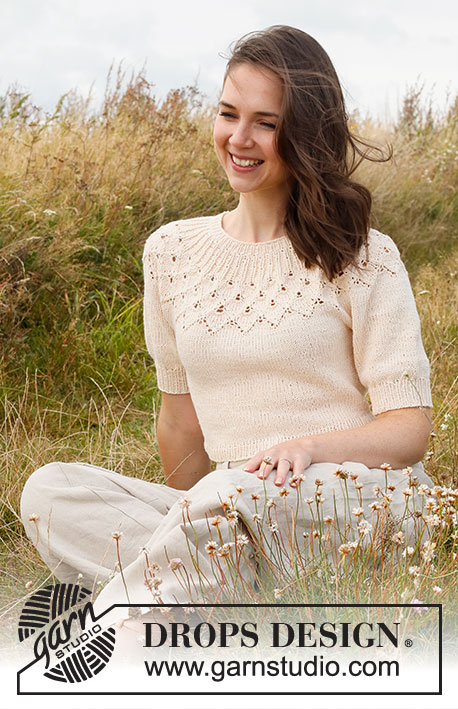
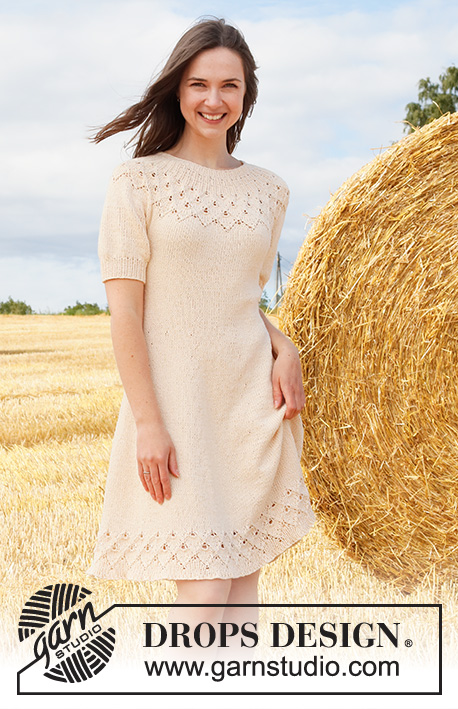
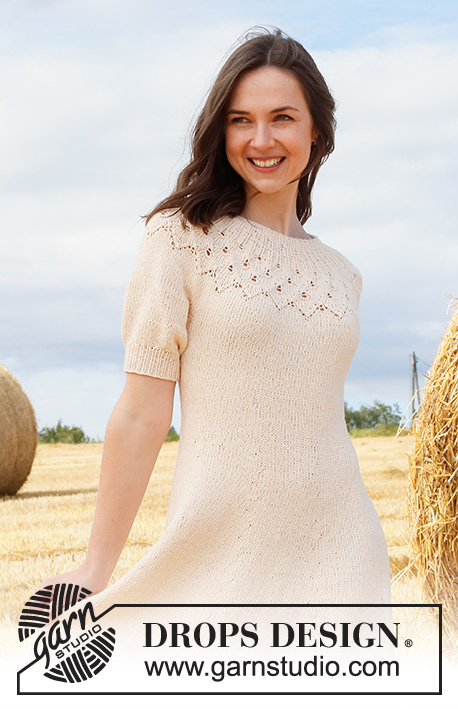
Knitted dress in DROPS Belle. Piece is knitted top down with round yoke, lace pattern, leaf pattern and short balloon sleeves. Size: S - XXXL
DROPS 223-2 |
||||||||||||||||||||||||||||
|
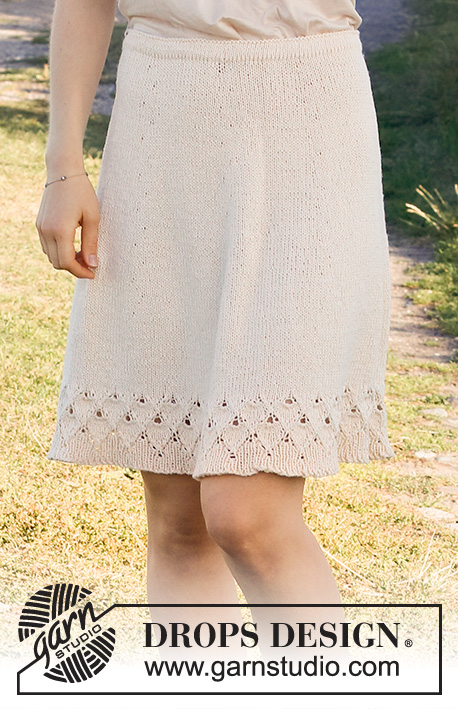
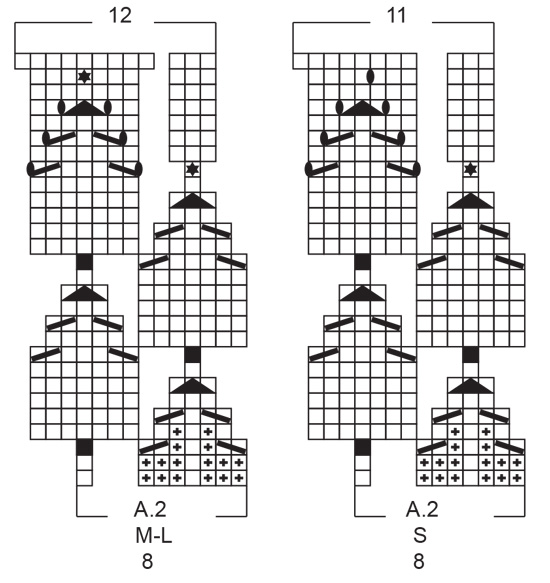
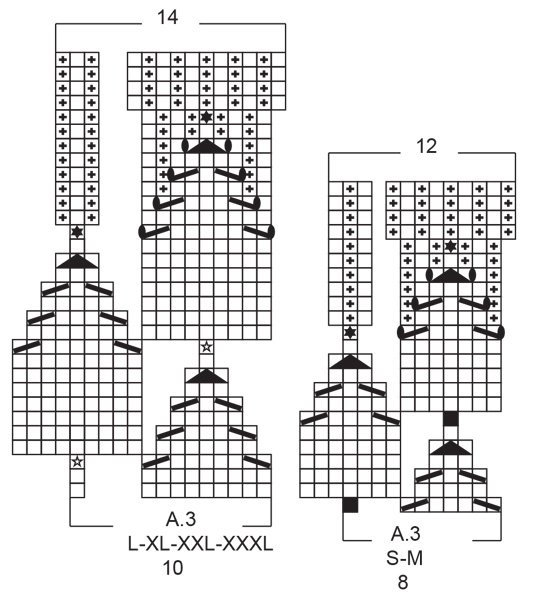
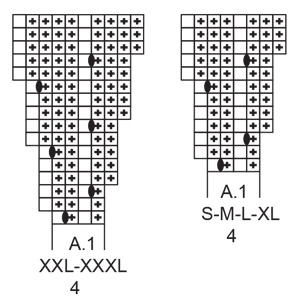
------------------------------------------------------- EXPLANATION FOR THE PATTERN: ------------------------------------------------------- PATTERN: See diagrams A.1 to A.3. Choose diagram for your size. INCREASE TIP (applies to on skirt): Increase alternately before and after each marker thread (i.e. do first increase before every marker thread, do second increase after every marker thread etc.). Increase 1 stitch before every marker thread as follows: Work until 1 stitch remains before marker thread, 1 yarn over (= 1 stitch increased), Increase like this at every marker thread (= 8 stitches increased total). Increase 1 stitch after every marker thread as follows: Work until marker thread, work 1 stitch after marker thread, 1 yarn over (= 1 stitch increased), Increase like this at every marker thread (= 8 stitches increased total). On next round knit yarns over twisted to avoid holes. Then work the new stitches in stocking stitch. DECREASE TIP (applies to sides of dress): Decrease 1 stitch on each side of marker thread as follows: Work until 3 stitches remain before marker thread and knit 2 together, knit 2 (marker thread is between these stitches), slip 1 stitch knitwise, knit 1, pass slipped stitch over stitch worked. CAST-OFF TIP: To avoid a tight cast-off edge you may use a larger needle size. If this also is too tight, work a 1 yarn over after approx. every 4th stitch while casting off (cast off yarn overs as regular stitches). ------------------------------------------------------- START THE PIECE HERE: ------------------------------------------------------- DRESS - SHORT OVERVIEW OF THE PIECE: Work neck edge and yoke in the round from mid back, top down. Now divide yoke for body and sleeves. Body is worked in the round on circular needle, top down. Work sleeves in the round on double pointed needles/short circular needle, top down. NECK EDGE: Cast on 100-100-104-108-112-120 stitches on circular needle size 3 mm with Belle. Knit 1 round. Then work rib = knit 1/purl 1. When rib measures 2-2-3-3-3-3 cm, switch to circular needle size 4 mm. Insert 1 marker at the beginning of round mid back, measure yoke from this marker! YOKE: Work A.1 in the round (= 25-25-26-27-28-30 repetitions of 4 stitches). When A.1 has been worked, there are 200-200-208-216-280-300 stitches on needle. Piece now measures 4-4-4-4-6-6 cm from marker. Then work A.2 in the round (= 25-25-26-27-28-30 repetitions of 8-8-8-8-10-10 stitches). REMEMBER THE KNITTING TENSION! When A.2 has been worked, there are 275-300-312-351-392-420 stitches on needle. Piece measures approx. 14-14-14-17-19-19 cm from marker (i.e. 16-16-17-20-22-22 cm from cast-on edge). Work in stocking stitch until piece measures 18-20-21-23-25-27 cm from marker. Now divide piece for body and sleeves. Work next round as follows: Knit 38-42-44-50-58-63 (= ½ back piece), slip the next 62-66-68-76-80-84 stitches on a stitch holder for sleeve, cast on 8-8-12-12-12-12 new stitches on needle (= in the side under sleeve), knit 75-84-88-99-116-126 (= front piece), slip the next 62-66-68-76-80-84 stitches on a stitch holder for sleeve, cast on 8-8-12-12-12-12 new stitches on needle (= in the side under sleeve), knit the last 38-42-44-50-58-63 stitches (= ½ back piece). BODY: = 167-184-200-223-256-276 stitches. Insert 1 marker thread in the middle of the 8-8-12-12-12-12 new stitches under each sleeve (= in the side of body). There are now 83-92-100-111-128-138 stitches on front piece and 84-92-100-112-128-138 stitches on back piece. Move the marker threads upwards when working; they are used when decreasing in the sides later. Work in stocking stitch in the round. When piece measures 3 cm from division, decrease 1 stitch on each side of every marker thread - read DECREASE TIP (= 4 stitches decreased). Decrease like this every 2 cm 4-4-4-4-5-5 times in total = 151-168-184-207-236-256 stitches. Work stocking stitch in the round until piece measures 15-15-16-16-16-16 cm from division. On next round insert 8 marker threads in the piece as follows: Knit 9-10-11-12-13-16, insert 1 marker thread, * knit 19-21-23-26-30-32, insert 1 marker thread *, work from *-* 7 times in total and finish with knit 9-11-12-13-13-16 Now increase stitches for skirt as follows: On next round, increase 1 stitch before every marker thread – read INCREASE TIP! Increase alternately before and after every marker thread for every increase on every 6th round 15 times in total = 271-288-304-327-356-376 stitches. Work in stocking stitch in the round. When dress measures 56-57-56-57-58-59 cm from division (approx. 8-8-11-11-11-11 cm remain, or to desired measurements), knit 1 round while increasing 1-0-6-3-4-4 stitches evenly = 272-288-310-330-360-380 stitches. Then work A.3 in the round (= 34-36-31-33-36-38 repetitions of 8-8-10-10-10-10 stitches). When A.3 has been worked, there are 408-432-434-462-504-532 stitches on needle. Cast off by knitting– read CAST-OFF TIP. Dress measures approx. 86-89-92-95-98-101 cm from shoulder and down. SLEEVES: Slip the 62-66-68-76-80-84 stitches from stitch holder in one side of piece on double pointed needles/a short circular needle size 4 mm, and pick up 1 stitch in each of the 8-8-12-12-12-12 new stitches cast on in the side under sleeve = 70-74-80-88-92-96 stitches. Work in stocking stitch in the round until sleeve measures 12-11-10-8-7-5 cm from division (approx. 5 cm remain until finished measurements, try the dress on and work to desired length). Knit 1 round while decreasing 16-16-14-14-14-14 stitches evenly = 54-58-66-74-78-82 stitches. Switch to double pointed needles size 3 mm. Work rib in the round = knit 1/purl 1 for 5 cm. Cast off with knit over knit and purl over purl - remember CAST-OFF TIP! Sleeve measures approx. 17-16-15-13-12-10 cm from division. Work the other sleeve the same way. |
||||||||||||||||||||||||||||
Diagram explanations |
||||||||||||||||||||||||||||
|
||||||||||||||||||||||||||||
 |
||||||||||||||||||||||||||||
 |
||||||||||||||||||||||||||||
 |
||||||||||||||||||||||||||||
 |
||||||||||||||||||||||||||||
 |
||||||||||||||||||||||||||||
Have you finished this pattern?Tag your pictures with #dropspattern #swingbyspringdress or submit them to the #dropsfan gallery. Do you need help with this pattern?You'll find 34 tutorial videos, a Comments/Questions area and more by visiting the pattern on garnstudio.com. © 1982-2026 DROPS Design A/S. We reserve all rights. This document, including all its sub-sections, has copyrights. Read more about what you can do with our patterns at the bottom of each pattern on our site. |
||||||||||||||||||||||||||||


With over 40 years in knitting and crochet design, DROPS Design offers one of the most extensive collections of free patterns on the internet - translated to 17 languages. As of today we count 325 catalogues and 12298 patterns translated into English (UK/cm). 12298
We work hard to bring you the best knitting and crochet have to offer, inspiration and advice as well as great quality yarns at incredible prices! Would you like to use our patterns for other than personal use? You can read what you are allowed to do in the Copyright text at the bottom of all our patterns. Happy crafting!
Post a comment to pattern DROPS 223-2
We would love to hear what you have to say about this pattern!
If you want to leave a question, please make sure you select the correct category in the form below, to speed up the answering process. Required fields are marked *.