
Popular categories
Looking for a yarn?


Comments / Questions (6)
![]() Elke Rodrigues wrote:
Elke Rodrigues wrote:
Ich verstehe leider die Anleitung für den Ärmel nicht so ganz. Werden nach den ersten 4 Krausrippen einfach noch zwei weitere gestrickt und dann im Muster A4 fortgefahren? Soll nach 6 M A.4 zuerst zurück gestrickt werden? Dann haut es aber nicht hin in Bezug auf Hin und Rückreihe....... Vielen Dank für die Hilfe! Viele Grüße, Elke Rodrigues
04.07.2024 - 14:06DROPS Design answered:
Liebe Frau Rodrigues, ganz am Anfang vom Ärmel stricken Sie 8 Reihen rechts ( = 4 Krausrippe), dann stricken Sie das Diagram A.4. Nach A.4 nehmen Sie regelmäßig verteilt zu mit 1 Umschlag nach jeder 2. rechte Masche (mit 1 Randmasche beidseitig), dann stricken Sie glatt rechts weiter. Viel Spaß beim Stricken!
05.07.2024 - 07:10
![]() Katja wrote:
Katja wrote:
Moi, kun hihoja päätellään (Päätä 5 silmukkaa 1-1-1-1-1-1 kertaa, 2 silmukkaa 1-1-1-1-1-1 kertaa ja sitten 1 silmukka 13-15-16-18-19-23 kertaa kummassakin reunassa) kuuluuko päättelykerroksen väliin neuloa yksi välikerros? Koska ilman välikerrosta päättelykerroksien pituus on noin 5cm kun ohjeessa lukee että korkeus olisi kuulunut kasvaa 10cm?
25.08.2021 - 10:17DROPS Design answered:
Silmukat päätetään aina kerrosten alusta, joten kun olet päättänyt kummastakin reunasta ensimmäiset 5 silmukkaa, olet neulonut 2 kerrosta.
09.09.2021 - 17:20
![]() Erzsebet wrote:
Erzsebet wrote:
Nice pattern and design. And i love the sleeves!
10.02.2021 - 11:35
![]() Odile wrote:
Odile wrote:
J'aime aussi beaucoup ce modele
18.01.2021 - 12:53
![]() Elizabeth wrote:
Elizabeth wrote:
Delicata
16.01.2021 - 17:17
![]() Merike wrote:
Merike wrote:
Hydrangea
09.01.2021 - 09:54
|
||||||||||||||||
Flower Wish Wrap#flowerwishwrap |
||||||||||||||||
 |
 |
|||||||||||||||
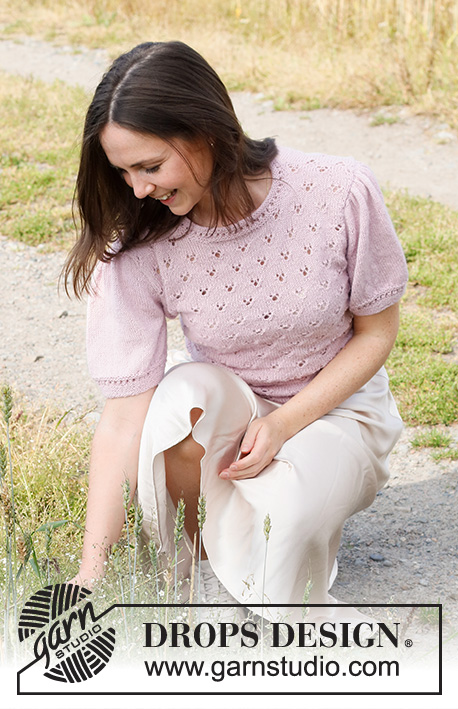
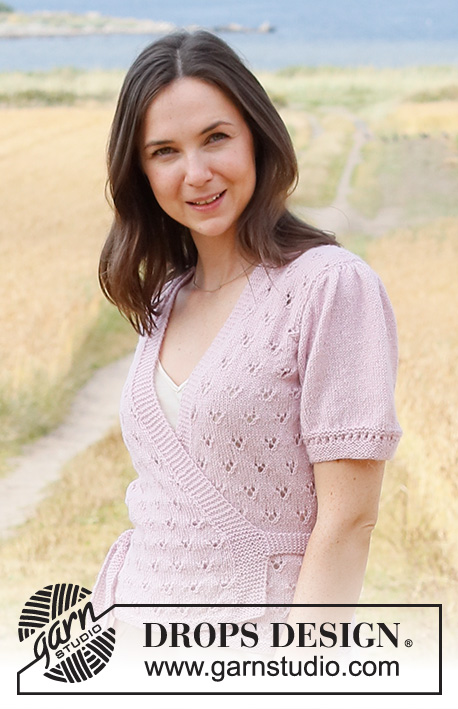
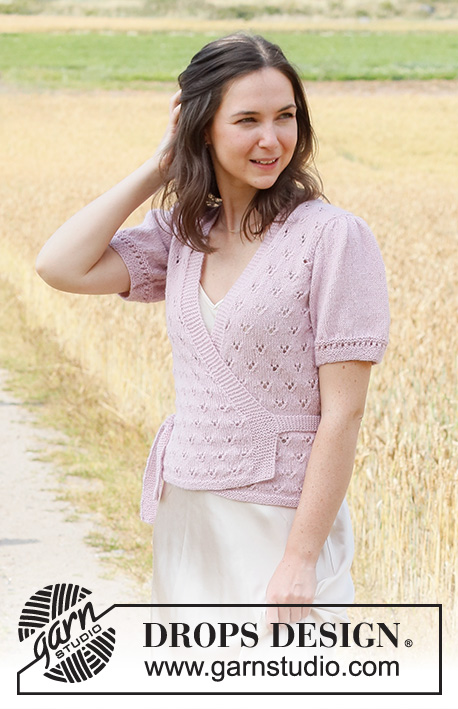
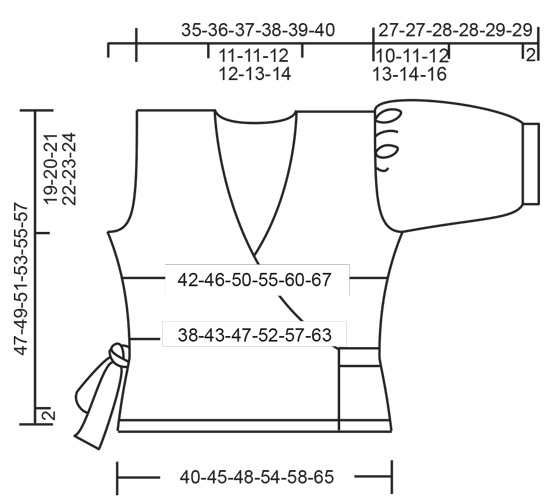
Knitted wrap-around jacket in DROPS Flora. The piece is worked with lace pattern and short puffed sleeves. Sizes S - XXXL.
DROPS 222-13 |
||||||||||||||||
|
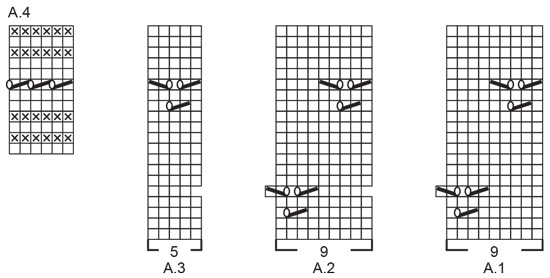
------------------------------------------------------- EXPLANATIONS FOR THE PATTERN: ------------------------------------------------------- RIDGE/GARTER STITCH (worked back and forth): Knit all rows. 1 ridge in height = Knit 2 rows. PATTERN: See diagrams A.1 to A.4. The diagrams show all rows in the pattern from the right side. DECREASE TIP-1 (for sides of front and back pieces): All decreases are worked from the right side! Decrease on the inside of the 3 outermost stitches on each side. BEFORE THE 3 OUTERMOST STITCHES: Slip 1 stitch as if to knit, knit 1 and pass the slipped stitch over the knitted stitch. AFTER THE 3 OUTERMOST STITCHES: Work until there are 2 stitches left before the 3 outermost stitches and knit these 2 stitches together. DECREASE TIP-2 (for neck-line in front): All decreases are worked from the right side! Decrease for the neck on the inside of the 9 band stitches. AFTER THE 9 BAND STITCHES: Slip 1 stitch as if to knit, knit 1 and pass the slipped stitch over the knitted stitch. BEFORE THE 9 BAND STITCHES: Work until there are 2 stitches left before the 9 band stitches and knit these 2 stitches together. INCREASE TIP (for sides of body): All increases are worked from the right side! Increase on the inside of the 3 outermost stitches on each side by making 1 yarn over. On the next row (wrong side) purl the yarn over twisted to avoid a hole. Then work the new stitches in stocking stitch. ------------------------------------------------------- START THE PIECE HERE: ------------------------------------------------------- JACKET – SHORT OVERVIEW OF THE PIECE: Each section is worked separately, back and forth, with circular needle and bottom up. The piece is sewn together and the ties are worked to finish. BACK PIECE: Cast on 98-109-118-131-142-158 stitches (including 1 edge stitch on each side) with circular needle size 2.5 mm and Flora. Work 4 RIDGES – read description above. Change to circular needle size 3 mm. Work the next row as follows from the right side: 1 edge stitch in garter stitch, 5-6-6-8-9-8 stitches in stocking stitch, work A.1 (= 9 stitches), A.2 over the next 72-81-90-99-108-126 stitches (= 8-9-10-11-12-14 repeats of 9 stitches), A.3 (= 5 stitches), 5-6-6-8-9-8 stitches in stocking stitch and 1 edge stitch in garter stitch. Continue this pattern. REMEMBER THE KNITTING TENSION! When the piece measures 4 cm, decrease 1 stitch on each side – read DECREASE TIP-1. Repeat the decrease on each side when the piece measures 8 cm = 94-105-114-127-138-154 stitches. When the piece measures 12-12-13-13-13-13 cm, increase 1 stitch on each side – read INCREASE TIP. Increase like this every 4-4-4½-4½-5-5 cm a total of 4 times on each side = 102-113-122-135-146-162 stitches. When the piece measures 28-29-30-31-32-33 cm, cast off for the armholes at the beginning of each row as follows: Cast off 5 stitches 1-1-1-1-1-1 time, 3 stitches 0-0-1-1-2-3 times, 2 stitches 1-2-2-4-4-5 times and 1 stitch 2-4-5-6-7-9 times on each side = 84-87-88-91-94-96 stitches. Continue this pattern with 1 edge stitch in garter stitch on each side. NOTE: The stitches which do not fit into the pattern by the armhole are worked in stocking stitch. When the piece measures 45-47-49-51-53 55 cm, cast off the middle 22-23-24-25-28-30 stitches for the neck and each shoulder is finished separately. Continue the pattern and cast off 2 stitches on the next row from the neck = 29-30-30-31-31-31 stitches on the shoulder. Continue working until the piece measures 47-49-51-53-55-57 cm. Cast off with knit from the right side. Work the other shoulder in the same way. RIGHT FRONT PIECE (when the garment is worn): Cast on 65-75-79-88-96-104 stitches (including 9 band stitches towards mid front and 1 edge stitch towards the side) with circular needle size 2.5 mm and Flora. Work 4 ridges. Change to circular needle size 3 mm. Work the next row as follows from the right side (i.e. from mid front): 9 band stitches in garter stitch, 0-0-4-2-0-0 stitches in stocking stitch, work A.1 (= 9 stitches), A.2 over the next 36-45-45-54-63-72 stitches (= 4-5-5-6-7-8 repeats of 9 stitches), A.3 (= 5 stitches), 5-6-6-8-9-8 stitches in stocking stitch and 1 edge stitch in garter stitch towards the side. Continue this pattern. When the piece measures 4 cm, decrease 1 stitch in the side – remember DECREASE TIP-1. Repeat the decrease when the piece measures 8 cm = 63-73-77-86-94-102 stitches. When the piece measures 12-12-13-13-13-13 cm, begin to decrease for the neckline and also increase in the side as described below: NECK-LINE: Decrease 1 stitch inside the 9 band stitches – read DECREASE TIP-2. Decrease like this every 4th row (every 2nd row from the right side) a total of 8-17-17-22-31-32 times, then every 6th row a total of 12-8-8-6-1-1 times. INCREASE IN SIDE: Increase 1 stitch in the side – read INCREASE TIP. Increase like this every 4-4-4½-4½-5-5 cm a total of 4 times. ARMHOLE: At the same time, when the piece measures 28-29-30-31-32-33 cm, cast off for the armhole at the beginning of each row from the side as follows: Cast off 5 stitches 1-1-1-1-1-1 time, 3 stitches 0-0-1-1-2-3 times, 2 stitches 1-2-2-4-4-5 times and 1 stitch 2-4-5-6-7-9 times. After all the decreases and increases there are 38-39-39-40-40-40 stitches on the needle. Continue the pattern with 9 band stitches in garter stitch towards mid front and 1 edge stitch in garter stitch by the armhole. NOTE: The stitches which do not fit into the pattern by the armhole are worked in stocking stitch. When the piece measures 47-49-51-53-55-57 cm, cast off for the shoulder as follows: Start from the wrong side and cast off the first 29-30-30-31-31-31 stitches = 9 garter stitches left on the needle. Work garter stitch back and forth over these 9 stitches until the piece measures 7-7-8-8-8-9 cm from where you cast off for the shoulder. Cast off with knit from the right side. LEFT FRONT PIECE (when the garment is worn): Cast on 65-75-79-88-96-104 stitches (including 1 edge stitch towards the side and 9 band stitches towards mid front) with circular needle size 2.5 mm and Flora. Work 4 ridges. Change to circular needle size 3 mm. Work the next row as follows from the right side (i.e. from the side): 1 edge stitch in garter stitch, 5-6-6-8-9-8 stitches in stocking stitch, work A.1 (= 9 stitches), A.2 over the next 36-45-45-54-63-72 stitches (= 4-5-5-6-7-8 repeats of 9 stitches), A.3 (= 5 stitches), 0-0-4-2-0-0 stitches in stocking stitch and 9 band stitches in garter stitch. Continue this pattern. When the piece measures 4 cm, decrease 1 stitch in the side – remember DECREASE TIP-1. Repeat the decrease when the piece measures 8 cm = 63-73-77-86-94-102 stitches. When the piece measures 12-12-13-13-13-13 cm, begin to increase in the side and decrease for the neckline as described below: INCREASE IN SIDE: Increase 1 stitch in the side – remember INCREASE TIP. Increase like this every 4-4-4½-4½-5-5 cm a total of 4 times. NECK-LINE: Decrease 1 stitch inside the 9 band stitches – remember DECREASE TIP-2. Decrease like this every 4th row (every 2nd row from the right side) a total of 8-17-17-22-31-32 times, then every 6th row a total of 12-8-8-6-1-1 times. ARMHOLE: At the same time, when the piece measures 28-29-30-31-32-33 cm, cast off for the armhole at the beginning of each row from the side as follows: Cast off 5 stitches 1-1-1-1-1-1 time, 3 stitches 0-0-1-1-2-3 times, 2 stitches 1-2-2-4-4-5 times and 1 stitch 2-4-5-6-7-9 times. After all the decreases and increases there are 38-39-39-40-40-40 stitches on the needle. Continue the pattern with 1 edge stitch in garter stitch by the armhole and 9 band stitches in garter stitch towards mid front. NOTE: The stitches which do not fit into the pattern by the armhole are worked in stocking stitch. When the piece measures 47-49-51-53-55-57 cm, cast off for the shoulder as follows: Start from the right side and cast off the first 29-30-30-31-31-31 stitches = 9 garter stitches left on the needle. Work garter stitch back and forth over these 9 stitches until the piece measures 7-7-8-8-8-9 cm from where you cast off for the shoulder. Cast off with knit from the wrong side. SLEEVES: Cast on 66-74-82-86-94-102 stitches (including 1 edge stitch on each side) with circular needle size 2.5 mm and Flora. Work 4 ridges back and forth. Then work A.4. When A.4 has been completed, work the next row from the right side as follows: 1 edge stitch in garter stitch, * knit 2, make 1 yarn over *, work from *-* until there is 1 stitch left and finish with 1 edge stitch in garter stitch = 98-110-122-128-140-152 stitches. Change to circular needle size 3 mm. Purl 1 row from the wrong side (edge stitches in garter stitch and yarn overs purled twisted to avoid holes). Continue with stocking stitch. When the piece measures 17-16-16-15-15-13 cm, cast off for the sleeve cap at the beginning of each row as follows: Cast off 5 stitches 1-1-1-1-1-1 time, 2 stitches 1-1-1-1-1-1 time and 1 stitch 13-15-16-18-19-23 times on each side = 58-66-76-78-88-92 stitches left. There are 2 rows left before the piece measures 27-27-28-28-29-29 cm. On the next row from the right side knit together the first 4-0-4-6-4-2 stitches 2 and 2 (= 2-0-2-3-2-1 stitches decreased), then knit together the remaining 54-66-72-72-84-90 stitches 3 and 3 = 20-22-26-27-30-31 stitches left. Purl 1 row. Cast off with knit from the right side. The sleeve measures approx. 27-27-28-28-29-29 cm. Work the other sleeve in the same way. ASSEMBLY: Sew the shoulder seams inside the cast-off edges. Sew the band stitches together mid back with the seam to the wrong side, then sew the bands to the neck-line with the seam to the wrong side. Sew in the sleeves, inside the 1 edge stitch along the armholes. Sew the sleeve and side seams in one go, inside the 1 edge stitch; leave an opening on the right side of the piece (when the garment is worn) to thread the tie through. The opening should measure 2½ to 3 cm and be 8-8-9-9-9-9 cm up from the bottom edge. TIES: Knit up 8 stitches on the front piece with needle size 3 mm and Flora, approx. 9-9-10-10-10-10 cm from the bottom edge. On the right front piece work garter stitch back and forth until the tie measures 84 to 94 cm, then cast off. On the left front piece work garter stitch back and forth until the tie measures 40 to 50 cm, then cast off. |
||||||||||||||||
Diagram explanations |
||||||||||||||||
|
||||||||||||||||
 |
||||||||||||||||
 |
||||||||||||||||
Have you finished this pattern?Tag your pictures with #dropspattern #flowerwishwrap or submit them to the #dropsfan gallery. Do you need help with this pattern?You'll find 20 tutorial videos, a Comments/Questions area and more by visiting the pattern on garnstudio.com. © 1982-2026 DROPS Design A/S. We reserve all rights. This document, including all its sub-sections, has copyrights. Read more about what you can do with our patterns at the bottom of each pattern on our site. |
||||||||||||||||


With over 40 years in knitting and crochet design, DROPS Design offers one of the most extensive collections of free patterns on the internet - translated to 17 languages. As of today we count 324 catalogues and 12290 patterns translated into English (UK/cm). 12290
We work hard to bring you the best knitting and crochet have to offer, inspiration and advice as well as great quality yarns at incredible prices! Would you like to use our patterns for other than personal use? You can read what you are allowed to do in the Copyright text at the bottom of all our patterns. Happy crafting!
Post a comment to pattern DROPS 222-13
We would love to hear what you have to say about this pattern!
If you want to leave a question, please make sure you select the correct category in the form below, to speed up the answering process. Required fields are marked *.