Comments / Questions (37)
![]() Ewa wrote:
Ewa wrote:
Jak mogę to odczytać po polsku?
31.03.2025 - 22:29DROPS Design answered:
Witaj Ewo, pod tytułem wzoru jest okienko do zmiany języka. Wzór w języku polskim jest dostępny TUTAJ. Pozdrawiamy!
01.04.2025 - 08:46
![]() Lotta wrote:
Lotta wrote:
Hej, har en fråga om varv 1 i Halskanten. Stickar strl L och då står det: * Sticka 1 rätmaska, gör 1 omslag om stickan, 1 avigmaska *, sticka *-* över de nästa 24 maskorna (=12 ökade) Men med första ökningen plus ökningen i de nästa 24 maskorna så får jag det till 13 ökningar. Eller är det bara jag som lyckats snurra till det och tolka beskrivning helt fel?
19.11.2024 - 03:33DROPS Design answered:
Hej Lotta. Det ska stickas så över 24 maskor totalt (alltså inklusive första gången), så då blir det 12 maskor ökade. Mvh DROPS Design
19.11.2024 - 14:01
![]() Mizuki wrote:
Mizuki wrote:
Hi, How many positive or negative ease should I use in this pattern when I choose size?
08.11.2024 - 21:52DROPS Design answered:
Dear Mizuki, you can see the finished measurements of the garment at the end of the pattern. The amount of ease will be up to each one's preference; if you want a tighter fit you can choose the smaller size; if you want a looser fit choose a larger one. It's always recommended to check the measurements of your favourite clothes to compare them and choose the best fit. Happy knitting!
10.11.2024 - 18:36
![]() Ioana wrote:
Ioana wrote:
Hello, I have a question related to this Drops218-28 patter: when starting the yoke, after putting the 4 markers it says "When 4 round have been worked, begin increase in each side of front piece and back piece - read INCREASE TIP." Does this mean that I need to work the first 4 rows in the yoke without any increases ? The meaning of "When 4 round have been worked" is not very clear to me. thank you, have a nice day
15.01.2024 - 14:12DROPS Design answered:
Dear Iona, you are right, just work 4 rounds on yoke before starting the increases for raglan. Happy knitting!
15.01.2024 - 16:19
![]() Bente wrote:
Bente wrote:
Holder på med denne. Men forstår ikke helt økningen midat bak og foran. Skal det økes 2 maske på hver side av kilen forann og bak? For når jeg har økt som jeg tror, så har jeg for lite masker. Har lest meg blind på oppskriften. Helt sikkert veldig enkelt
30.08.2023 - 09:27DROPS Design answered:
Hei Bente. Lett å lese seg blind på en oppskrift :) Prøve å se en video istedenfor. Nederst på oppskriften finner du en hjelpevideo som viser hvordan det økes, ta en titt på "Hvordan øke ved å strikke om tråden 3 ganger mellom 2 masker", så kanskje det hjelper. Hvis ikke, skriv tilbake og vi vil prøve å forklare (husk å oppgi str. du strikker). mvh DROPS Design
11.09.2023 - 12:56
![]() Bella wrote:
Bella wrote:
Hallo, ich habe Schwierigkeiten bei den Zunahmen aus den Querfäden, weil mir nicht klar ist, wo ich die Zunahmen machen muss: ich habe 3 Maschen je Vorder- und Rückenteil. Die äußern beiden Maschen sind markiert. Wenn ich nun wie im Zunahmetipp beschrieben 3 Maschen vor und nach den Markierungen zunehme bin ich im Ärmel… ? Bleiben die Markierungen in den Maschen oder werden mit den Zunahmen versetzt? LG Bella
10.12.2022 - 16:53DROPS Design answered:
Liebe Bella, haben Sie dieses Video mal geschaut? Es zeigt, wie man diese 3 Maschen zunimmt, zuerst nach der Markierung (nach der Ärmelmaschen, am Anfang Vorder- bzw Rückenteil) und vor der Markierung (am Ende Vorder- bzw Rückenteil und vor der Ärmel). Viel Spaß beim stricken!
12.12.2022 - 09:15
![]() Hansson wrote:
Hansson wrote:
Jag har försökt med garnkonverteraren..... så det är inte frågan om mängden garnystan, utan hur jag ska tänka när jag då väljer storlek? Eftersom Nepal är ett tunnare garn ska jag då sticka en XL fast jag egentligen vill ha Medium. Har försökt att googla också, men förstår tyvärr inte.
05.08.2022 - 11:55DROPS Design answered:
Hej igen, Når du bruger garnkonverteraren får du kun forslag på de kvaliteter som kan strikkes på samme strikkefasthed som det står i selve opskriften. Det vil sige at hvis du vælger at strikke med 2 tråde DROPS Nepal så skal du få 10 masker på 10 cm som det står i opskriften :)
05.08.2022 - 12:22
![]() Hansson wrote:
Hansson wrote:
Jag har verkligen försökt lära mig hur man byter garn men det går inte..... Vill så gärna sticka denna tröja i 1 st tråd Nepal, men hur ska jag göra då??
03.08.2022 - 20:24DROPS Design answered:
Hej, prøv vor garn-konverterare. Välj DROPS Air, välj antal gram i din storlek och klicka på Se alternativ ... du kan även dubbelkolla med DROPS Snow:)
05.08.2022 - 11:48
![]() Pamela Poulin wrote:
Pamela Poulin wrote:
I ask you a question . But after reading your pattern I find my problem, I'm very sorry to bother you. Best regards Pam
20.06.2022 - 23:25
![]() Pamela Poulin wrote:
Pamela Poulin wrote:
Hi , I have my Yarn & very happy to start but I'm having some problem..... I am doing the neck my size is L . My pattern is DROPS 218-28. ROUND 1: No problem for the beginning. But it says "Repeat 1 more time on the round " but when I do this I have a hole. Is this ok? Thank you very much for your help. I could not find a video on this.
20.06.2022 - 20:42DROPS Design answered:
Dear Mrs Poulin, on the first round you will increase with yarn overs, and on the 2nd round you will work these yarn overs twisted to avoid holes - see video. Happy knitting!
21.06.2022 - 08:53
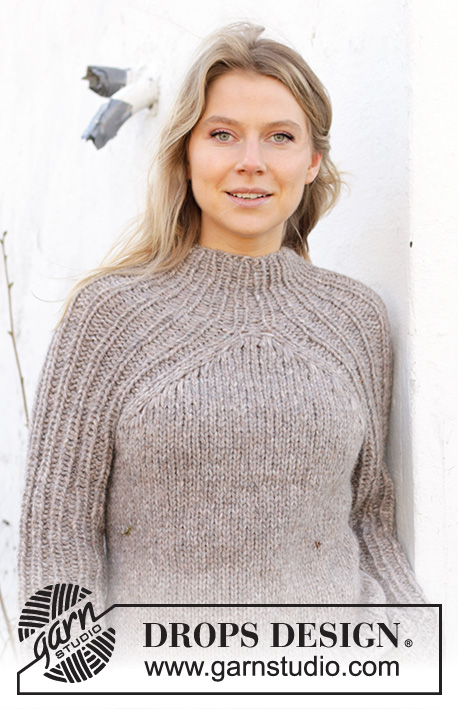
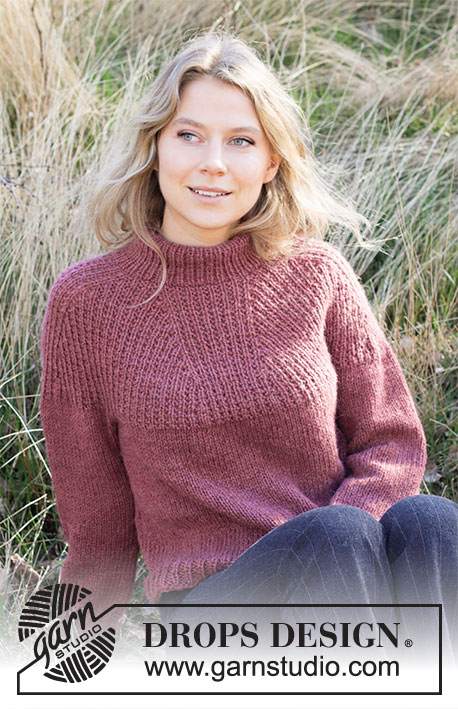
Divergence#divergencesweater |
|
 |
 |
Knitted jumper in 2 strands DROPS Air or 1 strand DROPS Snow or 1 strand Wish. Piece is knitted top down with rib. Size: S - XXXL
DROPS 218-28 |
|
|
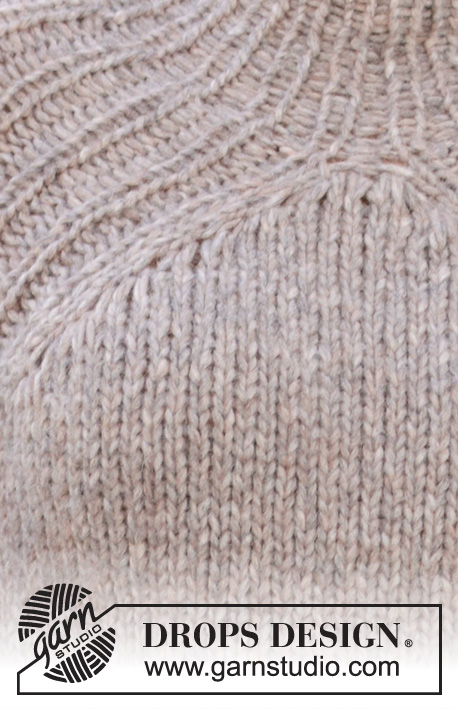
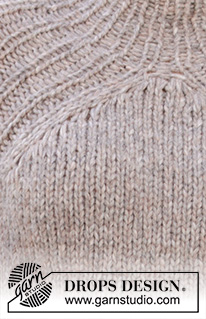
------------------------------------------------------- EXPLANATION FOR THE PATTERN: ------------------------------------------------------- INCREASE TIP: Increase in each side of front and back piece. Number of stitches on sleeves is the same (= 34-34-37-37-40-40 stitches in rib on sleeves). Do not increase in stitch but around strand between 2 stitches. Increase 3 stitches after stitch with marker (i.e. in transition between right sleeve and front piece and transition between left sleeve and back piece) as follows: Knit 1 around strand between stitch with marker and next stitch (= 1 round down), knit 1 around strand between stitch with marker and next stitch 2 rounds down (make sure to pull the strand long enough not to tighten vertically), knit 1 around strand between stitch with marker and next stitch 3 rounds down (make sure to pull the strand long enough not to tighten vertically). 1 stitch has been worked on each of the last 3 rounds (= 3 stitches increased). Increase 3 stitches before stitch with marker (i.e. in transition between front and left sleeve and in transition between back piece and right sleeve) as follows: Work until stitch with marker, knit 1 around strand before stitch with marker 3 rounds down (make sure to pull the strand long enough not to tighten vertically), knit 1 around strand before stitch with marker and 2 rounds down (make sure not to pull the strand long enough not to tighten vertically), knit 1 around strand before stitch with marker on previous round. 1 stitch has been worked on each of the last 3 rounds (= 3 stitches increased). DECREASE TIP (applies to sleeves): Work until 4-3-3-3-3-3 stitches remain before stitch with marker/marker between stitches, knit the next 2 together (= 1 stitches decreased), work the next 5-2-2-2-2-2 stitches, slip 1 stitch knitwise, knit 1, pass slipped stitch over stitch worked (= 1 stitch decreased). CAST-OFF TIP: To avoid a tight cast-off edge you may use a larger needle size. If this also is too tight, work a 1 yarn over after approx. every 4th stitch while casting off (cast off yarn overs as regular stitches). ------------------------------------------------------- START THE PIECE HERE: ------------------------------------------------------- JUMPER - SHORT OVERVIEW OF THE PIECE: Work neck and yoke in the round on circular needle. Then divide piece for body and sleeves. Work body in the round in stocking stitch. Work sleeves in the round on a short circular needle/double pointed needles in rib. NECK: Cast on 48-48-52-52-56-56 stitches on a short circular needle size 8 mm with 2 strands Air or 1 strand Snow or 1 strand Wish. Insert a marker thread at beginning of round. Work rib (knit 1/purl 1) in the round for 11 cm. Work next round as follows: ROUND 1: * Knit 1, make 1 yarn over, purl 1 *, work from *-* over the next 22-22-24-24-26-26 stitches (= 11-11-12-12-13-13 stitches increased), knit 1, purl 1 (= middle stitch on front/back piece). Repeat 1 more time on round = 70-70-76-76-82-82 stitches. ROUND 2: * Knit 1, purl yarn over twisted, purl 1 *, work *-* 11-11-12-12-13-13 times, knit 1, make 1 yarn over, purl 1 (= middle stitch on front/back piece), make 1 yarn over. Repeat 1 more time on round (= 4 stitches increased on round)= 74-74-80-80-86-86 stitches. Switch to circular needle size 9 mm. Insert 1 marker in middle stitch at the back, measure yoke from this marker! YOKE: Now insert 4 markers in the piece. Insert a marker in each of the yarn overs from previous round (= 1 marker in stitch on each side of middle stitch). There are 34-34-37-37-40-40 stitches for each of the sleeves and 3 stitches on front and back piece. REMEMBER THE KNITTING TENSION! Now work rib (= knit 1/purl 2) over the 34-34-37-37-40-40 stitches for sleeves in each side (first and last stitch on sleeve is knit 1), and work in stocking stitch over the 3 stitches on front piece and back piece (knit yarn overs twisted to avoid holes). When 4 round have been worked, begin increase in each side of front piece and back piece - read INCREASE TIP. Increase like this every 4th round 6-6-7-8-9-10 times in total = 146-146-164-176-194-206 stitches. Increase in size XL, XXL and XXXL is now done. In size S, M and L continue increase as follows. Increase 1 stitch in each side of front piece and back piece by making 1 yarn over inside stitch with marker (= 4 stitches increased on round). Increase like this every other round 1-2-1 time in total = 150-154-168 stitches. On next round knit yarn overs twisted to avoid holes. Then work the new stitches in stocking stitch. All sizes: Continue with knit over knit and purl over purl until piece measures 20-21-23-24-25-27 cm from marker in middle stitch at the back of neck. Work next round as follows: Slip the first 34-34-37-37-40-40 stitches on a stitch holder for sleeve, cast on 5-8-8-8-8-8 new stitches on needle (= in the side under sleeve), work stocking stitch over the next 41-43-47-51-57-63 stitches (= front piece), slip the next 34-34-37-37-40-40 stitches on a stitch holder (= sleeve), cast on 5-8-8-8-8-8 new stitches on needle (= in the side under sleeve), work in stocking stitch over the next 41-43-47-51-57-63 stitches. Then finish body and sleeves separately. NOW MEASURE PIECE FROM HERE! BODY: = 92-102-110-118-130-142 stitches. Work in stocking stitch in the round until body measures 24-25-25-26-26-26 cm. Switch to circular needle size 8 mm. Work rib (knit 1/purl 1) in the round for 4 cm. Cast off with knit over knit and purl over purl - read CAST-OFF TIP. Jumper measures approx. 54-56-58-60-62-64 cm from shoulder and down. SLEEVES: Slip the 34-34-37-37-40-40 stitches from stitch holder in one side of piece back on double pointed needles/a short circular needle size 9 mm and pick in addition up 1 stitch in each of the 5-8-8-8-8-8 stitches cast on under sleeve = 39-42-45-45-48-48 stitches. Insert a marker mid under sleeve. In size S insert marker in the middle knit stitch under sleeve. In size M, L, XL, XXL and XXXL insert marker in the middle of the middle 2 purl stitch. Work rib (= knit 1/purl 2) in the round as before. When piece measures 4 cm, decrease 2 stitches under sleeve - read DECREASE TIP. Decrease like this every 11-8-6-6-6-6 cm 4-5-6-6-6-6 times in total = 31-32-33-33-36-36 stitches. Continue with knit over knit and purl over purl until sleeve measures 45-45-43-43-43-42 cm - or to desired length (shorter measurements in the larger sizes because of longer yoke). Cast off with knit over knit and purl over purl - remember CAST-OFF TIP. Work the other sleeve the same way. |
|
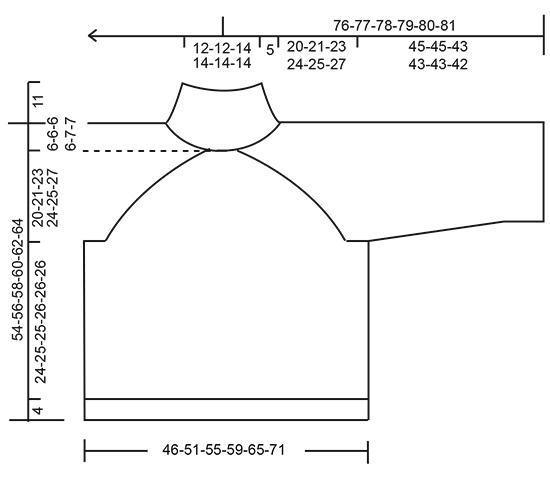 |
|
Have you finished this pattern?Tag your pictures with #dropspattern #divergencesweater or submit them to the #dropsfan gallery. Do you need help with this pattern?You'll find 27 tutorial videos, a Comments/Questions area and more by visiting the pattern on garnstudio.com. © 1982-2026 DROPS Design A/S. We reserve all rights. This document, including all its sub-sections, has copyrights. Read more about what you can do with our patterns at the bottom of each pattern on our site. |
|








Post a comment to pattern DROPS 218-28
We would love to hear what you have to say about this pattern!
If you want to leave a question, please make sure you select the correct category in the form below, to speed up the answering process. Required fields are marked *.