
Popular categories
Looking for a yarn?


Comments / Questions (92)
![]() Gabriella Castellanos wrote:
Gabriella Castellanos wrote:
Would making the body 3-5 cm longer affect the pattern/fitting?
17.03.2023 - 20:35DROPS Design answered:
Dear Gabriella, you can lengthen the body at the beginning, when you work stotking stitch in the round for 13-14-15-16-17-18 cm (until it measures 21-22.... cm). Since you don't increase the amount of stitches, it shouldn't affect the pattern. Happy knitting!
19.03.2023 - 22:56
![]() Sophia wrote:
Sophia wrote:
I would like advise as to where to place the decrease for the armhole. The instructions say "Decrease for armhole inside 2 edge stitches" so should I k1 garter edge, decrease 1 stitch, and then k1 garter edge or do I k2 garter edge stitches then decrease. I am confused as the instruction mention decreasing "after" and "before" edge stitches but also mention doing the decrease "inside" two edge stitches.
22.07.2022 - 18:09DROPS Design answered:
Dear Sophia, decrease after or before 2 edge sts, so that the outermost 2 (edge) stitches are always preserved and form a continuous edge. Happy knitting!
22.07.2022 - 18:57
![]() Sophia wrote:
Sophia wrote:
When decreasing on the separate front and back pieces, do I decrease the 1 stitch before or after the garter stitch edge?
20.07.2022 - 16:33DROPS Design answered:
Dear Sophia, yes, thats it. See also DECREASE TIP above the pattern: (applies to armholes): Decrease for armhole inside 2 edge stitches in garter stitch. All decreases are done from the right side. Decrease as follows after 2 edge stitches in garter stitch: Slip 1 stitch knitwise, knit 1, pass slipped stitch over stitch worked (= 1 stitch decreased). Decrease as follows before 2 edge stitches in garter stitch: Begin 2 stitches before the 2 edge stitches and knit 2 together (= 1 stitch decreased). Happy knitting!
20.07.2022 - 16:38
![]() Thuy Nguyen wrote:
Thuy Nguyen wrote:
Would the back of this top look shorter when worn since there's no shaping?
10.07.2022 - 03:09DROPS Design answered:
Hi Thuy, No, the top should be of equal length both back and front. Happy knitting!
11.07.2022 - 06:57
![]() Catrin wrote:
Catrin wrote:
Jag älskar detta mönster och denna topp. Har stickat den färdig på 2 dagar. Jag har gjort lite som jag själv tycker med storlek på stickor och använt samma stickor hela vägen. Passar mig utmärkt. Nu ska jag sticka en till i andra färger.
30.06.2022 - 22:08
![]() Paulina wrote:
Paulina wrote:
Robię rozmiar M i jestem przy zamykaniu oczek na podkroje rękawów (przed rozpoczęciem przodu). Gdzie powinny znajdować się markery wyznaczające początek i koniec przodu oraz tyłu? Po zamknięciu oczek mam je rozłożone niesymetrycznie ponad tymi 10 oczkami ściągaczem francuskim.
27.06.2022 - 13:37DROPS Design answered:
Witaj Paulino, na podkroje rękawów zamykasz 6 oczek na środku oczek przerabianych ściegiem francuskim, z każdej strony topu. Każdy marker powinien być umieszczony na środku tych 6 oczek (są zamknięte 3 oczka z każdej strony każdego markera). Pozdrawiamy!
27.06.2022 - 21:34
![]() Sandra wrote:
Sandra wrote:
Bonjour, N'y a-t-il pas un problème dans la longueur des bretelles ? En effet si je tricote 42 cm de longueur de bretelle pour le devant, puis par la suite, 42 cm pour la bretelle du dos, ma bretelle atteindra 84 cm de longueur totale. Peut être vouliez vous dire 21 cm ? Je pensais simplement coudre les 42 cm de bretelle le long des côtes de rabat du dos. Merci, bonne journée !
28.04.2022 - 14:06DROPS Design answered:
Bonjour Sandra et merci pour votre retour, effectivement, on doit mesurer à partir du rang de montage tout en bas du top et non à partir du début de la bretelle, correction faite. Bon tricot!
28.04.2022 - 15:27
![]() Kasia wrote:
Kasia wrote:
Dziękuję bardzo za szybkie wyjaśnienie. Pozdrawiam, Kasia
08.10.2021 - 09:44
![]() Kasia wrote:
Kasia wrote:
Witam, czy na pewno tył należy przerabiać tak jak w opisie? Jeśli tak robię, to wychodzi dużo wyżej niż przód a szelki są krótsze od przodu ? Proszę o korektę Pozdrawiam serdecznie
07.10.2021 - 21:11DROPS Design answered:
Witaj Kasiu, podkrój dekoltu z tyłu będzie wyżej niż z przodu, gdyż tył jest dłuższy. Szelki z tyłu będą krótsze niż z przodu. Przerabiaj tył, aż cała ta część (razem z szelką będzie mieć 44 cm). Jeśli chcesz aby tył i przód były takie same, przerabiaj tył tak samo jak przód. Co do długości szelek, to oczywiście możesz je dopasować do swojego rozmiaru. Pozdrawiamy!
08.10.2021 - 08:46
![]() Kasia wrote:
Kasia wrote:
Witam, mam pytanie, czy długość szelek przerabianych z przodu ma mieć 44 cm??? To chyba pomyłka, bo dochodzi jeszcze długość szelek z tyłu Pozdrawiam
05.10.2021 - 19:06DROPS Design answered:
Witaj Kasiu, powinno być "aż długość robótki (z szelką włącznie) wynosi 38-40-42-44-46-48 cm od rzędu nabierania oczek (lub ma inną długość wg uznania)." Już skorygowałam pomyłkę na stronie. Bardzo dziękuję i pozdrawiam!
05.10.2021 - 20:07
|
|
Spiced Breeze#spicedbreezetop |
|
 |
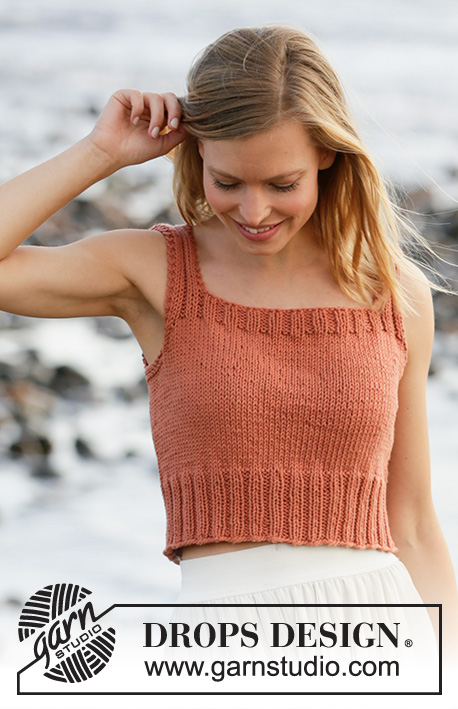 |
Knitted top in DROPS Paris. Piece is knitted in stocking stitch with edges in rib. Size: S - XXXL
DROPS 211-15 |
|
|
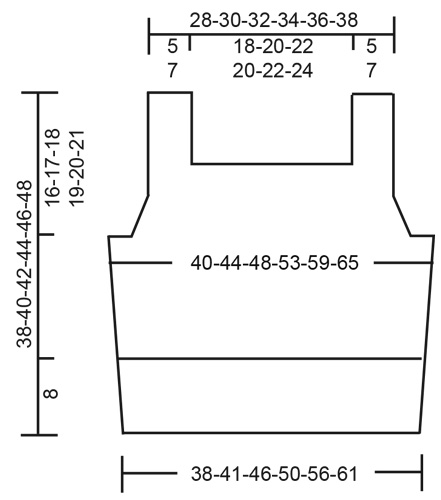
---------------------------------------------------------- EXPLANATION FOR THE PATTERN: ---------------------------------------------------------- GARTER STITCH (worked in the round): 1 ridge vertically = 2 rounds, i.e. knit 1 round and purl 1 round. GARTER STITCH (back and forth): Knit all rows. 1 ridge vertically = knit 2 rows. DECREASE TIP (applies to armholes): Decrease for armhole inside 2 edge stitches in garter stitch. All decreases are done from the right side. Decrease as follows after 2 edge stitches in garter stitch: Slip 1 stitch knitwise, knit 1, pass slipped stitch over stitch worked (= 1 stitch decreased). Decrease as follows before 2 edge stitches in garter stitch: Begin 2 stitches before the 2 edge stitches and knit 2 together (= 1 stitch decreased). ---------------------------------------------------------- START THE PIECE HERE: ---------------------------------------------------------- TOP - SHORT OVERVIEW OF THE PIECE: Worked in the round on circular needle, from the bottom and up to armholes. Then work front and back piece back and forth on circular needle separately. Then sew the shoulder seams. BODY: Cast on 136-148-164-180-200-220 stitches on circular needle size 4.5 mm with Paris. Knit 1 round. Then work rib in the round (= knit 2/purl 2) for 8 cm. Insert 1 marker thread at beginning of round and 1 marker thread after 68-74-82-90-100-110 stitches. Marker threads mark the sides on body. Switch to circular needle size 5 mm and work in stocking stitch in the round. REMEMBER THE KNITTING TENSION! When piece measures 21-22-23-24-25-26 cm, , work 2 ridges in GARTER STITCH - read explanation above, over the middle 10-10-14-14-20-24 stitches in each side (marker threads are in the middle of these 10-10-14-14-20-24 stitches - work the other stiches in stocking stitch). On first round after the 2 ridges cast off for armholes as follows: Cast off 3-3-5-5-8-10 stitches, work 62-68-72-80-84-90 stitches in stocking stitch, cast off 6-6-10-10-16-20 stitches (marker thread is in the middle of these 6-6-10-10-16-20 stitches), work 62-68-72-80-84-90 stitches in stocking stitch, and cast off the remaining 3-3-5-5-8-10 stitches. Cut the yarn. Finish front and back piece separately. FRONT PIECE: = 62-68-72-80-84-90 stitches. Begin from wrong side and continue with stocking stitch back and forth and 2 edge stitches in garter stitch in each side. AT THE SAME TIME on first row from right side, decrease 1 stitch in each side for armholes - read DECREASE TIP. Decrease like this on every other row (i.e. every row from right side) 4-5-5-7-7-8 times in total in each side = 54-58-62-66-70-74 stitches remain. After last decrease for armholes, purl 1 row from wrong side with 2 edge stitches in garter stitch in each side. Switch to circular needle size 4.5 mm and work next row from right side as follows: 2 edge stitches in garter stitch, * knit 2, purl 2 *, repeat from *-* until 4 stitches remain, knit 2 and finish with 2 edge stitches in garter stitch. Continue rib like this for 3 cm. On next row from right side cast off for neck as follows: Work 2 edge stitches in garter stitch, * knit 2, purl 2 *, work from *-* 1-1-1-2-2-2 times in total, knit 2 and 2 stitches in garter stitch, then cast off the next 34-38-42-38-42-46 stitches for neck (cast off with knit over knit and purl over purl), work 2 stitches in garter stitch, * knit 2, purl 2 *, work from *-* 1-1-1-2-2-2 times in total, knit 2 and finish 2 edge stitches in garter stitch. There are now 10-10-10-14-14-14 stitches remain in each side for shoulder strap. Finish the shoulder straps separately. SHOULDER STRAP: = 10-10-10-14-14-14 stitches. Work rib back and forth as before with 2 edge stitches in garter stitch in each side until entire piece measures 38-40-42-44-46-48 cm from cast-on edge (or desired length). Cast off. Work the other shoulder strap the same way. BACK PIECE: = 62-68-72-80-84-90 stitches. Begin from wrong side and continue with stocking stitch back and forth and 2 edge stitches in garter stitch in each side. AT THE SAME TIME on first row from right side, decrease 1 stitch in each side for armholes - read DECREASE TIP. Decrease like this on every 4th row (not on every other row on front piece) 4-5-5-7-7-8 times in total in each side = 54-58-62-66-70-74 stitches. After last decrease for armholes, purl 1 row from wrong side with 2 edge stitches in garter stitch in each side. Switch to circular needle size 4.5 mm and work next row from right side as follows: 2 edge stitches in garter stitch, * knit 2, purl 2 *, repeat from *-* until 4 stitches remain, knit 2 and finish with 2 edge stitches in garter stitch. Continue rib like this for 3 cm. On next row from right side cast off for neck as follows: Work 2 edge stitches in garter stitch, * knit 2, purl 2 *, work from *-* 1-1-1-2-2-2 times in total, knit 2 and 2 stitches in garter stitch, then cast off the next 34-38-42-38-42-46 stitches for neck (cast off with knit over knit and purl over purl), work 2 stitches in garter stitch, * knit 2, purl 2 *, work from *-* 1-1-1-2-2-2 times in total, knit 2 and finish 2 edge stitches in garter stitch. There are now 10-10-10-14-14-14 stitches remain in each side for shoulder strap. Work shoulder straps separately the same way as on front piece. ASSEMBLY: Sew the shoulder seams. |
|
 |
|
Have you finished this pattern?Tag your pictures with #dropspattern #spicedbreezetop or submit them to the #dropsfan gallery. Do you need help with this pattern?You'll find 21 tutorial videos, a Comments/Questions area and more by visiting the pattern on garnstudio.com. © 1982-2026 DROPS Design A/S. We reserve all rights. This document, including all its sub-sections, has copyrights. Read more about what you can do with our patterns at the bottom of each pattern on our site. |
|


With over 40 years in knitting and crochet design, DROPS Design offers one of the most extensive collections of free patterns on the internet - translated to 17 languages. As of today we count 324 catalogues and 12290 patterns translated into English (UK/cm). 12290
We work hard to bring you the best knitting and crochet have to offer, inspiration and advice as well as great quality yarns at incredible prices! Would you like to use our patterns for other than personal use? You can read what you are allowed to do in the Copyright text at the bottom of all our patterns. Happy crafting!
Post a comment to pattern DROPS 211-15
We would love to hear what you have to say about this pattern!
If you want to leave a question, please make sure you select the correct category in the form below, to speed up the answering process. Required fields are marked *.