
Popular categories
Looking for a yarn?


Comments / Questions (61)
![]() Jenny wrote:
Jenny wrote:
I am knitting the XL ,after the neckline and starting the yoke.), * knit 1, make 1 yarn over, knit 0-0-1-1-3-4, A.1 (= 10 stitches) over the next 30 stitches,. The k1 yo kl +A1 = 12 st not including the yo. 2 x12=24 leaving 6 from the next 30 .Do I knit those 6 and then the next 5 from A1?
29.03.2025 - 19:35DROPS Design answered:
Dear Jenny, only A.1 ( = 10 sts) is repeated over the 30 sts. You knit 1 stitch, work 1 yarn over, knit 1 stitch and work A.1 3 times. Then start with the first 5 stitches of the next repeat of A.1. Happy knitting!
30.03.2025 - 19:53
![]() HO wrote:
HO wrote:
Ser inte i beskrivningen hur många maskor det ska vara mellan ärmarna. Alltså bakstycke o framstycket. Mycket otydlig beskrivning, bara *-* Ber om förtydligande , tack.
01.03.2025 - 17:27DROPS Design answered:
Hvilken størrelse strikker du? Hvor langt er du kommet i opskriften? Hvor mange masker har du?
06.03.2025 - 14:29
![]() Maria José Barata Jorge wrote:
Maria José Barata Jorge wrote:
Muito bonito o modelo. O Algodão também parece bonito. Uma boa conjugação
01.03.2025 - 15:00
![]() Monica wrote:
Monica wrote:
Jeg sliter med å få riktig antall masker. Jeg strikker M og når jeg er ferdig med halskanten har jeg 112 m. Så kommer jeg bærestykket der jeg skal sette 4 merketråder og øke på hver side av disse. 112+8=120 m har jeg nå. Videre skal jeg øke 24 ganger x8 = 192 nye masker. Når jeg da legger sammen 120 + 192 = 312. I oppskriften står det at jeg skal ha 304? hva gjør jeg feil?
29.08.2024 - 12:46DROPS Design answered:
Hei Monica. Du skal økte til raglan TOTALT 24 ganger, altså den første gangen du øker og setter merketråder er inkl i de 24 gangene. Du starter med 112 masker + 192 (8 økninger x 24 ganger totalt) = 304 masker. mvh DROPS Design
02.09.2024 - 08:52
![]() Tina wrote:
Tina wrote:
Wat wordt er bedoeld met ‘ vermeerder voor de raglan 24 met maat m’ als er door de raglan 8 per per naald worden vermeerderd. Is het dan een naald 24 vermeerderen. En daarna met raglan beginnen. Of tussen de raglan in ook nog 24 vermeerderen?
16.06.2024 - 20:25DROPS Design answered:
Dag Tina,
Je meerdert 8 steken per naald en dit doe je in totaal 24 keer om de naald, dus je meerdert op naald 1 8 steken, op naald 2 0 steken, op naald 3 meerder je weer 8 steken, enz, dus om en om meerderen en niet meerderen. In totaal maak je 24 naalden waarin je meerdert.
25.06.2024 - 18:11
![]() Rosa wrote:
Rosa wrote:
Ik ben altijd erg blij met de patroonuitleg van Drops. Echter, bij dit patroon wordt mij niet duidelijk hoeveel steken er (na de hals) op de mouw/voorkant/mouw/achterkant komen, bij het plasten van de markers. Kunt u aangeven om hoeveel steken het gaat?
01.04.2024 - 18:35DROPS Design answered:
Dag Rosa,
De markeerdraden geven de overgang tussen het lijf en de mouwen aan. Vlak na de hals zijn de steken die ertussen zitten hetzelfde op het voorpand en het achterpand. Het hangt af van je maat hoeveel dit zijn, maar je kunt daarbij gewoon de beschrijving volgen.
03.04.2024 - 20:51
![]() Valerie wrote:
Valerie wrote:
For this pattern the instructions are to cast 12 stitches on the body under the arm before knitting the body. However, there is no equivalent instruction when taking up the stitches set aside for joining to knit the sleeve in the round, which leaves 12 less 2 stitches under arm at the top of the body. Could you please explain what I should do to join the sleeve to the body.
18.11.2022 - 06:15DROPS Design answered:
Dear Valerie, this lesson might help you understanding how to work a jumper top down and shows from picture 9) how to divide piece and work afterwards; you can also watch this video where you can see from time code approx. 07.:00 how piece will be divided. Hope it can help. Happy knitting!
18.11.2022 - 08:51
![]() Diana wrote:
Diana wrote:
Muchas gracias por las respuestas, voy a probar.
31.08.2022 - 21:25
![]() Diana wrote:
Diana wrote:
"Aumentar 1 punto a cada lado de 3 puntos derechos en cada transición entre la pieza del frente/pieza de la espalda y las mangas". pero en la respuesta anterior me decís "tiene que haber 2-2-3-3-5-6 puntos entre los aumentos del raglán y la lazada en la vuelta 5/ 15 ". En el resto de las vueltas no? Eso me confunde.
30.08.2022 - 03:14DROPS Design answered:
Hola Diana, en todas las vueltas tiene que estar separado el dibujo de la línea del raglán. Decimos que la lazada se trabaja en las vueltas 5/15 y se tiene que notar bien que esté separada de la línea del raglán, por eso remarcamos que haya separación entre los aumentos y la lazada. En el resto de vueltas también tiene que estar separado el patrón, para que se mantenga alineado, pero no se nota o distingue tanto el resto de puntos de los puntos aumentados para el raglán.
30.08.2022 - 23:15
![]() Diana wrote:
Diana wrote:
Hola buenos días! A que se refieren cuando dicen "AL MISMO TIEMPO cuando se aumentan puntos, hay espacio para más repeticiones con patrón de calados en dirección de cada raglán. Siempre debe haber 2-2-3-3-5-6 puntos derechos entre los aumentos para el raglán y la lazada más externa en dirección del raglán en la 5ª y 15ª vuelta de A.1."? A partir de la vuelta 5 hay que ir agregando motivo independientemente de no tener 10 ó 5 puntos?
29.08.2022 - 16:14DROPS Design answered:
Hola Diana, solo trabajas el motivo cuando puedas trabajarlo completo, es decir, cuando tengas 5 puntos puedes trabajar 1 repetición del diagrama (ten en cuenta que A.1 está representado como 2 repeticiones de 5 puntos). Recuerda que tiene que haber 2-2-3-3-5-6 puntos entre los aumentos del raglán y la lazada en la vuelta 5/ 15 de A.1. El dibujo no puede quedar pegado al raglán.
30.08.2022 - 00:54
|
||||||||||||||||
Flocking Gulls#flockinggullssweater |
||||||||||||||||
 |
 |
|||||||||||||||
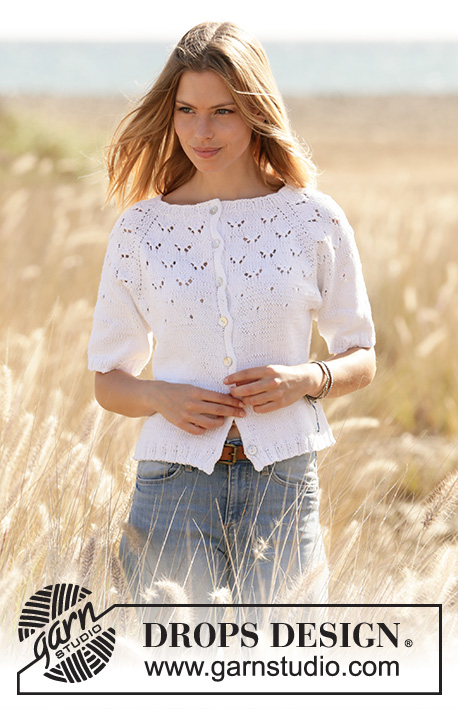
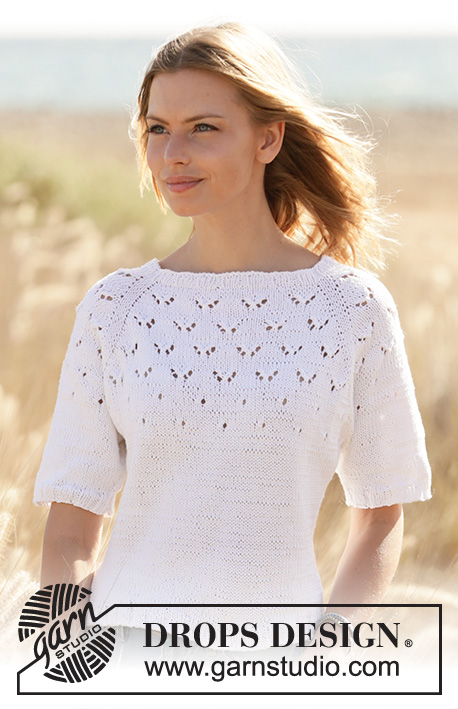
Knitted jumper with short sleeves and raglan in DROPS Muskat. Piece is knitted top down with lace pattern. Size: S - XXXL
DROPS 210-15 |
||||||||||||||||
|
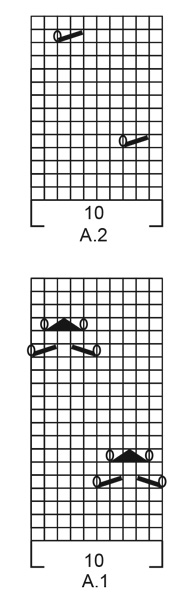
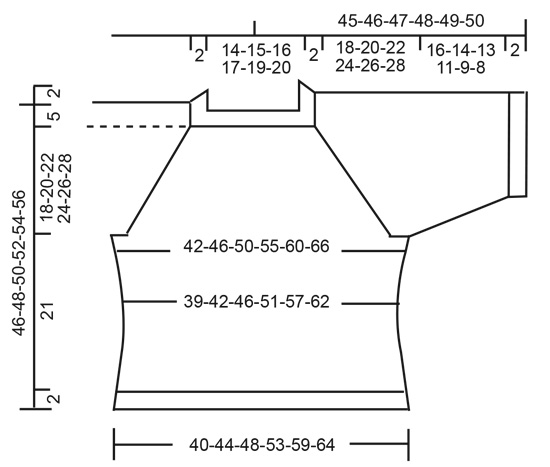
---------------------------------------------------------- EXPLANATION FOR THE PATTERN: ---------------------------------------------------------- PATTERN: See diagrams A.1 and A.2. INCREASE TIP-1 (evenly): To calculate how to increase evenly, use the total number of stitches on row (e.g. 100 stitches) and divide stitches by number of increases to be done (e.g. 12) = 8.3. In this example increase by making 1 yarn over after approx. every 8th stitch. On next round work yarn overs twisted to avoid holes. INCREASE TIP-2 (applies to sides of body): Work until 2 stitches remain before marker thread, 1 yarn over, knit 4 (marker thread is in the middle of these stitches), 1 yarn over. On next round knit yarn overs twisted to avoid holes. Then work the new stitches in stocking stitch. RAGLAN: Increase 1 stitch on each side of 3 knit stitches in every transition between front/back piece and sleeves (= 8 stitches increased on round). Increase 1 stitch by making 1 yarn over. On next round knit yarn overs twisted to avoid holes. Then work the new stitches in pattern/stocking stitch. DECREASE TIP: Decrease 1 stitch on each side of marker thread as follows: Work until 3 stitches remain before marker thread and knit 2 together, knit 2 (marker thread is between these stitches), slip 1 stitch knitwise, knit 1, pass slipped stitch over stitch worked. CAST-OFF TIP: To avoid a tight cast-off edge you may use a larger needle. If this also is too tight, make 1 yarn over after approx. every 4th stitch and cast off these as regular stitches. ---------------------------------------------------------- START THE PIECE HERE: ---------------------------------------------------------- JUMPER - SHORT OVERVIEW OF THE PIECE: Neck edge and yoke are worked in the round on circular needle, top down. Now divide yoke for body and sleeves. Then work the body in the round on circular needle. Work sleeves in the round on double pointed needles/short circular needle, top down. NECK EDGE: Cast on 100-105-110-115-120-125 stitches on circular needle size 3 mm with Muskat. Knit 1 round. Then work rib (= knit 3/purl 2) in the round for 2 cm. When rib is done, knit 1 round while increasing 12-7-10-5-16-19 stitches evenly - read INCREASE TIP-1 = 112-112-120-120-136-144 stitches. Knit 1 round (knit yarn overs twisted to avoid holes). Switch to circular needle size 4 mm. Insert 1 marker after rib at the beginning of round, measure yoke from this marker! YOKE: Now insert 4 marker threads in piece, work pattern as follows: Insert a marker thread at the beginning of round (= in transition between left sleeve and back piece), * knit 1, make 1 yarn over, knit 0-0-1-1-3-4, A.1 (= 10 stitches) over the next 30 stitches, work the first 5 stitches in A.1, knit 0-0-1-1-3-4, make 1 yarn over, knit 1, insert a marker thread here, knit 2, make 1 yarn over, knit 0-0-1-1-3-4, A.1 over the next 10 stitches, work the first 5 stitches in A.1, knit 0-0-1-1-3-4, make 1 yarn over, knit 2, insert a marker thread here *, work from *-* 1 more time on round, but do not insert a marker thread at the end of round. There are now 4 marker threads in piece (i.e. 1 marker thread in every transition between body and sleeves), and 1 stitches has been increased on each side of every marker thread for RAGLAN - read explanation above. REMEMBER THE KNITTING TENSION. READ THE WHOLE NEXT SECTION BEFORE WORKING – increase for raglan and work pattern as follows: Increase for raglan every other round 20-24-27-30-32-35 times in total = 272-304-336-360-392-424 stitches. Then increase 1 more time in each side of front piece and back piece (but do not increase in each side of sleeves) = 276-308-340-364-396-428 stitches. AT THE SAME TIME when increasing stitches, there is room for more repetitions with lace pattern towards each raglan. There should always be 2-2-3-3-5-6 knit stitches between increase for raglan and the outermost yarn over towards raglan on 5th and 15th round in A.1. When A.1 has been worked 1 time vertically, repeat diagram 1 more time vertically. Then work A.2 (= 10 stitches) over A.1, and work as many lace patterns you can towards every raglan when increasing stitches. When A.2 has been worked vertically, continue with stocking stitch until finished measurements. When all increases are done, the piece measures approx. 15-18-20-22-24-26 cm. Continue to work until piece measures 18-20-22-24-26-28 cm. Now divide piece for body and sleeves. In size S, M and L divide piece for body at the marker threads and in size XL, XXL and XXXL work 1-3-4 stitches from each side of sleeve in on front and back piece. Work next round as follows: Knit the first 79-87-95-102-112-121 stitches (= back piece), slip the next 59-67-75-79-83-89 stitches on a stitch holder for sleeve, cast on 10-10-10-12-12-14 new stitches on needle (= in the side under sleeve), work the next 79-87-95-103-115-125 stitches (= front piece), insert the next 59-67-75-79-83-89 stitches on a stitch holder for sleeve, cast on 10-10-10-12-12-14 new stitches on needle (= in the side under sleeve), work the last 0-0-0-1-3-4 stitches (= 79-87-95-103-115-125 stitches for back piece). Cut the yarn. Then finish body and sleeves separately. NOW MEASURE PIECE FROM HERE! BODY: = 178-194-210-230-254-278 stitches. Insert 1 marker thread in the middle of the new stitches cast on in the side under the sleeves (= 89-97-105-115-127-139 stitches between marker threads). Move the marker threads upwards when working; they are used when increasing and decreasing in the sides later. Begin round at marker thread in one of the sides. Continue in the round in stocking stitch. When piece measures 3 cm from division, decrease 1 stitch on each side of marker threads - read DECREASE TIP. Decrease like this approx. every 2½ cm 4 times in total = 162-178-194-214-238-262 stitches. When piece measures 14 cm from division in all sizes, increase 1 stitch on each side of marker thread - read INCREASE TIP-2. Repeat increase when piece measures 16 cm = 170-186-202-222-246-270 stitches. When piece measures 21 cm from division, increase 15-19-23-23-29-35 stitches evenly = 185-205-225-245-275-305 stitches. Switch to circular needle size 3 mm. Work rib (knit 3/purl 2) in the round for 2 cm. Cast off with knit over knit and purl over purl - read CAST-OFF TIP. Jumper measures approx. 46-48-50-52-54-56 cm from shoulder and down. SLEEVES: Slip the 59-67-75-79-83-89 stitches from stitch holder in one side back on a short circular needle/double pointed needles size 4 mm and pick in addition up 1 stitch in each of the new 10-10-10-12-12-14 stitches cast on in the side under sleeve = 69-77-85-91-95-103 stitches. Insert a marker thread in the middle of the new stitches cast on under sleeve. Move the marker thread upwards when working. Use marker later when decreasing under sleeve. Work in stocking stitch in the round. When sleeve measures 3-3-3-3-2-2 cm from division, decrease 1 stitch on each side of marker thread - remember DECREASE TIP. Decrease like this approx. every 3-2-1½1-1-1 cm 5-6-7-7-7-6 times in total = 59-65-71-77-81-91 stitches. When all decreases are done, work in stocking stitch until sleeve measures 16-14-13-11-9-8 cm (shorter measurements in the larger sizes because of longer yoke). Knit 1 round while increasing 1-0-4-3-4-4 stitches evenly = 60-65-75-80-85-95 stitches. Switch to double pointed needles size 3 mm. Work rib (knit 3/purl 2) in the round for 2 cm. Cast off with knit over knit and purl over purl - remember CAST-OFF TIP. Work the other sleeve the same way. |
||||||||||||||||
Diagram explanations |
||||||||||||||||
|
||||||||||||||||
 |
||||||||||||||||
 |
||||||||||||||||
Have you finished this pattern?Tag your pictures with #dropspattern #flockinggullssweater or submit them to the #dropsfan gallery. Do you need help with this pattern?You'll find 26 tutorial videos, a Comments/Questions area and more by visiting the pattern on garnstudio.com. © 1982-2026 DROPS Design A/S. We reserve all rights. This document, including all its sub-sections, has copyrights. Read more about what you can do with our patterns at the bottom of each pattern on our site. |
||||||||||||||||


With over 40 years in knitting and crochet design, DROPS Design offers one of the most extensive collections of free patterns on the internet - translated to 17 languages. As of today we count 324 catalogues and 12290 patterns translated into English (UK/cm). 12290
We work hard to bring you the best knitting and crochet have to offer, inspiration and advice as well as great quality yarns at incredible prices! Would you like to use our patterns for other than personal use? You can read what you are allowed to do in the Copyright text at the bottom of all our patterns. Happy crafting!
Post a comment to pattern DROPS 210-15
We would love to hear what you have to say about this pattern!
If you want to leave a question, please make sure you select the correct category in the form below, to speed up the answering process. Required fields are marked *.