
Popular categories
Looking for a yarn?


Comments / Questions (67)
![]() Melanie Schneider wrote:
Melanie Schneider wrote:
Hei, Jeg har et spørsmål om ermer: hvor starter omgangen for mønster? Og hvordan forandres omgangsstart når det felles? Jeg har lagt opp maskene som beskrevet og startet med mønster. Når jeg da satt merke midt i de 6 maskene som ble lagt opp under armen var det 3 masker før omgangsstart . Etter andre fellingsrunde gikk det ikke lenger opp med mønster og jeg vet ikke helt hva jeg gjør feil.
17.04.2026 - 22:49DROPS Design answered:
Hej Melanie, jo det er de samme 2 masker som vises i diagrammet, som fortsætter på ærmerne.
21.04.2026 - 11:49
![]() Dinah Hewstone wrote:
Dinah Hewstone wrote:
Is the raglan always p1, yo, k1 , while the remaining stitches are adjusted as increases occur? (Sweet Seventeen - drops design). Thank you so much for your help, looking forward to hearing from you. Have a wonderful day,
14.04.2026 - 02:50DROPS Design answered:
Hi Dinah, The raglan-stitches (each stitch with a marker, in each transition between the body and sleeves) are always worked in stocking stitch (knitted from the right side, purled from the wrong side). You increase for raglan by working 1 yarn over on each side of the raglan-stitches and these new stitches are then worked twisted into patterns A.1 and A.2 . To work the yarn overs twisted, you insert the right needle through the back loop (instead of the front loop as normal) and this avoids a hole. Regards, Drops Team.
14.04.2026 - 07:31
![]() Tone Clausen wrote:
Tone Clausen wrote:
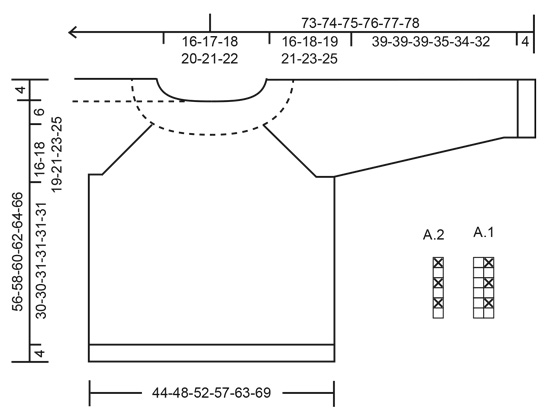
Oppfølgende spørsmål: Sorry at jeg spør på nytt..Jeg ser målskissen, men jeg synes det er vanskelig å se hvor mange cm det er rundt, og det er jo det målet jeg trenger aller mest. Hvordan finner jeg ut hvor langt det er rundt? Hvilke siffer må jeg legge sammen? Mvh masekråken
08.12.2025 - 14:03DROPS Design answered:
Hei Tone. F.eks de nederste målene (44-48-52-57-63-69), er angitt i cm og det er halve omkretsen på genseren. Så i f.eks str. S står det 44, da vil omkretsen være 88 cm. På denne genseren er omkretsen det samme ned som over brystet. Lengden på vrangborden er 4 cm. Lengden på genseren er 56-58-60-62-64-66). Du kan også les mer om hvordan man leser en målskisse under: TIPS & HJELP - LEKSJONER - Les en oppskrift - Slik leser du en målskisse. Er du f.eks usikker på hvilken str. du skal strikke? Se bort fra målene og ta mål fra en genser du allerede har og sammenlign med målskissen, velg så den str som matcher den genseren du allerede har og liker. Lykke til. mvh DROPS Design
08.12.2025 - 14:35
![]() Tone Clausen wrote:
Tone Clausen wrote:
Hvor finner jeg cm-målene for de ulike størrelsene? Jeg finner dem nemlig ikke....
08.12.2025 - 09:47DROPS Design answered:
Hei Tone. Scroll helt nederst på oppskriften, der finner du målskissen og alle mål til de ulike størrelsene. mvh DROPS Design
08.12.2025 - 12:08
![]() May-Brit wrote:
May-Brit wrote:
Hei, vedr mitt spørsmål under, nå gikk det opp for meg at jeg leser mønsteret fra venstre, og det er jo feil. Så bare ignorér spørsmålet mitt... 🙈
12.11.2025 - 09:33
![]() May-Brit wrote:
May-Brit wrote:
Hei, jeg lurer på mønsteret. På omgangen med økninger, stemmer det at jeg skal strikke 1 vr før raglansmaskene (1 vr (A2) - kast, 1 rett, kast, - *1 rett, 1 vr* (A1))? Det som forvirrer meg er at det skal mønsteret viser at det strikkes en vrang (A2) før hver økning (kast) men en rett (A1) etter økningene.
12.11.2025 - 09:30DROPS Design answered:
Hei May-Britt. Så fint at du fant det ut selv :) God Fornøyelse videre. mvh DROPS Design
17.11.2025 - 14:30
![]() Mathilde wrote:
Mathilde wrote:
Hej drops Hvordan ved jeg hvor meget bevægelse plads der er i blusen her. Diagrammet har jo kun mål, som jeg vel skal gå ud fra i eget mål og vælge str. Hvordan kan jeg finde svar ang modellens for, løs eller tættere. Svært at vurdere ud fra modellen på billedet. På forhånd tak for hjælpen😀
18.08.2025 - 11:20DROPS Design answered:
Hej Mathilde. Målen i diagrammet är mål på plagget, inte dina egna mål, så det bästa är att du jämför mål på en blus du har och väljer den storlek som är närmast. Mvh DROPS Design
26.08.2025 - 11:53
![]() Lynn wrote:
Lynn wrote:
Are the body and sleeves of Sweet Sixteen pattern knitted in stocking stitch after the rib section? If so, does this mean knitting every row in purl?
29.07.2025 - 22:31DROPS Design answered:
Hi Lynn, After the ribbed neck the yoke is worked in textured pattern, working A.1 and A.2 as described in the text. The diagrams A.1 and A.2 are found at the bottom of the pattern beside the size chart. As you are working in the round, the diagrams are always read from right to left and bottom up. Regards, Drops team.
30.07.2025 - 06:19
![]() Geraldine Judd wrote:
Geraldine Judd wrote:
After the first increase of 8 stitches and where it says \'Continue with stripes and pattern and increase for raglan\', do I knit the next row or knit/purl, or purl?
22.02.2025 - 08:08DROPS Design answered:
Dear Geraldine, continue the pattern means that you continue working the charts (and with the yarn overs on the sides of the charts every 2nd round) as established in the first round. Meanwhile, remember to change colours as indicated in STRIPES BODY. In A.1, you will alternate between knit rounds and rib (purl 1, knit 1) rounds, while in A.2 you work in garter stitch (knit 1 round, purl 1 round). Happy knitting!
23.02.2025 - 23:53
![]() Liv Holmstrand wrote:
Liv Holmstrand wrote:
Jeg strikker str xl. Ved deling for armene stemmer ikke mønsteret, siste maske på bakstykket er markeringsmasken for raglan, altså rett, så da blir første maske av de 8 vrang og avsluttes med rett maske så kommer første maske på forstykket som også er rett og da stemmer ikke mønsteret. hva gjør jeg feil her
01.01.2025 - 19:36DROPS Design answered:
Hej Liv, det er svært at gætte hvad der er fejl. Men det kan være at du bliver nødt til at tage 1 maske ind i siden, så du får mønsteret til at stemme :)
14.01.2025 - 12:09
|
|||||||
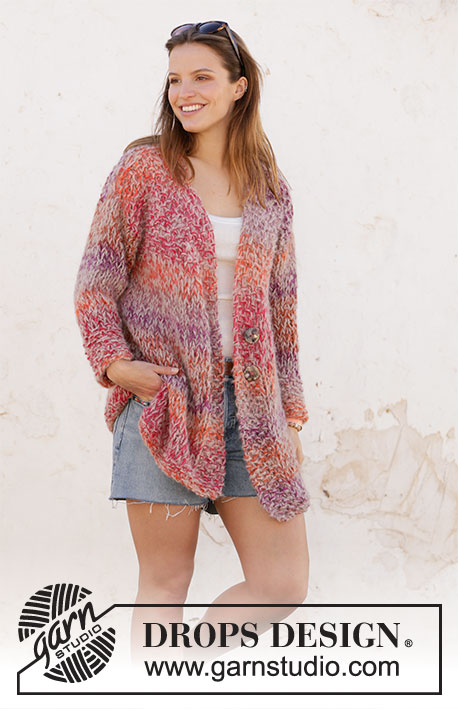
Sweet Seventeen#sweetseventeensweater |
|||||||
 |
 |
||||||
Knitted jumper with raglan in DROPS Sky. Piece is knitted top down with textured pattern and stripes. Size: S - XXXL
DROPS 212-16 |
|||||||
|
---------------------------------------------------------- EXPLANATION FOR THE PATTERN: ---------------------------------------------------------- GARTER STITCH (worked in the round): 1 ridge vertically = 2 rounds, i.e. knit 1 round and purl 1 round. PATTERN: See diagrams A.1 and A.2. STRIPES BODY: Work stripes as follows: Work with light beige from cast on to 9-11-12-13-15-17 cm. Work 3 rounds with brick, 3 rounds light beige, 3 round brick, 6 rounds light beige, 3 rounds brick, 6 rounds light beige, 3 rounds brick, 3 rounds light beige, 3 rounds brick. Work with light beige for 18-18-19-20-20-20 cm. Work 3 rounds with brick, 3 rounds with light beige, 3 rounds with brick, work with light beige for 5 cm, work 3 rounds with brick, 3 rounds with light beige, 3 rounds with brick. Work until finished measurements with light beige. STRIPES SLEEVE: Work with light beige until sleeve measures 29-28-27-25-24-22 cm from division, work 3 rounds with brick, 3 rounds with light beige, 3 rounds with brick, work with light beige until finished measurements. RAGLAN: Increase on each side of the 4 stitches with markers on every other round. Increase by making 1 yarn over on each side of stitch with marker, on next round work yarn over twisted to avoid holes. Work the increased stitches in pattern when increasing. DECREASE TIP (applies to sleeves): Decrease 1 stitch on each side of marker thread as follows: Work until 3 stitches remain before marker thread, slip 1 stitch knitwise, knit 1, pass slipped stitch over stitch worked, knit 2 (marker thread is in the middle of these stitches), knit the next 2 stitches together. ---------------------------------------------------------- START THE PIECE HERE: ---------------------------------------------------------- JUMPER - SHORT OVERVIEW OF THE PIECE: Yoke and body are worked in the round, top down. Work sleeves in the round on double pointed needles. YOKE: Cast on 100-104-108-116-120-124 stitches on circular needle size 3.5 mmwith light beige. Insert 1 marker between first and last stitch(=beginning of the round, between sleeve and back piece). Work rib in the round with knit 2/purl 2. When piece measures 3 cm, increase 1 stitch in all purl sections = 125-130-135-145-150-155 stitches. Then work knit 2/purl 3 until piece measures 6 cm. Then switch to circular needle size 4 mm. Knit 1 round while adjusting number of stitches to 124-128-136-144-148-156. Now insert 4 markers for RAGLAN in the piece without working, as follows: Insert 1st marker in the 1st stitch on round, insert 2nd marker in the 41st-43rd-47th-51st-53rd-57th stitch, insert 3rd marker in the 63rd-65th-69th-73rd-75th-79th stitch, insert 4th marker in the 103rd-107th-115th-123rd-127th-135th stitch. Then work STRIPES AND PATTERN - read explanation above, and read the entire section before continuing. Work as follows from beginning of round: Work 1 stitch in stocking stitch, make 1 yarn over, work A.1 over the next 38-40-44-48-50-54 stitches, work A.2 over 1 stitch, make 1 yarn over and work 1 stitch in stocking stitch (= back piece). Make 1 yarn over, work A.1 over the next 20 stitches, work A.2 over 1 stitch, make 1 yarn over and work 1 stitch in stocking stitch (= sleeve). Make 1 yarn over. Work A.1 over the next 38-40-44-48-50-54 stitches, work A.2 over 1 stitch, make 1 yarn over and work 1 stitch in stocking stitch (= front piece). Make 1 yarn over, work A.1 over the next 20 stitches, work A.2 over 1 stitch, and make 1 yarn over (= sleeve). First increase for raglan is now done (= 8 stitches increased). REMEMBER THE KNITTING TENSION! Continue with stripes and pattern and increase for raglan every other round until 22-24-26-30-33-35 increases have been done in total = 300-320-344-384-412-436 stitches. Continue with pattern and stripes until piece measures 22-24-25-27-29-31 cm from cast-on edge. Finish the last round 1-2-1-0-2-3 stitches before the beginning of the next round. Insert a new marker (= new beginning of round). On next round divide piece for body and sleeves as follows: Work 87-95-101-111-123-133 stitches in pattern as before (= back piece), slip the next 63-65-71-81-83-85 stitches on a stitch holder for sleeve and cast on 6-6-8-8-10-12 stitches in the side under sleeve, work 87-95-101-111-123-133 stitches in stocking stitch (= front piece), slip the next 63-65-71-81-83-85 stitches on a stitch holder for sleeve and cast on 6-6-8-8-10-12 stitches under sleeve. Now finish body and sleeves separately. NOW MEASURE PIECE FROM HERE! BODY: = 186-202-218-238-266-290 stitches. Then continue with pattern and stripes as before until piece measures 30-30-31-31-31-31 cm from division, switch to circular needle size 3.5 mm, knit 1 round while decreasing 2 stitches evenly = 184-200-216-236-264-288 stitches. Work rib knit 2/purl 2 for 4 cm, then cast off with knit over knit and purl over purl – use a larger needle size to cast off to avoid a tight edge. Jumper measures approx. 60-62-64-66-68-70 cm, measured from shoulder and down. SLEEVE: Slip the 63-65-71-81-83-85 stitches from stitch holder in one side of piece on double pointed needles size 4 mm, and pick up 1 stitch in each of the 6-6-8-8-10-12 stitches cast on under sleeve = 69-71-79-89-93-97 stitches. Work in the round and continue pattern A.1 and STRIPES SLEEVE. Insert 1 marker thread mid under sleeve. When sleeve measures 2 cm from where sleeve was divided from body, decrease 1 stitch on each side of marker thread (= 2 stitches decreased) - read DECREASE TIP. Decrease like this every 3½-3-2½-1½-1½-1½ cm 10-10-13-17-18-19 times in total = 49-51-53-55-57-59 stitches. Work until piece measures 39-38-37-35-34-32 cm from division. Knit 1 round and decrease 1-3-1-3-1-3 stitches evenly = 48-48-52-52-56-56 stitches. Switch to double pointed needles size 3.5 mm and work rib with knit 2/purl 2. Cast off by knitting when sleeve measures 43-42-41-39-38-36 cm from division – use if needed a thicker needle to cast off to avoid a tight edge. Work the other sleeve the same way. |
|||||||
Diagram explanations |
|||||||
|
|||||||
 |
|||||||
Have you finished this pattern?Tag your pictures with #dropspattern #sweetseventeensweater or submit them to the #dropsfan gallery. Do you need help with this pattern?You'll find 24 tutorial videos, a Comments/Questions area and more by visiting the pattern on garnstudio.com. © 1982-2026 DROPS Design A/S. We reserve all rights. This document, including all its sub-sections, has copyrights. Read more about what you can do with our patterns at the bottom of each pattern on our site. |
|||||||


With over 40 years in knitting and crochet design, DROPS Design offers one of the most extensive collections of free patterns on the internet - translated to 17 languages. As of today we count 324 catalogues and 12290 patterns translated into English (UK/cm). 12290
We work hard to bring you the best knitting and crochet have to offer, inspiration and advice as well as great quality yarns at incredible prices! Would you like to use our patterns for other than personal use? You can read what you are allowed to do in the Copyright text at the bottom of all our patterns. Happy crafting!
Post a comment to pattern DROPS 212-16
We would love to hear what you have to say about this pattern!
If you want to leave a question, please make sure you select the correct category in the form below, to speed up the answering process. Required fields are marked *.