
Popular categories
Looking for a yarn?


Comments / Questions (37)
![]() Bente Torp wrote:
Bente Torp wrote:
Hej Jeg er lige begyndt på dette fine babytæppe. Jeg er kun nået til mønster A1. Kan det passe at 11. pind skal strikkes fra vrangsiden ?, i diagramforklaring står der at maskerne skal strikkes 2 ret sammen ? Håber i kan hjælpe mig. Venlig hilsen Bente Torp
28.02.2024 - 17:03DROPS Design answered:
Hei Bente. Rad 11 strikkes fra retten. Du legger opp 94 eller 130 masker, så starter du på 1.rad av diagrammet som er fra retten og der strikkes det vrang (bortsett fra kantmaskene). 2. rad (vrangen) = strikk rett. 3. rad (retten) = strikk rett. 4. rad (vrangen) = strikk vrang. 5.rad (retten) = strikk vrang. 6. rad (vrangen) = strikk rett. Rad 7-10 strikkes i glattstrikk og når du skal strikke hullmønstret fra 11. rad er du nå på retten. mvh DROPS Design
04.03.2024 - 14:21
![]() Michal Finkelstein wrote:
Michal Finkelstein wrote:
Are there a row by row instructions for this pattern?
17.07.2023 - 07:21DROPS Design answered:
Hi Michal, At this present time, there are only the instructions follwing the diagrams available for this pattern. Have a good summer. Drops Team.
17.07.2023 - 07:32
![]() Perrier Jeannette wrote:
Perrier Jeannette wrote:
Bonjour, Je souhaiterai savoir si vous faites les livraisons dans les Dom ? Je réside en Martinique. Merci
14.01.2023 - 20:46DROPS Design answered:
Bonjour Mme Perrier, fort probablement, consultez les différentes boutiques en ligne et n'hésitez pas à les contacter directement si besoin. Bon tricot!
16.01.2023 - 08:59
![]() Jessica Fraser wrote:
Jessica Fraser wrote:
So basically there are 4 edge stitches and a multiple of 9 for pattern A1. When you switch to the next part of pattern, it is 4 edge stitches, 9 stitches of A2a, multiple of 8 stitches for A2b, and another 8 stitches for A2c. so the decrease is to adjust for the correct number of stitches from repeats of 9 to repeats of 8. Am i understanding correctly?
11.02.2022 - 17:22DROPS Design answered:
Dear Jessica, yes, the decrease is to adjust the number of stitches to work A.2a-A.2c. Happy knitting!
13.02.2022 - 20:03
![]() Gina wrote:
Gina wrote:
Hello. I would like to make this blanket begin with 148 stitches instead of 130. I just don’t know how to figure out how many decrease stitches to divide by. For instance with 130 stitches you divide by 5 and it’s approx. every 25th stitch so you have 5 decreases. Thank you
29.01.2022 - 12:03DROPS Design answered:
Dear Gina, A.2b is an 8 stitches repeat. If you want to increase the blanket while using the pattern, you need to begin with an increase of a multiple of 8 stitches from 130 (i.e 138, 146 stitches). In this way, you simply need to add 1/2/... repeats of A.2b. Happy knitting!
30.01.2022 - 21:54
![]() Jessica Fraser wrote:
Jessica Fraser wrote:
I would like to make the 65x80 size of this blanket. so what do i cast on? 130 stitches? is the reason for the decreases to accommodate a 8 stitch repeat vs a 9 stitch repeat? your directions are confusing...
30.12.2021 - 23:10DROPS Design answered:
Hi Jessica, you should cast on 130 stitches. Then you should follow the pattern for the size chosen. Happy knitting!
31.12.2021 - 08:59
![]() Martyna wrote:
Martyna wrote:
Hi, I would like to make this blanket 65 x 80 cm but with the DROPS Big Merino on 5.5mm stiches, how many grams of yarn do I need?
04.10.2021 - 22:18DROPS Design answered:
Dear Martyna, we are unfortunately not able to adjust every pattern to every single request - you can take inspiration from Baby Blankets worked in a yarn group C (see here) just as Big Merino - note that this one is worked with Merino Extra Fine, a yarn group B. Happy knitting!
05.10.2021 - 07:13
![]() Martyna wrote:
Martyna wrote:
Hi, I would like to make this blanket 65 x 80 cm but with the DROPS Big Merino, how many grams of yarn do I need?
04.10.2021 - 22:17DROPS Design answered:
Dear Martyna, using Drops Big Merino instead of Merino extra fine will result atotally different style of blanket, much ticker, much less soft than the original. If you adamant using it, you will have to make a gauge swatch, check the stitch and row count and calculate the necessary amount of yarn accordingly. Happy Stitching!
04.10.2021 - 22:27
![]() Gendron Denise wrote:
Gendron Denise wrote:
Bonjour, je ne comprend pas le patron à la ligne 11car d\'après moi il doit y avoir 2 jetée à cause des boule noir 2 fois je fais le patron 36-6 modèle me-072-by Merci de bien vouloir m\'aider
02.10.2021 - 17:32DROPS Design answered:
Bonjour Mme Gendron, effectivement, au 11ème rang de A.1 tricotez: 2 m end, 2 m ens à l'end, 1 jeté, 1 m end, 1 jeté, glissez 1 m à l'end, 1 m end, passez la m glissée par-dessus la m tricoté, 2 m end = 9 m (répétez ces 9 m). Bon tricot!
04.10.2021 - 09:08
![]() Susanne J wrote:
Susanne J wrote:
Hej. Varv 7 och 8 i a2 är överflödiga eller hur?
22.09.2021 - 17:28
|
|||||||||||||||||||
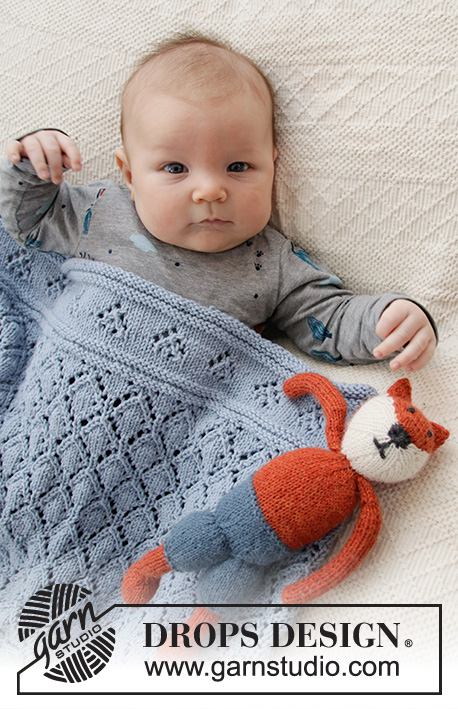
Baby Diamonds#babydiamondsblanket |
|||||||||||||||||||
 |
 |
||||||||||||||||||
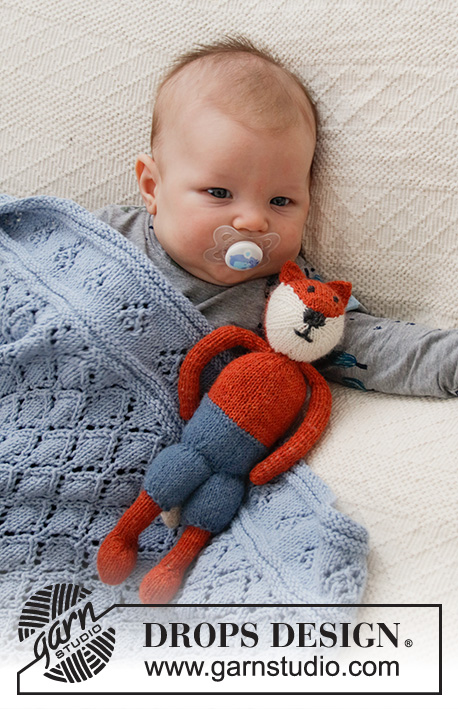
Knitted blanket for babies in DROPS Merino Extra Fine. The piece is worked with lace pattern. Theme: Baby blanket
DROPS Baby 36-6 |
|||||||||||||||||||
|
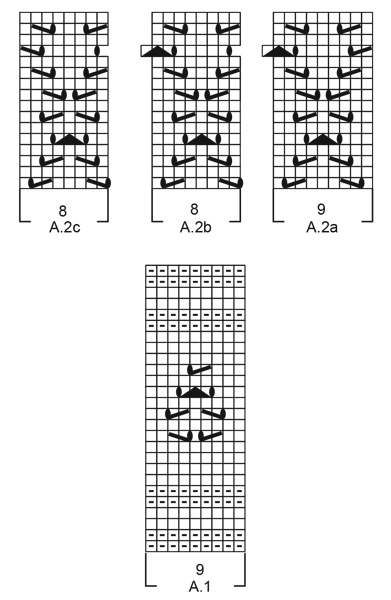
------------------------------------------------------- EXPLANATIONS FOR THE PATTERN: ------------------------------------------------------- RIDGE/GARTER STITCH (worked back and forth): Knit all rows. 1 ridge in height = Knit 2 rows. PATTERN: See diagrams A.1 and A.2. The diagrams show all rows in the pattern from the right side. DECREASE/INCREASE TIP (evenly spaced): To work out how to decrease/increase evenly, count the total number of stitches on needle (e.g. 130 stitches), minus the edge stitches (e.g. 4 stitches) and divide the remaining stitches by the number of decreases/increases to be made (e.g. 5) = 25.2. In this example, decrease by knitting together approx. each 24th and 25th stitch (do not decrease over the edge stitches). When increasing, make 1 yarn over after approx. each 25th stitch (do not increase over the edge stitches). On the next row work the yarn overs twisted to avoid holes. ------------------------------------------------------- START THE PIECE HERE: ------------------------------------------------------- BLANKET – SHORT OVERVIEW OF THE PIECE: The piece is worked back and forth with circular needle. BLANKET: Cast on 94-130 stitches with circular needle size 4.5 mm and Merino Extra Fine. Work pattern as follows: 2 edge stitches in GARTER STITCH – read description above, A.1 until there are 2 stitches left, 2 edge stitches in garter stitch. Continue this pattern back and forth. On the last knitted row from the wrong side, decrease 1-5 stitches evenly spaced – read DECREASE/INCREASE TIP = 93-125 stitches. Now work pattern as follows: 2 edge stitches in garter stitch, A.2a over the next 9 stitches, A.2b over the next 72-104 stitches (= 9-13 repeats of 8 stitches), A.2c over the next 8 stitches, 2 edge stitches in garter stitch. REMEMBER THE KNITTING TENSION! Continue this pattern until the piece measures approx. 45-73 cm – adjust so you finish after row 8 or 16 in the diagrams. Now work pattern as follows: 2 edge stitches in garter stitch, A.1 until there are 2 stitches left, 2 edge stitches in garter stitch; at the same time on row 3 increase 1-5 stitches evenly spaced – remember DECREASE/INCREASE TIP = 94-130 stitches. When A.1 has been completed in height, cast off with purl from the right side. The blanket measures approx. 52-80 cm. |
|||||||||||||||||||
Diagram explanations |
|||||||||||||||||||
|
|||||||||||||||||||
 |
|||||||||||||||||||
Have you finished this pattern?Tag your pictures with #dropspattern #babydiamondsblanket or submit them to the #dropsfan gallery. Do you need help with this pattern?You'll find 17 tutorial videos, a Comments/Questions area and more by visiting the pattern on garnstudio.com. © 1982-2026 DROPS Design A/S. We reserve all rights. This document, including all its sub-sections, has copyrights. Read more about what you can do with our patterns at the bottom of each pattern on our site. |
|||||||||||||||||||


With over 40 years in knitting and crochet design, DROPS Design offers one of the most extensive collections of free patterns on the internet - translated to 17 languages. As of today we count 324 catalogues and 12290 patterns translated into English (UK/cm). 12290
We work hard to bring you the best knitting and crochet have to offer, inspiration and advice as well as great quality yarns at incredible prices! Would you like to use our patterns for other than personal use? You can read what you are allowed to do in the Copyright text at the bottom of all our patterns. Happy crafting!
Post a comment to pattern DROPS Baby 36-6
We would love to hear what you have to say about this pattern!
If you want to leave a question, please make sure you select the correct category in the form below, to speed up the answering process. Required fields are marked *.