
Popular categories
Looking for a yarn?


Comments / Questions (41)
![]() Peggy wrote:
Peggy wrote:
Can this be sized down for a young girl? She's a small 10 year old. I'd love to know how to make this happen!
03.09.2025 - 04:59DROPS Design answered:
Dear Peggy, we don't make custom patterns. You can recalculate the pattern yourself, but you can also use a children's cardigan model with similar shaping and simply replace the chart/ texture used. You can use as a basis this pattern and replace the pattern in the yoke. Happy knitting!
14.09.2025 - 23:52
![]() Cinzia wrote:
Cinzia wrote:
Buongiorno! Sto provando a fare questo modello ma mi trovo in difficoltà con la legenda dei punti: non capisco la differenza tra il quadratino nero( 4 maglie nella stessa maglia) e l asterisco nero(3 maglie nella stessa maglia), hanno la stessa spiegazione e non capisco la differenza. Certa della risposta, vorrei complimentarmi per questo magnifico sito e ringraziarvi per le possibilità che ci date! Grazie mille!
06.08.2025 - 06:59DROPS Design answered:
Buonasera Cinzia, grazie per la segnalazione: abbiamo corretto la legenda. Buon lavoro!
06.08.2025 - 20:54
![]() Monica wrote:
Monica wrote:
Thanks. I did not realize that "the pattern" meant the 1st rib row repeated 5 more times. (I also think it's confusing to say 'cast on 139 stitches including the band stitches'. So many people think that means to include 7 MORE stitches at the beginning and end. It'd be better to say "Cast on 139 stitches (which includes the 7 band stitches on each end).
07.07.2025 - 17:22
![]() Monica wrote:
Monica wrote:
Neck question: I purled the 1st row, then knit the 2nd. What do I do next? It just says, "when the next 6 rows of the pattern are knit". How do I knit rows 3, 4, 5 & 6?
05.07.2025 - 02:49DROPS Design answered:
Hi Monica, It states "after the first 6 rows of the pattern have been worked" (not knitted). So you continue the rib, A.1 and A.2 back and forth for 6 rows. Regards, Drops Team.
05.07.2025 - 14:24
![]() Helena Kozlovská wrote:
Helena Kozlovská wrote:
Dobrý den, Hano, dovoluji si odepsat, obdarovaná měla opravdu ohromnou radost. Dala jsem na Vás a popis v návodu, svetřík vyšel skoro tak hezky, jako má modelka na obrázku a je děsně slušivý. Děkuji a hezký den Vám přeji, Helena
24.04.2025 - 09:14
![]() Helena Kozlovská wrote:
Helena Kozlovská wrote:
Dobrý den, model svetříku na obrázku (pletu velikost S), nezdá se mi, že bych měla plést rukáv 30 cm od podpaží + ještě lem, tedy 34 cm. Bude to dárek, tak nechci nechat vyzkoušet, chci překvapit, svetřík na modelce je nádherný. Prosím o radu, kolik cm plést, abych dosáhla této délky rukávu. Děkuji Vám za odpověď, a také za tu spoustu nádherných návodů, s pozdravem a přáním hezkého dne, Helena
27.03.2025 - 19:19DROPS Design answered:
Dobrý den, Heleno, děkujeme za zprávu - jsme rádi, že vám naše modely a návody líbí. Pokud jde o rukáv, délka odpovídá, měl sahat zhruba do poloviny předloktí. Pokud se vám to zdá moc dlouhé, můžete samozřejmě pár řad ubrat a rukávy zkrátit s ohledem na proporce budoucí majitelky. Jistě bude mít radost v každém případě! Hodně zdaru, Hana
29.03.2025 - 10:41
![]() Joan wrote:
Joan wrote:
Hej Jeg er startet med at strikke mønster A1 og A2 altså 5 masker over hele pinden (undtagen stolpe) Kan se at en anden har gjort det samme. Kan det tydeliggøres at A1 kun skal strikkes efter og før stolpe.
04.06.2024 - 10:43
![]() Eva Persson wrote:
Eva Persson wrote:
Jag har börjat med med halskant ,lagt upp 143 maskor (xxl) och börjat med mönstret ...7 kantmaskor ,mönster A1 + A2 = 5 maskor ,och man ska göra detta 32 gånger på bredden ....det kan väl inte stämma .antalet maskor räcker inte ?
13.09.2023 - 13:41DROPS Design answered:
Hei Eva. A.1 = 1 maske og den skal bare strikkes 1 gang slik at starten og slutten på jakken blir 1 rettmaske før/etter stolpen. Altså strikk: Stolpen over 7 masker (2 rett, 2 vrang, 1 rett, 2 vrang), deretter A.1 (= 1 maske), så strikk A.2 (= 4 masker) til det gjenstår 7 masker (= A.2 32 ganger i bredden i str. XXL). Over stolpen strikkes 2 vrang, 1 rett, 2 vrang, 2 rett. mvh DROPS Design
18.09.2023 - 12:59
![]() Majolie wrote:
Majolie wrote:
Dans le diagramme A3, je dois tricoter la maille 4 fois. Donc si je fait ainsi 1 maille endroit sans lâcher la maille de l’aiguille gauche, 1 jeté, je tricote la même maille et je fais 1 jeté et je dois lâcher la maille de l’aiguille gauche. Ma jeté que j’ai faite sans tricoter la maille fait très bizarre. Suis-je dans l’erreur car il doit avoir 4 mailles sur mon aiguille droite et si je la tricote j’en aurais 5.
10.07.2023 - 02:31DROPS Design answered:
Bonjour Majolie, vous devez tricoter 4 fois la même maille, autrement dit augmenter 3 mailles ainsi: tricotez 1 m à l'end, faites 1 jeté, tricotez la même maille encore 1 fois à l'endroit et faites encore 1 jeté puis lâcher la maille de l'aiguille gauche et continuez le rang. Bon tricot!
25.08.2023 - 09:51
![]() Martine wrote:
Martine wrote:
En ce qui concerne la boutonnière, j’ai 2m end , 2m env , 1m end , 2m env pour la bordure. De l’autre côté j’ai 2m env , 1m end , 2m env , 2m end. Donc dans le patron de la boutonnière c’est écrit jusqu’à ce qu’il reste 4 m. , faire une jetée, tricoter 2 m ens à l’endroit et tricoter les 2 dernières m. à l’endroit. Donc ça ne fonctionne pas car j’ai des mailles aussi à l’envers . Merci de prendre le temps de me répondre.
04.06.2023 - 12:41DROPS Design answered:
Bonjour Martine, les boutonnières se tricotent en fin de rang sur l'endroit (bordure devant droit = 2 m env, 1 m end, 2 m env, 2 m end. Tricotez jusqu'à la fin du rang, tricotez ensuite: 2 m env, 1 m end, il reste 4 mailles sur l'aiguille gauche; tricotez ensuite les 2 m suivantes à l'endroit (vous pouvez aussi les tricoter à l'envers si vous préférez ), et terminez par 2 mailles endroit. Bon tricot!
05.06.2023 - 10:12
|
|||||||||||||||||||||||||||||||
Alberta Rose Jacket#albertarosejacket |
|||||||||||||||||||||||||||||||
 |
 |
||||||||||||||||||||||||||||||
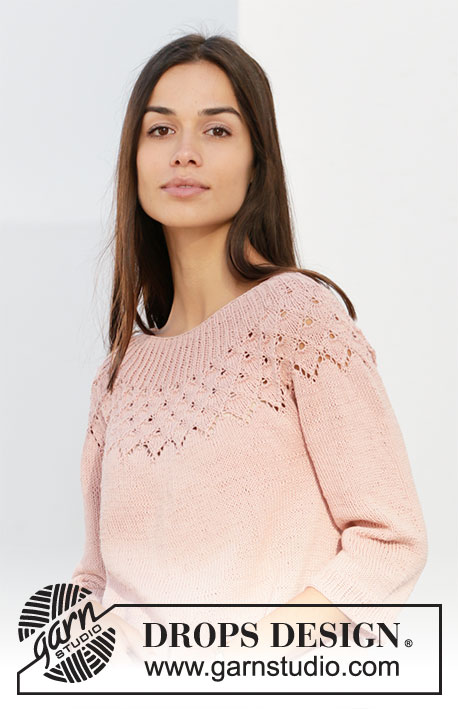
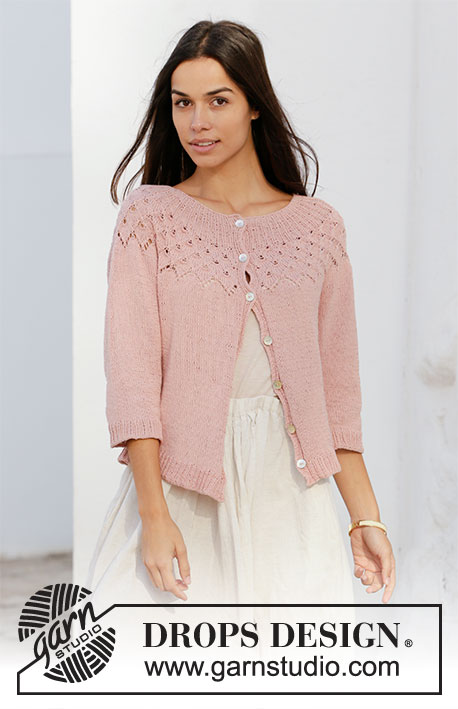
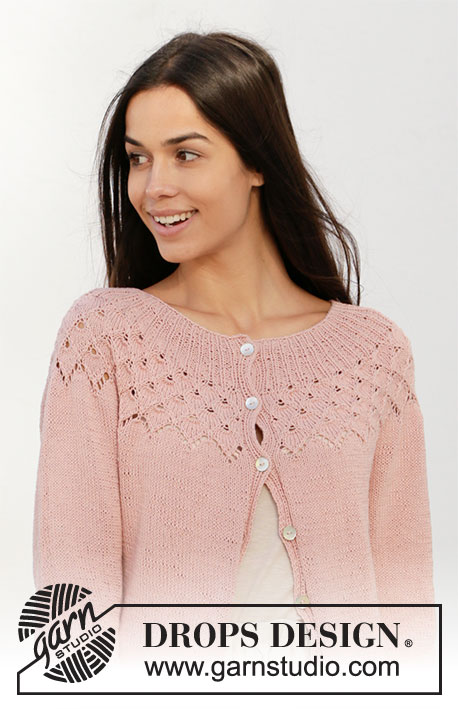
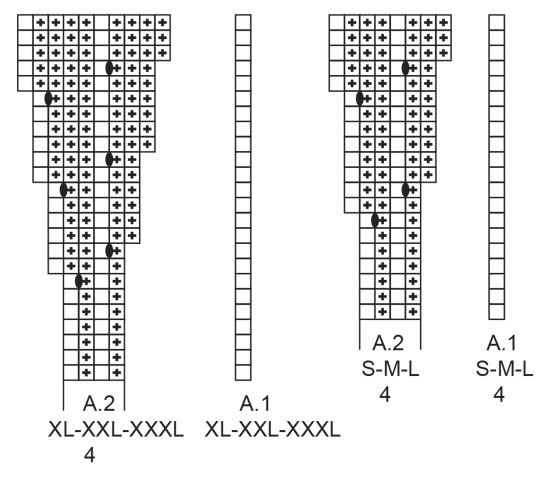
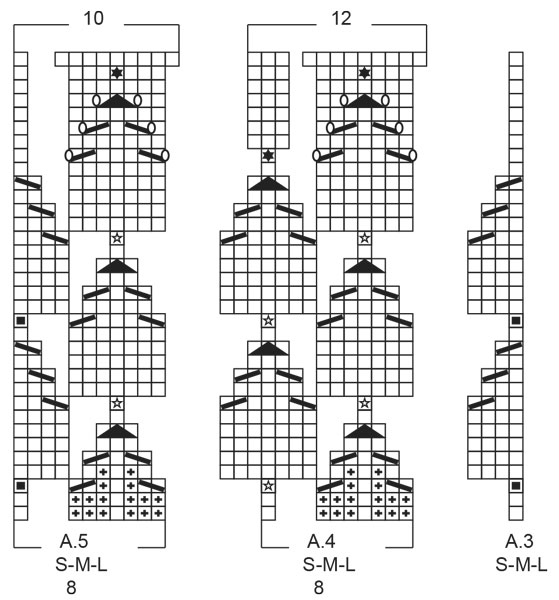
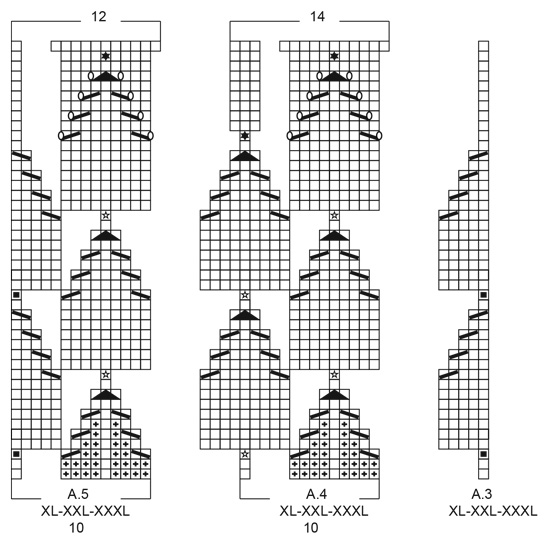
Knitted jacket with round yoke in DROPS Safran. The piece is worked top down with lace pattern, leaf pattern and ¾-length sleeves. Sizes S - XXXL.
DROPS 212-6 |
|||||||||||||||||||||||||||||||
|
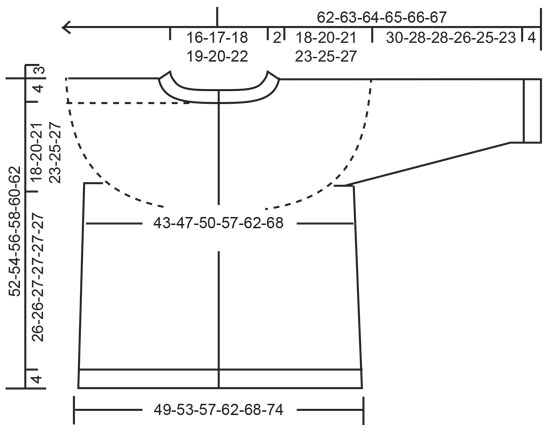
------------------------------------------------------- EXPLANATIONS FOR THE PATTERN: ------------------------------------------------------- PATTERN: See diagrams A.1 to A.5. Choose diagrams for your size. The diagrams show all the rows in the pattern seen from the right side. INCREASE TIP-1 (for sides of body): All increases are worked from the right side! Work until there are 2 stitches left before the marker thread, make 1 yarn over, knit 4 (marker thread sits between these 4 stitches), make 1 yarn over. On the next row work the yarn overs twisted to avoid holes. Then work the new stitches in stocking stitch. INCREASE TIP-2 (evenly spaced): To work out how to increase evenly, count the total number of stitches on the needle (e.g. 257 stitches) minus the bands (e.g. 14 stitches) and divide the remaining stitches by the number of increases to be made (e.g. 64) = 3.79. In this example, increase by making 1 yarn over after approx. each 4th stitch. On the next row work the yarn overs twisted to avoid holes. DECREASE TIP (for sleeves): Decrease 1 stitch on each side of the marker thread as follows: Work until there are 3 stitches left before the marker thread, knit 2 together, knit 2 (marker thread sits between these 2 stitches), slip 1 stitch as if to knit, knit 1 and pass the slipped stitch over the knitted stitch. CASTING-OFF TIP: To avoid the cast-off edge being tight you can cast off with a larger size needle. If the edge is still tight, make 1 yarn over after approx. each 4th stitch at the same time as casting off and the yarn overs are cast off as normal stitches. . BUTTONHOLES: Work buttonholes on right band (when garment is worn). Work from the right side when there are 4 stitches left on row as follows: Make 1 yarn over, knit 2 together and knit the last 2 stitches. On the next row (wrong side) knit the yarn over to leave a hole. The first buttonhole is worked when the neck measures 1½-2 cm. Then work the other 6-6-7-7-7-7 buttonholes with approx. 7-7-7½-7-7-7½ cm between each one. ------------------------------------------------------- START THE PIECE HERE: ------------------------------------------------------- JACKET – SHORT OVERVIEW OF THE PIECE: The neck and yoke are worked back and forth with circular needle, from mid front and top down. The yoke is divided for body and sleeves and the body is continued back and forth with circular needle. The sleeves are worked in the round with double pointed needles, top down. NECK: Cast on 123-131-139-139-143-155 stitches (including 7 band stitches on each side towards mid front) with circular needle size 2.5 mm and Safran. Purl 1 row (= wrong side). The next row is worked as follows from the right side: Knit 2, purl 2, knit 1, purl 2 (= band), A.1 (= 1 stitch), A.2 (= 4 stitches) until there are 7 stitches left on the row (= 27-29-31-31-32-35 times in width) and over the band purl 2, knit 1, purl 2, knit 2. Remember the BUTTONHOLES – see description above. When the first 6 rows of the pattern have been worked, change to circular needle size 3.5 mm. Insert 1 marker after the band at the beginning of the row; the yoke will be measured from this marker! YOKE: Continue the pattern as before and increase as shown in A.2. When A.1 and A.2 have been worked 1 time in height there are 231-247-263-325-335-365 stitches on the row. The piece measures approx. 5-5-5-6-6-6 cm from the marker. On the next row from the right side work as follows: Knit 2, purl 2, knit 1, purl 2 over the band stitches as before, A.3 (= 1 stitch), A.4 (= 8-8-8-10-10-10 stitches) until there are 15-15-15-17-17-17 stitches left (= 26-28-30-30-31-34 times in width), A.5 (= 8-8-8-10-10-10 stitches) and over the band purl 2, knit 1, purl 2 and knit 2. REMEMBER THE KNITTING TENSION! When A.3 to A.5 have been worked 1 time in height there are 337-361-385-447-461-503 stitches on the row. The piece measures approx. 16-16-16-21-21-21 cm from the marker. Continue with stocking stitch and knit over knit and purl over purl on the bands until the piece measures 18-20-21-23-25-27 cm from the marker. Now divide the piece for body and sleeves as follows: Work the first 53-56-59-69-71-80 stitches, place the next 70-74-80-93-94-98 stitches on a thread for the sleeve and cast on 8-8-10-8-12-10 stitches under the sleeve, work 91-101-107-123-131-147 stitches, place the next 70-74-80-93-94-98 stitches on a thread for the sleeve and cast on 8-8-10-8-12-10 stitches under the sleeve and work the last 53-56-59-69-71-80 stitches. BODY: = 213-229-245-277-297-327 stitches. Insert 1 marker thread 57-60-64-73-77-85 stitches in from each side (= sides of body). There are 99-109-117-131-143-157 stitches between the marker threads on the back piece. Allow the threads to follow your work onwards; they will be used when increasing in the sides. Continue with stocking stitch and knit over knit and purl over purl on the bands as before. When the piece measures 3 cm from the division increase 1 stitch on each side of both marker threads – read INCREASE TIP-1 (= 4 stitches increased). Increase like this every 2½ cm a total of 7 times = 241-257-273-305-325-355 stitches. Continue working until the piece measures 26-26-27-27-27-27 cm from the division. (or to desired length; there are 4 cm left to finished length). Knit 1 row from the right side and increase 62-64-66-67-68-68 stitches evenly spaced (band stitches worked as before) – read INCREASE TIP-2 = 303-321-339-372-393-423 stitches. The increase is done to prevent the rib being tight. Change to circular needle size 2.5 mm and work the next row from the wrong side as follows: Purl 2, knit 2, purl 1, knit 2 on the band as before, * purl 1, knit 2 *, work from *-* until you have 8 stitches left on the row, purl 1 and then, on the bands, knit 2, purl 1, knit 2, purl 2 as before. Continue this rib for 4 cm. Cast off with knit from the right side – read CASTING-OFF TIP. SLEEVES: Place the 70-74-80-93-94-98 stitches from the thread on the one side of the piece onto double pointed needles size 3.5 mm and knit up 1 stitch in each of the 8-8-10-8-12-10 stitches cast on under the sleeve = 78-82-90-101-106-108 stitches. Insert 1 marker thread in the middle of these 8-8-10-8-12-10 new stitches under the sleeve. Allow the thread to follow your work onwards; it will be used when decreasing mid under sleeve. Work in the round in stocking stitch. When the piece measures 2 cm from the division decrease 1 stitch on each side of the marker thread – read DECREASE TIP (= 2 stitches decreased). Decrease like this every 2½-2-1½-1-1-1 cm a total of 9-10-13-17-18-18 times = 60-62-64-67-70-72 stitches. When the sleeve measures 30-28-28-26-25-23 cm from where the sleeve was divided from the body, increase 6-7-8-5-8-6 stitches evenly spaced = 66-69-72-72-78-78 stitches. Change to double pointed needles size 2.5 mm and work rib (= knit 1 / purl 2) over all stitches. Cast off with knit when the sleeve measures 34-32-32-30-29-27 cm from the division. Work the other sleeve in the same way. ASSEMBLY: Sew the buttons onto the left band. |
|||||||||||||||||||||||||||||||
Diagram explanations |
|||||||||||||||||||||||||||||||
|
|||||||||||||||||||||||||||||||
 |
|||||||||||||||||||||||||||||||
 |
|||||||||||||||||||||||||||||||
 |
|||||||||||||||||||||||||||||||
 |
|||||||||||||||||||||||||||||||
Have you finished this pattern?Tag your pictures with #dropspattern #albertarosejacket or submit them to the #dropsfan gallery. Do you need help with this pattern?You'll find 26 tutorial videos, a Comments/Questions area and more by visiting the pattern on garnstudio.com. © 1982-2026 DROPS Design A/S. We reserve all rights. This document, including all its sub-sections, has copyrights. Read more about what you can do with our patterns at the bottom of each pattern on our site. |
|||||||||||||||||||||||||||||||


With over 40 years in knitting and crochet design, DROPS Design offers one of the most extensive collections of free patterns on the internet - translated to 17 languages. As of today we count 325 catalogues and 12298 patterns translated into English (UK/cm). 12298
We work hard to bring you the best knitting and crochet have to offer, inspiration and advice as well as great quality yarns at incredible prices! Would you like to use our patterns for other than personal use? You can read what you are allowed to do in the Copyright text at the bottom of all our patterns. Happy crafting!
Post a comment to pattern DROPS 212-6
We would love to hear what you have to say about this pattern!
If you want to leave a question, please make sure you select the correct category in the form below, to speed up the answering process. Required fields are marked *.