
Popular categories
Looking for a yarn?


|
|||||||||||||||||||||||||||||||
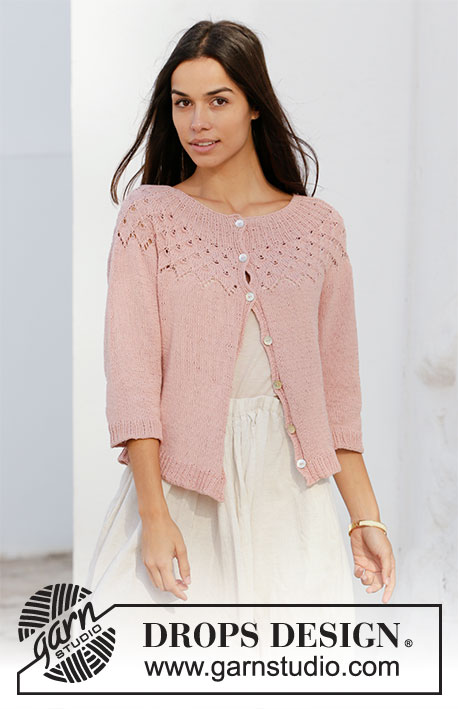
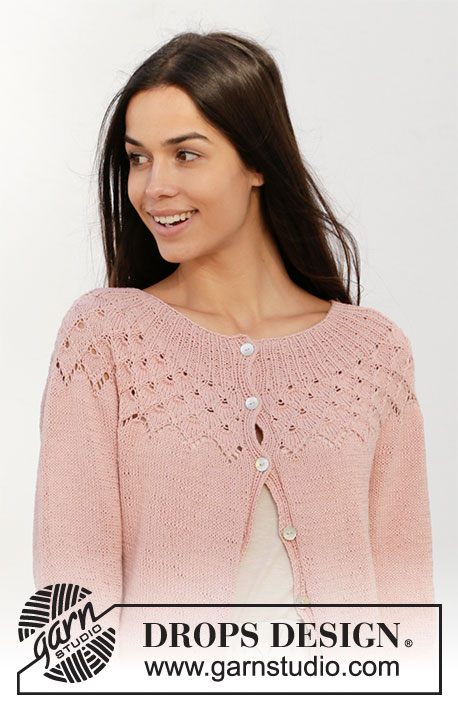
Alberta Rose Jacket |
|||||||||||||||||||||||||||||||
 |
 |
||||||||||||||||||||||||||||||
Knitted jacket with round yoke in DROPS Safran. The piece is worked top down with lace pattern, leaf pattern and ¾-length sleeves. Sizes S - XXXL.
DROPS 212-6 |
|||||||||||||||||||||||||||||||
|
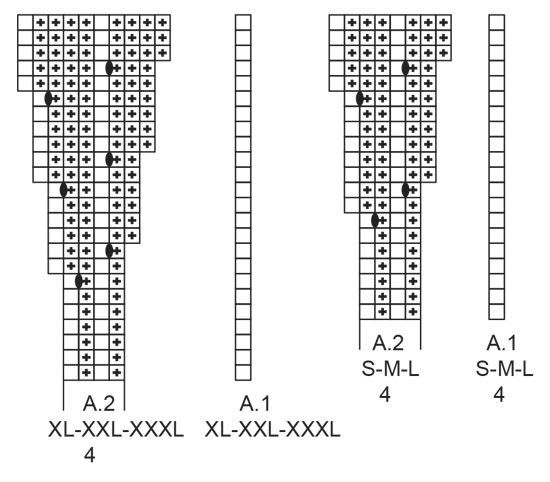
------------------------------------------------------- EXPLANATIONS FOR THE PATTERN: ------------------------------------------------------- PATTERN: See diagrams A.1 to A.5. Choose diagrams for your size. The diagrams show all the rows in the pattern seen from the right side. INCREASE TIP-1 (for sides of body): All increases are worked from the right side! Work until there are 2 stitches left before the marker thread, make 1 yarn over, knit 4 (marker thread sits between these 4 stitches), make 1 yarn over. On the next row work the yarn overs twisted to avoid holes. Then work the new stitches in stocking stitch. INCREASE TIP-2 (evenly spaced): To work out how to increase evenly, count the total number of stitches on the needle (e.g. 257 stitches) minus the bands (e.g. 14 stitches) and divide the remaining stitches by the number of increases to be made (e.g. 64) = 3.79. In this example, increase by making 1 yarn over after approx. each 4th stitch. On the next row work the yarn overs twisted to avoid holes. DECREASE TIP (for sleeves): Decrease 1 stitch on each side of the marker thread as follows: Work until there are 3 stitches left before the marker thread, knit 2 together, knit 2 (marker thread sits between these 2 stitches), slip 1 stitch as if to knit, knit 1 and pass the slipped stitch over the knitted stitch. CASTING-OFF TIP: To avoid the cast-off edge being tight you can cast off with a larger size needle. If the edge is still tight, make 1 yarn over after approx. each 4th stitch at the same time as casting off and the yarn overs are cast off as normal stitches. . BUTTONHOLES: Work buttonholes on right band (when garment is worn). Work from the right side when there are 4 stitches left on row as follows: Make 1 yarn over, knit 2 together and knit the last 2 stitches. On the next row (wrong side) knit the yarn over to leave a hole. The first buttonhole is worked when the neck measures 1½-2 cm. Then work the other 6-6-7-7-7-7 buttonholes with approx. 7-7-7½-7-7-7½ cm between each one. ------------------------------------------------------- START THE PIECE HERE: ------------------------------------------------------- JACKET – SHORT OVERVIEW OF THE PIECE: The neck and yoke are worked back and forth with circular needle, from mid front and top down. The yoke is divided for body and sleeves and the body is continued back and forth with circular needle. The sleeves are worked in the round with double pointed needles, top down. NECK: Cast on 123-131-139-139-143-155 stitches (including 7 band stitches on each side towards mid front) with circular needle size 2.5 mm and Safran. Purl 1 row (= wrong side). The next row is worked as follows from the right side: Knit 2, purl 2, knit 1, purl 2 (= band), A.1 (= 1 stitch), A.2 (= 4 stitches) until there are 7 stitches left on the row (= 27-29-31-31-32-35 times in width) and over the band purl 2, knit 1, purl 2, knit 2. Remember the BUTTONHOLES – see description above. When the first 6 rows of the pattern have been worked, change to circular needle size 3.5 mm. Insert 1 marker after the band at the beginning of the row; the yoke will be measured from this marker! YOKE: Continue the pattern as before and increase as shown in A.2. When A.1 and A.2 have been worked 1 time in height there are 231-247-263-325-335-365 stitches on the row. The piece measures approx. 5-5-5-6-6-6 cm from the marker. On the next row from the right side work as follows: Knit 2, purl 2, knit 1, purl 2 over the band stitches as before, A.3 (= 1 stitch), A.4 (= 8-8-8-10-10-10 stitches) until there are 15-15-15-17-17-17 stitches left (= 26-28-30-30-31-34 times in width), A.5 (= 8-8-8-10-10-10 stitches) and over the band purl 2, knit 1, purl 2 and knit 2. REMEMBER THE KNITTING TENSION! When A.3 to A.5 have been worked 1 time in height there are 337-361-385-447-461-503 stitches on the row. The piece measures approx. 16-16-16-21-21-21 cm from the marker. Continue with stocking stitch and knit over knit and purl over purl on the bands until the piece measures 18-20-21-23-25-27 cm from the marker. Now divide the piece for body and sleeves as follows: Work the first 53-56-59-69-71-80 stitches, place the next 70-74-80-93-94-98 stitches on a thread for the sleeve and cast on 8-8-10-8-12-10 stitches under the sleeve, work 91-101-107-123-131-147 stitches, place the next 70-74-80-93-94-98 stitches on a thread for the sleeve and cast on 8-8-10-8-12-10 stitches under the sleeve and work the last 53-56-59-69-71-80 stitches. BODY: = 213-229-245-277-297-327 stitches. Insert 1 marker thread 57-60-64-73-77-85 stitches in from each side (= sides of body). There are 99-109-117-131-143-157 stitches between the marker threads on the back piece. Allow the threads to follow your work onwards; they will be used when increasing in the sides. Continue with stocking stitch and knit over knit and purl over purl on the bands as before. When the piece measures 3 cm from the division increase 1 stitch on each side of both marker threads – read INCREASE TIP-1 (= 4 stitches increased). Increase like this every 2½ cm a total of 7 times = 241-257-273-305-325-355 stitches. Continue working until the piece measures 26-26-27-27-27-27 cm from the division. (or to desired length; there are 4 cm left to finished length). Knit 1 row from the right side and increase 62-64-66-67-68-68 stitches evenly spaced (band stitches worked as before) – read INCREASE TIP-2 = 303-321-339-372-393-423 stitches. The increase is done to prevent the rib being tight. Change to circular needle size 2.5 mm and work the next row from the wrong side as follows: Purl 2, knit 2, purl 1, knit 2 on the band as before, * purl 1, knit 2 *, work from *-* until you have 8 stitches left on the row, purl 1 and then, on the bands, knit 2, purl 1, knit 2, purl 2 as before. Continue this rib for 4 cm. Cast off with knit from the right side – read CASTING-OFF TIP. SLEEVES: Place the 70-74-80-93-94-98 stitches from the thread on the one side of the piece onto double pointed needles size 3.5 mm and knit up 1 stitch in each of the 8-8-10-8-12-10 stitches cast on under the sleeve = 78-82-90-101-106-108 stitches. Insert 1 marker thread in the middle of these 8-8-10-8-12-10 new stitches under the sleeve. Allow the thread to follow your work onwards; it will be used when decreasing mid under sleeve. Work in the round in stocking stitch. When the piece measures 2 cm from the division decrease 1 stitch on each side of the marker thread – read DECREASE TIP (= 2 stitches decreased). Decrease like this every 2½-2-1½-1-1-1 cm a total of 9-10-13-17-18-18 times = 60-62-64-67-70-72 stitches. When the sleeve measures 30-28-28-26-25-23 cm from where the sleeve was divided from the body, increase 6-7-8-5-8-6 stitches evenly spaced = 66-69-72-72-78-78 stitches. Change to double pointed needles size 2.5 mm and work rib (= knit 1 / purl 2) over all stitches. Cast off with knit when the sleeve measures 34-32-32-30-29-27 cm from the division. Work the other sleeve in the same way. ASSEMBLY: Sew the buttons onto the left band. |
|||||||||||||||||||||||||||||||
Diagram explanations |
|||||||||||||||||||||||||||||||
|
|||||||||||||||||||||||||||||||

|
|||||||||||||||||||||||||||||||
|
|||||||||||||||||||||||||||||||

|
|||||||||||||||||||||||||||||||

|
|||||||||||||||||||||||||||||||
|
Have you made this or any other of our designs? Tag your pictures in social media with #dropsdesign so we can see them! Do you need help with this pattern?You'll find tutorial videos, a Comments/Questions area and more by visiting the pattern on garnstudio.com. © 1982-2024 DROPS Design A/S. We reserve all rights. This document, including all its sub-sections, has copyrights. Read more about what you can do with our patterns at the bottom of each pattern on our site. |
|||||||||||||||||||||||||||||||


With over 40 years in knitting and crochet design, DROPS Design offers one of the most extensive collections of free patterns on the internet - translated to 17 languages. As of today we count 304 catalogues and 11422 patterns - 11422 of which are translated into English (UK/cm).
We work hard to bring you the best knitting and crochet have to offer, inspiration and advice as well as great quality yarns at incredible prices! Would you like to use our patterns for other than personal use? You can read what you are allowed to do in the Copyright text at the bottom of all our patterns. Happy crafting!
Comments / Questions (34)
Jag har börjat med med halskant ,lagt upp 143 maskor (xxl) och börjat med mönstret ...7 kantmaskor ,mönster A1 + A2 = 5 maskor ,och man ska göra detta 32 gånger på bredden ....det kan väl inte stämma .antalet maskor räcker inte ?
13.09.2023 - 13:41DROPS Design answered:
Hei Eva. A.1 = 1 maske og den skal bare strikkes 1 gang slik at starten og slutten på jakken blir 1 rettmaske før/etter stolpen. Altså strikk: Stolpen over 7 masker (2 rett, 2 vrang, 1 rett, 2 vrang), deretter A.1 (= 1 maske), så strikk A.2 (= 4 masker) til det gjenstår 7 masker (= A.2 32 ganger i bredden i str. XXL). Over stolpen strikkes 2 vrang, 1 rett, 2 vrang, 2 rett. mvh DROPS Design
18.09.2023 - 12:59Dans le diagramme A3, je dois tricoter la maille 4 fois. Donc si je fait ainsi 1 maille endroit sans lâcher la maille de l’aiguille gauche, 1 jeté, je tricote la même maille et je fais 1 jeté et je dois lâcher la maille de l’aiguille gauche. Ma jeté que j’ai faite sans tricoter la maille fait très bizarre. Suis-je dans l’erreur car il doit avoir 4 mailles sur mon aiguille droite et si je la tricote j’en aurais 5.
10.07.2023 - 02:31DROPS Design answered:
Bonjour Majolie, vous devez tricoter 4 fois la même maille, autrement dit augmenter 3 mailles ainsi: tricotez 1 m à l'end, faites 1 jeté, tricotez la même maille encore 1 fois à l'endroit et faites encore 1 jeté puis lâcher la maille de l'aiguille gauche et continuez le rang. Bon tricot!
25.08.2023 - 09:51En ce qui concerne la boutonnière, j’ai 2m end , 2m env , 1m end , 2m env pour la bordure. De l’autre côté j’ai 2m env , 1m end , 2m env , 2m end. Donc dans le patron de la boutonnière c’est écrit jusqu’à ce qu’il reste 4 m. , faire une jetée, tricoter 2 m ens à l’endroit et tricoter les 2 dernières m. à l’endroit. Donc ça ne fonctionne pas car j’ai des mailles aussi à l’envers . Merci de prendre le temps de me répondre.
04.06.2023 - 12:41DROPS Design answered:
Bonjour Martine, les boutonnières se tricotent en fin de rang sur l'endroit (bordure devant droit = 2 m env, 1 m end, 2 m env, 2 m end. Tricotez jusqu'à la fin du rang, tricotez ensuite: 2 m env, 1 m end, il reste 4 mailles sur l'aiguille gauche; tricotez ensuite les 2 m suivantes à l'endroit (vous pouvez aussi les tricoter à l'envers si vous préférez ), et terminez par 2 mailles endroit. Bon tricot!
05.06.2023 - 10:12I figured out my mistake - I missed the bit about ALL the rows from the right.
17.04.2023 - 04:07The instructions state the gauge is 30 rows = 4"; in the yoke, they show after completing A1&A2 once, the piece measures 2", from the marker on row 6; my problem is my piece measures ~3.25" after 32 rows & my gauge is accurate. I'm supposed to have 247 stitches, but I only have 218, & I haven't started A5 yet. I don't know how to fix this, at 2" I would only have 189 sts. at most.
15.04.2023 - 22:59DROPS Design answered:
Dear Alecia, the gauge is calculated in stocking stitch, while you are working A.1 and A.2, which is mostly a rib pattern. So both gauges shouldn't match. The increases are indicated in A.2 so, as long as you complete the charts you should have the correct number of stitches. The relevant part is that you should have the correct number of stitches after having completed the charts. A.1 and A.2 are only 20 rows, so you should measure the garment from the marker after having worked these 20 rows of the charts in total. Please indicate the measurement at this point (from the marker) so that we can help you more. Happy knitting!
16.04.2023 - 18:51I'm trying to make the medium size, I cast on 131 stitches, but the numbers didn't work; I'm supposed to do 29 repeats of A1+A2, 29x5=145, plus 7 on each side = 159. HELP!!
12.04.2023 - 01:00DROPS Design answered:
Hi Alecia, You have the 7 stitches on each side, as you say, which leaves you with 117 stitches for the pattern, then you work A.1 (which is not repeated), leaving you with 116 stitches for the repeats of A.4 (4 x 29). Hope this helps and happy knitting!
12.04.2023 - 06:53Strikker i str. M og følger oppskriften men det stemmer dårlig med maskeantall. Måtte ha 134(131står i oppskriften) for å få mønsteret til å stemme men når jeg var ferdig med A1 og A2 hadde jeg bare 230 masker. Er det noe feil i oppskriften?
05.06.2022 - 19:12DROPS Design answered:
Hej Hilde, du starter med 131 masker, strikker 2+2+1+2 (stolpe) 1 + A.2 (=4x29) + 2+1+2+2 =131 masker. Du tager 4 masker ud ifølge diagrammet 29 gange = 247 masker. God fornøjelse!
08.06.2022 - 07:50Na de meerderingen in de hals in A.2(maat M) verspringen de rechte steken. Heel lelijk.... maar ik snap niet hoe dit komt? Graag advies!
31.05.2022 - 16:25DROPS Design answered:
Dag Brenda,
Het is de bedoeling dat je na de meerderingen de lijnen van de rechte steken doorzet en de gemeerderde steken worden dus averechte steken aan de goede kant. Op die manier zouden ze niet moeten verspringen.
05.06.2022 - 21:19Désolée pour l'erreur dans mon précédent post c'est avec du Safran que je souhaite le tricoter mais avec des manches longues. Cordialement
23.08.2021 - 13:54DROPS Design answered:
- cf réponse ci-dessous-
23.08.2021 - 14:36Bonjour, Je voudrais faire des manches longues à ce modèle. Combien de grammes ou de pelotes de Fabel me faut-il en plus? Merci
23.08.2021 - 13:51DROPS Design answered:
Bonjour Mme Louvet, nous ne sommes malheureusement pas en mesure de pouvoir adapter chacun de nos modèles à chaque demande; votre magasin pourra volontiers vous conseiller, même par mail ou téléphone. Merci pour votre compréhension. Bon tricot!
23.08.2021 - 14:36