
Popular categories
Looking for a yarn?


Comments / Questions (37)
![]() Melanie wrote:
Melanie wrote:
When switching from A6 to A7-A11, there is a distinct change in the yo / dec. alignment. You can easily tell where A6 ends and where A7-A11 starts. I'm pretty sure I'm following the pattern correctly, but I can't see that same change in the picture. Does the model in the picture skipped that last section ? I'm making mine in size S, and my A7-A11 section is at least 14 rows to get to the right length, so I'm confused.
06.06.2019 - 21:40DROPS Design answered:
Hi Melanie. You are supposed to continue working A.6 until the lace pattern marked with a star (in the middle) is worked across all stitches (+ 2 stitches in garter each side). This means: after A.6 is completed in height, you continue the pattern the same way (ie: increasing the lace pattern to each side) until the 8 stitches each side NOT marked with a star, is worked in lace pattern. Then you work A.7-A.11, which continues this pattern. Happy knitting
07.06.2019 - 07:26
![]() Andrea wrote:
Andrea wrote:
Ich stricke diesen wunderschöne Bolero und bin gerade bei A6. Ich habe Schwierigkeiten wie ich A6 weiter Stricken soll. Für einen Rat und Erklärung wäre ich sehr dankbar
15.05.2019 - 17:45DROPS Design answered:
Liebe Andrea, nach A.6 1 Mal in der Höhe stricken Sie weiter wie in A.6 aber die Diagonale weiter stricken, dh, bei der 17. Reihe stricken Sie 7 M re, dann die 2 M re zs, 3 M re, Umschlag, 2 M re, 2 M re zs, 2 M re, (Umschlag, 2 M re zs) wiederholen bis die 2 linke Maschen und die mittleren Maschen wie zuvor stricken (= wie bei der 1. Reihe), und die 2. Hälfte gegengleich stricken, damit das Lochmuster auf den Seiten wächst und die Maschen glatt rechts von dem Lochmuster "gegessen" werden. Viel Spaß beim stricken!
16.05.2019 - 09:23
![]() Karen Tzv wrote:
Karen Tzv wrote:
I can't wait to get started on this beauty!!
24.04.2019 - 20:34
![]() Odile wrote:
Odile wrote:
J'ai hâte de le tricoter
12.01.2019 - 12:58
![]() Aukje Van Doeveren wrote:
Aukje Van Doeveren wrote:
Torra bella
11.01.2019 - 16:35
![]() Brigitte wrote:
Brigitte wrote:
Gefällt mir sehr gut, würde ich gerne nachmachen.
02.01.2019 - 15:07
![]() Anneli wrote:
Anneli wrote:
Omapärane ja ilus!
14.12.2018 - 12:12
|
|||||||||||||||||||||||||||||||
Alas de Libelula#alasdelibelulacardigan |
|||||||||||||||||||||||||||||||
 |
 |
||||||||||||||||||||||||||||||
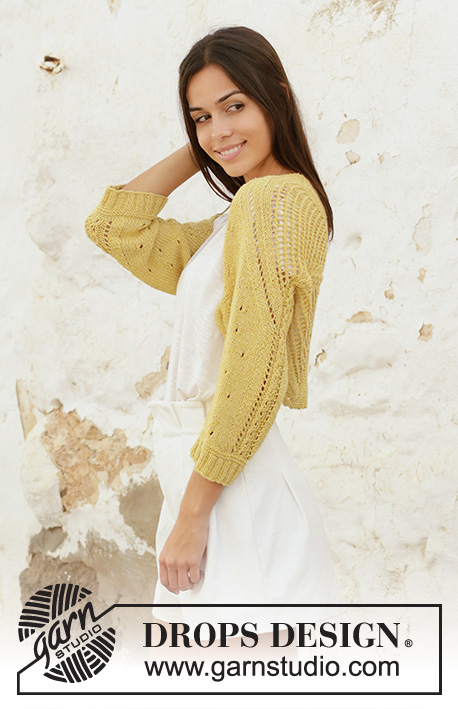
Knitted bolero in DROPS Belle. The piece is worked from the sleeve to mid-back in lace pattern. Sizes S - XXXL.
DROPS 200-25 |
|||||||||||||||||||||||||||||||
|
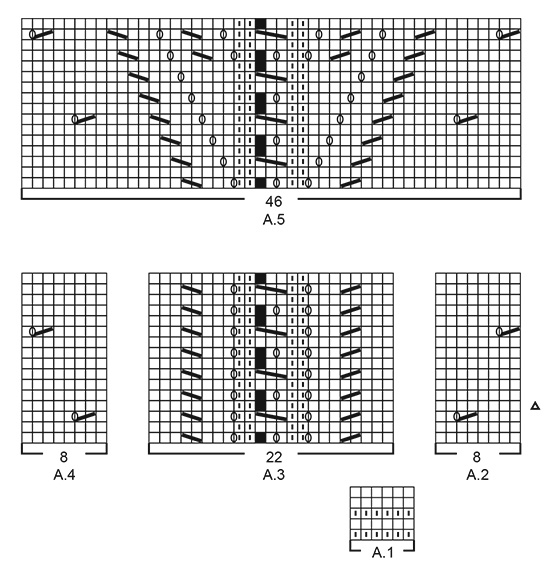
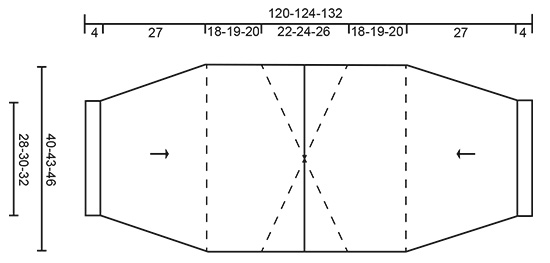
------------------------------------------------------- EXPLANATIONS FOR THE PATTERN: ------------------------------------------------------- RIDGE/GARTER STITCH (worked back and forth): Knit all rows. 1 ridge in height = Knit 2 rows. DECREASE TIP (evenly spaced): To work out how to decrease evenly, count the total number of stitches on needle (e.g. 70 stitches) minus the edge stitches (e.g. 4 stitches) and divide the remaining 66 stitches by number of decreases to be made (e.g. 12) = 5.5. In this example decrease by knitting together alternately each 4th and 5th stitch and each 5th and 6th stitch. Do not decrease over the edge stitches PATTERN: See diagrams A.1 to A.11. The diagrams show all rows in pattern seen from the right side. INCREASE TIP (for each side of sleeve): All increases are worked from the right side! Increase on each side of sleeve by making 1 yarn over inside the 2 edge stitches in garter stitch on each side. On the next row (wrong side) purl the yarn overs twisted to avoid holes. Then work the new stitches in stocking stitch until they fit into A.2/A.4. TURNING TIP: When turning in the middle of the piece on short rows slip the first stitch as if to knit, tighten the strand and knit the next stitch (a bit tightly). This is to avoid a hole when turning. ------------------------------------------------------ START THE PIECE HERE: ------------------------------------------------------- BOLERO - SHORT OVERVIEW OF THE PIECE: The piece is worked back and forth with circular needle in 2 sections from each sleeve to mid-back. Then the piece is sewn together mid-back and under the sleeves. SLEEVE AND HALF BACK PIECE (read the whole section before working): Cast on 70-74-78 stitches with circular needle size 3.5 mm and Belle. Purl 1 row (= wrong side). The next row is worked as follows from the right side: 2 edge stitches in GARTER STITCH – read description above, * Knit 2, purl 2 *, work from *-* until there are 4 stitches left on row, knit 2 and finish with 2 edge stitches in garter stitch. Continue this rib for 4 cm. Knit 1 row from the right side where you decrease 12 stitches evenly spaced in all sizes – read DECREASE TIP = 58-62-66 stitches. Work A.1 with 2 edge stitches in garter stitch on each side (row 1 in A.1 is worked from the wrong side). When A.1 has been completed change to circular needle size 4.5 mm. The next row is worked as follows from the right side: 2 edge stitches in garter stitch, 0-2-4 stitches in stocking stitch, work A.2 over the next 16 stitches (= 2 repeats of 8 stitches), work A.3 (= 22 stitches), A.4 over the next 16 stitches (= 2 repeats of 8 stitches), work 0-2-4 stitches in stocking stitch and finish with 2 edge stitches in garter stitch. Continue this pattern. REMEMBER THE KNITTING TENSION! AT THE SAME TIME when the piece measures 6-6-7 cm, increase 1 stitch on each side – read INCREASE TIP (= 2 stitches increased). Increase like this every 2½-2½-2 cm a total of 11-11-13 times on each side = 80-84-92 stitches (when the last increase on each side has been worked the piece measures approx. 31 cm from the cast-on edge. Insert 1 marker on each side of this row; they show where the sleeve-seam stops. NOTE: The lace pattern described below is worked well before the last increase). AT THE SAME TIME when A.2 to A.4 have been worked a total of 3 times in height, work them 1 more time in height but finish the repeats after row 4 (i.e. after the row marked with a triangle in A.2). The piece now measures approx. 25 cm from the cast-on edge. Insert 1 marker thread in the middle of the row (i.e. middle of A.3). Allow the thread to follow your work onwards. Now the lace pattern in A.3 will «grow» out towards the sides; i.e. on the next row work as follows from the right side: 2 edge stitches in garter stitch, continue A.2 as before until there are 23 stitches left before the marker thread in the middle, work A.5 (= 46 stitches – marker thread now sits in the middle of A.5), continue A.4 as before until there are 2 stitches left on row and finish with 2 edge stitches in garter stitch. Continue this pattern. When A.5 has been completed, work the next row from the right side as follows: 2 edge stitches in garter stitch, continue A.2 as before until there are 31 stitches left before the marker thread, work A.6 (= 62 stitches), continue A.4 as before until there are 2 stitches left on row and finish with 2 edge stitches in garter stitch. Continue this pattern until the stitches marked with a star in A.6 are worked over all stitches on the row as far as the 2 edge stitches in garter stitch on each side. The next row is worked as follows from the right side: 2 edge stitches in garter stitch, work A.7 (= 11 stitches), A.8 until there are 3 stitches left before the marker thread (= 12-13-15 repeats of 2 stitches), work A.9 (= 6 stitches), A.10 until there are 13 stitches left on row (= 12-13-15 repeats of 2 stitches), work A.11 (= 11 stitches) and finish with 2 edge stitches in garter stitch. Continue this pattern until the piece measures 49-49-51 cm from the cast-on edge (Due to the pattern the piece will measure longer along the middle than on the sides - measure along the side where the piece is shortest). Then work short rows in garter stitch as described below. SHORT ROWS: Change to circular needle size 3.5 mm. Start from the right side and work garter stitch with short rows back and forth over the stitches as far as the marker thread; i.e. work the first ridge back and forth over 40-42-46 stitches, then 1 ridge back and forth over 38-40-44 stitches, etc. Work 1 ridge over 2 fewer stitches each time – read TURNING TIP. AT THE SAME TIME on every 2nd ridge (i.e. every 4th row) decrease 1 stitch at the beginning of the row from the right side by knitting together the first 2 stitches. This avoids a point mid-back. Continue with short rows and decreases every 4th row until you have worked back and forth over the last 2 stitches on this side. Knit 1 row from the right side over all stitches. Turn the piece, start from the wrong side and work short rows back and forth over the stitches as far as the marker thread in the same way as on the first side of the piece; i.e. the first ridge is worked over 40-42-46 stitches, then 1 ridge over 38-40-44 stitches, etc. AT THE SAME TIME on every 2nd ridge (i.e. every 4th row) decrease 1 stitch at the beginning of the row from the wrong side by knitting together the first 2 stitches. Continue with short rows and decreases every 4th row until you have worked back and forth over the last 2 stitches on this side. Knit 1 row from the wrong side, knit 1 row from the right side and knit 1 row from the wrong side over all stitches. Place the stitches on 1 thread or change to circular needle size 4.5 mm and loosely cast off with knit from the right side. Work the other sleeve and half back piece in the same way. ASSEMBLY: Sew the 2 sections together mid-back with grafting stitches, or sew inside the cast-off edge if the stitches have been cast off. Sew sleeve seams – start at bottom of sleeve and sew edge to edge in the outermost loop of the outermost stitch as far as the markers. |
|||||||||||||||||||||||||||||||
Diagram explanations |
|||||||||||||||||||||||||||||||
|
|||||||||||||||||||||||||||||||
 |
|||||||||||||||||||||||||||||||
 |
|||||||||||||||||||||||||||||||
 |
|||||||||||||||||||||||||||||||
Have you finished this pattern?Tag your pictures with #dropspattern #alasdelibelulacardigan or submit them to the #dropsfan gallery. Do you need help with this pattern?You'll find 23 tutorial videos, a Comments/Questions area and more by visiting the pattern on garnstudio.com. © 1982-2026 DROPS Design A/S. We reserve all rights. This document, including all its sub-sections, has copyrights. Read more about what you can do with our patterns at the bottom of each pattern on our site. |
|||||||||||||||||||||||||||||||


With over 40 years in knitting and crochet design, DROPS Design offers one of the most extensive collections of free patterns on the internet - translated to 17 languages. As of today we count 324 catalogues and 12290 patterns translated into English (UK/cm). 12290
We work hard to bring you the best knitting and crochet have to offer, inspiration and advice as well as great quality yarns at incredible prices! Would you like to use our patterns for other than personal use? You can read what you are allowed to do in the Copyright text at the bottom of all our patterns. Happy crafting!
Post a comment to pattern DROPS 200-25
We would love to hear what you have to say about this pattern!
If you want to leave a question, please make sure you select the correct category in the form below, to speed up the answering process. Required fields are marked *.