
Popular categories
Looking for a yarn?


Comments / Questions (40)
![]() Chrystal wrote:
Chrystal wrote:
Anyone have this pattern in written form instead of the diagram? I'm not figuring this out. . :(
26.08.2019 - 05:30DROPS Design answered:
Dear Chrystal, we only have diagrams to this pattern - you will find in our FAQ how to read crochet diagrams here. Happy crocheting!
26.08.2019 - 09:29
![]() Sarah Fr wrote:
Sarah Fr wrote:
Bonjour, je viens de le terminer pour ma fille de 13 ans. Il est très facile et très beau. J'ai juste changé les couleurs. Dommage que je ne puisse pas insérer la photo. Bonne journée
17.08.2019 - 10:13DROPS Design answered:
Bonjour Sarah Fr et merci. Vous pouvez volontiers nous montrer vos photos via notre Facebook, notre groupe DROPS Workshop ou bien nous envoyer le lien de votre photo pour la galerie #dropsfan. Bon crochet!
19.08.2019 - 12:21
![]() De Jong wrote:
De Jong wrote:
De kleuren worden niet juist aangegeven in het patroon, de medium grijs word erg vaak gebruikt maar dat moet grijs zijn. Het poolse patroon bijvoorbeeld is wel juist.
09.05.2019 - 13:38
![]() Colleen Wilkowske wrote:
Colleen Wilkowske wrote:
Please ignore previous questions. The error was mine on the 2nd round, I missed a stitch.
13.03.2019 - 03:12
![]() Colleen Wilkowske wrote:
Colleen Wilkowske wrote:
I believe there’s an error on the pattern diagram. On Round 11, (the round where the corners begin), the last 2 sets of stitches on the diagram (left side of chart) it shows to make 2 SC, chain 4, 2SC, then start at beginning with 2 more SC. When done this way, there are too many stitches. I think it should only have 1 set of SC at end.
13.03.2019 - 02:51DROPS Design answered:
Dear Mrs Wilkowske, make sure you have a total of 32 chain-spaces on row 10, so that you get pattern right, ie repeating 4 times A.1b in width will get you A.1b starting with 2 sc, ch4, and ending with 2 sc, 4 ch, 2 sc, 4 ch = 2 sc a total of 3 times with ch4 between each. Happy crocheting!
13.03.2019 - 08:12
![]() Colleen Wilkowske wrote:
Colleen Wilkowske wrote:
I am crocheting the poncho and have done a Guauge swatch to determine correct hook size. After completing 7 rows, the edges are curling up, forming more of a “cup” shape. Will this flatten out when I get to the rows which form into square shape or have I done something wrong? I’d appreciate any help you can provide. Thank you
12.03.2019 - 19:30DROPS Design answered:
Dear Mrs Wilkowske, make sure you are keeping the same tension when working the square, so that all sts have same width - and remember also to keep the correct tension in height. Happy crocheting!
13.03.2019 - 08:04
![]() Marie Laure Beani wrote:
Marie Laure Beani wrote:
Modèle crochet assez simple et agréable
21.01.2019 - 09:10
![]() Sonja wrote:
Sonja wrote:
Hallo, ich habe grade diesen wunderschoenen Poncho auf der Nadel. Leider habe ich Schwierigkeiten beim Halsteil. Arbeite ich weiter in Runden und wird es dann nicht sehr gross, wenn ich in den Ecken zunehme? Bisher sieht es echt toll aus und eure Wolle ist super! Ich freue mich schon auf eure Hilfe...
16.12.2018 - 20:19DROPS Design answered:
Liebe Sonja, die Halsblende wird in der Runde gehäkelt, in der hintere Mitte beginnen und A.3a Häkeln (Anfang der Runde = 3 Lm, dan A.3b häkeln, den Lmbogen in der Ecke aber überspringen, dann Runde schliessen wie im A.3a beschrieben (= 1 KM in die 3.Lm am Anfang der Runde). Und dann so weiterhäkeln: A.3a und A.3b wiederholen. Viel Spaß beim häkeln!
17.12.2018 - 10:16
![]() Mirka wrote:
Mirka wrote:
Jakim kolorem łączyć kwadraty?
11.11.2018 - 22:18DROPS Design answered:
Witaj Mirko! Należy połączyć kwadraty kolorem ostatniego okrążenia kwadratu, a jeżeli obok siebie są różne kolorystycznie kwadraty, wybierz kolor wykończenia zgodnie ze swoim gustem. Powodzenia!
11.11.2018 - 22:46Marcela Collao Orellama wrote:
Beautiful!!!
22.06.2018 - 04:09
|
||||||||||||||||||||||||||||||||||||||||||||||||||||||||||||||||||||||
Serena#serenaponcho |
||||||||||||||||||||||||||||||||||||||||||||||||||||||||||||||||||||||
 |
 |
|||||||||||||||||||||||||||||||||||||||||||||||||||||||||||||||||||||
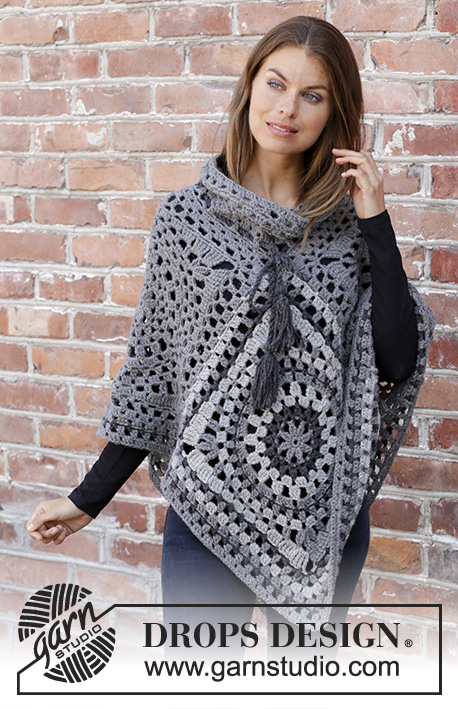
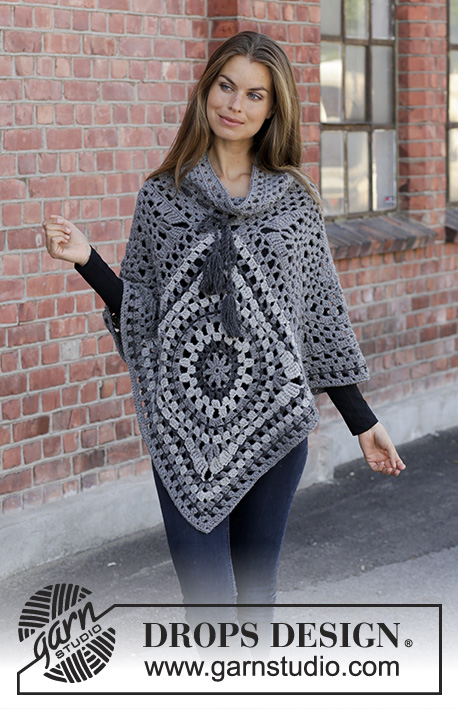
Crocheted poncho in DROPS Nepal. The piece is worked with crochet squares, lace pattern and stripes. Sizes S - XXXL.
DROPS 195-35 |
||||||||||||||||||||||||||||||||||||||||||||||||||||||||||||||||||||||
|
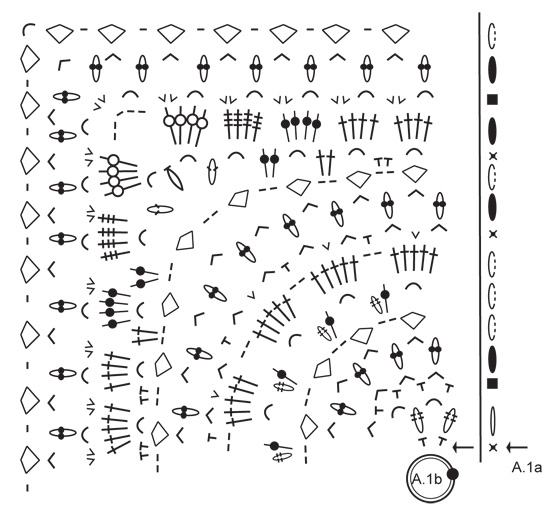
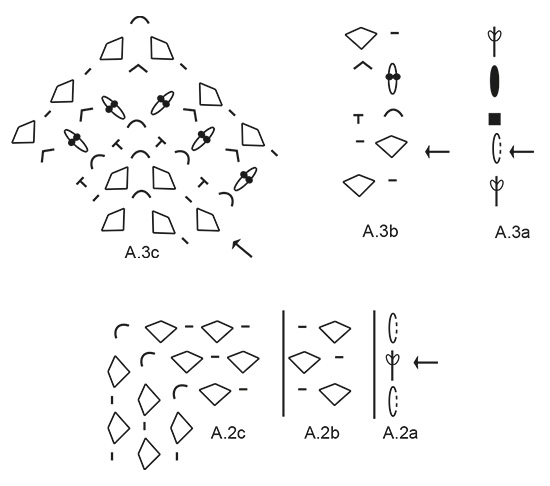
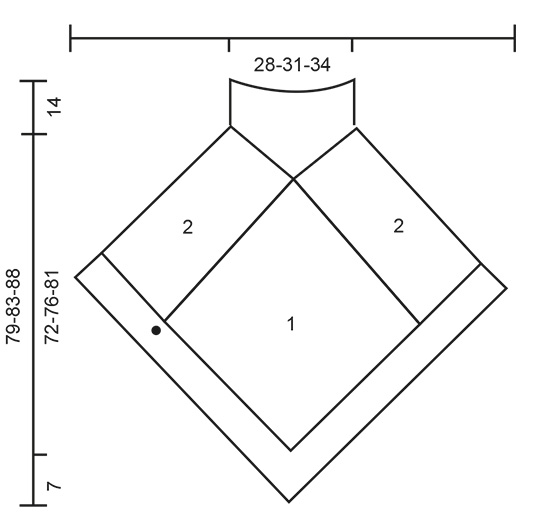
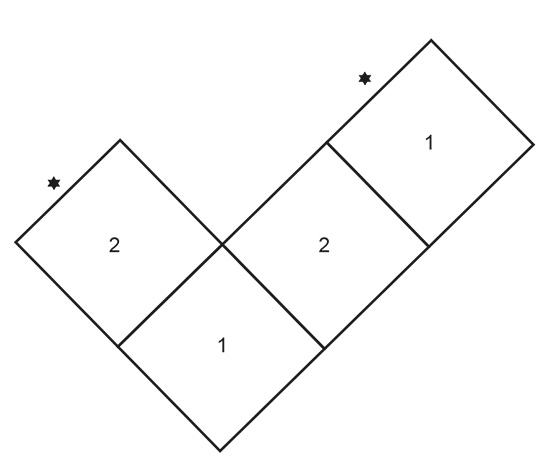
EXPLANATIONS FOR THE PATTERN: ------------------------------------------------------- PATTERN: See diagrams A.1 to A.3. STRIPES-1 (for crochet squares back and front): Chain-stitch ring at beginning of square + ROUNDS 1-2: medium grey. ROUNDS 3-4: dark grey ROUNDS 5-6: grey ROUND 7: medium grey ROUND 8: dark grey ROUND 9: medium grey ROUND 10: grey ROUND 11: medium grey ROUND 12: grey ROUND 13: dark grey ROUND 14: medium grey ROUND 15: grey Size S/M is now finished, for sizes L/XL and XXL/XXXL continue with medium grey. STRIPES-2 (for bottom edge): ROUND 1: medium grey ROUND 2: dark grey ROUND 3: medium grey ROUND 4: medium grey ------------------------------------------------------- START THE PIECE HERE: ------------------------------------------------------- PONCHO - SHORT OVERVIEW OF THE PIECE: 4 crochet squares are worked and sewn together: 2 single-coloured squares and 2 striped squares. An edge is worked at the bottom of the poncho and a neck at the top. CROCHET SQUARE: Work 4 chain stitches with hook size 5.5 mm and medium grey. Form them into a ring with 1 slip stitch in the first chain stitch. Work STRIPES-1- read description above and pattern in the round as follows: Work A.1a – start at arrow - (shows how the rounds start and finish), A.1b a total of 4 times on the round. REMEMBER THE CROCHET TENSION! When the crochet square has been completed, it measures approx. 40 x 40 cm. Size S/M is now finished. For sizes L/XL and XXL/XXXL continue as follows: Work A.2a (shows how the rounds start and finish), * A.2b until there is 1 chain stitch left before the corner. A.2c (= corner) *, work from *-* a total of 4 times on the round, then work A.2b to the end of the round. When you have worked 1 round, size L/XL is finished and the square measures approx. 44 x 44 cm. For size XXL/XXXL work the last round in the diagrams. When the last round has been worked the square measures approx. 48 x 48 cm. Work 1 more square in the same way = 2 crochet squares. Now work 2 single-coloured squares in the same way using medium grey. You have now worked a total of 4 crochet squares. ASSEMBLY: Lay the crochet squares out as shown in the illustration – see below beside the diagrams and sketch. 1 = crochet square with stripes; 2 = single-coloured square. Work the squares together through both layers from the wrong side as follows: 1 double crochet around chain-space in corner, * work 3 chain stitches, skip 3 treble crochets, 1 double crochet around the next chain stitch *, work from *-* along the whole side and finish with 1 double crochet in the next corner. Work the other squares together in the same way. Then finally work together the side marked with a star in the illustration. BOTTOM EDGE: Now work the bottom edge as follows: Start with medium grey in the transition between a single-coloured and a striped square – see black spot on sketch, work STRIPES-2 and pattern in the round as follows: Work A.3a (shows how the rounds start and finish), work A.3b as far as the corner mid front, A.3c around the chain-space in the corner, work A.3b as far as the next corner mid back, A.3c and A.3b to the start of the round. Continue in the round like this until A.3a - A.3c have been completed in height. Cut and fasten the strand. NECK: The whole neck is worked with medium grey. Start with medium grey in the chain-space in the corner of the middle crochet square (= mid back), work A.3a (shows how the rounds start and finish), work A.3b around the same chain-space in the corner, * skip the chain-space in the corner of the next square, work A.3b as far as the next corner, skip the chain-space in the corner, work A.3b around the chain-space in the crochet square mid front *, work from *-* 1 more time on the round, but finish as shown in A.3a. When A.3a and A.3b have been completed in height, repeat the last 4 rounds 2 more times (= a total of 3 times in height). Cut and fasten the strand. Make a twisted cord as follows: TWISTED CORD AND TASSELS Cut 4 strands dark grey, 5 metres in length. Twist them together until they begin to resist, fold them double and they will continue to twist. Tie a knot in each end so that the cord stays twisted. Thread the cord up and down through Round 3 on the neck; start and finish mid front. Make 1 tassel in each end of the cord: 1 tassel = Cut 11 strands dark grey, 24 cm in length. Thread them through the end of the cord and fold them so that all the ends are together (= 24 strand-ends). Cut one more strand, 20 cm in length and wind it around the strands, approx. 1 cm down from the fold and tie a knot. Trim the strands so that they are even at the bottom. Make 1 more tassel in the same way for the other end of the cord. |
||||||||||||||||||||||||||||||||||||||||||||||||||||||||||||||||||||||
Diagram explanations |
||||||||||||||||||||||||||||||||||||||||||||||||||||||||||||||||||||||
|
||||||||||||||||||||||||||||||||||||||||||||||||||||||||||||||||||||||
 |
||||||||||||||||||||||||||||||||||||||||||||||||||||||||||||||||||||||
 |
||||||||||||||||||||||||||||||||||||||||||||||||||||||||||||||||||||||
 |
||||||||||||||||||||||||||||||||||||||||||||||||||||||||||||||||||||||
 |
||||||||||||||||||||||||||||||||||||||||||||||||||||||||||||||||||||||
Have you finished this pattern?Tag your pictures with #dropspattern #serenaponcho or submit them to the #dropsfan gallery. Do you need help with this pattern?You'll find 13 tutorial videos, a Comments/Questions area and more by visiting the pattern on garnstudio.com. © 1982-2026 DROPS Design A/S. We reserve all rights. This document, including all its sub-sections, has copyrights. Read more about what you can do with our patterns at the bottom of each pattern on our site. |
||||||||||||||||||||||||||||||||||||||||||||||||||||||||||||||||||||||


With over 40 years in knitting and crochet design, DROPS Design offers one of the most extensive collections of free patterns on the internet - translated to 17 languages. As of today we count 324 catalogues and 12290 patterns translated into English (UK/cm). 12290
We work hard to bring you the best knitting and crochet have to offer, inspiration and advice as well as great quality yarns at incredible prices! Would you like to use our patterns for other than personal use? You can read what you are allowed to do in the Copyright text at the bottom of all our patterns. Happy crafting!
Post a comment to pattern DROPS 195-35
We would love to hear what you have to say about this pattern!
If you want to leave a question, please make sure you select the correct category in the form below, to speed up the answering process. Required fields are marked *.