
Popular categories
Looking for a yarn?


Comments / Questions (8)
![]() Alyssa wrote:
Alyssa wrote:
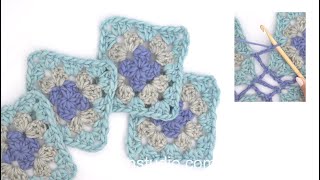
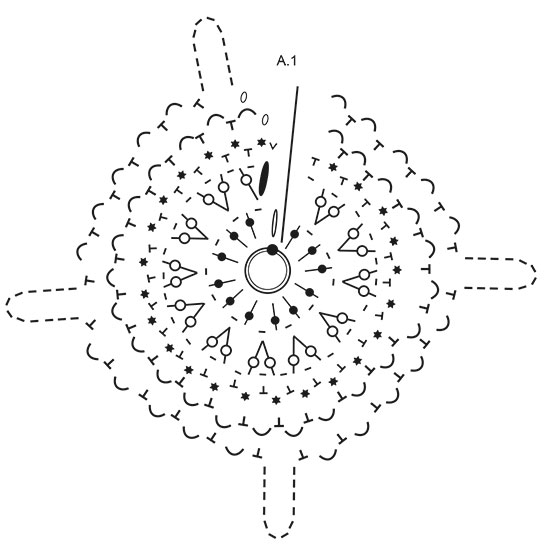
Hi, I am fairly new to crocheting, and would love to make DROPS 190-12 #sunburstshawl and am confused on how to read the pattern diagram. Do you happen to have written instructions and/or video instructions on the flower squares? Thank you.
06.02.2025 - 02:17DROPS Design answered:
Dear Alyssa, this can help you understanding how to read a crochet diagram, start here from the middle and read every round from the left from the beginning of each round, working each symbol as explained under diagram text. Happy crocheting!
06.02.2025 - 16:42
![]() Debby Nijboer wrote:
Debby Nijboer wrote:
Ik heb met veel plezier de vierkantjes gehaakt en wil graag afwerken maar snap er heel weinig van. Is hier een demo video van? Of foto reeks….zou heel erg helpen. Dank voor de hulp en het schitterende patroon. Vr.gr. Debby
27.09.2024 - 11:25DROPS Design answered:
Dag Debby,
Er is niet specifiek voor deze omslagdoek een instructievideo, maar bij de video's die bij het patroon geplaatst zijn, zit wel een video waarin wordt uitgelegd hoe je oma-vierkanten kunt samen haken. De geschreven instructie in het patroon is dan natuurlijk wel leidend. Hopelijk heb je hier wat aan!
27.09.2024 - 21:23
![]() Fanny wrote:
Fanny wrote:
Liebes Drops-Team, ich hätte eine Frage zu den 2 LM am Übergang zw. zwei Häkelquadraten (beim Zusammenhäkeln). Ich verstehe nicht ganz die Funktion dieser LM bzw. sind diese als "Verstärkung" gedacht? LG Fanny
24.08.2024 - 12:49DROPS Design answered:
Liebe Fanny, diese 2 Lm sind als Übergang zwischen die Quadrate gehäkelt, siehe dieses Video als Beispiel (auch wenn die Luftmaschenanzahl verschieden ist). Viel Spaß beim Zusammenhäkeln!
26.08.2024 - 07:47
![]() Debbie Bullen wrote:
Debbie Bullen wrote:
Thank you for your reply. I have used this technique on another Drops blanket but the sunburst shawl instructions indicate that dc bd chains should be worked with two squares on top of each other (wrong side to wrong side) as opposed to working from one to the other making the zig zig pattern. Can I confirm that that is correct. Hope I'm making sense. Thanks very much.
04.08.2020 - 16:40DROPS Design answered:
Dear Mrs Bullen, oh oops you are right sorry, these squares are worked together from RS, this means you will crochet the dc around both chain spaces ( of each square), with the chains in between. I don't think we have a video for this technique, but you just have to work the squares together from WS chain between dc and work the dc around the ch-spaces of both squares, this way, the squares will be next to each other tighter than with the other technique. Happy assembly!
05.08.2020 - 07:46
![]() Debbie Bullen wrote:
Debbie Bullen wrote:
Thank you for the lovely pattern. This is the first time using a diagram to crochet and the squares are really lovely. However, I'm finding it difficult understanding the assembly and wondered whether there was a better tutorial to follow. I have watched the recommended tutorial but it is not the same by the look of the instructions in the Sunburst Shawl. Any help would be great. Thank you.
04.08.2020 - 11:35DROPS Design answered:
Dear Mrs Bullen, this video shows for another pattern how to crochet squares together - the technique is the same as for the shawl, you will just here crochet 4/6 chains between each dc and work 1 dc in each chain-space - but this should help you to understand the technique of crochet together. Happy crocheting!
04.08.2020 - 13:45
![]() Margaret K Weller wrote:
Margaret K Weller wrote:
Utter Beauty!
22.06.2019 - 19:26
![]() Ola wrote:
Ola wrote:
Dlaczego schemat jest inny niż kwadraty przedstawione w chuście ? Proszę o odpowiedź.
01.07.2018 - 14:39DROPS Design answered:
Witaj Olu, wg mnie schemat się zgadza. Czy już zaczęłaś go wykonywać? Jeśli tak napisz co według Ciebie się nie zgadza, sprawdzimy. Pozdrawiamy
02.07.2018 - 21:30
![]() Birgitta Svaneblom wrote:
Birgitta Svaneblom wrote:
Hej. Den är så vacker låt den bli med
21.12.2017 - 19:21
|
||||||||||||||||||||||||||||||||||
Sunburst#sunburstshawl |
||||||||||||||||||||||||||||||||||
 |
 |
|||||||||||||||||||||||||||||||||
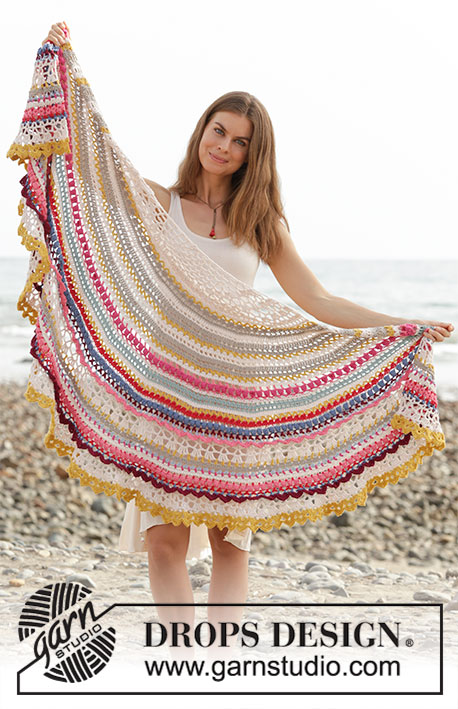
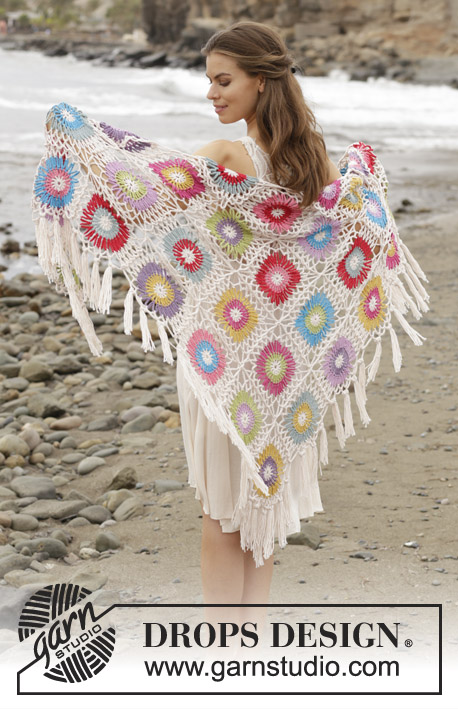
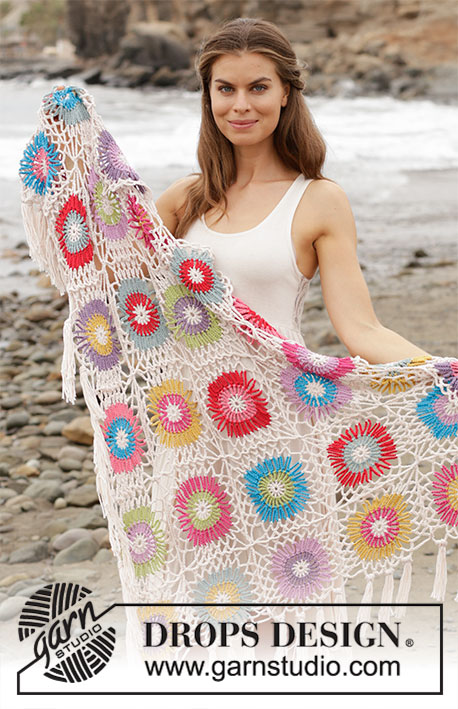
Crocheted shawl with squares and fringes. The piece is worked in DROPS Cotton Merino.
DROPS 190-12 |
||||||||||||||||||||||||||||||||||
|
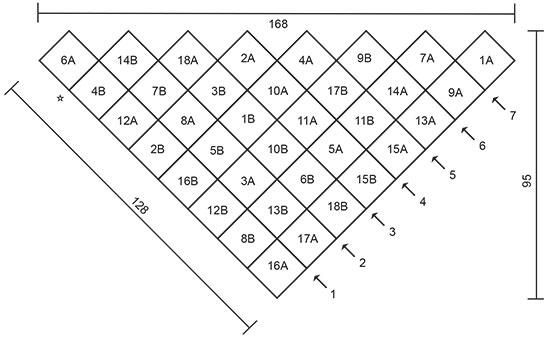
INFORMATION FOR THE PATTERN: PATTERN: See diagram A.1. ---------------------------------------------------------- SHAWL: 36 crochet squares are worked with different colour combinations; these are crocheted together to finish. CROCHET SQUARE: Start with hook size 4.5 mm and Cotton Merino. Work pattern in the round according to diagram A.1 and work 1 square of each of the 18 different colour combinations described below. Then work all 18 different colour combinations 1 more time BUT change colours 2 and 3 in each combination = 36 crochet squares. NOTE: Colour combinations 2 and 5 are the same with reversed colours. Colour combinations 10 and 14 are the same with reversed colours. When all the squares have been completed, there are therefore 4 squares which have the same colours as another square (= 8 squares). The other 28 squares have different colour combinations. COLOUR COMBINATION 1: Chain stitch ring on start of round + ROUND 1: powder ROUND 2: pistachio ROUND 3: lavender ROUNDS 4-5: powder COLOUR COMBINATION 2: Chain stitch ring on start of round + ROUND 1: powder ROUND 2: red ROUND 3: sea green ROUNDS 4-5: powder COLOUR COMBINATION 3: Chain stitch ring on start of round + ROUND 1: powder ROUND 2: cerise ROUND 3: mustard ROUNDS 4-5: powder COLOUR COMBINATION 4: Chain stitch ring on start of round + ROUND 1: powder ROUND 2: lilac ROUND 3: cerise ROUNDS 4-5: powder COLOUR COMBINATION 5: Chain stitch ring on start of round + ROUND 1: powder ROUND 2: sea green ROUND 3: red ROUNDS 4-5: powder COLOUR COMBINATION 6: Chain stitch ring on start of round + ROUND 1: powder ROUND 2: turquoise ROUND 3: pistachio ROUNDS 4-5: powder COLOUR COMBINATION 7: Chain stitch ring on start of round + ROUND 1: powder ROUND 2: sea green ROUND 3: turquoise ROUNDS 4-5: powder COLOUR COMBINATION 8: Chain stitch ring on start of round + ROUND 1: powder ROUND 2: pistachio ROUND 3: lilac ROUNDS 4-5: powder COLOUR COMBINATION 9: Chain stitch ring on start of round + ROUND 1: powder ROUND 2: lavender ROUND 3: coral ROUNDS 4-5: powder COLOUR COMBINATION 10: Chain stitch ring on start of round + ROUND 1: powder ROUND 2: red ROUND 3: coral ROUNDS 4-5: powder COLOUR COMBINATION 11: Chain stitch ring on start of round + ROUND 1: powder ROUND 2: turquoise ROUND 3: lilac ROUNDS 4-5: powder COLOUR COMBINATION 12: Chain stitch ring on start of round + ROUND 1: powder ROUND 2: coral ROUND 3: turquoise ROUNDS 4-5: powder COLOUR COMBINATION 13: Chain stitch ring on start of round + ROUND 1: powder ROUND 2: cerise ROUND 3: pistachio ROUNDS 4-5: powder COLOUR COMBINATION 14: Chain stitch ring on start of round + ROUND 1: powder ROUND 2: coral ROUND 3: red ROUNDS 4-5: powder COLOUR COMBINATION 15: Chain stitch ring on start of round + ROUND 1: powder ROUND 2: mustard ROUND 3: cerise ROUNDS 4-5: powder COLOUR COMBINATION 16: Chain stitch ring on start of round + ROUND 1: powder ROUND 2: lavender ROUND 3: mustard ROUNDS 4-5: powder COLOUR COMBINATION 17: Chain stitch ring on start of round + ROUND 1: powder ROUND 2: mustard ROUND 3: sea green ROUNDS 4-5: powder COLOUR COMBINATION 18: Chain stitch ring on start of round + ROUND 1: powder ROUND 2: lilac ROUND 3: lavender ROUNDS 4-5: powder ASSEMBLY: Lay the crochet squares as shown in the sketch. The numbers in the sketch show where the different colour combinations should be. The numbers with A behind show the first 18 colour combinations worked and the numbers with B show the last 18 (i.e. those crocheted with reversed colours in rounds 2 and 3). It is a good idea to fasten the squares together temporarily by tying them with a thread, so that they do not move too much as you assemble them. Lay the squares wrong side to wrong side and crochet from the right side with powder through both layers. Work from arrow 1 along the thick line and then across and down to the star between 6A and 4B as follows – see sketch: Work 1 double crochet around the chain-space outermost in the corner of the 2 crochet squares, * work 6 chain stitches, (1 double crochet around the next chain-space, 4 chain stitches), work from (-) 3 more times, work 1 double crochet around the next chain-space, 6 chain stitches, 1 double crochet around the chain-space in the corner, 2 chain stitches (= in the transition between 2 crochet squares), 1 double crochet around the next chain-space in the corner (= new crochet square) *, work from *-* until 7 crochet squares have been worked together with their adjacent squares (i.e. as far as 6A) but finish with a double crochet around the last chain-space in the corner. Now continue working along the thick line and down to the star: 1 chain stitch, 1 double crochet around the chain-space in the corner (i.e. the same chain-space on crochet square 4B and chain-space in the corner of 6A), and continue to work in the same way as before down to the star, but finish with 1 double crochet around the chain-space in the corner. Cut and fasten the strand. Work like this from arrow 2, arrow 3, etc., until all the crochet squares have been worked together. Cut and fasten the strands. TASSELS: Cut 16 strands powder of 26 cm, fold them double. Use a crochet hook and pull the middle of the strands through the chain-space in the corner outermost on the side of 6A, pull the ends of the strands through the loop and tighten. Fasten tassels along the whole of the bottom edge of the shawl, in every other chain-space. To get the tassels to hang neatly, you can dip them in/spray them with water, then shake them out and hang the shawl to dry over a chair so that the tassels hang down while they dry. |
||||||||||||||||||||||||||||||||||
Diagram explanations |
||||||||||||||||||||||||||||||||||
|
||||||||||||||||||||||||||||||||||
 |
||||||||||||||||||||||||||||||||||
 |
||||||||||||||||||||||||||||||||||
Have you finished this pattern?Tag your pictures with #dropspattern #sunburstshawl or submit them to the #dropsfan gallery. Do you need help with this pattern?You'll find 10 tutorial videos, a Comments/Questions area and more by visiting the pattern on garnstudio.com. © 1982-2026 DROPS Design A/S. We reserve all rights. This document, including all its sub-sections, has copyrights. Read more about what you can do with our patterns at the bottom of each pattern on our site. |
||||||||||||||||||||||||||||||||||


With over 40 years in knitting and crochet design, DROPS Design offers one of the most extensive collections of free patterns on the internet - translated to 17 languages. As of today we count 324 catalogues and 12290 patterns translated into English (UK/cm). 12290
We work hard to bring you the best knitting and crochet have to offer, inspiration and advice as well as great quality yarns at incredible prices! Would you like to use our patterns for other than personal use? You can read what you are allowed to do in the Copyright text at the bottom of all our patterns. Happy crafting!
Post a comment to pattern DROPS 190-12
We would love to hear what you have to say about this pattern!
If you want to leave a question, please make sure you select the correct category in the form below, to speed up the answering process. Required fields are marked *.