
Popular categories
Looking for a yarn?


Comments / Questions (5)
![]() LT wrote:
LT wrote:
Hello! Thank you for this interesting pattern. Do you have a photo of the pullover without a shoulder warmer on top? Thanks very much.
26.11.2023 - 20:01DROPS Design answered:
Dear LT, these are all of the photos of the pattern that we have available. Happy knitting!
27.11.2023 - 00:06
![]() Jette wrote:
Jette wrote:
Hættedelen hvor er den blevet af ?
15.09.2015 - 12:05DROPS Design answered:
Hej Jette, den kom ikke med og Pelliza som hætteponchoen er strikket i er udgået, så du må finde en anden poncho. God fornøjelse!
15.09.2015 - 16:06
![]() DROPS Design wrote:
DROPS Design wrote:
Oppskriften til skuldervarmeren kommer etter oppskriften til genser (denne delen mangler på svensk, jeg ber oversetteren legge det til).
31.10.2011 - 08:45
![]() Gunwer Vinberg wrote:
Gunwer Vinberg wrote:
Var hittar jag mönstret till axelvärmaren
28.10.2011 - 13:58
![]() Jaymee wrote:
Jaymee wrote:
I made this one and it was cute! Although, a little more loose in the mid-section than I would have liked. Also, you can't see it in the photo because of the shoulder cover, but the shoulders are open in the pull-over. Just FYI. Great patterns though and I LOVE this web-site. Also, the people are VERY helpful. Thank you!
02.02.2006 - 04:05
|
||||||||||
Lady Locksley |
||||||||||
 |
 |
|||||||||
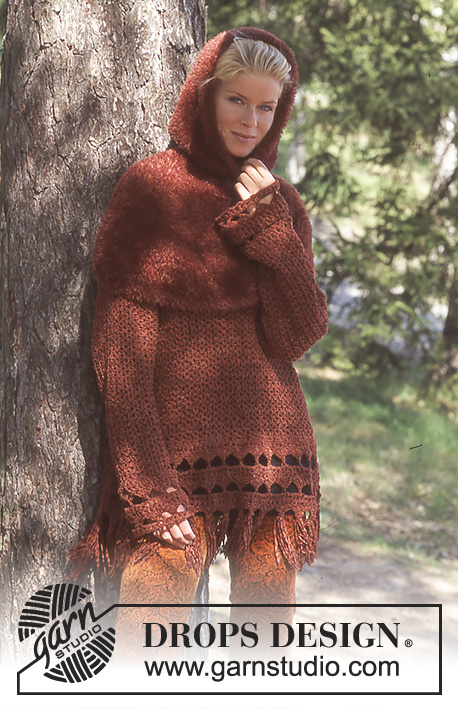
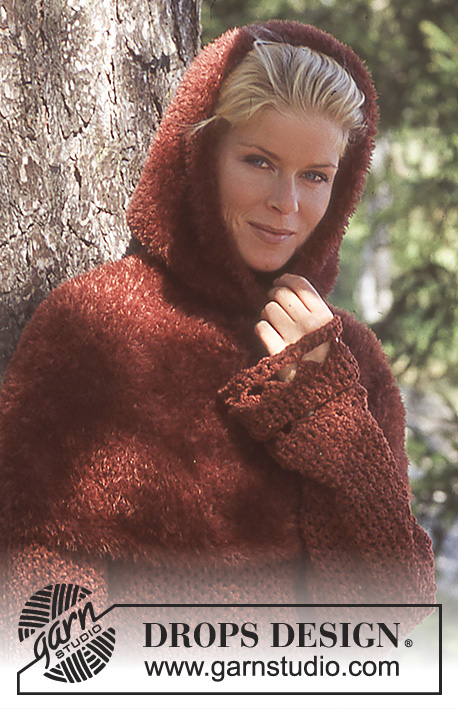
Crochet DROPS jumper with fringe in Tynn Cotton Chenille and shoulder warmer with hood in "Pelliza"
DROPS 66-20 |
||||||||||
|
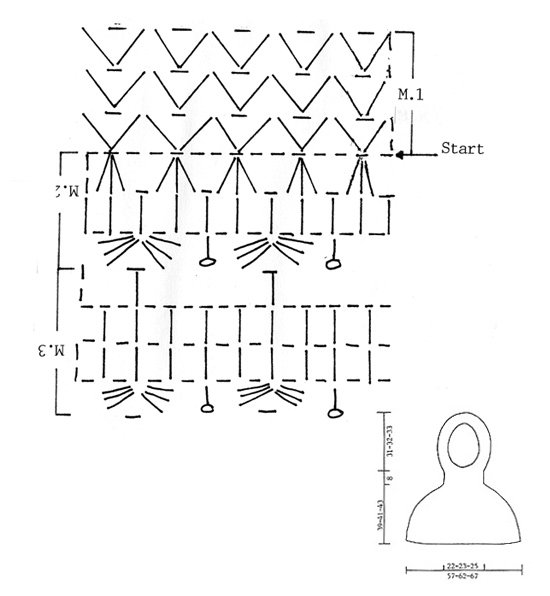
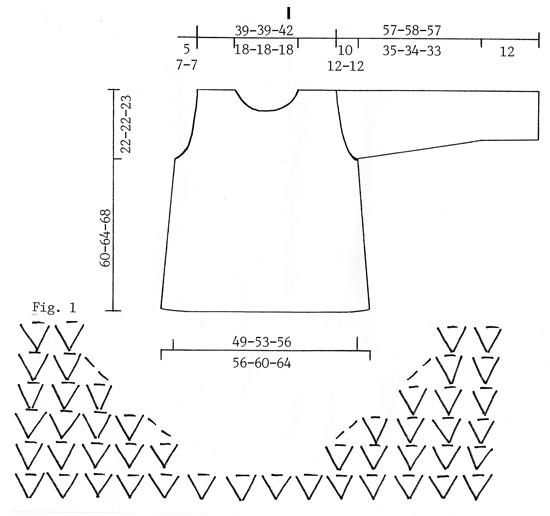
Crochet tension: 17 chain stitches = 10 cm, M.1 covers 6 chain stitches (i.e. 2 treble crochet groups) = 3.5 cm, 8 rows of M.1 in height = 10 cm. 1 repeat of M.2 = 4 cm. Remember hook size is only a guide! Pattern: See diagrams - M.1, M.2 and M.3 Neck decrease: See fig.1. ------------------------------------------------------- Jumper: Start to crochet 16 cm from the bottom edge, both on body and sleeves, work M.1 the whole way - the bottom 16 cm are worked to finish. Front piece: Crochet with Tynn Cotton Chenille and hook size 4 mm a row of 84-90-96 chain stitches. Continue with M.1 (will be 28-30-32 treble crochet groups on row; 1 treble crochet group = 1 treble crochet, 1 chain stitch, 1 treble crochet) to finished length. Remember the crochet tension! When piece measures approx. 22-26-29 cm decrease for armhole in each side by working over 1 treble crochet group less every 2nd row x 3-4-4 = 22-22-24 treble crochet groups left on row. When piece measures approx. 38-42-46 cm decrease for neck mid front - see fig.1. When one side of neck is finished - start to work the other side from the armhole and inwards towards neck - this is important so that the decreases are the same on both sides. After decreasing to neck the piece measures 44-48-52 cm and there are 6-6-7 treble crochet groups left on each shoulder. Start to crochet in the bottom edge of front piece again - turn the diagram and work M.2 and then M.3 two times in height. The piece now measures approx. 60-64-68 cm up to shoulder. Back piece: Worked as for front piece, but do not decrease for neck before there is just 1 row of M.1 left up to the shoulder; now do not work over the middle 10-10-10 treble crochet groups. Work M.2 and M.3 at bottom of back piece as for front piece. Sleeve: The sleeve is worked in the round with increases mid under sleeve. M.2 and M.3 are worked at the end as for the body. Work 1 row of 48-48-48 chain stitches, continue with M.1 = 16 treble crochet groups - insert 1 marker thread in the middle of 1 treble crochet group under the sleeve (1 treble crochet group = 1 treble crochet, 1 chain stitch, 1 treble crochet i.e. the marker thread is inserted in the chain stitch). After 2 rows, increase 1 treble crochet group mid under sleeve by working 2 treble crochet groups in same chain stitch. Repeat the increase alternately on right and left side of the marker thread: 5-5-7 times every 4th-4th-3rd row. After all increases, there are 22-22-24 treble crochet groups around the sleeve. When piece measures approx. 35-34-33 cm, finish working back and forth from mid under sleeve. Start by decreasing 2 treble crochet groups mid under sleeve, then work over 1 treble crochet group less at the end of each row x 3-4-4, i.e. you decrease 4-5-5 treble crochet groups in each side. After the decreases there are 14-12-14 treble crochet groups left and the piece measures approx. 45-46-45 cm. Start at bottom of sleeve again and work M.2 and then M.3 two times – but; the last 2 rows in M.3 are not worked the last time. Finish with 1 row double crochets – sleeve measures approx. 57-58-57 cm. Assembly: Work side and shoulder seams as follows: * 1 double crochet in front piece, 2 chain stitches, 1 double crochet in back piece, 2 chain stitches *, repeat from *-* upwards. Work sleeves to body in the same way. Fringe: Fasten 1 tassel in each tip at bottom of body = 28-30-32 tassels. 1 tassel = Cut 10 strands of 30 cm, fold them double and fasten around the chain stitch in each tip. SHOULDER WARMER: Pattern: DROPS design Sizes: S/M - M/L - XL Materials: GARNSTUDIO's Pelliza, 100% polyamide, 50 g = approx. 115 m. 300-300-350 g colour no 07, rust. DROPS Circular needle and short circular needle sizes 3 and 3.5 mm. ---------------------------------------------------------- Knitting tension: 23 stitches x 30 rows with needle size 3.5 mm and stocking stitch = 10 x 10 cm. Remember needle size is only a guide! Ridge/Garter stitch (back and forth on needle): 1 ridge = Knit 2 rows. Rib: * K1, P1 *, repeat from *-*. Knitting tip (decreases for hood): All decreases are worked from the right side. Decrease as follows before the 8 edge stitches: K2 together. Decrease as follows after the 8 edge stitches: Slip 1 stitch, K1, pass slipped stitch over. ------------------------------------------------------------- Shoulder warmer: You work from the bottom edge of the shoulders and up to top of hood. Cast on 264-288-312 stitches with circular needle size 3 mm and Pelliza. Work Rib - see description above - for 3 cm. Change to circular needle size 3.5 mm and continue with stocking stitch upwards. Remember the knitting tension! When piece measures 14-15-16 cm insert 6 marker threads in piece - with 44-48-52 stitches between each. On the next round, decrease 1 stitch on each side of all marker threads - decrease 1 stitch by knitting 2 together = 252-276-300 stitches (i.e. 12 stitches decreased). Repeat the decreases every 2 cm x 6-6-7 and then every cm x 4-5-5 = 132-144-156 stitches. When piece measures 31-33-35 cm decrease 32-36-40 stitches evenly on round = 100-108-116 stitches. Change to short circular needle size 3 mm and work Rib for 8-8-8 cm. Change back to circular needle size 3.5 mm and work stocking stitch at the same time as you increase 40-36-32 stitches evenly on round = 140-144-148 stitches. Work stocking stitch for 4 cm. On the next round purl the 14-14-14 stitches mid front (seen from right side), then cast off the middle 6 stitches. The hood is now finished back and forth on needle. Cast on 4 new stitches on each side towards face = 148-152-156 stitches. Continue with stocking stitch, but the outermost 8 stitches in each side are worked in garter stitch upwards. At the same time, after the division, decrease on each side towards face every 2nd row - inside the 8 stitches in garter stitch - see Knitting tip: 1 stitch x 6-6-6 = 130-134-138 stitches. Work stocking stitch until piece measures approx. 31-32-33 cm (measured from where the stocking stitch section begins after the rib). Insert 1 marker thread mid back, i.e. after 65-67-69 stitches. Then decrease on each side of the marker thread: 2 stitches x 9-9-9 every 2nd row - decrease 2 stitches by working 3 stitches together = 94-98-102 stitches. Place half the stitches on a thread and the other half on another thread. Lay the 2 threads side by side and sew 1 stitch from each thread together with grafting stitches so that the seam is invisible. Fold the outermost 4 garter stitch stitches double towards the wrong side and sew down. |
||||||||||
Diagram explanations |
||||||||||
|
||||||||||
 |
||||||||||
 |
||||||||||
Have you finished this pattern?Tag your pictures with #dropspattern or submit them to the #dropsfan gallery. Do you need help with this pattern?You'll find 21 tutorial videos, a Comments/Questions area and more by visiting the pattern on garnstudio.com. © 1982-2026 DROPS Design A/S. We reserve all rights. This document, including all its sub-sections, has copyrights. Read more about what you can do with our patterns at the bottom of each pattern on our site. |
||||||||||


With over 40 years in knitting and crochet design, DROPS Design offers one of the most extensive collections of free patterns on the internet - translated to 17 languages. As of today we count 324 catalogues and 12290 patterns translated into English (UK/cm). 12290
We work hard to bring you the best knitting and crochet have to offer, inspiration and advice as well as great quality yarns at incredible prices! Would you like to use our patterns for other than personal use? You can read what you are allowed to do in the Copyright text at the bottom of all our patterns. Happy crafting!
Post a comment to pattern DROPS 66-20
We would love to hear what you have to say about this pattern!
If you want to leave a question, please make sure you select the correct category in the form below, to speed up the answering process. Required fields are marked *.