
Popular categories
Looking for a yarn?


Comments / Questions (17)
![]() Griet Hanssens wrote:
Griet Hanssens wrote:
Zou het kunnen dat er een foutje zit in de uitleg van het telpatroon? Het derde symbool, een verticaal stokje met dubbele streepjes door, is volgens de uitleg een vaste om een lossenlus. Moet dit geen dubbelstokje om een mossel uw zijn?
20.02.2018 - 13:13DROPS Design answered:
Hallo Griet, Dat moet inderdaad een dubbel stokje zijn en niet een vaste. Bedankt voor het doorgeven, ik heb het inmiddels aangepast.
20.02.2018 - 16:51
![]() Sara wrote:
Sara wrote:
Hallo! Ich habe eine Frage zum Rand. Für den Rand steht in der Anleitung, dass man die erste Runde der Streifen nicht häkelt, da sie die letzte Runde der Häkelquadrate darstellt. Man soll also direkt mit dem 2. Streifen beginnen. Bei "Streifen" steht, dass die 1. Runde dunkelgrau ist. Dabei ist die letzte Runde aller Häkelquadrate immer grau (nicht dunkelgrau). Wie geht man jetzt also vor beim Rand? Ab welcher Runde beginnt man und mit welcher/n Farbe(n)? Danke für eine kurze Antwort!
11.11.2017 - 10:20DROPS Design answered:
Liebe Sara, der Rand wird mit beschriebenen Streifen gehäkelt (= 1. Runde = dunkelgrau) aber die erste Reihe wird die 2. in Diagram sein (1. Reihe zeigt die letzte Reihe von Quadrat), dh mit 1 Lm, dann 2 Lm, 2 M überspringen, 1 fM in die nächste M, usw... Viel Spaß beim häkeln!
13.11.2017 - 13:35
![]() Karin Kook wrote:
Karin Kook wrote:
Tekkis selline küsimus selle mustri kohta, et kui jõuan 3nda rea juurde siis on vaja alguses teha 4 ahelsilmust ja peale seda tekib segadus. Selle tumeda ovaalse selgitus on, et "heegelda 4 ühekordset sammas kokku: tee 1 kahekordne sammas..." jne. Et siis kas peab tegema kahekordsed samabad või ühekordsed sambad?
08.10.2017 - 12:11DROPS Design answered:
Tere Karin! Tegemist on kahekordsete sammastega. Viga parandatud! Tänan. Head heegeldamist!
15.05.2018 - 12:45
![]() Sara wrote:
Sara wrote:
Hallo, wäre es möglich ein Foto mit einer Nahaufnahme der Quadrate einzustellen? Ich würde mir gerne das hübsche Blumenmuster von nahem ansehen. Danke und Grüße Sara
17.09.2017 - 20:07DROPS Design answered:
Liebe Sarah, dieses Video zeigt der Quadrat und wie man ihn häkelt. Viel Spaß beim häkeln!
18.09.2017 - 09:19
![]() Tracey wrote:
Tracey wrote:
The motifs look like snowflakes falling from a grey winter sky. Very pretty!
30.06.2017 - 16:44
![]() Marita wrote:
Marita wrote:
So schön und so viele möglichkeiten Farben zu kombinieren
03.06.2017 - 17:12
![]() Christine Paul wrote:
Christine Paul wrote:
Ein Traum........ gefällt mir mehr als gut
02.06.2017 - 23:50
|
||||||||||||||||||||||||||||||||||||||||||||||
Margarita#margaritablanket |
||||||||||||||||||||||||||||||||||||||||||||||
 |
 |
|||||||||||||||||||||||||||||||||||||||||||||
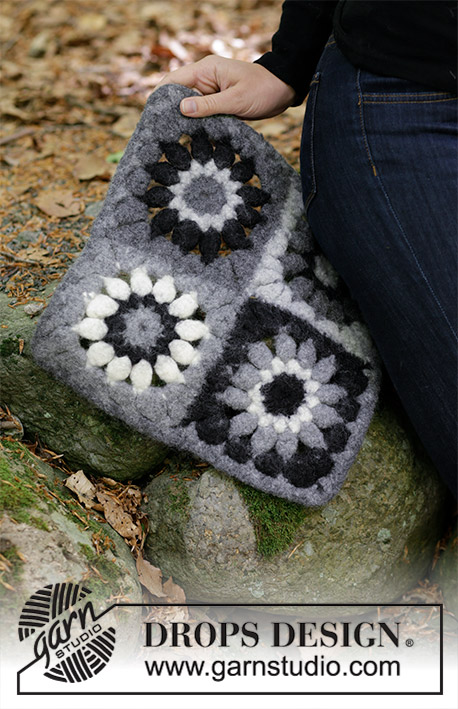
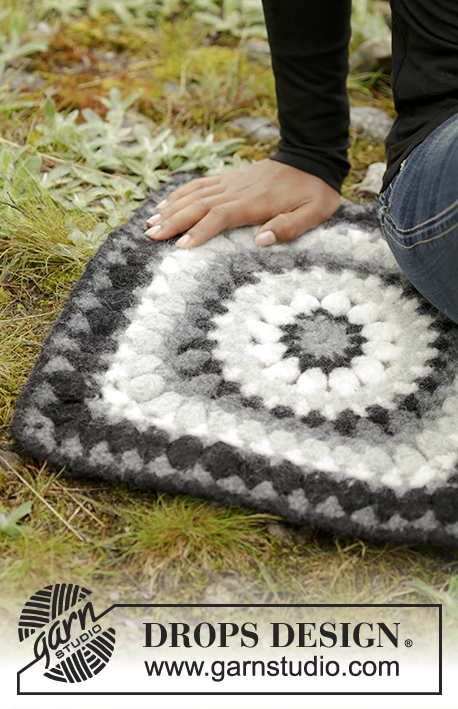
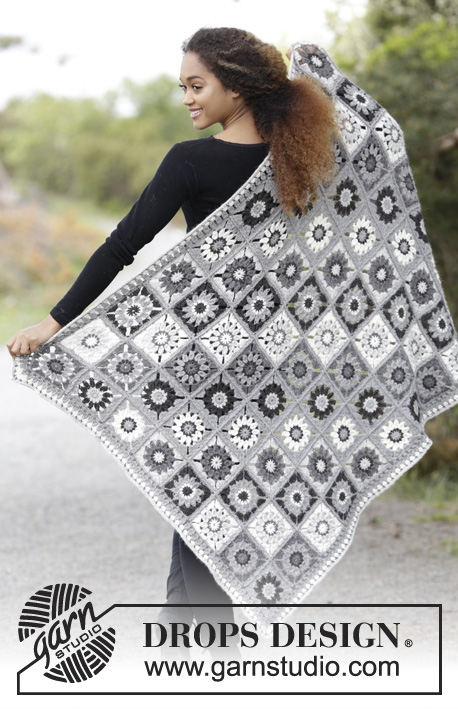
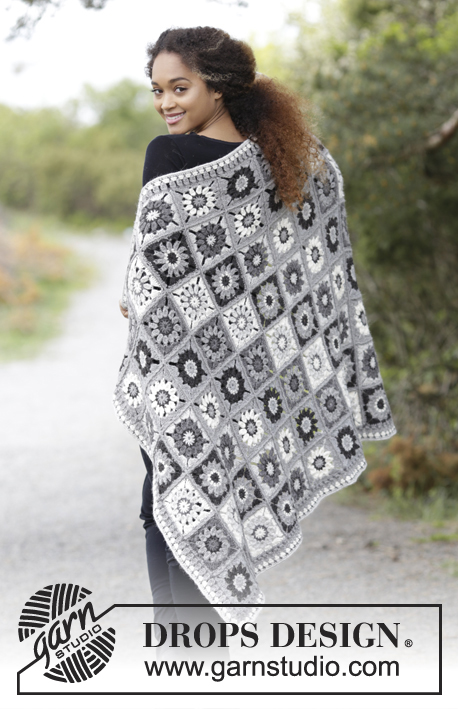
Blanket with crochet squares. Piece is crocheted in DROPS Puna or Sky.
DROPS 179-5 |
||||||||||||||||||||||||||||||||||||||||||||||
|
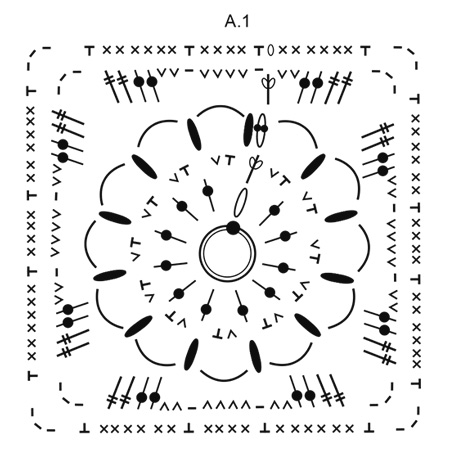
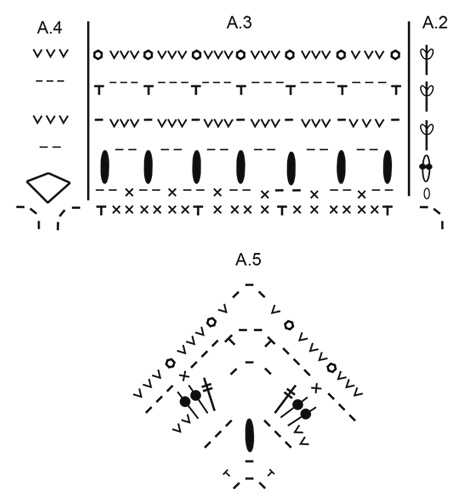
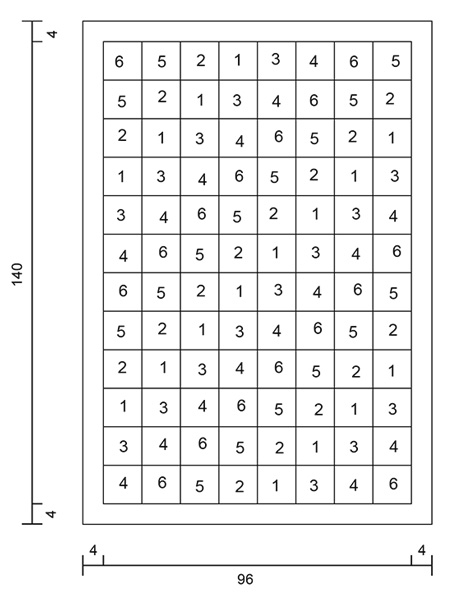
INFORMATION FOR PATTERN: PATTERN: See diagrams A.1 to A.5. COLOURS (applies to crochet squares): Square 1: Cast on + ROUND 1: black ROUND 2: off white ROUND 3: grey ROUND 4: black ROUND 5: grey Square 2: Cast on + 1 ROUND: light grey ROUND 2: black ROUND 3: dark grey ROUND 4: light grey ROUND 5: grey Square 3: Cast on + ROUND 1: off white ROUND 2: dark grey ROUND 3: light grey ROUND 4: off white ROUND 5: grey Square 4: Cast on + 1 ROUND: dark grey ROUND 2: black ROUND 3: grey ROUND 4: dark grey ROUND 5: grey Square 5: Cast on + 1 ROUND: grey ROUND 2: black ROUND 3: off white ROUND 4: grey ROUND 5: grey Square 6: Cast on + 1 ROUND: grey ROUND 2: light grey ROUND 3: black ROUND 4: grey ROUND 5: grey STRIPES (applies to edge): ROUND 1: dark grey ROUND 2: grey ROUND 3: off white ROUND 4: dark grey ROUND 5: light grey ---------------------------------------------------------- BLANKET: Work first 16 squares in every colour combination. Then assemble the crochet squares by working them together. Work an edge around the entire blanket. CROCHET SQUARES: Begin with hook size 4.5 mm and Puna os Sky and work PATTERN according to diagram A.1 - work 16 squares of each COLOUR – see explanation above = 96 squares. REMEMBER THE CROCHET TENSION! 1 square measures approx. 11 x 11 cm. Fasten yarn while working and on the backside of piece. ASSEMBLY: Place squares with correct square number as shown in illustration/chart (8 squares in width and 12 squares in length). Square number on illustration/chart refers to crochet squares with same number explained below COLOURS. Work squares together first alongside the entire blanket and then across. Work them together as follows: Place 2 squares together wrong side against wrong side. Work through both layers with grey: 1 double crochet around corner, * 2 chain stitches, skip 2 double crochets, work 1 double crochet in next double crochet *. Work from *-* until and with corner (= 7 chain spaces) and work 3 chain stitches (= transition to the next 2 squares). Repeat the same on the next two squares that are next to them. Continue the same to other end of blanket until all squares on these two rows have been worked together. Cut the yarn. Now work this double row together with next row the same way. When all rows have been worked together alongside, the squares hang together. Now work the same way across. EDGE: Work an edge around the entire blanket in STRIPES - see explanation above. Begin on 2nd round in diagram (first round shows last round worked on crochet squares). Begin in one corner on blanket. Work pattern according to diagram A.2 (shows how round begins and ends). * Work A.3 along the side of crochet square, A.4 in transition between 2 crochet squares *, work from *-* until 1 crochet square remains before next corner, work A.3 along the side on this crochet square, work A.5 around chain space in corner. Work the same way along the next 3 sides and corner on blanket. Fasten off. |
||||||||||||||||||||||||||||||||||||||||||||||
Diagram explanations |
||||||||||||||||||||||||||||||||||||||||||||||
|
||||||||||||||||||||||||||||||||||||||||||||||
 |
||||||||||||||||||||||||||||||||||||||||||||||
 |
||||||||||||||||||||||||||||||||||||||||||||||
 |
||||||||||||||||||||||||||||||||||||||||||||||
Have you finished this pattern?Tag your pictures with #dropspattern #margaritablanket or submit them to the #dropsfan gallery. Do you need help with this pattern?You'll find 14 tutorial videos, a Comments/Questions area and more by visiting the pattern on garnstudio.com. © 1982-2026 DROPS Design A/S. We reserve all rights. This document, including all its sub-sections, has copyrights. Read more about what you can do with our patterns at the bottom of each pattern on our site. |
||||||||||||||||||||||||||||||||||||||||||||||


With over 40 years in knitting and crochet design, DROPS Design offers one of the most extensive collections of free patterns on the internet - translated to 17 languages. As of today we count 324 catalogues and 12290 patterns translated into English (UK/cm). 12290
We work hard to bring you the best knitting and crochet have to offer, inspiration and advice as well as great quality yarns at incredible prices! Would you like to use our patterns for other than personal use? You can read what you are allowed to do in the Copyright text at the bottom of all our patterns. Happy crafting!
Post a comment to pattern DROPS 179-5
We would love to hear what you have to say about this pattern!
If you want to leave a question, please make sure you select the correct category in the form below, to speed up the answering process. Required fields are marked *.