
Popular categories
Looking for a yarn?


Comments / Questions (23)
![]() Leigh Olsen wrote:
Leigh Olsen wrote:
Hello, I just wanted to check that when you bind off stitches at the bottom edge of the sweater you stop increasing stitches after the center marker #1, #4 increase stitches are bound off. I am referring to the part of the pattern that begins with: "Now work back and forth as follows: Continue with pattern as before until finished measurements." Thank you so much! Leigh
31.07.2021 - 04:10DROPS Design answered:
Dear Mrs Olsen, you don't increase anymore since the increases were worked on mid front and on mid back and you will now work the sides = from mid front to mid back (and reversed for the other side of jumper), this means you cast off 2 sts at the beg each row from row 1 to row 10 (= from RS + from WS) and at the same time decrease on mid under sleeve as before on row 1 and 7 . Happy knitting!
02.08.2021 - 07:10
![]() AnnaKarin wrote:
AnnaKarin wrote:
Hej Jag förstår inte vilken färg jag ska använda vid de olika omslagen så att mönsterstickningen ska bli rätt. Stick tipset ” omslaget görs med samma färg som sista/första m före/efter omslaget är inte helt tydligt. När ska jag gå efter maskan innan och när ska jag gå efter maskan efter?
03.06.2021 - 15:15DROPS Design answered:
Hej AnnaKarin, det betyder samma färg som sista m före omslaget och som första m efter omslaget. Tror du kan se på närbilden att det är finast om det inte är mönster i mittm mellan ökningarna :)
04.06.2021 - 14:28
![]() Margaretha Westlund wrote:
Margaretha Westlund wrote:
Vilken storlek ska man välja om bystmåttets omkrets är 134 cm
10.08.2020 - 22:25DROPS Design answered:
Hej Margaretha Bystmåttet på den största storleken är 132 cm, så om du tycker att det är ok att den blir lite tight så får det bli den storleken. Lycka till!
13.08.2020 - 11:29
![]() Ellen wrote:
Ellen wrote:
Ik krijg de onderkant met de ribbelsteken niet goed. De ribbelrand slaat dubbel. Hoe kan ik dit voorkomen?
10.07.2020 - 22:35DROPS Design answered:
Dag Ellen,
Dit is een bekend probleem met een rand in ribbelsteek en kun je oplossen door, als het kledingstuk helemaal klaar is, het op te persen met een natte doek. Je legt het kledingstuk op een strijkplank, je legt een natte theedoek erover en dan de je erover heen met een heet strijkijzer. Doe dit wel heel voorzichtig (niet te lang en hard drukken met strijkijzer) anders kun je de breistructuur vernielen
12.07.2020 - 14:33
![]() Ioana wrote:
Ioana wrote:
Hello! I dec 8 sts and inc 4 sts in total on round. Next decrease/increase is after 2,5 cm or I must continue as before?(dec/inc 4 sts on round until I knit 2,5 cm) Thanks
17.11.2019 - 05:50DROPS Design answered:
Dear Iona, when you start to dec 8 sts and inc 4 sts, you continue in pattern as before (=dec/inc 4 sts every other round) and at the same time dec 8 sts/inc 4 sts in every 2,5 cm, there should be 2,5 cm between each round with dec 8 sts/inc 4 sts. Happy knitting!
18.11.2019 - 10:04
![]() Ioana wrote:
Ioana wrote:
Hello! This jumper has no seams? I read the entire pattern and I'm not sure I fully understood Thanks, Ioana
03.11.2019 - 07:51DROPS Design answered:
Hello Iona! Yes, this jumper is worked simple way top down in the rounds. No need to sew seams afterwards! Happy knitting!
03.11.2019 - 15:49
![]() Francesca Pellencin wrote:
Francesca Pellencin wrote:
Bonjour, j'aimerais savoir si le dos de ce pull comporte la forme en chevron dans le dos comme devant (à cause de l'échancrure en V à l'encolure...je trouve que pour un pull en laine, c'est mieux d'avoir chaud en haut du dos !) et si oui, pensez-vous qu'il soit possible de ne pas faire le chevron et de tricoter droit derrière tout en rnéalisant la forme en chevron devant ?
09.05.2019 - 11:45DROPS Design answered:
Bonjour Mme Pellencin, l'encolure dos et devant sont ici identique, autrement dit, elles seront toutes les 2 en V. Nous ne sommes malheureusement pas en mesure de pouvoir adapter chacun de nos modèles à chaque demande, n'hésitez pas à contacter un forum tricot ou votre magasin DROPS pour toute assistance complémentaire. Bon tricot!
09.05.2019 - 14:07
![]() LACOMBLEZ Odile wrote:
LACOMBLEZ Odile wrote:
Bonjour Vous serait-il possible de modifier les explications pour que je puisse tricoter ce modèle de BAS en HAUT MERCI
13.06.2018 - 22:08DROPS Design answered:
Bonjour Mme Lacomblez, nous ne sommes malheureusement pas en mesure de pouvoir ajuster chacun de nos modèles à chaque demande individuelle. Pour toute assistance personnalisée, vous pouvez volontiers contacter le magasin où vous avez acheté votre laine. Bon tricot!
14.06.2018 - 08:30
![]() Nicola wrote:
Nicola wrote:
Eine Rückfrage zur Anleitung: Die Anleitung erwähnt zunächst nur die Raglanzunahmen. Stimmt es wirklich, dass erst danach mit den Abnahmen in der Mitte des Vorder- und Rückenteils begonnen wird? Damit die optische Diagonale erreicht wird müsste doch sofort mit den Abnahmen begonnen werden? Ich fände es hilfreich, wenn noch in einem Satz darauf hingewiesen würde, wann die ABNAHME tatsächlich beginnt. DANKE!
31.12.2017 - 12:35DROPS Design answered:
Liebe Nicola, die Raglanzunahme bei Vorder- und Rückenteil werden in der Mitte Vorder- und Rückenteil gestrickt, dh beidseitig der 1. und der 4. Markierer. Die Raglanzunahmen bei den Ärmeln werden nach den 2./vor den 3. + nach den 5./vor den 6. Markierer gestrickt. Viel Spaß beim stricken!
02.01.2018 - 11:14
![]() Leena Mannsåker wrote:
Leena Mannsåker wrote:
Jeg forstår ikke meningen med denne setningen: "Kastet kastes med samme farge som siste/første m før/etter kastet". På en pinne med kun en farge er det jo naturlig å kaste med pinnens farge, mens der hvor det er to farger, er det naturlig å følge mønsteret med kastet, eller? Hva er det jeg misforstår?
10.04.2017 - 14:23
|
|||||||
From my Angle#frommyanglesweater |
|||||||
|
|
|||||||
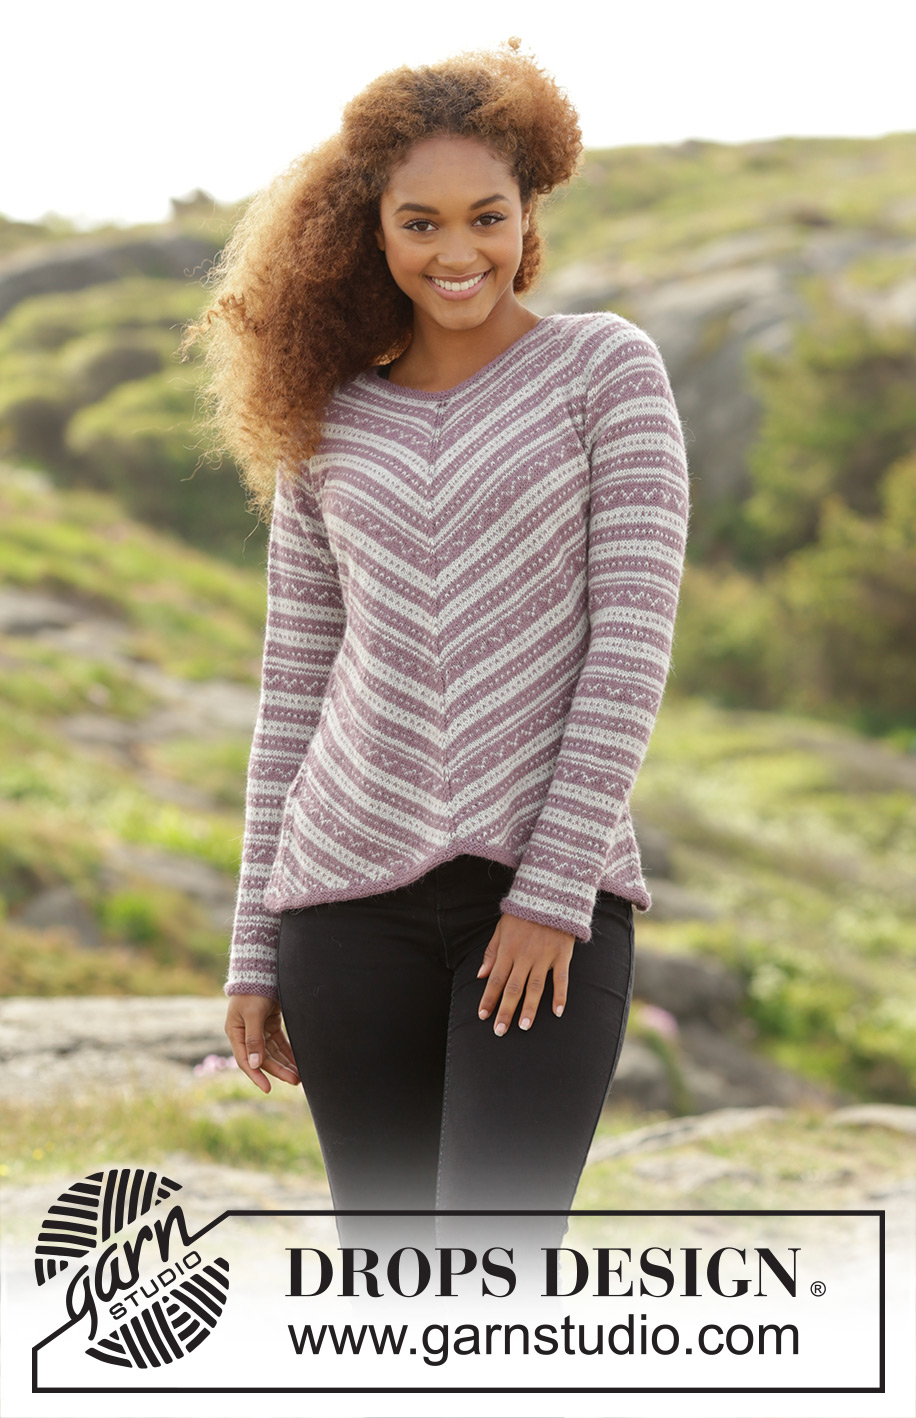
Knitted DROPS jumper with multi-coloured pattern, worked in an angle top down in ”Alpaca”. Size: S - XXXL.
DROPS 172-24 |
|||||||
|
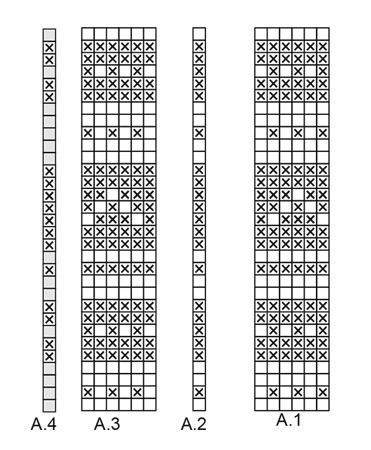
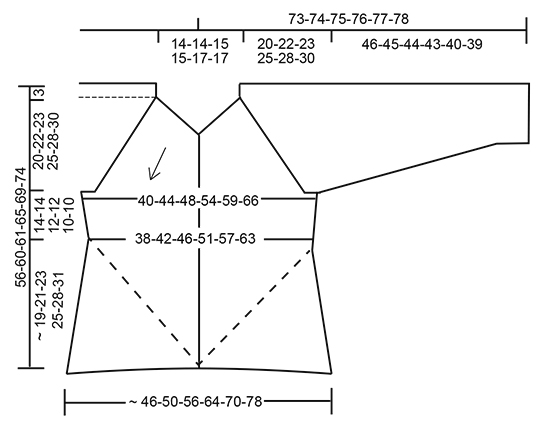
GARTER ST (worked in the round): 1 ridge = 2 rounds. * K 1 round and P 1 round *, repeat from *-*. PATTERN: See diagrams A.1 to A.4. Pattern is worked in stocking st. The diagrams show all rows in pattern seen from RS. NOTE: When diagram is worked back and forth, work as follows: If the strand to be worked with is in the wrong side of piece, move sts back and work 2 rows from the same side or cut the yarn if needed. RAGLAN: Inc differently on sleeves and body. Inc by making YO. K YO TWISTED in pattern, they should NOT make holes – READ KNITTING TIP! BODY: Inc with 1 YO on each side of 1st and 4th marker (which is in st) as follows: Inc every round 6-12-10-22-18-32 times in total and inc on every other round a total of 28-28-30-28-34-30 times (= 34-40-40-50-52-62 times in total). SLEEVE: Inc with 1 YO after 2nd and 5th marker and before 3rd and 6th marker (that are between sts) as follows: Inc every round 0-4-6-4-0-0 times in total and inc on every other round a total of 31-32-32-37-43-46 times (= 31-36-38-41-43-46 times in total). DECREASE TIP: Dec 1 st on each side of each marker as follows: Work until 3 sts remain before marker, K 2 tog, K 2 (marker is in the middle of these sts), slip 1 st as if to K, K 1, psso (= 2 sts dec = 4 sts dec in total). Dec 2 st on each side of each marker as follows: Work until 5 sts remain before marker, * K 2 tog * repeat from *-* 2 times in total (= 2 sts dec), K 2 (marker is in the middle of these sts), * slip 1 st as if to K, K 1, psso *, repeat from *-* 2 times in total (= 4 sts dec = 8 sts dec in total). KNITTING TIP: Work YO with same colour as last/first st before/after YO. CAST-OFF TIP: To avoid a tight cast-off edge you may use a needle ½ size larger. ---------------------------------------------------------- JUMPER: Worked top down in the round on circular needle. Cast on 124-124-132-132-148-148 sts on circular needle size 2.5 mm with old pink. Work 3 ridges in GARTER ST – see explanation above, AT THE SAME TIME on 3rd and 5th round (round with K) inc 12-12-20-20-24-24 sts evenly on each of the rounds (= 24-24-40-40-48-48 sts inc in total) = 148-148-172-172-196-196 sts. Switch to circular needle size 3 mm. Work next round as follows: On this round insert 4 markers between sts in piece and 2 marker in st (= 6 markers in total). Back piece: Work A.1 over the first 30-30-36-36-42-42 sts (= 5-5-6-6-7-7 times in width), insert 1st marker in next st and work st as A.2 (= mid back), work A.3 over the next 30-30-36-36-42-42 sts (= 5-5-6-6-7-7 times in width), insert 2nd marker. Right sleeve: Work A.3 over the next 12 sts (= 2 times in width), A.4 over next st (this is done so that the pattern is the same in both sides of sleeve), insert 3rd marker. Front piece: Work A.1 over the first 30-30-36-36-42-42 sts (= 5-5-6-6-7-7 times in width), insert 4th marker in next st and work st as A.2 (= mid front), work A.3 over the next 30-30-36-36-42-42 sts (= 5-5-6-6-7-7 times in width), insert 5th marker. Left sleeve: Work A.3 over the next 12 sts (= 2 times in width), A.4 over next st (this is done so that the pattern is the same in both sides of sleeve), insert 6th marker. Inc for RAGLAN – see explanation above! Repeat A.1 to A.4 vertically until finished measurements. REMEMBER THE KNITTING TENSION When inc for raglan is finished, piece measures approx. 20-22-23-25-28-30 cm on the shortest part of piece. There are 64-70-76-86-94-104 sts on each side of 1st and 4th marker on body (= 129-141-153-173-189-209 sts in total on each front piece and back piece) and 75-85-89-95-99-105 sts on each of the sleeves = 408-452-484-536-576-628 sts in total. On next round, work as follows: K the first 2 sts tog (= 1 st dec), work pattern as before until 1st marker, 1 YO, work sts with marker as before (= mid back), 1 YO (= 2 sts inc), work pattern as before until 2 sts remain before 2nd marker, K 2 tog (= 1 st dec), slip the next 75-85-89-95-99-105 sts (sts between 2nd and 3rd marker) on a stitch holder for sleeve, cast on 8-8-12-12-12-16 sts under sleeve with the same colour as last st was worked with, (insert 1 marker between in the middle of the new sts), K 2 tog (= 1 st dec), work until st with 4th marker, 1 YO, work st with marker as before (= mid front), 1 YO (= 2 sts inc), work pattern as before until 2 sts remain before 5th marker, K 2 tog (= 1 st dec), slip the next 75-85-89-95-99-105 sts (sts between 5th and 6th marker) on a stitch holder for sleeve, cast on 8-8-12-12-12-16 sts under sleeve with the same colour as last st was worked with, (insert 1 marker in the middle between the new sts) = 274-298-330-370-402-450 sts. BODY: Displace round so that it beg mid under sleeve (i.e. move the next sts over on left needle without working them, until marker under right sleeve.). Insert 1 marker thread in piece. NOW MEASURE PIECE FROM HERE! Leave marker thread in piece. Move the markers upwards when working. Continue pattern as before. K YOs twisted in pattern, they should NOT make holes. Work the new sts under sleeve in pattern, adjust so that pattern is mirrored under sleeve (i.e. on each side of marker). On every other round inc 1 st on each side of sts mid front and mid back (i.e. st with 1st and 4th marker) and dec 1 st on each side of marker under each sleeve – READ DECREASE TIP (= 4 sts dec and 4 sts inc every other round). The same no of sts will remain on needle, inc mid front and mid back and dec in the sides. When piece measures 3 cm from marker thread under sleeve, adjust so that next round is 1 inc/dec round. Work pattern and inc as before but now dec 2 sts on each side of each marker under sleeve (instead of 1 st) on next round. I.e. dec 8 sts in total and inc 4 sts in total (= 2 sts dec at each marker = 4 sts dec in total on round). Dec like this every 2½-7-6-1½-2-2 cm 4-2-2-6-4-4 times in total = 258-290-322-346-386-434 sts. Work the remaining rounds as before, i.e. dec and inc 4 sts on every other round. Continue like this until piece measures 46-50-50-54-58-63 cm measured along mid st (i.e. st at 1st or 4th marker). Piece measures approx. 56-60-61-65-69-74 cm measured from the shoulder on the longest. Adjust so that next round is 1 inc/dec round. Cut the yarn. Slip the first 65-73-81-87-97-109 sts (= half back piece, incl st with 1st marker) on a stitch holder, and slip the last 64-72-80-86-96-108 sts on a stitch holder (= half front piece). Now work over the remaining 129-145-161-173-193-217 sts on needle (i.e. from st after 1st marker towards and incl st with 4th marker = right side of jumper, from mid back to mid front). Now work back and forth as follows: Continue with pattern as before until finished measurements. Row 1 (= RS): Cast off the first 2 sts, work pattern as before until 3 sts remain before marker under sleeve, dec 1 st on each side of marker as before (= 2 sts dec), work pattern the rest of row as before = 2 sts cast off at beg of row towards mid back and 2 sts dec in the side on garment (= 4 sts cast off/dec in total). Row 2 (= WS): Cast off the first 2 sts, work pattern the rest of row as before = 2 sts cast off at beg of row towards mid front. Row 3 (= RS): Cast off the first 2 sts, work pattern the rest of row as before = 2 sts cast off at beg of row towards mid back. Row 4 (= WS): Work as 2nd row = 2 sts cast off at beg of row towards mid front. Row 5 (= RS): Work as 3rd row = 2 sts cast off at beg of row towards mid back. Row 6 (= WS): Work as 2nd row = 2 sts cast off at beg of row towards mid front. Row 7 (= RS): Work as 1st row = 2 sts cast off at beg of row towards mid back and 2 sts dec in the side on garment (= 4 sts cast off/dec in total). Row 8 (= WS): Work as 2nd row = 2 sts cast off at beg of row towards mid front. Row 9 (= RS): Work as 3rd row = 2 sts cast off at beg of row towards mid back. Row 10 (= WS): Work as 2nd row = 2 sts cast off at beg of row towards mid front. Repeat 1st to 10th row until 5 sts remain on needle. Cast off. Slip sts from stitch holder back on needle and work the same way (= left side of jumper, from mid front towards mid back). SLEEVE: Worked in the round on double pointed needles. Distribute sts from stitch holder in one side of piece on double pointed needles size 3 mm = 75-85-89-95-99-105 sts. Pick up 8-8-12-12-12-16 sts in the sts cast on under sleeve on body = 83-93-101-107-111-121 sts. Insert 1 marker in the middle of the new sts. Continue with pattern as before, i.e. mirror the pattern at marker. Insert 1 marker thread in piece, NOW MEASURE PIECE FROM HERE. Leave marker thread in piece. Move the markers upwards when working. When piece measures 3 cm, dec 1 st on each side of marker (= 2 sts dec). Dec like this every 1 cm 8-8-8-8-12-25 times in total = 67-77-85-91-87-71 sts. Then every 3½-2-1½-1½-1½-1½ cm 8-12-15-17-13-4 times in total = 51-53-55-57-61-63 sts. When piece measures 45-44-43-42-39-38 cm, switch to double pointed needles size 2.5 mm. Work 3 ridge in GARTER ST - see explanation above, with old pink. Cast off. Piece measures approx. 46-45-44-43-40-39 cm. Work the other sleeve the same way. EDGE AT THE BOTTOM: Knit up sts for an edge inside 1 st along the entire bottom edge of jumper. Knit up approx. 240-260-290-332-364-406 sts evenly distributed with old pink from RS on circular needle size 2.5 mm. Make sure that the edge is not too tight on body. If it does pick up more sts. Work 3 ridges in the round. Cast off with circular needle size 3 mm – READ CAST-OFF TIP. |
|||||||
Diagram explanations |
|||||||
|
|||||||
 |
|||||||
 |
|||||||
Have you finished this pattern?Tag your pictures with #dropspattern #frommyanglesweater or submit them to the #dropsfan gallery. Do you need help with this pattern?You'll find 25 tutorial videos, a Comments/Questions area and more by visiting the pattern on garnstudio.com. © 1982-2026 DROPS Design A/S. We reserve all rights. This document, including all its sub-sections, has copyrights. Read more about what you can do with our patterns at the bottom of each pattern on our site. |
|||||||


With over 40 years in knitting and crochet design, DROPS Design offers one of the most extensive collections of free patterns on the internet - translated to 17 languages. As of today we count 324 catalogues and 12290 patterns translated into English (UK/cm). 12290
We work hard to bring you the best knitting and crochet have to offer, inspiration and advice as well as great quality yarns at incredible prices! Would you like to use our patterns for other than personal use? You can read what you are allowed to do in the Copyright text at the bottom of all our patterns. Happy crafting!
Post a comment to pattern DROPS 172-24
We would love to hear what you have to say about this pattern!
If you want to leave a question, please make sure you select the correct category in the form below, to speed up the answering process. Required fields are marked *.