
Popular categories
Looking for a yarn?


Comments / Questions (54)
![]() Zabeth wrote:
Zabeth wrote:
Ce modèle me plait beaucoup avec sa coupe évasée, sa forme un peu tunique, l'encolure assez dégagée, son point fantaisie, tout y est! Modèle à classer dans "mes envies".
27.06.2016 - 09:40
![]() Erna wrote:
Erna wrote:
Heel mooi !
26.06.2016 - 14:06
![]() Jutta Poetz wrote:
Jutta Poetz wrote:
Nu das ist was sehr schoenes fuer den Winter........da braucht man nur noch die Anleitung. Hoffe es kommt in den Katalog
18.06.2016 - 13:38
![]() Susanne Meier wrote:
Susanne Meier wrote:
Wunderschön!!!
12.06.2016 - 13:43
![]() Tove wrote:
Tove wrote:
En jätte fin enkel o användbar modell. Kommer o bli en favorit.
09.06.2016 - 08:46
![]() Ellis wrote:
Ellis wrote:
This design -whith long or short sleeves - will fit everybody, long or short, thick or thin, older or young, well done drops designer.
08.06.2016 - 20:10
![]() Ann Hansen wrote:
Ann Hansen wrote:
Den ville helt sikkert blive min favorit
08.06.2016 - 15:09
![]() FANI wrote:
FANI wrote:
ΜΟΥ ΑΡΕΣΕΙ Η ΓΡΑΜΜΗ ΤΟΥ ΠΑΤΡΟΝ! ΚΟΛΑΚΕΥΕΙ ΠΟΛΥ!
08.06.2016 - 12:37
![]() Annwe wrote:
Annwe wrote:
Beautiful, would like to knit this one🐝🐝
07.06.2016 - 10:15
![]() Sonja wrote:
Sonja wrote:
Zo mooi
07.06.2016 - 09:00
|
||||||||||||||||||||||
Bridget#bridgetsweater |
||||||||||||||||||||||
|
|
||||||||||||||||||||||
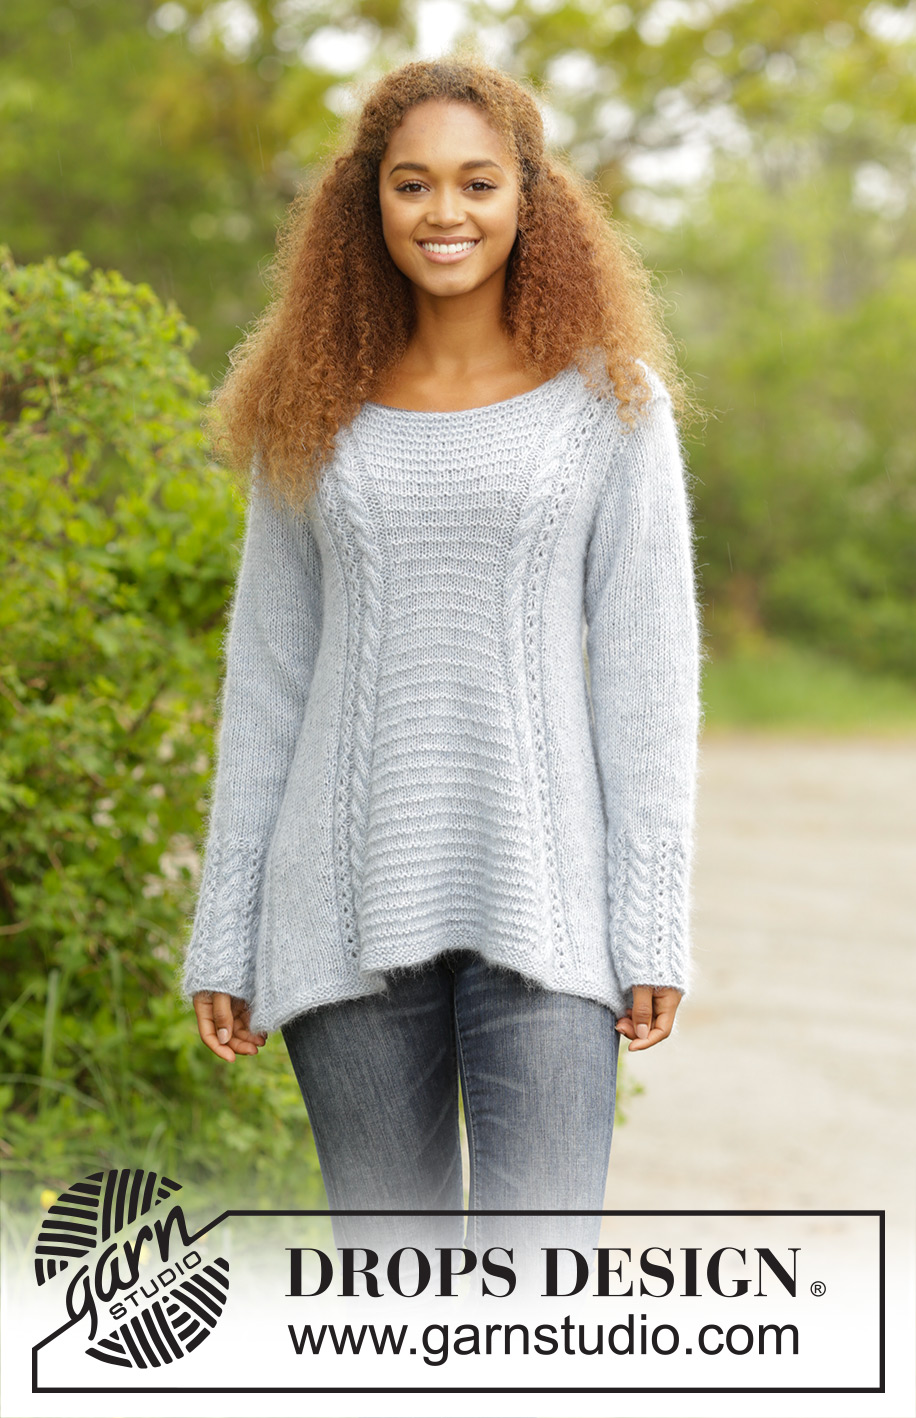
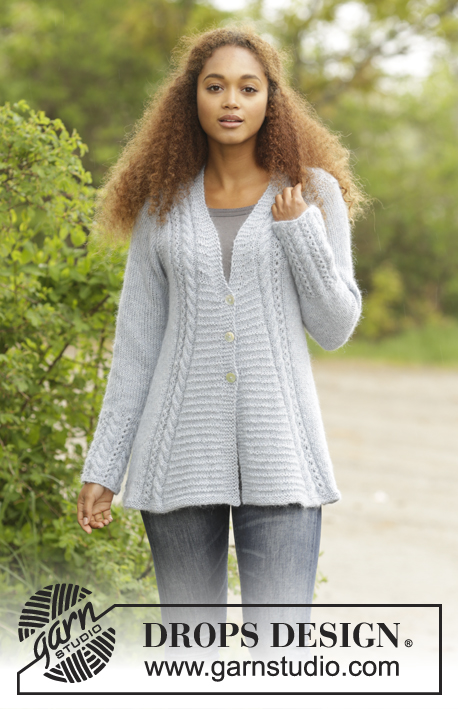
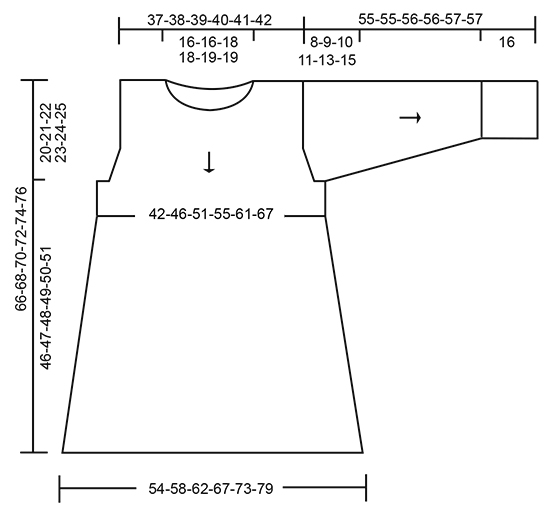
Knitted DROPS jumper with textured pattern and A-shape worked top down in ”Alpaca” and “Kid-Silk”. Size: S - XXXL.
DROPS 171-4 |
||||||||||||||||||||||
|
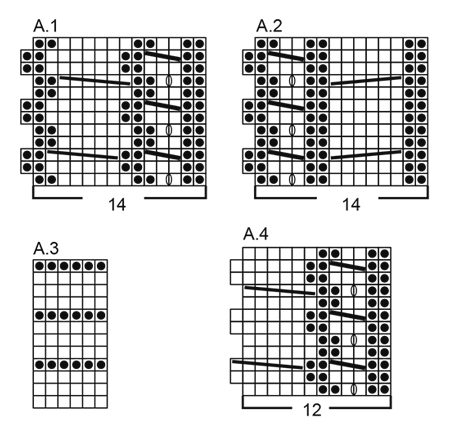
GARTER ST (back and forth): K all rows. 1 ridge = 2 rows K. PATTERN: See diagrams A.1 to A.4. The diagrams show all rows in pattern seen from RS. DECREASE TIP-1: All dec are done from RS! Dec as follows before marker: Beg 2 sts before marker and K 2 tog. Dec as follows after marker: Slip 1 st as if to K, K 1, psso. INCREASE TIP: All inc are done from RS. Inc after/before marker by making 1 YO. On next row P YO twisted to avoid holes. DECREASE TIP-2: Beg 3 sts before marker and K 2 tog, K 2 (marker is between these sts), slip 1 st as if to K, K 1, psso (= 2 sts dec). KNITTING TIP: Because of the shape of the jumper it will be somewhat longer in the sides than mid front/mid back. To avoid this you can work short rows over middle part evenly spaced as follows: * Beg from RS and work as before until A.2, turn, tighten yarn and work from WS until A.1, turn, tighten yarn and work from RS as before *, repeat from *-* approx. every 7th cm. ---------------------------------------------------------- JUMPER: Work front and back piece back and forth on circular needle in sections. FRONT PIECE: Beg with left shoulder, then work right shoulder before casting on sts for neck and continuing over all sts – READ KNITTING TIP! LEFT SHOULDER (when garment is worn): Cast on 17-18-18-19-19-20 sts on circular needle size 5 mm with 1 strand Alpaca and 1 strand Kid-Silk (= 2 strands). K 1 row from WS. Work next row as follows from RS: 2 edge sts in GARTER ST – see explanation above (= towards the neck), P 2, inc 1 st in each of the next 3 sts (K 2 in each st), P 2, K 2, P 2, 1-2-2-3-3-4 sts in stocking st and 3 edge sts in garter st towards armhole = 20-21-21-22-22-23 sts on needle. Work back from WS with garter st over garter st, P over P, K over K. Work next row as follows from RS: 2 edge sts in garter st, work pattern according to diagram A.2 over the next 14 sts, 1-2-2-3-3-4 sts in stocking st and 3 edge sts in garter st. Continue pattern like this until piece measures 4 cm. REMEMBER THE KNITTING TENSION Insert 1 marker before A.2 (seen from RS) and 1 marker 1 st after A.2 (= 15 sts between markers). Now beg displacement of cable towards mid front AT THE SAME TIME cast on new sts for neck at the end of every row from WS as follows: DISPLACEMENT IN A.2: Dec 1 st before A.2 and inc 1 st after A.2 – READ DECREASE TIP-1 and INCREASE TIP. Dec and inc like this every 4th-6th-6th-8th-10th-10th row 8-7-7-6-6-6 times in total (work the inc sts in stocking st). NECK: AT THE SAME TIME on 1st row from WS beg the inc for neck by casting on new sts for neck at the end of every row from WS as follows: Cast on 1 st 2-2-2-2-3-3 times and 2 sts 1 time (work the inc sts in garter st) = 24-25-25-26-27-28 sts. Put piece aside and work right shoulder. RIGHT SHOULDER (when garment is worn): Cast on 17-18-18-19-19-20 sts on circular needle size 5 mm with 1 strand Alpaca and 1 strand Kid-Silk (= 2 strands). K 1 row from WS. Work next row as follows from RS: 3 edge sts in garter st towards armhole, 1-2-2-3-3-4 sts in stocking st, P 2, K 2, P 2, inc 1 st in each of the next 3 sts (K 2 in each st), P 2 and 2 edge sts in garter st towards the neck = 20-21-21-22-22-23 sts on needle. Work back from WS with K over K, P over P and garter st over garter st. Work next row as follows from RS: 3 edge sts in garter st, 1-2-2-3-3-4 sts in stocking st, work pattern according to A.1 over the next 14 sts and finish with 2 edge sts in garter st. Continue pattern like this until piece measures 4 cm. Insert 1 marker 1 st before A.1 (seen from RS) and 1 marker after A.1 (= 15 sts between markers). Now beg displacement of cable towards mid front AT THE SAME TIME cast on new sts for neck at the end of every row from RS as follows: DISPLACEMENT IN A.1: Inc 1 st before A.1 and dec 1 st after A.1 – READ INCREASE TIP and DECREASE TIP-1. Inc and dec like this every 4th-6th-6th-8th-10th-10th row 8-7-7-6-6-6 times in total (work the inc sts in stocking st). NECK: AT THE SAME TIME on 1st row from RS beg the inc for neck by casting on new sts at the end of every row from RS as follows: Cast on 1 st 2-2-2-2-3-3 times, 2 sts 1 time and then 20-20-22-22-22-22 sts 1 time (work the inc sts in garter st) = 44-45-47-48-49-50 sts. Now work right and left shoulder tog for front piece. FRONT PIECE: Keep sts on right shoulder on needle and continue pattern from RS over sts from left shoulder = 68-70-72-74-76-78 sts on needle. Work next row as follows from WS: 3 edge sts in garter st, P until A.2, continue A.2 (= 14 sts), K over sts between A.2 and A.1, continue A.1 (= 14 sts), P until 3 sts remain on needle and finish with 3 edge sts in garter st. Work next row as follows from RS (continue displacement in A.1/A.2 as before): 3 edge sts in garter st, work in stocking st until A.1, continue A.1, work pattern according to diagram A.3 over sts between A.1 and A.2, continue A.2, work in stocking st until 3 sts remain on needle and finish with 3 edge sts in garter st. Continue pattern like this and displacement as explained above. AT THE SAME TIME when piece measures 17-17-17-16-14-12 cm, inc for armholes in each side (from RS): Inc 1 st inside 3 edge sts in garter st in each side by making 1 YO. On next row P YO twisted to avoid holes. Inc like this every other row (i.e. on every row from RS) 2-3-5-7-10-13 times in total, then cast on 3-4-5-6-7-8 new sts at the end of the next 2 rows for armholes = 78-84-92-100-110-120 sts on needle. READ ALL OF THE FOLLOWING SECTION BEFORE CONTINUING! Continue pattern as before but work 1 ridge over the outermost 6-7-8-9-10-11 sts in each side (work the remaining sts as before). NOTE: In size XXL + XXXL continue displacements in A.1/A.2 as before (in size S + M + L + XL displacements are now done if the knitting tension is kept vertically). When 1 ridge has been worked over the outermost 6-7-8-9-10-11 sts in each side continue pattern as before, but with 2-2-2-3-3-3 edge sts in garter st in each side until finished measurements. When displacement is done in all sizes, there are 16-18-20-22-24-24 sts pattern according to A.3 mid front and 15-17-20-22-26-31 sts in stocking st on inside of 2-2-2-3-3-3 edge sts in garter st in each side. Continue to work without displacement until piece measures 28-30-32-34-36-38 cm from shoulder – adjust so that the next row is worked from RS. Now beg inc in the sides AT THE SAME TIME the cables will displace towards the sides as follows: INC IN THE SIDES: Inc 1 st inside of the outermost 5-5-5-6-6-6 sts in each side by making 1 YO. On next row P YO twisted to avoid holes. Inc like this every 8th row 10 times in total in each side (or desired length – NOTE: All inc are done from RS). DISPLACEMENT IN A.1/A.2: Dec 1 st before A.1 and inc 1 st after A.1, inc 1 st before A.2 and dec 1 st after A.2 (work the inc sts in towards the middle in A.3 so that middle part with A.3 get bigger and bigger). Dec and inc like this every 8th row until finished measurements. Continue like this until piece measures approx. 64-66-68-70-72-74 cm from the shoulder and down (adjust so that next row is worked from RS) = approx. 98-104-112-120-130-140 sts on needle. Switch to circular needle 4 and work 3 ridges back and forth over all sts – AT THE SAME TIME on first row dec over each cable by working sts in the cables K tog two by two (= 6 sts dec) = approx. 92-98-106-114-124-134 sts on needle. Switch back to circular needle size 5 mm and cast off (this is done to avoid a tight cast-off edge). BACK PIECE: Beg with right shoulder (when garment is worn), then work left shoulder before casting on sts for neck and continuing over all sts. RIGHT SHOULDER (when garment is worn): Cast on and work as left shoulder on front piece, but when piece measures 2 cm, beg inc for neck and cast on 1 new st at the end of first row from WS (work inc st in garter st) = 21-22-22-23-23-24 sts. Put piece aside and work left shoulder. LEFT SHOULDER (when garment is worn): Cast on and work as right shoulder on front piece but when piece measures 2 cm, beg inc for neck and cast on new sts for neck at the end of every row from RS as follows: Cast on 1 st 1 time and then 26-26-28-28-30-30 sts 1 time (work the inc sts in garter st) = 47-48-50-51-53-54 sts. Now work left and right shoulder tog for back piece. BACK PIECE: Keep sts on left shoulder on needle and continue pattern from RS over sts from right shoulder = 68-70-72-74-76-78 sts on needle. Work next row as follows from WS: 3 edge sts in garter st, P until A.2, continue A.2 (= 14 sts), K over sts between A.2 and A.1, continue A.1 (= 14 sts), P until 3 sts remain on needle and finish with 3 edge sts in garter st. Work next row as follows from RS: 3 edge sts in garter st, work in stocking st until A.1, continue A.1, work pattern according to diagram A.3 over sts between A.1 and A.2, continue A.2, work in stocking st until 3 sts remain on needle and finish with 3 edge sts in garter st. Continue pattern like this until piece measures 4 cm. Insert 1 marker 1 st before A.1 (seen from RS) and 1 marker after A.1 (= 15 sts between markers), in addition insert 1 marker before A.2 and 1 marker 1 st after A.2 (= 15 sts between markers). Now beg displacement of cables towards mid back as follows (from RS): DISPLACEMENT IN A.1/A.2: Inc 1 st before A.1 and dec 1 st after A.1 in addition dec 1 st before A.2 and inc 1 st after A.2 – READ INCREASE TIP and DECREASE TIP-1. Inc and dec like this every 4th-6th-6th-8th-10th-10th row 8-7-7-6-6-6 times in total (work the inc sts in stocking st). AT THE SAME TIME when piece measures 17-17-17-16-14-12 cm, beg inc for armholes in each side and work the rest of back piece the same way as front piece. SLEEVE: Work back and forth on a short circular needle, top down until sleeve cap is done, then work sleeve in the round on a short circular needle/double pointed needles until finished measurements. Cast on 24-24-26-24-24-24 sts on a short circular needle size 5 mm with 1 strand Alpaca and 1 strand Kid-Silk (= 2 strands). Work stocking st back and forth AT THE SAME TIME cast on new sts for sleeve cap at the end of every row in each side as follows: Cast on 3 sts 1 time in all sizes, 2 sts 2-3-3-3-3-3 times, 1 st 3-3-3-3-5-7 times, 2 sts 2-2-3-3-3-3 times and 3 sts 1-1-1-2-2-2 times = 58-62-68-72-76-80 sts on needle (piece measures approx. 8-9-10-11-13-15 cm). Insert 1 marker thread at beg of row (= mid under sleeve). Then work in stocking st in the round. When piece measures 2 cm from marker thread, dec 2 sts mid under sleeve - READ DECREASE TIP-2. Dec a total of 12-13-15-17-18-19 times in Size S: Alternately on every 5th and 6th round, in size M: On every 5th round, in size L: On every 4th round, in size XL: Alternately on every 3rd and 4th round, in size XXL: On every 3rd round and in size XXXL: Alternately on every 2nd and 3rd round = 34-36-38-38-40-42 sts. When piece measures 31-30-30-29-28-26 cm from marker thread (entire sleeve measures approx. 39-39-40-40-41-41 cm and dec should be done), K 1 round while inc 26-24-22-22-32-30 sts evenly = 60-60-60-60-72-72 sts. Switch to double pointed needles size 4 mm and work pattern in the round according to diagram A.4 for 15 cm (= 5-5-5-5-6-6 repetitions of 12 sts). K 1 round while working sts in every cable K tog two by two (= 15-15-15-15-18-18 sts dec) = 45-45-45-45-54-54 sts. Then cast off sts with K over K and P over P. Sleeve measures approx. 55-55-56-56-57-57 cm from cast-on edge. Knit another sleeve. ASSEMBLY: Sew shoulder seams inside cast-on edges. Sew side seam from armhole and down, sew in outer loops of edge sts so that the seam is flat. Place one sleeve in under edge in garter st in armhole and sew neatly with small stitches (edge in garter st should be on the outside of sleeve - make sure to avoid a tight seam). Sew in the other sleeve the same way. |
||||||||||||||||||||||
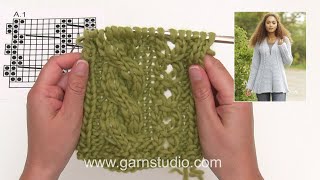
Diagram explanations |
||||||||||||||||||||||
|
||||||||||||||||||||||
 |
||||||||||||||||||||||
 |
||||||||||||||||||||||
Have you finished this pattern?Tag your pictures with #dropspattern #bridgetsweater or submit them to the #dropsfan gallery. Do you need help with this pattern?You'll find 25 tutorial videos, a Comments/Questions area and more by visiting the pattern on garnstudio.com. © 1982-2026 DROPS Design A/S. We reserve all rights. This document, including all its sub-sections, has copyrights. Read more about what you can do with our patterns at the bottom of each pattern on our site. |
||||||||||||||||||||||


With over 40 years in knitting and crochet design, DROPS Design offers one of the most extensive collections of free patterns on the internet - translated to 17 languages. As of today we count 324 catalogues and 12290 patterns translated into English (UK/cm). 12290
We work hard to bring you the best knitting and crochet have to offer, inspiration and advice as well as great quality yarns at incredible prices! Would you like to use our patterns for other than personal use? You can read what you are allowed to do in the Copyright text at the bottom of all our patterns. Happy crafting!
Post a comment to pattern DROPS 171-4
We would love to hear what you have to say about this pattern!
If you want to leave a question, please make sure you select the correct category in the form below, to speed up the answering process. Required fields are marked *.