
Popular categories
Looking for a yarn?


Comments / Questions (31)
![]() Tina wrote:
Tina wrote:
It's difficult to follow. I've been crocheting for 8yrs now, blankets, baby clothes, shawls & a bit of amigarumi in the last year. This is the first bit of adult size clothing I decided to try.... It is also the most difficult to work out! It doesn't have headings for what part you're crocheting like Back,Right side, left side, or sleeve! Even the anagrams aren't much help! 😥🤔
11.05.2025 - 12:42
![]() Maria wrote:
Maria wrote:
Når jeg hækler M er det så rigtigt forstået at jeg laver 16 rækker fra jeg begynder at tage ud til RAGLAN jeg kan kun få det til at passe hvis jeg dobler udtagninger på ærme og ryg, eller har jeg misforstået beskrivelsen? Mvh
10.09.2024 - 20:45DROPS Design answered:
Hej Maria, jo du tager 2 masker ud før og efter A.2, se øverst i opskriften hvor det står RAGLAN :)
13.09.2024 - 14:16
![]() Anngunn wrote:
Anngunn wrote:
Hei! Jakke : i oppskriften står det :ØK SLIK PÅ FORSTK OG BAKSTK: Øk 2 st på hver rad totalt 3-4-7-9-13-16 ganger, deretter 1 st på hver rad totalt 12-12-10-9-6-5 ganger. Hvor skal en øke dem? jeg regner med at økningen av raglan er utenom denne økningen? Håper på snarlig svar!
21.04.2024 - 12:36DROPS Design answered:
Hei Anngunn, Du bruker Øketips-1 - hekle 2 st i samme st - og økninger er fordelt jevnt på hver rad. De er utenom raglanøkningene. God fornøyelse!
22.04.2024 - 06:47
![]() Anne wrote:
Anne wrote:
Bonjour, j'ai commencé ce modèle et je n'arrive pas au nombre de brides sur le second rang, en effet les 174 chainettes de départ ne correspondent pas au nombres du second rang en additionnant l'ensemble des brides augmentations comprises j'arrive à 139 brides. j'ai beau recompter c'est toujours pareil... merci de m'indiquer où j'ai bien pu commettre une erreur ? belle fin de journée d'avance merci
31.03.2024 - 20:11DROPS Design answered:
Bonjour Anne, procédez ainsi: 1 bride dans la 4ème ml à partir du crochet (= 2 brides / 4 ml), puis répétez 34 fois (sautez 1 maille en l'air, 1 bride dans chacune des 4 mailles en l'air suivante) autrement dit vous crochetez 34 x 4 brides au-dessus des 34 x 5 mailles en l'air, vous avez donc bien 2 brides + 34x4 = 138 brides (et au total: 5 ml + 34x5 = 174 ml). Bon crochet!
02.04.2024 - 14:47
![]() Penny McPherson wrote:
Penny McPherson wrote:
Where do I find the size measurements in inches or centimetres please? The patterns say s, m, l, xl etc but I don't know what size I would be. Also do these patterns include positive ease or do I make the next size up to get that?
12.05.2021 - 00:21DROPS Design answered:
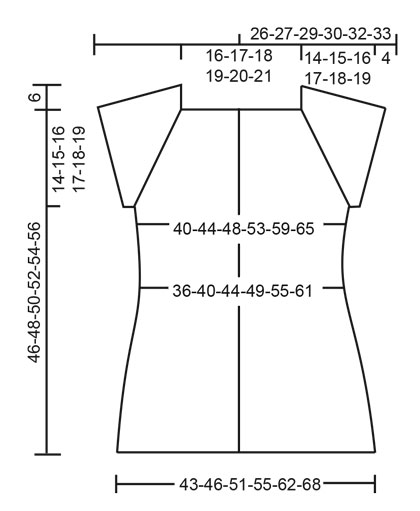
Dear Penny, you can find the finished measurements of the garnment on the schematic drawing at the bottom of the pattern. We suggest compare them to a piece that fits you more or less as you would prefer this piece fitting you. Happy Crafting!!
12.05.2021 - 00:36
![]() Marianne Schmidt wrote:
Marianne Schmidt wrote:
Hvordan hækler jeg På hver omg med st erstattes første st med 3 lm, omg afsluttes med 1 km i 3.lm i beg af omg. I denne opskrift det er det med 1 kædemaske i 3 luftmasker jeg ikke forstår jeg er helt ny i hækling så kan du forklare det så jeg forstår det... Og kanten foran med de 5 masker hvor de 5 første masker skal være stangmasker skal jeg så ikke starte med 3 luftmasker og hvis ja bliver det ikke en grim kant så? Håber virkelig du kan hjælpe mig.
03.10.2020 - 08:35DROPS Design answered:
Hei Marianne. Jo, når du hekler rundt med staver, starter du med å hekle 3 luftmasker (da kommer du opp i samme høyde som en vanlig stav og disse luftmaskene erstatter 1 stav, om ikke annet er nevn i oppskriften). Nå du da har heklet omgangen rundt med staver, avslutter du med å feste omgangen med en kjedemaske i den siste av de 3 luftmaskene du startet omgangen med. Da har du liksom avsluttet omgangen/rundet. Stolpen foran jakken med 5 staver må også starte med 3 luftmasker, disse luftmaskene erstatter den første staven. Se gjerne hjelpevidoene til denne jakken. God Fornøyelse!
05.10.2020 - 12:53
![]() Marianne Schmidt wrote:
Marianne Schmidt wrote:
Jeg kan ikke finde knaphuller i opskriften? Tænkte så at det måske var fordi knapperne blev syet på uden huller.... Men jeg kunne se på billedet at der var knaphuller??
02.10.2020 - 06:29DROPS Design answered:
Hej Marianne, knapperne knappes mellem 2. og 3. st på højre forkant, så der laves ikke knaphuller. God fornøjelse!
02.10.2020 - 09:56
![]() Stefania wrote:
Stefania wrote:
Guten Tag, Ich kann die Anleitung für die Knopflöcher in der Blende nicht finden, wann werden diese gehäkelt? Danke für Ihre Hilfe
24.07.2020 - 06:31DROPS Design answered:
Liebe Stefania, es sind keine Knopflöcher bei dieser Jacke gearbeitet, Knöpfe werden zwischen dem 2. und dem 3. Stäbchen der rechten Blende zugeknöpft. Viel Spaß beim häkeln!
29.07.2020 - 09:34
![]() Kati wrote:
Kati wrote:
Hallo,ich häckel das Muster in Gr. L Ich habe pro Ärmel 2x A1. Nehme dann pro Ärmel in jeder Runde 6 Maschen zu wie in der Raglanzunahme beschrieben. Dazu noch die Maschen die in der Beschreibung unter "Wie folgt an den Ärmeln zunehmen". Wenn ich dann alle 17 Runden fertig habe, sind es deutlich mehr Maschen als ich haben sollte. Und wenn dort steht "1 Stb in jeder Runde insgesamt zunehmen", nehme ich dann abwechselnd 1x am rechten Arm und 1x am linken Arm zu? MfG
18.10.2019 - 19:22DROPS Design answered:
Liebe Kati, Sie haben 8 Maschen zwischen A.2 für jeden Ärmel, So wird es zugenommen: 2 Maschen nach A.2/vor A.2 (= 4 M) x 1 + 1 M nach A.2/vor A.2 (= 2 M) x 16 = 4+32 = 36 Zunahmen + 8 Maschen = es sind jetzt 42 M für jeden Ärmel zwische beiden A.2 (Raglanlinie). Viel Spaß beim stricken!
21.10.2019 - 08:52
![]() Le Roy wrote:
Le Roy wrote:
Pouvez vous m'expliquer pour les dopes..je fais la bride sans la finir
01.07.2019 - 15:57DROPS Design answered:
Bonjour Mme Le Roy, tout à fait, pour faire 1 nope, crochetez 4 brides dans la même bride, mais à la fin de chacune de ces 4 brides, vous ne faites pas le dernier jeté (= vous avez alors 5 boucles sur le crochet), faites ensuite encore 1 dernier jeté et écoulez-le dans toutes les boucles sur le crochet. Bon crochet!
02.07.2019 - 08:30
|
|||||||||||||||||||||||||
Warm Apricot Cardigan |
|||||||||||||||||||||||||
|
|
|||||||||||||||||||||||||
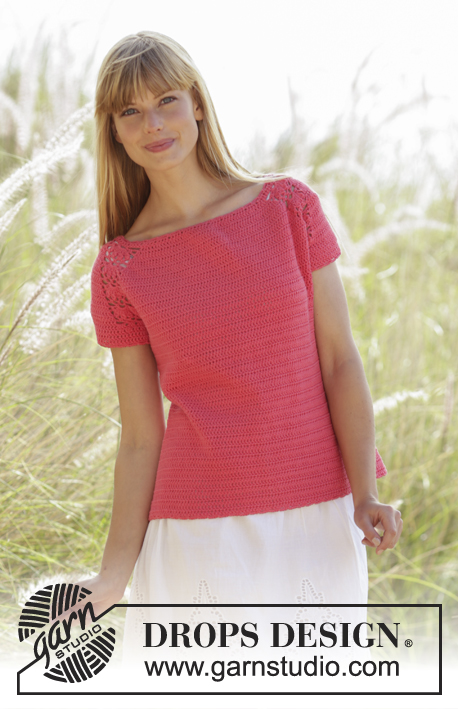
Crochet DROPS jacket with lace pattern and raglan in ”Safran”. The piece is worked top down. Size: S - XXXL.
DROPS Extra 0-1286 |
|||||||||||||||||||||||||
|
PATTERN: See diagrams A.1 to A.3. CROCHET INFO: On every tr row replace first tr with 3 ch. On every dc row replace first dc with 1 ch. Replace first tr at on every tr round with 3 ch, finish the round with 1 sl st in 3rd ch from beg of round. On every dc round, replace first dc with 1 ch and finish round with 1 sl st in 1st ch from beg of round. INCREASE TIP-1: Inc 1 tr by working 2 tr in same tr. INCREASE TIP-2 (applies to sides of body): Work until 3 tr remain before the marker thread, work 2 tr in next tr (= 1 tr inc), work 1 tr in each of the next 4 tr (the marker thread is in the middle of these sts), work 2 tr in next tr (= 1 tr inc). RAGLAN: Inc for raglan on each side of A.2. Inc 2 sts BEFORE A.2 as follows: Work until 2 tr remain before A.2, work 2 tr in each of the next 2 tr (= 2 tr inc). Inc 2 sts AFTER A.2 as follows: Work 2 tr in each of the first 2 tr after A.2 (= 2 tr inc). Inc 1 sts BEFORE A.2 as follows: Work until 1 tr remains before A.2, work 2 tr in next tr (= 1 tr inc). Inc 1 sts AFTER A.2 as follows: Work 2 tr in first tr after A.2 (= 1 tr inc). The inc on body and sleeves are uneven as explained in pattern. DECREASE TIP: Work until 4 tr remain before marker thread, work the next 2 tr tog as follows: Work 1 tr in next tr but wait with last pull through (= 2 sts on hook), work 1 tr in next tr, but on last pull through pull yarn through all sts on hook - 1 tr have been dec, work 1 tr in each of the next 4 tr (marker thread is between these sts), work the next 2 tr tog (= 1 tr dec). ---------------------------------------------------------- YOKE: Worked back and forth, top down. Work 174-179-184-189-194-199 ch on hook size 3.5 mm with Safran. Work next row as follows: Work 1 tr in 4th ch from hook (= 2 tr) - READ CROCHET INFO, * skip 1 ch, 1 tr in each of the next 4 ch *, repeat from *-* = 138-142-146-150-154-158 tr (= incl 5 band tr in each side of piece). Then work next row as follows: Work 1 tr in each of the first 5 tr (= band), A.1 over the next 7 tr, 1 tr in each of the next 11-12-13-14-15-16 tr AT THE SAME TIME inc 4-5-5-6-7-8 tr evenly – READ INCREASE TIP-1 – (= front piece), A.2 over the next 11 tr, 2 tr in next tr, 1 tr in each of the next 4 tr, 2 tr in next tr, A.2 over the next 11 tr (= sleeve), 1 tr in each of the next 36-38-40-42-44-46 tr AT THE SAME TIME inc 8-10-10-12-14-16 tr evenly (= back piece), A.2 over the next 11 tr, 2 tr in next tr, 1 tr in each of the next 4 tr, 2 tr in next tr, A.2 over the next 11 tr (= sleeve), 1 tr in each of the next 11-12-13-14-15-16 tr AT THE SAME TIME inc 4-5-5-6-7-8 tr evenly, A.1 over the next 7 tr (= front piece), 1 tr in each of the last 5 tr (= band). On front piece there are now 5 band sts, A.1 and 15-17-18-20-22-24 tr, on sleeve there is A.2, 8 tr and A.2 and on back piece there are 44-48-50-54-58-62 tr. On next row inc for RAGLAN – see explanation above! INC AS FOLLOWS ON FRONT AND BACK PIECE: Inc 2 tr every row 3-4-7-9-13-16 times in total, then 1 tr every row 12-12-10-9-6-5 times in total. INC AS FOLLOWS ON SLEEVES: Inc 2 tr every row 0-0-1-3-4-4 times in total, then 1 tr every row 15-16-16-15-15-17 times in total. REMEMBER THE CROCHET TENSION! When A.1 and A.2 have been worked 1 time vertically, repeat A.1a over A.1 and A.2a over A.2. After all inc there are now on each front piece 5 band sts, A.1 and 33-37-42-47-54-61 tr, on each sleeve there is A.2, 38-40-44-50-54-58 tr and A.2 and on back piece there are 80-88-98-108-122-136 tr. Piece measures approx. 14-15-16-17-18-19 cm. Work next row as follows: Work 1 tr in each of the first 5 tr, A.1a as before, 1 tr in each of the next 33-37-42-47-54-61 tr, work 8 ch (= under sleeve), insert 1 marker thread in the middle between the new ch, skip: A.2a, 38-40-44-50-54-58 tr and A.2a (= sleeve), work 1 tr in each of the next 80-88-98-108-122-136 tr, 8 ch (= under sleeve), insert 1 marker thread in the middle of the new sts, skip: A.2a, 38-40-44-50-54-58 tr and A.2a (= sleeve), work 1 tr in each of the next 33-37-42-47-54-61 tr, A.1a as before, 1 tr in each of the last 5 tr = 156-172-192-212-240-268 tr (incl 5 band sts in each side), 16 ch and A.1a inside 5 band tr in each side of piece. Insert 1 marker in piece, NOW MEASURE PIECE FROM HERE. Move marker threads when working, leave the marker in piece. BODY: Work 1 tr in every tr, 1 tr in every ch and A.1a as before. There are 88-96-106-116-130-144 tr between marker threads on back piece. When piece measures 3 cm (measured from marker), dec 1 st on each side of each marker threads in the side (= 4 sts dec) - READ DECREASE TIP! Repeat dec every 4-4-3½-4½-4½-4½ cm 3-3-4-3-3-4 more times = 156-172-188-212-240-264 tr in total (incl band sts in each side) and A.1a inside 5 band tr in each side of piece. There are 80-88-96-108-122-134 tr on back piece. When piece measures 17-18-19-20-21-22 cm (measured from marker), inc 1 st on each side of each marker thread (= 4 tr inc) – see INCREASE TIP-2. Repeat inc every 1½ cm 6-6-7-6-6-7 more times = 184-200-220-240-268-296 tr on row (incl 5 band sts in each side) and A.1a inside 5 band tr in each side of piece. Continue with 1 tr in every tr and A.1a until piece measures 32-33-34-35-36-37 cm (measured from marker). Piece measures approx. 46-48-50-52-54-56 cm in total from neck edge. Work 1 edge along the bottom of the jacket as follows: Work * 1 dc in first/next tr, 4 ch, skip approx. 1 cm *, repeat from *-* over tr, work A.1a over A.1a as before. Adjust to finish with 1 dc in last tr. Fasten off. SLEEVE EDGE: Sleeve is worked in the round, top down. Beg by working mid under sleeve as follows: Work 1 dc in 5th ch of the 8 ch worked in armhole on body. Work 3 ch (= 1 tr). Then work with 1 tr in each of the next 3 ch, A.2a as before, 1 tr in each of the next 38-40-44-50-54-58 tr, A.2a as before, 1 tr in each of the last 4 ch under sleeve, finish with 1 sl st in 3rd ch at beg of round. Work 1 tr in every tr and A.2a until 1 whole repetition of A.2a has been worked. Then work 1 tr in every tr, work A.2b over A.2a = 68-70-74-80-84-88 tr. On next round work 1 tr in every tr AT THE SAME TIME dec 12 tr evenly = 56-58-62-68-72-76 tr. Work 1 tr in every tr until sleeve edge measures approx. 4 cm. Work * 1 dc in first/next tr, 4 ch, skip approx. 1 cm *, repeat from *-* around the entire sleeve. Fasten off. Work a sleeve edge around the other sleeve. NECK EDGE: Beg mid front. Work * 1 dc in first/next tr, 4 ch, skip approx. 1 cm *, repeat from *-* around the entire neck, make sure to avoid a tight neck edge. Adjust to finish with 1 dc in last tr. POCKET: Work 34 ch (incl 1 ch to turn with) on hook size 3.5 mm with Safran. Work A.3a 4 times in total in width (NOTE: Work first dc in 2nd ch from hook), finish with first st of A.3a in last ch (so piece is the same in both sides). NOTE: Always work last st as first st in diagram. When A.3a has been worked 1 time vertically, repeat A.3b over A.3a until piece measures 7 cm, adjust so that last row is last row in A.3b, then work A.3c over A.3b. Fasten off. Crochet another pocket. ASSEMBLY: Sew pockets on to jacket, approx. 7 cm from bottom edge and approx. in the middle on front piece. Fasten buttons on left band, fasten the top button approx. 2 cm from neck edge, then fasten them approx. 8 cm apart. Button between 2nd and 3rd tr on right band. |
|||||||||||||||||||||||||
Diagram explanations |
|||||||||||||||||||||||||
|
|||||||||||||||||||||||||
 |
|||||||||||||||||||||||||
 |
|||||||||||||||||||||||||
Have you finished this pattern?Tag your pictures with #dropspattern or submit them to the #dropsfan gallery. Do you need help with this pattern?You'll find 12 tutorial videos, a Comments/Questions area and more by visiting the pattern on garnstudio.com. © 1982-2026 DROPS Design A/S. We reserve all rights. This document, including all its sub-sections, has copyrights. Read more about what you can do with our patterns at the bottom of each pattern on our site. |
|||||||||||||||||||||||||


With over 40 years in knitting and crochet design, DROPS Design offers one of the most extensive collections of free patterns on the internet - translated to 17 languages. As of today we count 324 catalogues and 12290 patterns translated into English (UK/cm). 12290
We work hard to bring you the best knitting and crochet have to offer, inspiration and advice as well as great quality yarns at incredible prices! Would you like to use our patterns for other than personal use? You can read what you are allowed to do in the Copyright text at the bottom of all our patterns. Happy crafting!
Post a comment to pattern DROPS Extra 0-1286
We would love to hear what you have to say about this pattern!
If you want to leave a question, please make sure you select the correct category in the form below, to speed up the answering process. Required fields are marked *.