DROPS Children 49 · Lots of new kid designs!
Product image DROPS Belle yarn
DROPS Belle
53% Cotton, 33% Viscose, 14% Linen
from 2.20 € /50g
Get the yarn to make this pattern from 15.40€.

The yarn cost is calculated from the pattern’s smallest size and the yarn’s cheapest product type. Looking for an even better price? You might find it on the DROPS Deals!

DROPS AW2425

Summer Bliss Vest

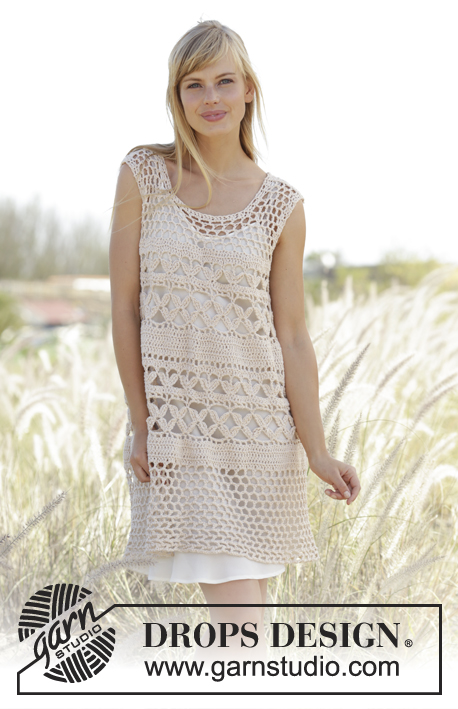
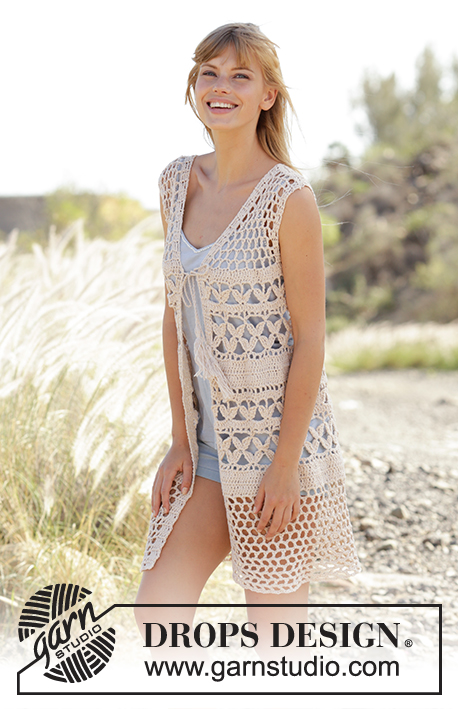
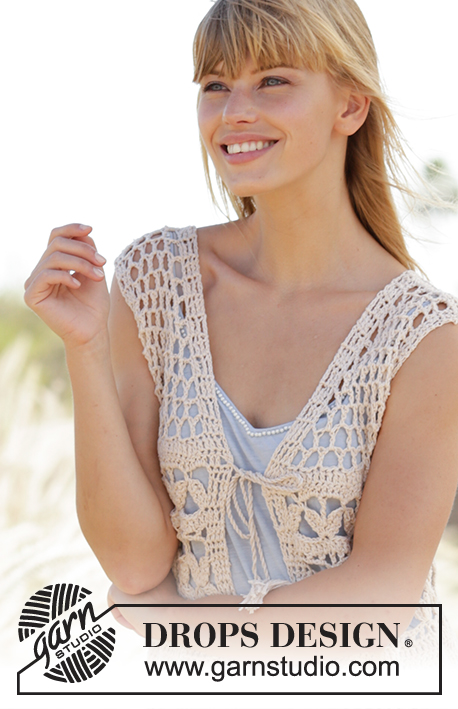
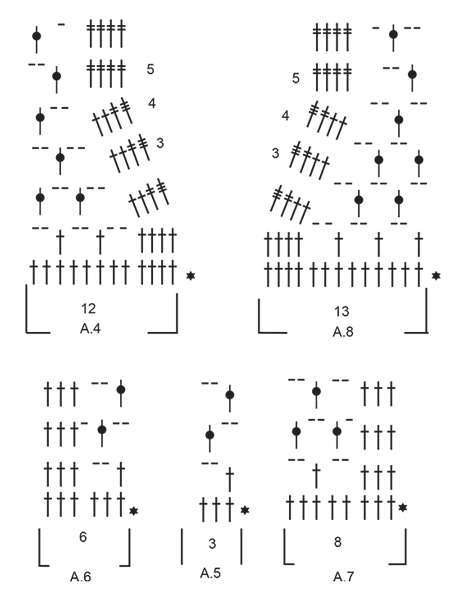
Crochet DROPS vest with A-shape, lace pattern and ties in ”Belle”. Size S-XXXL.

Highlight Size:
DROPS 167-19

#summerblissvestvest

DROPS design: Pattern no vs-019
Yarn group B
----------------------------------------------------------
Size: S - M - L - XL - XXL - XXXL
Materials:
DROPS BELLE from Garnstudio
350-350-400-450-450-500 g colour no 03, light beige

DROPS HOOK SIZE 4.5 mm - or size needed to get 16 tr x 8 rows = 10 x 10 cm, or 1 repetition of A.2 = width 5 cm. NOTE: 1 ch-space = 1 tr + 2 ch should measure 1½ cm in width - make sure that ch are not worked too tight.

-------------------------------------------------------

Alternative Yarn – See how to change yarns here
Yarn Groups A to F – Use the same pattern and change the yarn here
Yarn usage using an alternative yarn – Use our yarn converter here

-------------------------------------------------------

You might also like...

Product image DROPS Belle
DROPS Belle
53% Cotton, 33% Viscose, 14% Linen
from 2.20 € /50g
Get the yarn to make this pattern from 15.40€.

The yarn cost is calculated from the pattern’s smallest size and the yarn’s cheapest product type. Looking for an even better price? You might find it on the DROPS Deals!

Pattern instructions

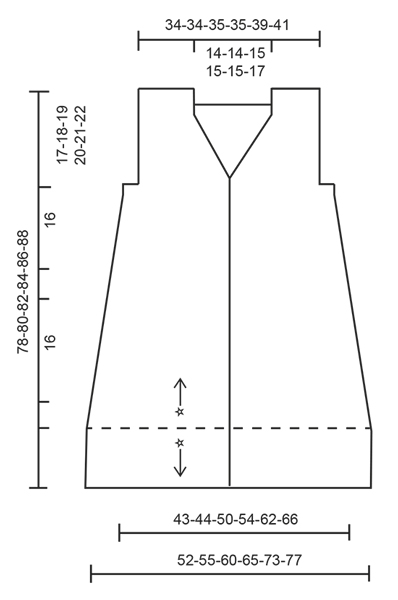
CROCHET INFO:
On every tr row replace first tr with 4 ch.
Replace first dtr on every dtr row with 5 ch.
Replace first triple tr on every triple tr row with 6 ch.
Beg every dc row with 1 ch. Ch does not replace first dc.

PATTERN:
See diagrams A.1 to A.8.

DECREASE TIP:
Dec 1 tr by working the next 2 tr tog as follows: Work 1 tr but wait with last pull through (= 2 loops on hook), then work next tr but on last pull through, pull yarn through all 3 loops on hook.

DECREASE TIP CH-SPACES:
Dec 1 ch-space at beg of row as follows seen from RS: Work 2 ch, skip the first ch-space, work 1 tr around next ch-space. On next row skip the last ch-space seen from WS (= first ch-space seen from RS).

Dec 1 ch-space at end of row as follows seen from RS: Work until 1 ch-space remains, 2 ch, skip the last ch-space, work 1 st in each of the remaining sts. On next row skip the first ch-space, work 2 ch, and 1 tr around next ch-space seen from WS (= last ch-space seen from RS).
----------------------------------------------------------

VEST:
Worked back and forth, bottom up. Then divide piece at the armholes and work front and back piece separately. Work an edge at the bottom of with mesh pattern at the end.

Work 197-206-225-244-272-290 loose ch (incl 4 ch to turn with) on hook size 4.5 mm with Belle. Turn and work as follows: Work 1 tr in 5th ch from hook, then work 1 tr in each of the next 3-5-3-1-1-5 ch, * skip 1 ch, work 1 tr in each of the next 6 ch *, repeat from *-* 26-27-30-33-37-39 more times = 166-174-190-206-230-246 tr and 4 ch to turn with - READ CROCHET INFO. REMEMBER THE CROCHET TENSION! Continue back and forth with 1 tr in every tr until piece measures 5-5-6-6-7-7 cm. Now work pattern from 2nd row in diagram from RS as follows: Work A.1 (= 8 tr), then work A.2 (= 8 tr) 19-20-22-24-27-29 times in width, A.3 (= 7 tr). On last row in diagram A.1 to A.3 dec 32 tr evenly in all sizes - READ DECREASE TIP = 135-143-159-175-199-215 tr. Continue with 1 tr in every tr until piece measures 25-25-26-26-27-27 cm vertically. Then work pattern from 2nd row in A.1, A.2 and A.3 as before (but now work 15-16-18-20-23-25 repetitions of A.2 in width). Finish before the last 2 rows in diagram A.1 to A.3. Now work 1 row with 1 tr in every tr and adjust no of sts to 136-140-161-173-197-210 tr. Cut the yarn. Insert a marker here. NOW MEASURE THE PIECE FROM HERE. Now divide the piece into 2 front pieces and one back piece.

RIGHT FRONT PIECE:
Work first row as follows: A.4 over the first 12 tr, then work A.5 over the next 15-15-21-24-30-33 tr (= 5-5-7-8-10-11 repetitions in width), A.6 over the next 6 tr = 9-9-11-12-14-15 ch-spaces on first row. Now work as explained in the different sizes below:

SIZE S and M:
Continue back and forth until 4th row in A.4 has been worked vertically. NOTE: Repeat 2nd and 3rd row in A.5 and A.6 vertically. 2 ch-spaces have been dec for neck mid front in both sizes.
Then repeat 3rd and 4th row in diagram A.4 3-3 more times vertically = 5-5 ch-spaces dec in total for neck mid front and 4-4 ch-spaces (with 2 ch) remain for shoulder. Piece measures approx. 13-13 cm.

SIZE L, XL, XXL and XXXL:
Continue back and forth with ch-spaces, AT THE SAME TIME on next row dec ch-spaces for neck towards mid front and dec ch-spaces for armhole as follows:

DECREASE ARMHOLE:
On next row dec 1 ch-space for armhole – READ DECREASE TIP CH-SPACES. Repeat dec 0-1-2-2) more times = 1-2-3-3 ch-spaces dec in total for armhole.

DECREASE NECK:
When 4th row in A.4 has been worked, 2 ch-spaces have been dec in size L, XL, XXL and XXXL. Then repeat dec for neck (i.e. 3rd and 4th row in A.4) 3-3-3-4 more times = 6-6-6-7 ch-spaces dec in total for neck.

ALL SIZES:
Continue with ch-spaces as before but now work 5th and 6th row in A.4 towards the neck until piece measures 16-17-18-19-20-21 cm. Turn and work 16-16-16-16-19-19 tr evenly over shoulder. Fasten off. Piece measures approx. 17-18-19-20-21-22 cm.

BACK PIECE:
Beg at armhole on right front piece and skip 4-6-6-6-6-8 tr for armhole. Work A.7 (= 8 tr), A.5 (= 3 tr) 16-16-19-21-25-26 times in width, work A.6 (= 6 tr) = 19-19-22-24-28-29 ch-spaces on first row. Continue as explained in the different sizes below:

SIZE S and M:
Continue back and forth with pattern as shown on 2nd and 3rd row in A.5 to A.7 until piece measures 14-15 cm – adjust so that next row is worked as 3rd row.

SIZE L, XL, XXL and XXXL:
Continue back and forth with pattern as shown on 2nd and 3rd row in A.5 to A.7, AT THE SAME TIME on next row dec for armholes in each side inside 3 sts - READ DECREASE TIP CH-SPACES. NOTE: Work 3 dtr instead of 3 tr in each side on the rows with dec (this is done to avoid tight edges). Repeat dec 0-1-2-2 more times (= 1-2-3-3 dec in total in each side) = 20-20-22-23 ch-spaces remain. Then continue with ch-spaces as shown on 2nd and 3rd row in diagram A.5 to A.7 until piece measures 16-17-18-19 cm – adjust so that next row is worked as 3rd row.

Then continue as explained below in all sizes:
Work 1 tr in each of the first 3 tr and 4-4-4-4-5-5 whole ch-spaces (i.e. ch-spaces with 2 ch), work 1 tr in next tr, then work 24-24-26-26-26-28 tr evenly over the next 10-10-11-11-11-12 ch-spaces from previous row, work 1 tr in next tr, and 1 tr around next ch-space, continue with 4-4-4-4-5-5 whole ch-spaces (i.e. ch-spaces with 2 ch) and 1 tr in each of the outermost 3 tr. There are now 26-26-28-28-28-30 tr consecutively in the middle of back piece.
Then finish each shoulder separately. Turn, work 1 tr in each of the first 3 tr, then work as before over the 4-4-4-4-5-5 ch-spaces, work 1 tr in each of the first 3 tr of the 26-26-28-28-28-30 tr. Turn and work 16-16-16-16-19-19 tr evenly over shoulder. Fasten off.
Work the other shoulder the same way but reversed. Beg at the armhole, and work 1 tr in each of the outermost 3 tr, then work ch-spaces as before over the 4-4-4-4-5-5 ch-spaces, and 1 tr in each of the next 3 tr. Turn and work 16-16-16-16-19-19 tr evenly over shoulder. Fasten off.

LEFT FRONT PIECE:
Beg at armhole on back piece and skip 4-6-6-6-6-7 tr for armhole. Work A.7 (= 8 tr), A.5 (= 3 tr) 4-4-6-7-9-10 times in width, finish with A.8 (= 13 tr). Continue like this back and forth as on right front piece but reversed. Adjust according to right front piece.

ASSEMBLY:
Sew the shoulder seams tog. Sew one and one stitch neatly tog and make sure to avoid a tight seam. Fasten off.

EDGE AT THE BOTTOM:
Now work an edge at the bottom of vest as follows:
ROW 1: Fasten yarn with 1 dc and 3 ch in the first ch worked at beg of piece, work 1 tr in each of the next 3 ch (= band), then work * 2 ch, skip approx. 1½ cm, work 1 tr in next ch *, repeat from *-* along entire edge until approx. 1½ cm remain before the last 4 ch on row, work 2 ch and finish with 1 tr in each of the last 4 ch. There are now approx. 66-69-76-83-93-99 ch-spaces and 4 tr for band in each side - remember crochet info.
ROW 2: Work 1 tr in each of the first 4 tr, work 1 ch, 1 tr around next ch-space, * 2 ch, 1 tr around next ch-space * in every ch-space on row, and finish with 1 ch and 1 tr in each of the 4 tr for band.
ROW 3: Work 1 tr in each of the first 4 tr, work 2 ch, skip 1 ch and 1 tr, * 1 tr around next ch-space, 2 ch *, repeat from *-* until 1 ch-space remains with 2 ch, work 1 tr around this ch-space, 2 ch, and finish with 1 tr in each of the 4 tr for band.
Repeat 2nd and 3rd row until piece measures 78-80-82-84-86-88 cm in total (measured from shoulder) or to desired length. Fasten off.

TIES WITH TASSEL:
Cut 2 lengths of yarn of 90 cm. Twine them until the resist. Thread one end through last tr-row worked before piece was divided for front pieces and back piece and place tie double so that it twines again. Tie a knot in the loose end. Repeat in the other side.
Then make a tassel in the end of each of the ties: Cut 14 strands of 24 cm, thread them through one end on one of the ties and distribute the ends so that they are even. Wind a strand several times around the tassel approx. 1 cm from the top, to get a nice top and fasten the strand.

This pattern has been corrected.

Updated online: 03.03.2016
Correction in chart A.1 and A.2, row 4: 1 dc in st (not: 1 dc around st).
Updated online: 06.09.2016
Description of symbol no 10 is edited: this row is explained in pattern / work from second row

Diagram

1 ch = 1 ch
4 ch = 4 ch
1 dc around st<br />
<br />
<br />
<br />
= 1 dc around st


1 dc in st = 1 dc in st
1 tr in st = 1 tr in st
1 tr around ch/ch-space = 1 tr around ch/ch-space
1 dtr in st = 1 dtr in st
1 triple tr = 1 triple tr
Work 2 triple tr into 1 tr as follows: Work 1 triple tr but wait with last pull through = 2 sts on hook. Work 1 triple tr more in same st but on last pull through, pull yarn through all 3 sts on hook. = Work 2 triple tr into 1 tr as follows: Work 1 triple tr but wait with last pull through = 2 sts on hook. Work 1 triple tr more in same st but on last pull through, pull yarn through all 3 sts on hook.
this row is explained in pattern/ work from second row = this row is explained in pattern/ work from second row
work in this st = work in this st
crochet direction = crochet direction
Diagram for DROPS 167-19
Do you have a question? See a list of frequently asked questions (FAQ)

Knitting tension is what determines the final measurements of your work, and is usually measured per 10 x 10 cm. It is provided like so: number of stitches in width x number of rows in height - eg: 19 stitches x 26 rows = 10 x 10 cm.

The knitting tension is very individual; some people knit/crochet loosely while others work tightly. You adjust the knitting tension with the needle size, which is why the suggested needle size is only meant as a guide! You need to adjust this (up or down) to ensure that YOUR knitting tension matches the knitting tension provided in the pattern. If you work with a different knitting tension than provided you will have a different yarn consumption, and your work will have different measurements than what the pattern suggests.

The knitting tension also determines which yarns can replace each other. As long as you achieve the same knitting tension you can replace one yarn with another.

See DROPS lesson: How to measure your tension/gauge

See DROPS video: How to make a gauge tension swatch

The required amount of yarn is provided in grams, eg: 450 g. To calculate how many balls you’ll need you first need to know how many grams are in 1 ball (25g, 50g or 100g). This information is available if you click on the individual yarn quality on our pages. Divide the amount required with the amount of each ball. For example, if each ball is 50g (the most common amount), the calculation will be as follows: 450 / 50 = 9 balls.

The important thing when changing from one yarn to another is that the knitting/crochet tension remains the same. This is so that the measurements of the finished piece will be the same as on the sketch provided. It is easier to achieve the same knitting tension using yarns from the same yarn group. It is also possible to work with multiple strands of a thinner yarn to achieve the knitting tension of a thicker one. Please try our yarn converter. We recommend you to always work a test swatch.

Please NOTE: when changing yarn the garment might have a different look and feel to the garment in the photo, due to individual properties and qualities of each yarn.

See DROPS lesson: Can I use a different yarn than the one mentioned in the pattern?

All our yarns are categorised into yarn groups (from A to F) according to thickness and knitting tension – group A contains the thinnest yarns and group F the thickest. This makes it easier for you to find alternative yarns to our patterns, should you wish to switch yarn. All yarns within the same group have a similar knitting tension and can easily replace each other. However, different yarn qualities have different structures and properties which will give the finished work a unique look and feel.

Click here for an overview of the yarns in each yarn group

At the top of all our patterns you’ll find a link to our yarn calculator, which is a helpful tool should you wish to use a different yarn than suggested. By filling in the yarn quality you wish to replace, the amount (in your size) and number of strands, the calculator will present good alternative yarns with the same knitting tension. Additionally it will tell you how much you’ll require in the new qualities and whether you’ll need to work with multiple strands. Most skeins are 50g (some are 25g or 100g).

If the pattern is worked with multiple colours, every colour will have to be calculated separately. Similarly, if the pattern is worked with several strands of different yarns (for example 1 strand Alpaca and 1 strand Kid-Silk) you will have to find alternatives for each, individually.

Click here to see our yarn calculator

Since different yarns have different qualities and textures we have chosen to keep the original yarn in our patterns. However, you can easily find options among our available qualities by using our yarn calculator, or simply pick a yarn from the same yarn group.

It is possible that some retailers still have discontinued yarns in stock, or that someone has a few skeins at home that they would like to find patterns for.

The yarn calculator will provide both alternative yarn as well as required amount in the new quality.

If you think it's hard to decide what size to make, it can be a good idea to measure a garment you own already and like the size of. Then you can pick the size by comparing those measures with the ones available in the pattern's size chart.

You'll find the size chart at the bottom of the pattern.

See DROPS lesson: How to read size chart

The needle size provided in the pattern serves only as a guide, the important thing is to follow the knitting tension. And since knitting tension is very individual, you will have to adjust the needle size to ensure that YOUR tension is the same as in the pattern – maybe you’ll have to adjust 1, or even 2 needle sizes, up or down to achieve the correct tension. For this, we recommend that you work test swatches.

Should you work with a different knitting tension than the one provided, the measurements of the finished garment might deviate from the measurement sketch.

See DROPS lesson: How to measure your tension/gauge

See DROPS video: How to make a tension/gauge swatch

Working a garment top-down provides more flexibility and room for personal adjustment. For example it is easier to try the garment on while working, as well as making adjustments to length of yoke and shoulder caps.

The instructions are carefully explaining every step, in the correct order. Diagrams are adjusted to the knitting direction and are worked as usual.

The diagram depicts all rows/rounds, and every stitch seen from the right side. It is read from bottom to top, from right to left. 1 square = 1 stitch.

When working back and forth, every other row is worked from the right side and every other row is worked from the wrong side. When working from the wrong side, the diagram will have to be worked reversed: from left to right, knit stitches are purled, purl stitches are knit etc.

When working in the round every round is worked from the right side and the diagram are worked from right to left on all rounds.

See DROPS lesson: How to read knitting diagrams

The diagram depicts all rows/rounds, and every stitch seen from the right side. It is worked from bottom to top, from right to left.

When working back and forth every other row is worked from the right side: from right to left and every other row is worked from the wrong side: from left to right.

When working in the round, every row in the diagram are worked from the right side, from right to left.

When working a circular diagram you start in the middle and work your way outwards, counter clockwise, row by row.

The rows usually start with a given number of chain stitches (equivalent to the height of the following stitch), this will either be depicted in the diagram or explained in the pattern.

See DROPS lesson: How to read crochet diagrams

Instructions for working several diagrams after each other on the same row/round, will often be written like so: “work A.1, A.2, A.3 a total of 0-0-2-3-4 times". This means you work A.1 once, then A.2 is worked once, and A.3 is repeated (in width) the number of times provided for your size – in this case like so: S = 0 times, M = 0 times, L=2 times, XL= 3 times and XXL = 4 times.

The diagrams are worked as usual: begin with the first row in A.1, then work the first row in A.2 etc.

See DROPS lesson: How to read knitting diagrams

See DROPS lesson: How to read crochet diagrams

The total width of the garment (from wrist-to-wrist) will be larger in the larger sizes, despite the actual sleeves being shorter. The larger sizes have longer sleeve caps and wider shoulders, so there will be a good fit in all sizes.

The measurement sketch/schematic drawing provides information regarding the full length of the garment. If it’s a jumper or a jacket the length is measured from the highest point on the shoulder closest to the neckline, and straight down to the bottom of the garment. It is NOT measured from the tip of shoulder. Similarly, the length of yoke is measured from the highest point on the shoulder and down to where yoke is split into body and sleeves.

On a jacket measures are never taken along bands, unless specifically stated. Always measure inside band stitches when measuring the length.

See DROPS lesson: How to read a schematic drawing

Diagrams are often repeated on the round or in height. 1 repeat is the diagram the way it appears in the pattern. If it says to work 5 repeats of A.1 in the round, then you work A.1 a total of 5 times after/next to each other in the round. If it says to work 2 repeats of A.1 vertically/in height you work the entire diagram once, then begin again at the start and work the entire diagram one more time.

Chain stitches are slightly narrower than other stitches and to avoid working the cast-on edge too tight, we simply chain more stitches to begin with. The stitch count will be adjusted on the following row to fit the pattern and measurement sketch.

The rib edge is more elastic and will contract slightly compared to, for example, stocking stitch. By increasing before the rib edge, you avoid a visible difference in width between the rib edge and the rest of the body.

It’s very easy to cast off too tightly, and by making yarn overs while casting off (and simultaneously casting these off) you avoid a too tight cast off edge.

See DROPS video: How to bind off with yarn overs (yo)

To achieve an even increase (or decrease) you can increase on, for example: every 3rd and 4th row alternately, like so: work 2 rows and increase on the 3rd row, work 3 rows and increase on the 4th. Repeat this until the increase is complete.

See DROPS lesson: Increase or decrease 1 st on every 3rd and 4th row alternately

Should you prefer to work in the round instead of back and forth, you may of course adjust the pattern. You’ll need to add steeks mid-front (usually 5 stitches), and follow the instructions. When you would normally turn and work from the wrong side, simply work across the steek and continue in the round. At the end you’ll cut the piece open, pick up stitches to work bands, and cover the cut edges.

See DROPS video: How to knit steeks and cut open

Should you prefer to work back and forth instead of in the round, you may of course adjust the pattern so you work the pieces separately and then assemble them at the end. Divide the stitches for the body in 2, add 1 edge stitch in each side (for sewing) and work the front and back pieces separately.

See DROPS lesson: Can I adapt a pattern for circular needles into straight needles?

Pattern repeats can vary slightly in the different sizes, in order to get the correct proportions. If you’re not working the exact same size as the garment in the photo, yours might deviate slightly. This has been carefully developed and adjusted so that the complete impression of the garment is the same in all sizes.

Make sure to follow instructions and diagrams for your size!

If you have found a pattern you like which is available in women’s size it’s not very difficult to convert it to men’s size. The biggest difference will be the length of sleeves and body. Start working on the women size that you think would fit across the chest. The additional length will be worked right before you cast off for the armhole/sleeve cap. If the pattern is worked top-down you can add the length right after the armhole or before the first decrease on sleeve.

Regarding additional yarn amount, this will depend on how much length you add, but it is better with a skein too many than too few.

All yarns will have excess fibres (from production) that might come off as lint or shedding. Brushed yarns (ie hairier yarns) have more of these loose, excess fibres, causing more shedding.

Shedding also depends on what is worn under or over the garment, and whether this pulls at the yarn fibres. It’s therefore not possible to guarantee that there will be no shedding

Below are some tips on how to get the best result when working with hairier yarns:

1. When the garment is finished (before you wash it) shake it vigorously so the looser hairs come off. NOTE: do NOT use a lint roller, brush or any method that pulls at the yarn.

2. Place the garment in a plastic bag and put it in your freezer - the temperature will cause the fibres to become less attached to each other, and excess fibres will come off easier.

3. Leave in the freezer for a few hours before taking it out and shaking it again.

4. Wash the garment according to the instructions on the yarn label.

Pilling is a natural process that happens to even the most exclusive of fibers. It's a natural sign of wear and tear that is hard to avoid, and that is most visible in high friction areas of your garment like a sweater's arms and cuffs.

You can make your garment look as new by removing the pilling, using a fabric comb or a pill/lint remover.

Still can't find the answer you need? Then scroll down and leave your question so one of our experts can try to help you. This will be done normally within 5 to 10 working days.
In the meantime, you can read the questions and answers that others have left to this pattern or join the DROPS Workshop on Facebook to get help from fellow knitters/crocheters!
Have you finished this pattern?
Tag your pictures with #dropspattern #summerblissvestvest or submit them to the #dropsfan gallery.

Post a comment to pattern DROPS 167-19

We would love to hear what you have to say about this pattern!

If you want to leave a question, please make sure you select the correct category in the form below, to speed up the answering process. Required fields are marked *.

Comments / Questions (88)

country flag Irene Strachal wrote:

Jag virkar med Belle enligt rekommendation men med nål nr 2,5 så blir 16 st 13 cm. Mindre nål kan jag knappt använda. Hur kommer detta sig? Vad ska jag göra? Ska jag dela garnet? Eller dela antalet maskor?

07.06.2016 - 11:34

DROPS Design answered:

Hej Irene. Det er lidt svaert for mig at vurdere hvad du gör, men det lyder som om du haekler meget löst. Jeg ville pröve at haekle noget fastere/strammere, pröv evt og se hvad du faar med en rapport af A.2 i bredden.

08.06.2016 - 16:41

country flag H.T.G. Van Den Ende wrote:

Ik snap niet hoe ik verder moet met het voorpand. Wat beschreven staat over de eerste toer snap ik tot de omschrijving van A6 Daar staat : over de volgende 6 stk = 14 (voor mij) l-lussen op de eerste toer. Moet je het werk omdraaien of zo? Ik snap niet waar die l-lussen anders vandaan komen

03.06.2016 - 15:51

DROPS Design answered:

Hoi T.G. Je haakt als volgt (maat XXL): A.4 over de eerste 12 stk, haak dan A.5 over de volgende 30 stk (= dwz, 10 patroonherhalingen van A.5 in de breedte), A.6 over de volgende 6 stk = en je hebt dan in totaal (dus over alle st) 14 l-lussen op de eerste toer. Het gaat niet om A.6 alleen.

06.06.2016 - 15:18

country flag Mieke wrote:

Vrij meteen in het begin, snap ik niet goed hoe de minderingen gaan. Er staat: Minder op de laatste toer in telpatroon A1 tot en met A3 32 stk gelijkmatig voor alle maten. Moet ik in 1 toer al die 32 steken minderen ?? Normaal minder je verdeeld over een aantal toeren, misschien is dat i.v.m. het patroon niet mogelijk, maar het lijkt me nogal veel in 1 toer., of lees ik het verkeerd?

29.05.2016 - 20:47

DROPS Design answered:

Hoi Mieke. Ja, je mindert gelijkmatig 32 st in die ene toer over de st van A.1, 2 en 3

30.05.2016 - 13:23

country flag Shannon wrote:

Ik ben nu nog met het middelste gedeelte van dit vest bezig. Maar ik ben bijna bij het voor en achterpand. Nu snap ik alleen niet of ik die los moet haken of gewoon gelijk op de laatste toer en dan alleen vastmaken als ik de 2 voorpanden en achterpand klaar heb🙈

14.05.2016 - 19:04

DROPS Design answered:

Hoi Shannon. Je hebt de voorpanden en achterpand in één gehaakt tot aan de armsgaten. Hier deel je het werk in voorpanden en achterpand en haakt nu elke deel afzonderlijk verder. Bij het afwerken sluit je de schoudernaden.

17.05.2016 - 13:40

country flag Frankie Todd wrote:

I am unclear on the direction to work A.1, A.2, & the A.3 part of the pattern. Do I crochet a panel at a time? Or do I crochet in rows? Either way Im stuck also because I have the required number of stitches=174. If I followed the pattern from left to right the total sts in A.1, A.2, & A.3 = 8 + 8 +7 = 23 Upon completion of the row I end up with 6 sts remaining and it ends at A.3. Which isnt where I should be to continue. Please advise. Kindest Regards, FRANKIE

07.05.2016 - 18:35

DROPS Design answered:

Dear Mrs Todd, before working diagrams you have 174 dc + 3 ch to turn with, over these 175 sts you will work: A.1 (= 8 sts), repeat the 8 sts in A.2 a total of 20 times and finish with the 7 sts in A.3. Start reading diagram on the bottom corner on the right side towards the left from RS and from the left towards the right from WS. See also how to crochet the flowers here. Happy crocheting!

09.05.2016 - 09:44

country flag Kiki Clauer wrote:

Auf die idee bin ich natürlich nicht gekommen,. Vielen dank für eure hilfe

03.05.2016 - 10:37

Ivar wrote:

Ich glaube es ist keine Masche sondern ein Pfeil und bedeutet: es wird in diese Masche gehäkelt"

20.04.2016 - 15:28

country flag Kiki wrote:

Hallo nochmal, Vielen Danke für den tipp. Ich hab mich jetzt mal durch so ähnliche muster durchprobiert nur finde ich nirgends eine antwort auf meine frage : welche masche ist in a.1 bis a.3 in reihe 3 gemeint ? Ich finde keine erklärung zu dem diagramm. Kann mir jemand bitte die masche sagen (feste masche, doppelstäbchen .... ??) Oder wo finde ich im raum bodensee jemanden der mir weiterhelfen kann ? Danke für eure hilfe

20.04.2016 - 13:41

DROPS Design answered:

Liebe Kiki, Sie finden alle Symbole in der Legende erklärt. Der Pfeil zwischen Reihe 2 und 3 zeigt, in welche Masche die 2 Dreifach-Stb gehäkelt werden.

21.04.2016 - 08:33

country flag Kiki wrote:

Hallo zusammen, Ich versuche mich zum ersten mal am häkeln. Leider komme ich mit der maschenschrift leider nicht ganz klar. A1 -A3 3. Reihe was muss ich da häkeln ?? Gibt es auch ein video von diesem muster ? Für ihre mühe möchte ich mich schon im voraus bedanken Liebe grüße kiki

18.04.2016 - 21:07

DROPS Design answered:

Liebe Kiki, dieses Modelle ist vielleicht nicht gerade das ideale Anfängermodell, da einige Häkeltechniken darin vorkommen. Ich würde Ihnen empfehlen, zunächst alle verlinkten Lektionen an einem Pröbchen nachzuarbeiten, um sich mit den Häkeltechniken vertraut zu machen. Wir sind bemüht, für jedes Muster ein eigenes Video einzustellen, unser Videoteam lädt täglich neue Videos hoch.

19.04.2016 - 12:12

country flag Susanne wrote:

Ja natürlich, da habe ich mich lediglich vertan. Natürlich ist das Modell gehäkelt.

09.04.2016 - 09:48