
Popular categories
Looking for a yarn?


Comments / Questions (14)
![]() Dinie Bouman wrote:
Dinie Bouman wrote:
Bij het patroon staat dat zowel de linker als de rechtermouw van onder naar boven wordt gebreid, echter er zit verschil in de steek verhouding, bij de een begin je met 66 steken en bij de ander begin je met 46 steken, in het engels staat wel dat de een van onder naar boven en de ander van boven naar beneden wordt gebreid.
28.11.2016 - 15:56DROPS Design answered:
Hoi Dinie. Ik heb vergeleken met het originele Noorse patroon en je hebt gelijk. Het was een foutje in de vertaling en ik heb het aangepast. Bedankt voor het melden.
28.11.2016 - 16:46
![]() Kamilla wrote:
Kamilla wrote:
Kan denne strikkes i Air, og hvordan regner jeg garnforbruget ud, hvis den kan? Tak for hjælpen - Kamilla
30.11.2015 - 22:14DROPS Design answered:
Hej Kamilla, Ja du kan strikke den i Air (samme strikkefasthed) se her hvordan du gør: Se nederste eksempel!
01.12.2015 - 10:25Hélène Morin wrote:
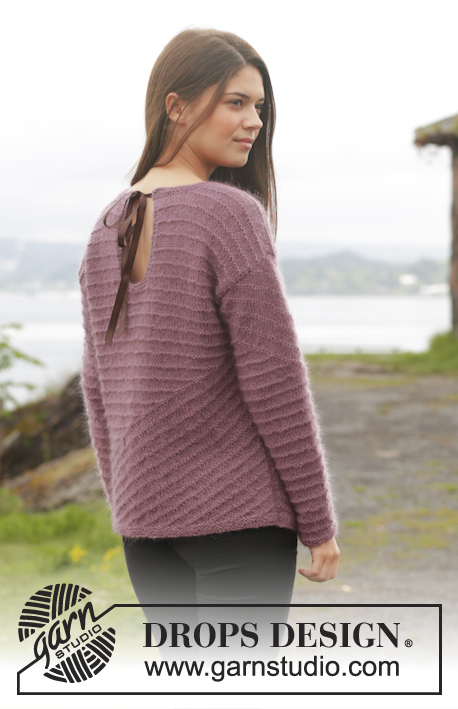
J'adore ce modèle tel qu'il est. L'ouverture au dos lui donne tout son charme.
07.07.2014 - 18:48
![]() Nancy Hurley wrote:
Nancy Hurley wrote:
I really like the design and pattern of this sweater. However, I don't like the keyhole neckline in the back.
19.06.2014 - 03:16
![]() Berit Lauritzen wrote:
Berit Lauritzen wrote:
Rigtig sød model. Forslag: lukket ryg og raglanærmer, så fortsætter de skrå linier der...
11.06.2014 - 12:46
![]() Kitty67 wrote:
Kitty67 wrote:
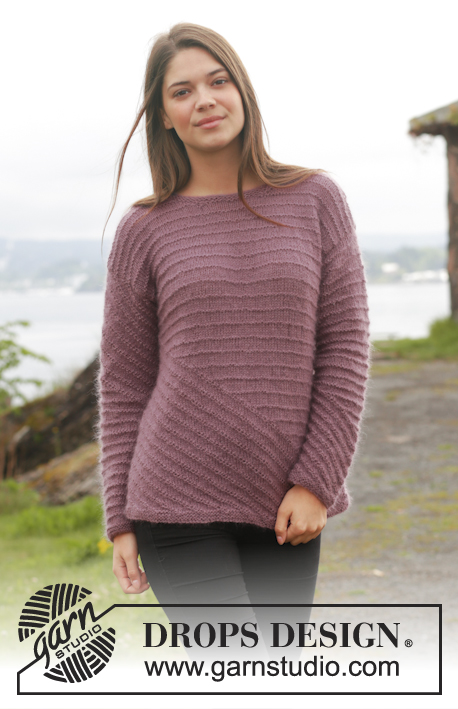
Idee gefällt. Aber warum steht der untere Saum/Rand so ab? Liegt das am Material?
08.06.2014 - 17:11C Darmanin wrote:
I like it with the slit at the back-it's what makes it extra special. You could just wear a turtleneck or something underneath if it's cold!
06.06.2014 - 19:49C Darmanin wrote:
Simple yet effective design. Hope to have the pattern so can knit it.
06.06.2014 - 19:47Sieneke wrote:
Indeed no gap.
05.06.2014 - 06:33Lada wrote:
Cannot agree with the ladies. I like this model as it is. I think this extraordinary back makes this jumper so catchy. This pattern is not for skiing, but for restaurants, museums, theaters. Please do not change anything.
04.06.2014 - 11:55
|
||||||||||
Sonata#sonatasweater |
||||||||||
 |
 |
|||||||||
Knitted DROPS jumper in garter st with texture in ”Alpaca” and ”Kid-Silk”. Size: S - XXXL.
DROPS 156-20 |
||||||||||
|
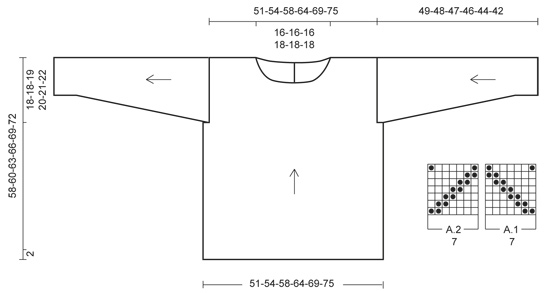
GARTER ST (back and forth on needle): K all rows. 1 ridge = 2 rows K. PATTERN: See diagrams A.1-A.2. The diagrams show all rows in pattern seen from RS. Diagram A.1 is displaced 1 st towards the left side of piece (seen from RS) on every row all the way to 1 edge st in left side of piece. Diagram A.2 is displaced 1 st towards the right side of piece (seen from RS) on every row all the way to 1 edge st in right side of piece. PATTERN 1: Row 1: P from WS. Row 2: K from RS. Row 3: P from WS. Row 4: K from RS. Row 5: K from WS. Row 6: K from RS. Repeat rows 1-6. DECREASE TIP (applies to right sleeve): Dec from RS 1 st inside 1 edge st. After 1 edge st: Slip 1 st as if to K, K 1, psso. Before 1 edge st: K 2 tog. ---------------------------------------------------------- FRONT PIECE: Worked back and forth on circular needle. Cast on 88-94-100-110-120-130 sts (incl 1 edge st in each side of piece) on circular needle size 4.5 mm with 1 strand of each yarn. Work 3 ridges in GARTER ST - see explanation above. Switch to circular needle size 5 mm. Then work as follows from RS: 1 edge st in garter st, A.1 (= 7 sts) 12-13-14-15-16-18 times in width, 2-1-0-3-6-2 sts in stocking st, finish with 1 edge st in garter st. Work edge sts in garter st until finished measurements. Continue displacement and repeat A.1 vertically until piece measures 6 cm, adjust so that next row is from WS. REMEMBER THE KNITTING TENSION! Then continue displacement of P sts on the repetitions of A.1 it is already started on, but now work PATTERN 1 – see explanation above, over sts on right side of P sts. There will be 1 st more pattern 1 on right side. Continue pattern like this. When last A.1 has been displaced out to 1 edge st in the left side of piece, work pattern 1 over all sts until finished measurements. When piece measures 40-42-44-46-48-50 cm, dec 1 edge st in each side of piece at beg of the next 2 rows = 86-92-98-108-118-128 sts. When piece measures 50-52-54-57-59-62 cm, slip the middle 16 sts on a stitch holder for neck and finish each shoulder separately (= 35-38-41-46-51-56 sts remain on each shoulder). Then cast off at beg of every row from neck: 2 sts 2 times, 1 st 2-2-2-3-3-3 times = 29-32-35-39-44-49 sts remain on shoulder. Cast off when piece measures 58-60-63-66-69-72 cm. BACK PIECE: Cast on and work as front piece but reversed, i.e. work A.2 instead of A.1. When piece measures 41-43-45-47-49-51 cm, work 2 ridges over the middle 12 sts (= 37-40-43-48-53-58 sts on each side). Then cast off the middle 6 sts in garter st for vent mid back (= 3 sts in garter st on each side) and finish each shoulder separately = 40-43-46-51-56-61 sts remain on every shoulder. Continue with 3 sts in garter st and pattern 1 over the remaining sts. When piece measures 54-56-59-62-65-68 cm, cast off 10-10-10-11-11-11 sts on next row from the neck. Continue to cast off 1 st at beg of row from neck = 29-32-35-39-44-49 sts remain on the shoulder. Cast off when piece measures 58-60-63-66-69-72 cm. RIGHT SLEEVE: Worked back and forth, top down on circular needle. Cast on 62-62-66-70-74-78 sts (incl 1 edge st in each side of piece) on circular needle size 5 mm with 1 strand of each yarn. READ ALL OF THE FOLLOWING SECTION BEFORE CONTINUING! Work as follows from RS: 1 edge st in garter st, A.1 8-8-9-9-10-10 times in width, 4-4-1-5-2-6 sts in stocking st, finish with 1 edge st in garter st. Work edge sts in garter st until finished measurements. Continue displacement and repeat A.1 vertically until piece measures 6 cm, adjust so that next row is from WS. Then continue displacement on the repetitions of A.1 it is already started on, but work pattern 1 over sts on right side of P sts. There will be 1 st more pattern 1 on right side. AT THE SAME TIME when piece measures 3 cm, dec 1 st in each side inside 1 edge st - READ DECREASE TIP. Repeat dec in each side of piece every 4½-4½-4-3-2½-2 cm 8-8-9-11-12-14 more times (9-9-10-12-13-15 times in total) = 44-44-46-46-48-48 sts. When last A.1 has been displaced out to 1 edge st in the left side of piece, work pattern 1 over all sts. When piece measures approx. 47-46-45-44-42-40 cm (shorter measurements in the larger sizes because of wider shoulders) - adjust so that last row is 4th row in pattern 1, switch to circular needle size 4.5 mm and work 3 ridges over all sts. Cast off. LEFT SLEEVE: Work back and forth on circular needle from bottom up. Cast on 44-44-46-46-48-48 sts (incl 1 edge st in each side of piece) on circular needle size 4.5 mm with 1 strand of each yarn. Work 3 ridges. Switch to circular needle size 5 mm. READ ALL OF THE FOLLOWING SECTION BEFORE CONTINUING! Work as follows from RS: 1 edge st in garter st, A.1 6 times in width, 0-0-2-2-4-4 sts in stocking st, finish with 1 edge st in garter st. Work edge sts in garter st until finished measurements. Continue displacement and repeat A.1 vertically until piece measures 8 cm, adjust so that next row is from WS. Then continue displacement of P sts on the repetitions of A.1 it is already started on, but work pattern 1 over sts on right side of P sts. There will be 1 st more pattern 1 on right side. When last A.1 has been displaced out to 1 edge st in the left side of piece, work pattern 1 over all sts until finished measurements. AT THE SAME TIME when piece measures 6-5-8-5-5-4 cm, inc 1 st in each side of piece inside 1 edge st. Repeat inc in each side of piece every 4½-4½-4-3-2½-2 cm 8-8-9-11-12-14 more times (9-9-10-12-13-15 times in total) = 62-62-66-70-74-78 sts. Cast off when piece measures 49-48-47-46-44-42 cm, adjust so that last row is 5th row in pattern 1. ASSEMBLY: Sew the shoulder seams. Sew sleeves in body. Sew underarm seams and sides in one inside 1 edge st. Divide the silk ribbon in two, fold the cutting edge inwards and fasten it at the top of vent, tie a bow. NECK EDGE: Worked back and forth on needle. Pick up approx. 66 to 76 sts (incl sts on stitch holders) on circular needle size 4.5 mm with 1 strand of each yarn. Work 3 ridges. Cast off. |
||||||||||
Diagram explanations |
||||||||||
|
||||||||||
 |
||||||||||
Have you finished this pattern?Tag your pictures with #dropspattern #sonatasweater or submit them to the #dropsfan gallery. Do you need help with this pattern?You'll find 22 tutorial videos, a Comments/Questions area and more by visiting the pattern on garnstudio.com. © 1982-2026 DROPS Design A/S. We reserve all rights. This document, including all its sub-sections, has copyrights. Read more about what you can do with our patterns at the bottom of each pattern on our site. |
||||||||||


With over 40 years in knitting and crochet design, DROPS Design offers one of the most extensive collections of free patterns on the internet - translated to 17 languages. As of today we count 324 catalogues and 12290 patterns translated into English (UK/cm). 12290
We work hard to bring you the best knitting and crochet have to offer, inspiration and advice as well as great quality yarns at incredible prices! Would you like to use our patterns for other than personal use? You can read what you are allowed to do in the Copyright text at the bottom of all our patterns. Happy crafting!
Post a comment to pattern DROPS 156-20
We would love to hear what you have to say about this pattern!
If you want to leave a question, please make sure you select the correct category in the form below, to speed up the answering process. Required fields are marked *.