
Popular categories
Looking for a yarn?


Comments / Questions (44)
![]() Sarah wrote:
Sarah wrote:
Kan I uddybe nærmere hvordan man laver snoren?
02.10.2025 - 11:55DROPS Design answered:
Hei Sarah. Ta en titt på hjelpevideoen Hæklet Snor, samme teknikk som er beskrevet i oppskriften, men i videoen hekles det 3 luftmasker, mens det i oppskriften hekles 2 luftmasker. Du finner den under: Instruktionsvideoer - Andre teknikker - Snore - Hæklet: Snor. mvh DROPS Design
13.10.2025 - 14:55
![]() Aurora wrote:
Aurora wrote:
Er ganske ny i hekleverdenen, så kan hende det er et dumt spørsmål, men når jeg hekler kjm i slutten en omgang som skal inn i lm(e) fra starten, gjør jeg dette i stedet for en fm i siste maske på runden, dvs at kjm erstatter siste fm, siden lm ikke erstatter første maske på starten? Hvis ikke vil vel runden øke med en maske? Føler jeg alltid ender med flere masker dersom jeg skulle gjøre det på noen annen måte. Takk på forhånd for svar. :)
19.10.2024 - 01:22
![]() Corinne wrote:
Corinne wrote:
Bonjour. au moment de commencer la réhausse est ce que je la commence dans le même sens qu'à la fin de mon tour ou dois-je tourner mon ouvrage et faire 3 mailles en l'air avant de continuer et ensuite, à chaque fois que je tourne mon ouvrage, dois je à nouveau faire 3 mailles en l'air? . une fois la réhausse terminée, je dois obtenir le même nombre de maille qu'au début de mon ouvrage ? (pour moi 140 mailles) ...d'avance merci de m'éclairer ) ce sujet. Cordialement.
20.10.2022 - 08:24DROPS Design answered:
Bonjour Corinne, tout à fait, votre nombre de mailles doit être le même après la réhausse, les rangs raccourcis permettent juste d'avoir plus de longueur dans le dos, mais par la suite, continuez comme avant - mais attention, vous devez avoir, en fonction de la taille choisie: 120-126-132 (138-144) ms - dans la 1ère taille, vous montez bien 140 ml, mais vous devez ensuite sauter des mailles en l'air pour qu'il ne reste que 120 ms à la fin du 1er tour (ainsi le début du pantalon n'est pas trop serré).. Bon crochet!
20.10.2022 - 10:11
![]() Julie Nemec wrote:
Julie Nemec wrote:
Hello, I’m confused about the top of the backside when you have us crochet 20 one way, then 30 the other, and so forth, this creates holes where the stitches have to jump a tow. Can you help me understand this or can I see the back of the pattern to see if I am doing this wrong?
12.10.2022 - 17:46DROPS Design answered:
Dear Mrs Nemec, if the holes are too large, you can work the first stitch after the previous turn crocheting a single crochet in the last stitch worked on previous short row but do not make last yarn over and pull through, crochet 1 single crochet in the next stitch and pull all loops on hook (just as for a decrease), that way you shouldn't have any holes anymore. Happy crocheting!
13.10.2022 - 09:08
![]() Iris wrote:
Iris wrote:
Ik snap de extra ronding op het achterpand niet, ik neem aan dat dit voor betere pasvorm voor de luierkont is? Ik heb de ronding gehaakt, ik denk dat je steeds naar een toer lager moet als je elke toer 10 steken extra moet haken? Ik heb na 80 steken de draad afgeknipt, en het midden opgezocht om vanaf dat punt de broek te gaan haken. Dat leek me logischer dan 40 steken naar het midden haken en vanaf daar verder te gaan met de broek, je blijft dan altijd die halve toer van 40 steken zien.
09.09.2022 - 23:22
![]() Monika wrote:
Monika wrote:
Hallo, danke für die schöne Anleitung. Ich habe mühsam mit dem Google-Übersetzer einige Fragen angeschaut wegen den 2 x 5 Kettmaschen beim Beinanfang. Die Antworten sind leider genauso unverständlich wie die Anleitung! Bitte verbessern sie diese! Man versteht nicht, ob man über die 5 Kettmaschen arbeiten soll oder nicht. Die Anleitung enthält zwar eine "Korrektur", aber in der steht genau das Gleiche wie in der Anleitung. Ich mache es jetzt irgendwie, aber schade... Danke!
04.04.2022 - 11:16
![]() Maj wrote:
Maj wrote:
Hej, hur fortsätter man med benen efter de 5 smygmaskorna i början o slutet på första varvet. Ska man sluta ihop varvet o virka benet runt o hur gör man med de 5 sm? Ska de ingå i benets maskor? Tacksam för en förklaring.
14.10.2021 - 11:28DROPS Design answered:
Hei Maj. I f.eks str. 1/3 mnd har du 136 masker og det skal nå hekles 2 bein. Da hekler du først 5 kjedemasker (smygmasker) + 58 fastmasker + 5 kjedemasker = 1 bein. Nå skal det hekles rundt og rundt til 1 bein over disse 58 fastmaskene, følg oppskriften til stripemønster og fellingene. Når 1. bein er ferdig hekles 2. bein på samme måte. Du får da en åpning midt under buksen, som sys sammen kant i kant. mvh DROPS Design
18.10.2021 - 09:46
![]() Alexandra wrote:
Alexandra wrote:
Skall varvet avslutas efter sm? 5sm-58fm-5sm skall det på sista sm vändas eller avslutas och sedan börja nästa V på första fm?
05.05.2021 - 13:27DROPS Design answered:
Hei Alexandra. Når du hekler det første benet, hekler du 5 sm, deretter 58 fm og så 5 sm. Nå hekles det rundt og med STRIPEMØNSTER og husk å lese HEKLETIPS hvordan du starter neste omgang. mvh DROPS design
10.05.2021 - 09:27
![]() Keriman Koçer wrote:
Keriman Koçer wrote:
Hi, I couldn't figure out how to make each leg. Should I make the last 5 slip stitches, then make the first round of leg? Thanks a lot.
11.04.2021 - 15:27DROPS Design answered:
Dear Keriman Koçer, for the legs the first and last 5 stitches on the round for the legs (round starts at the inner mid-line of the legs) should be done with sl stitches, So start the round at the middle of the inner side of the leg, 5 slip stitch, do the rest of the leg until the last 5 stitch, and 5 slip stitch again. Happy Crafting!
11.04.2021 - 19:03
![]() Karin wrote:
Karin wrote:
Om benen: jag ska sätta en markör på ”insidan av benet” och minska 1 fm på varje sida av markören - men varje sida av det virkade blir ju till insida på benet? Så ska minskningarna göras på en (1) sida av benet eller på båda? Om de ska göras på endast en sida, ska det då minskas på benets sida bak eller fram?
22.05.2020 - 09:08DROPS Design answered:
Hej Karin, du minskar bara på insidan av benet, på varje sida av markören (= 2 minskningar på ett varv). Lycka till
29.05.2020 - 10:06
|
|
Heartthrob Pants#heartthrobpants |
|
|
|
|
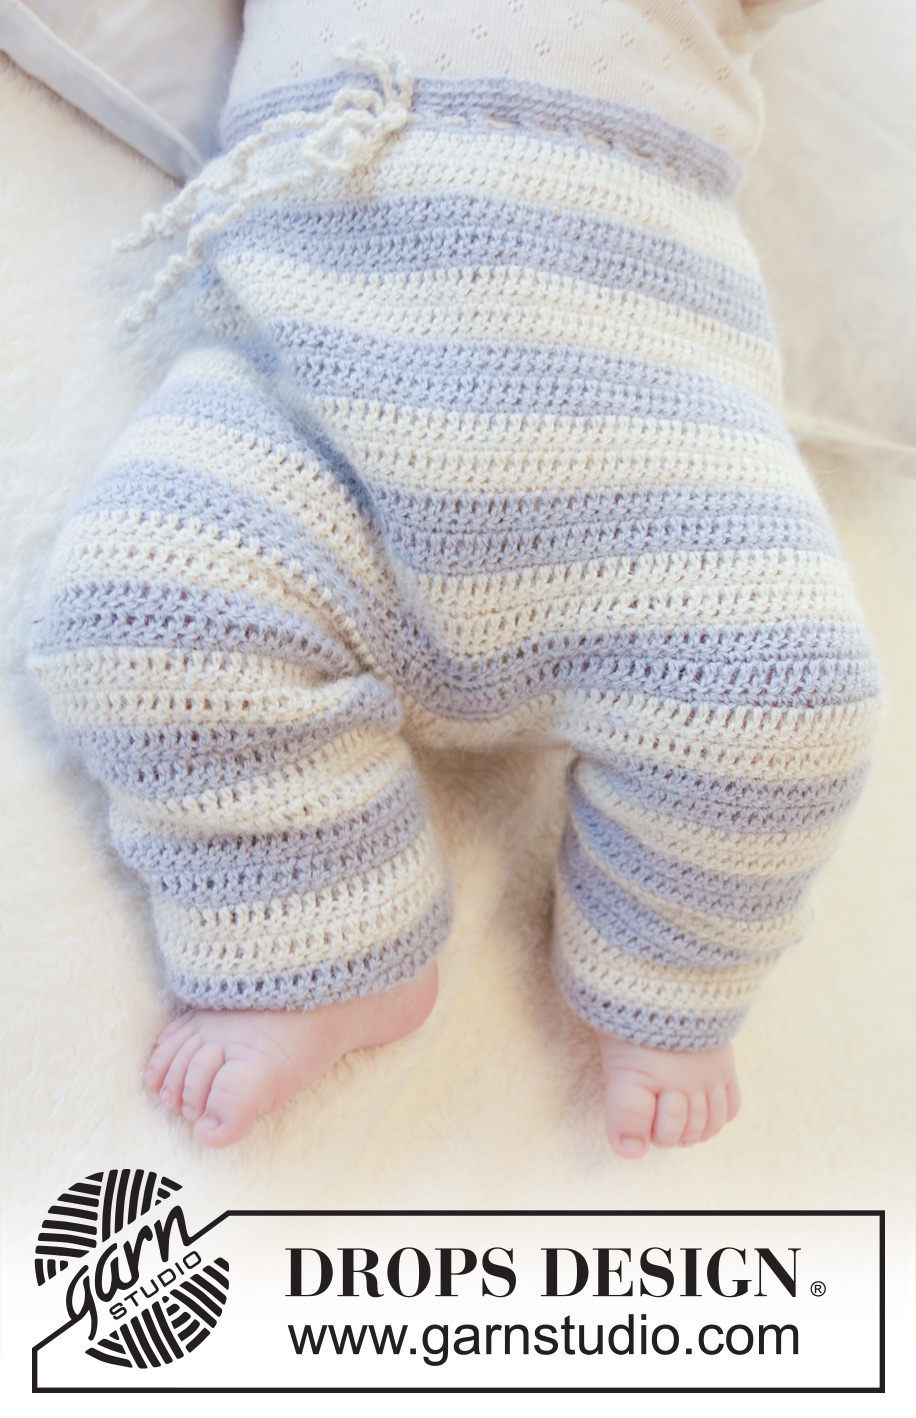
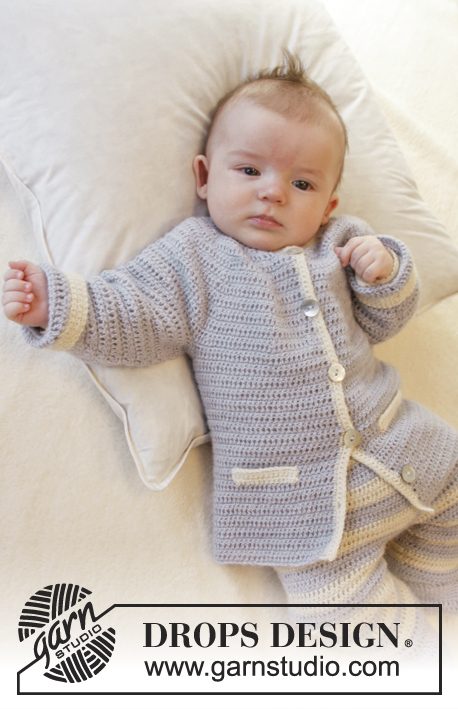
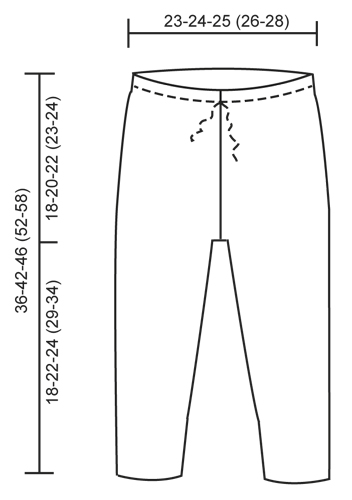
Crochet baby pants with tie-waist in DROPS Alpaca. Size 0 – 4 years.
DROPS Baby 25-24 |
|
|
CROCHET TIP: Beg every round with dc with 1 ch and finish round with 1 sl st in ch from beg of round. Beg every round with tr with 3 ch and finish round with 1 sl st in 3rd ch from beg of round. NOTE: These ch do NOT replace first dc/tr on round. STRIPE PATTERN: ROUND 1 (= from WS with off white): Work 1 tr in every dc. ROUND 2 (= from RS with off white): Work 1 dc in every tr. ROUND 3 (= from WS with off white): Work 1 tr in every dc. ROUND 4 (= from RS with off white): Work 1 dc in every tr. ROUND 5 (= from WS with light steel blue): Work 1 tr in every dc. ROUND 6 (= from RS with light steel blue): Work 1 dc in every tr. ROUND 7 (= from WS with light steel blue): Work 1 tr in every dc. ROUND 8 (= from RS with light steel blue): Work 1 dc in every tr. Repeat rounds 1 to 8. DECREASE TIP: Dec 1 dc by working 2 dc tog as follows: Insert hook in first st and pull yarn through, insert hook in next st and pull yarn through, make 1 YO and pull yarn through all 3 sts on hook. Dec 1 tr by working 2 tr tog as follows: Work 1 tr but wait with last YO and pull through, work next tr but pull last YO through all 3 sts on hook. ---------------------------------------------------------- PANTS: Worked in the round, top down, but turn piece after every round to work alternately from RS and WS. Work 140-147-154 (161-168) ch on hook size 3 mm with light steel blue and form a ring with 1 sl st in first ch. Insert a marker at beg of round = mid back. Work first round as follows: 1 ch, then * 1 dc in each of the first 6 ch, skip 1 ch *, repeat from *-* the entire round, finish with 1 sl st in first dc from beg of round = 120-126-132 (138-144) dc. Continue with 1 dc in every dc for 2 more rounds. Then work 1 round with holes for tie as follows: 4 ch (= 1 tr + 1 ch), * skip 1 dc, 1 tr in next dc, 1 ch *, repeat from *-* the entire round, finish with 1 sl st in 3rd ch from beg of round. On next round work 1 dc in every ch and in every tr. Work 1 more round with 1 dc in every dc. Now work an elevation in the back as follows: Work 10 dc past marker mid back, turn and work 1 dc in each of the first 20 dc, turn, work 1 dc in each of the first 30 dc, continue like this by work 10 dc more on every turn until 80-80-100 (100-120) dc in total have been worked. Turn and work back to mid back again. Continue in the round over all sts with STRIPE PATTERN - see explanation above. REMEMBER THE CROCHET TENSION! When piece measures 15-17-18 (19-20) cm mid front, insert 1 marker mid front as well, there should be 60-63-66 (69-72) sts between markers mid front and mid back. On next round inc 1 st on each side of marker front and back by working 2 dc/tr in same st. Repeat inc every round 3-3-4 (4-4) more times (= 4-4-5 (5-5) inc in total) = 136-142-152 (158-164) sts in total on round. Then finish legs separately. LEG: Work sl sts over the first 5 dc on round, then work dc over the next 58-61-66 (69-72) sts and finish with sl sts over the next 5 dc. Cut the yarn. Work now in the round and continue with stripe pattern over these 58-61-66 (69-72) sts. Insert 1 marker at beg of round = inside of leg. When leg measures 2-2-2 (3-3) cm, dec 1 dc on each side of marker – READ DECREASE TIP. Repeat dec every 2-2½-3 (3½-4½) cm 6-6-6 (5-5) more times (= 7-7-7 (6-6) dec in total) = 44-47-52 (57-60) dc. Continue to work until leg measures 16-20-22 (27-32) cm (finish after a stripe with off white). Then work 8 rounds dc with light steel blue. Fasten off. Work the other leg the same way. The 10 sts mid front and mid back = gusset. ASSEMBLY: Sew tog opening between legs edge to edge to avoid a chunky seam. TIE: Work with off white on hook size 3 mm as follows: * 2 ch, 1 dc in first ch *, repeat from *-* until tie measures approx. 80-85-90 (95-100) cm, fasten off. Thread the tie in the round with eyelet holes at the top of pants – start and finish mid front. |
|
 |
|
Have you finished this pattern?Tag your pictures with #dropspattern #heartthrobpants or submit them to the #dropsfan gallery. Do you need help with this pattern?You'll find 9 tutorial videos, a Comments/Questions area and more by visiting the pattern on garnstudio.com. © 1982-2026 DROPS Design A/S. We reserve all rights. This document, including all its sub-sections, has copyrights. Read more about what you can do with our patterns at the bottom of each pattern on our site. |


With over 40 years in knitting and crochet design, DROPS Design offers one of the most extensive collections of free patterns on the internet - translated to 17 languages. As of today we count 324 catalogues and 12290 patterns translated into English (UK/cm). 12290
We work hard to bring you the best knitting and crochet have to offer, inspiration and advice as well as great quality yarns at incredible prices! Would you like to use our patterns for other than personal use? You can read what you are allowed to do in the Copyright text at the bottom of all our patterns. Happy crafting!
Post a comment to pattern DROPS Baby 25-24
We would love to hear what you have to say about this pattern!
If you want to leave a question, please make sure you select the correct category in the form below, to speed up the answering process. Required fields are marked *.