
Popular categories
Looking for a yarn?


Comments / Questions (41)
![]() Catherine wrote:
Catherine wrote:
Pourquoi y a t il 5 rangs pour la bordure devant droit (3 rgs+2rgs) et 6 rangs pour la bordure devant gauche? Et pourquoi les boutonnieres ne sont elles pas au milieu de la bordure? (2e rang/6). Merci!
14.04.2026 - 07:47DROPS Design answered:
Bonjour Catherine, vous pouvez probablement crocheter aussi 5 rangs pour la bordure du devant gauche. Les boutonnières sont placées de sorte que les boutons tiennent mieux, mais vous pouvez les placer différemment si vous préférez. Bon crochet!
14.04.2026 - 08:57
![]() Ann-Christine wrote:
Ann-Christine wrote:
Hej! Jag skrev en fråga i går men jag inser nu att jag räknat fel, 11x14 blir inte 124 utan 154. Alltså är det inget fel på mönstret utan det är jag som har klantat till det. Ursäkta mig!
22.12.2024 - 10:51DROPS Design answered:
Hei Ann-Christine. Så flott at du fant ut av det selv. Da håper jeg du fikk tid til å strikke i julen. Godt nytt strikke år :) mvh DROPS Design
02.01.2025 - 13:56
![]() Ann-Christine wrote:
Ann-Christine wrote:
Hej! Jag virkar stl 2 år och har problem med oket. Jag har virkat samman delarna och fått 232 maskor och sedan satt ut 14 markörer. Enligt beskrivningen ska jag göra minskningar 3+4+4=11 gånger. Det blir ju 124 maskor. Alltså har jag 108 maskor kvar. Men det står att det ska finnas 78 maskor kvar. Jag har alltså 30 maskor för mycket. Är det fel på mönstret eller är det jag som tänker/gör fel???
21.12.2024 - 16:01DROPS Design answered:
Hei Ann-Christine. Så flott at du fant ut av det selv. Da håper jeg du fikk tid til å strikke i julen. Godt nytt strikke år :) mvh DROPS Design
02.01.2025 - 13:56
![]() Anja wrote:
Anja wrote:
Guten Tag, In der Anleitung beim Raglan steht man soll fm in das rechte Vorderteil häkeln. Nun stellt sich mir die Frage, wo das recht Vorderteil sein soll. Ist damit das Rumpfteil gemeint? Vielen Dank
21.11.2024 - 11:18DROPS Design answered:
Liebe Anja, das rechte Vorderteil besteht aus die ersten 26-36 Maschen (siehe Größe) vom Rumpfteil. Viel Spaß eim Häkeln!
21.11.2024 - 15:50
![]() Leire Perret wrote:
Leire Perret wrote:
Bonjour, Je n'arrive pas a placer les marqueurs. Je fais le modele en 12/18 mois. J'ai bien 216 mailles, mais bizarrement je n'arrive à placer que 13 marqueurs, et après le dernier marqueur je me retrouve avec 12 mailles... Lorsque vous dites "on doit avoir ensuite 14-15-15 (16-18) m entre chaque marqueur" faut il placer le marqueur à la 15eme maille ou a la 16eme? Merci de votre aide
17.02.2023 - 17:43DROPS Design answered:
Bonjour Mme Perret, il faut placer les marqueurs entre les mailles, pas dans une maille, placez-les ainsi: comptez 11 m, placez un marqueur après cette 11ème m, *comptez 15 m, placez un marqueur après cette 15ème m*, répétez de *-* jusqu'à la fin du rang, il reste 10 mailles après le dernier marqueur. Bon crochet!
20.02.2023 - 08:56
![]() Karolina wrote:
Karolina wrote:
Robię teraz karczek. I nie do końca rozumiem zmniejszanie. Czy po wykonaniu zmniejszenia po 13,14 oczku pierwszego zmniejszenia, następne zmniejszanie też mam zrobić po/przed 13,14 oczku?
26.10.2022 - 21:54DROPS Design answered:
Witaj Karolino, w następnym rzędzie z zamykaniem/zmniejszaniem oczek w robótce, wykonujesz to w miejscu markerów (przed lub za markerem - czyli w jednym okrążeniu zawsze zamykasz oczko przed każdym markerem, a w kolejnym zawsze za markerem, itd.). Pozdrawiamy!
27.10.2022 - 08:44
![]() Nathalie wrote:
Nathalie wrote:
Bonsoir, Je vois rune éponse mais elle n’est pas en français pourriez-vous la traduire . Merci
10.06.2022 - 23:51DROPS Design answered:
Bonjour Nathalie, vous trouverez - en français - la réponse à votre question, si vous souhaitez traduire les questions & réponses précédentes, vous pouvez utiliser un traducteur en ligne, ils ne sont pas toujours très justes mais permettent souvent de saisir le sens. Bon crochet!
13.06.2022 - 08:39
![]() Nathalie wrote:
Nathalie wrote:
Bonjour, C’est la première fois que je fais un empiècement , alors je ne comprends pas ,je dois crocheter les manches à la suite ou les m ensemble ?
10.06.2022 - 23:04DROPS Design answered:
Bonjour Nathalie, vous crochetez d'abord le bas du gilet (devant droit, dos, devant gauche, vu sur l'endroit) jusqu'aux emmanchures, puis vous crochetez les manches jusqu'aux emmanchures également, et ensuite, vous crochèterez tout ensemble: le devant droit, la manche droite, le dos, la manche gauche et le devant gauche, en même temps, vous diminuerez pour les raglans aux marqueurs placés après le 1er tour. Bon crochet!
13.06.2022 - 08:34
![]() Natalie wrote:
Natalie wrote:
Hej. Jeg forstår ikke delen med montering, skal hækle 6 rækker med natur garn nederst rundt om hvert ærme, men hvordan får jeg så den blå kant som er på billedet? For det står der intet om??
19.02.2022 - 11:36DROPS Design answered:
Hei Natalie. På bildet er ermene brettet oppover. Så den "blå kanten" er starten når du begynte å hekle ermet. Om du ser på bildet og da høyre arm på babyen ser du tydelig at den er brettet (de hvite maskene på ermet matcher ikke resten av ermet oppover). mvh DROPS Design
21.02.2022 - 11:48
![]() Anna wrote:
Anna wrote:
På oket står det Upprepa minskn på vart 4:e v 1-1-2 (2-2) ggr till (= totalt 2-2-3 (3-3) minskn) - men nästa gång, minskas det EFTER alla markörerna, FRÅGA! Ska det minskas vart 4:e v då också?
27.01.2022 - 23:08DROPS Design answered:
Hei Anna. Første gang du feller, skal du felle FØR merketrådene, så hekler du 3 rader, så skal du felle ETTER merketrådene. Hekler du de minste str er du ferdig å felle etter hver 4.rad, hekler du en av de største str. hekler du 3 rader før det felles igjen (FØR merkene). Deretter skal det felles på hver 2. rad (5-5-4 (4-5) ganger) og tilslutt på hver rad 2-3-3 (4-4) ganger. mvh DROPS Design
31.01.2022 - 13:03
|
|
Heartthrob#heartthrobcardigan |
|
|
|
|
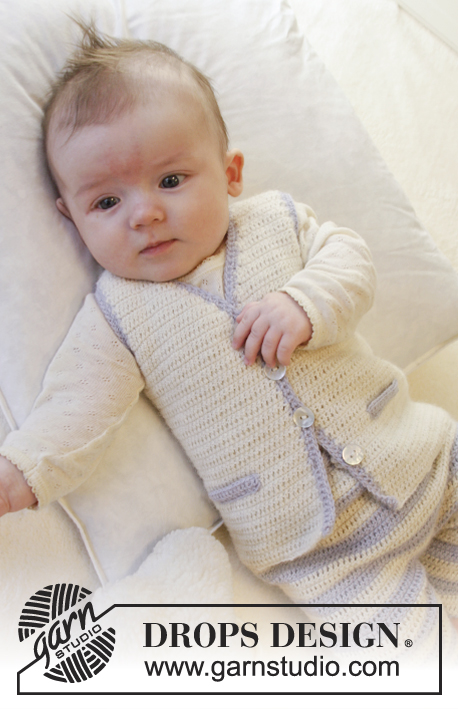
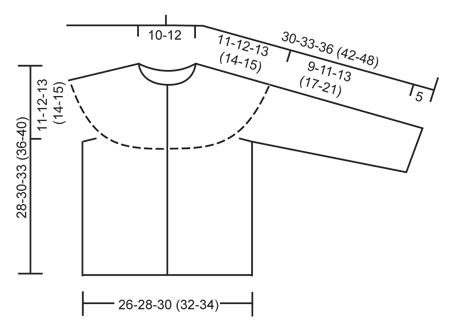
Crochet baby jacket with round yoke and pocket edges in DROPS Alpaca. Size 0 – 4 years.
DROPS Baby 25-21 |
|
|
CROCHET TIP: Beg every dc row with 1 ch and beg every tr row with 3 ch – these do NOT replace first dc/tr on row. PATTERN: ROW 1 (= WS): Work 1 tr in every dc. ROW 2 (= RS): Work 1 dc in every tr. DECREASE TIP: Dec 1 dc/tr by working 2 sts tog. Work 2 dc tog as follows: Insert hook in first st and pull yarn through, insert hook in next st and pull yarn through, make 1 YO and pull yarn through all 3 loops on hook. Work 2 tr tog as follows: Work 1 tr in first st but wait with last pull through, work 1 tr in next st but on last pull through, pull yarn through all 3 loops on hook. ---------------------------------------------------------- BODY: Worked back and forth from mid front. Work 140-153-162 (171-185) ch on hook size 3 mm with light steel blue. READ CROCHET TIP! Work back as follows (= RS): 1 dc in 2nd ch from hook, then 1 dc in each of the next 3-7-7 (7-3) ch, * skip 1 ch, 1 dc in each of the next 8 ch *, repeat from *-* the entire row = 124-136-144 (152-164) dc. Continue with PATTERN - see explanation above. REMEMBER THE CROCHET TENSION! When piece measures 17-18-20 (22-25) cm, put piece aside – finish after 1 row with tr (= WS). Continue with sleeves. SLEEVE: Work back and forth and sew tog mid under afterwards. Work 42-42-44 (46-49) ch on hook size 3 mm with light steel blue. Work back as follows (= RS): 1 dc in 2nd ch from hook, then 1 dc in each of the next 5-5-7 (9-5) ch, * skip 1 ch, 1 dc in each of the next 6 ch *, repeat from *-* the entire row = 36-36-38 (40-42) dc. Continue with PATTERN - see explanation above. AT THE SAME TIME when piece measures 4 cm, inc 1 st in each side by working 2 sts in second and next to last st. Repeat inc every 2-2-2 (2-3) rows 5-7-8 (9-10) more times (= 6-8-9 (10-11) inc in total) = 48-52-56 (60-64) sts. When piece measures 13-15-17 (21-25) cm, put piece aside – finish after 1 row with tr (= WS). Work another sleeve. YOKE: Work first row from RS as follows: 1 dc in each of the first 26-29-31 (33-36) sts on right front piece, skip the first 5 sts on one sleeve, then work 1 dc in each of the next 38-42-46 (50-54) sts on sleeve, skip 10 sts on body, work 1 dc in each of the next 52-58-62 (66-72) sts, skip the first 5 sts on next sleeve, work 1 dc in each of the next 38-42-46 (50-54) sts on sleeve, skip 10 sts on body and work 1 dc in each of the last 26-29-31 (33-36) sts = 180-200-216 (232-252) sts in total. Now insert 12-13-14 (14-14) markers in the piece as follows: First after 13-10-11 (12-9) sts, there should then be 14-15-15 (16-18) sts between markers, after last marker there are 13-10-10 (12-9) sts. Continue with PATTERN as before - AT THE SAME TIME on next row (= tr) dec 1 st BEFORE all markers by working 2 tr tog - READ DECREASE TIP! Repeat dec every 4 rows 1-1-2 (2-2) more times (= 2-2-3 (3-3) dec in total) - but next time dec AFTER all markers, then dec alternately before and after upwards. Then dec every other row 5-5-4 (4-5) times and finally every row 2-3-3 (4-4) times. After all dec are done, 72-70-76 (78-84) sts remain. Work 1 row while AT THE SAME TIME dec 16-11-14 (13-16) sts evenly = 56-59-62 (65-68) sts, fasten off. ASSEMBLY: Work 6 rows dc with off white at the bottom around each sleeve - beg from WS. Then sew sleeve seams edge to edge to avoid a chunky seam. RIGHT BAND: Work 3 rows with dc along right band with off white - beg from RS. On 2nd row (= WS) work 5-5-6 (6-6) buttonholes evenly. 1 buttonhole = 2 ch, skip 2 dc. Top buttonhole should be after 1 dc from the top, there should then be approx. 5-5-5 (6-6) cm between each buttonhole. On 3rd row work 2 dc over each of the 2 ch for buttonholes. Work 2 rows with dc, fasten off. LEFT BAND: Work 6 rows dc with off white as on right band but without buttonholes. NECK EDGE: Work 3 rows dc with off white - beg from WS. Sew on buttons. POCKET EDGE: Work 13-14-15 (16-17) loose ch with off white on hook size 3 mm. Turn and work 1 dc in 2nd ch from hook and then work 1 dc in every ch the entire row = 12-13-14 (15-16) dc in total. Then work 3-3-3 (4-4) more rows with dc, to make a total of 4-4-4 (5-5) rows, fasten off. Work another pocket edge. Sew 1 pocket edge on to each front piece – approx. 6-7-8 (9-10) cm from bottom edge and approx. 4-4-5 (5-6) cm from mid front – sew neatly along bottom edge and in each side (there should be an opening at the top). |
|
 |
|
Have you finished this pattern?Tag your pictures with #dropspattern #heartthrobcardigan or submit them to the #dropsfan gallery. Do you need help with this pattern?You'll find 6 tutorial videos, a Comments/Questions area and more by visiting the pattern on garnstudio.com. © 1982-2026 DROPS Design A/S. We reserve all rights. This document, including all its sub-sections, has copyrights. Read more about what you can do with our patterns at the bottom of each pattern on our site. |


With over 40 years in knitting and crochet design, DROPS Design offers one of the most extensive collections of free patterns on the internet - translated to 17 languages. As of today we count 324 catalogues and 12290 patterns translated into English (UK/cm). 12290
We work hard to bring you the best knitting and crochet have to offer, inspiration and advice as well as great quality yarns at incredible prices! Would you like to use our patterns for other than personal use? You can read what you are allowed to do in the Copyright text at the bottom of all our patterns. Happy crafting!
Post a comment to pattern DROPS Baby 25-21
We would love to hear what you have to say about this pattern!
If you want to leave a question, please make sure you select the correct category in the form below, to speed up the answering process. Required fields are marked *.