
Popular categories
Looking for a yarn?


Comments / Questions (13)
![]() Silke wrote:
Silke wrote:
Danke für die antwort schön wäre es wenn sie auf deutsch wäre denn ich bin deutsch und kann kein englisch
26.09.2025 - 16:10
![]() Silke wrote:
Silke wrote:
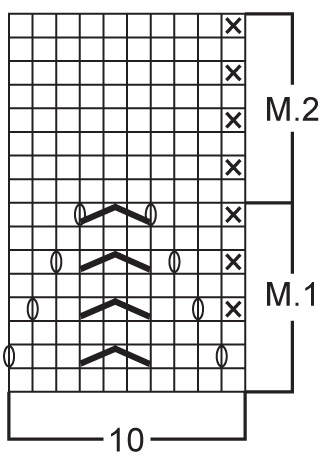
Hallo,im Diagramm sind 3 Kästchen wo ich 1 M. re. abheben, 1 re., die abgehobene über die gestrickte ziehen soll und 2 umschläge stricken fehlt da nicht 1 Masche?
26.09.2025 - 08:31DROPS Design answered:
Hi Silke, knit (from right side): slip 1 as if to knit, K 2 tog, psso > 2 stitches are decreased, but note that they are compensated by 2 yarn overs in the same row (2 stitches increased). So the total number of stitches doesn't change. Happy knitting!
26.09.2025 - 09:09
![]() Anne wrote:
Anne wrote:
Bonjour, j'ai une question sur les augmentations du col à partir de la bordure. J'ai modifié cette bordure : au lieu de 4 mailles, j'en ai fait 10. Pour les augmentations, est-ce que j'en fait 16 comme indiqué à partir de 4 mailles de bordure ? Ou dois-je en faire plus ? Merci d'avance. Anne
02.03.2025 - 13:39DROPS Design answered:
Bonjour Anne, les 4 mailles du col sont ensuite placées en attente puis reprises à la fin pour tricoter le col , en Vienna cette fois. Donc, en fonction de l'effet que vous souhaitez, vous devrez peut être modifier cette partie, à vous de voir comment vous voulez votre col. Bon tricot!
03.03.2025 - 10:07
![]() Anne wrote:
Anne wrote:
Bonjour, Je ne comprends pas la répartition des mailles du motif M1. Quand je le fais, j'ai plus de mailles à la fin de chaque rang et du coup, le motif se décale. Ai-je mal compris le diagramme ? J'ai fait le test sur la manche, je n'ai pas osé sur les 189 mailles du corps... Merci Anne
12.01.2025 - 11:26DROPS Design answered:
Bonjour Anne, à chaque rang avec jeté, on fait une double diminution au milieu (dernier symbole dans la légende), ainsi, vous devez toujours avoir 10 mailles dans chaque M.1. Vous allez tricoter les 189 m du bas de la veste ainsi: 4 m point mousse, répétez les 10 mailles de M.1 jusqu'à ce qu'il reste 5 mailles (- 18 fois), tricotez la 1ère m de M.1 (ainsi le motif est symétrique) et 4 m point mousse. Sur l'envers, tricotez: 4 m point mousse, la 1ère m de M.1 puis répétez les 10 m de M.1 et terminez par 4 m point mousse. Bon tricot!
13.01.2025 - 09:09
![]() Lia Tacken wrote:
Lia Tacken wrote:
Ik begrijp niet waarom ik bij het minderen/meerderen van de taille telkens een mindering moet maken in elke 9e en 10e (8e en 9e) steek van de teltekening. Dan heb ik toch niet 8 maar 16 steken per naald geminderd?
13.06.2024 - 16:15DROPS Design answered:
Dag Lia,
Als je de 9e en 10e steek samen breit, dan maak je daarmee 1 steek van die 2 steken en minder je dus 1 steek.
24.06.2024 - 08:44
![]() Astrid De Vos wrote:
Astrid De Vos wrote:
Ik snap niet goed bij de kraag na het midden hoe ik de15 buitenste steken moet breien. Zijn dat de steken aan de kant van het vest? Moet ik daarna iets dubbelvouwen en vastnaaien. Kunnen jullie een tekening toevoegen van de vorm?
05.07.2021 - 19:22DROPS Design answered:
Dag Astrid,
Je breit eerst steeds ribbelsteken over alle steken tot de kraag ongeveer een lengte heeft van 23-24-25-26-27 cm. Op dit punt plaats je een markeerdraad in de kraag aan de kant van de hals, dus waar de kraag straks aan de hals vastgenaaid wordt. Nu brei je 2 naalden ribbelsteek over alle 20 steken en dan brei je 2 naalden alleen over de eerste 15 steken. Dus als je 15 steken hebt gebreid keer je het werk en brei je terug. Dit herhaal je een aantal keren zoals aangegeven in de beschrijving. Op deze manier wordt de kraag aan de buitenkant iets royaler, waardoor het niet gaat trekken als hij omegvouwen wordt.
20.07.2021 - 15:05
![]() Ursula wrote:
Ursula wrote:
Ich möchte gerne diese wunderschöne Jacke stricken, aber leider steht das GLITTER Garn derzeit nicht zur Verfügung. Wie kann ich GLITTER ersetzen?
12.02.2020 - 17:43DROPS Design answered:
Liebe Ursula, DROPS Glitter können Sie bei einigen DROPS Laden immer noch finden und sollte ab Anfang März wieder lieferbar sein - dieser Glitzerfaden hat bei uns keine Alternative, es ist so dünn, daß die Maschenprobe mit oder ohne dieselbe ist. Viel Spaß beim stricken!
13.02.2020 - 11:44
![]() Jennifer wrote:
Jennifer wrote:
I am having trouble understanding 75-11. Pattern says cast on 179 sts, purl one row, then pattern chart 1. This chart has 10 sts, therefore if I continue with chart and include 4 sts garter st for band at each end, I am left with 1 st over. I have contacted WoolWarehouse where I bought the wool but their experienced knitters cannot understand either. Perhaps you could explain.
15.02.2018 - 18:03DROPS Design answered:
Dear Jennifer, work the 179 sts as follows: 4 garter st, repeat M.1 a total of 10 times in width, work now the first st in M.1 (so that the pattern will be symetrical on both sides) and finish with 4 garter st = 4 + 170+1 + 4 = 179 sts. Happy knitting!
16.02.2018 - 09:06
![]() Nina Unsgaard wrote:
Nina Unsgaard wrote:
På mönstret ser man en tröja men jag kan inte hitta beskrivningen till den??? Vill så gärna sticka den!
09.01.2017 - 21:18DROPS Design answered:
Hej. Du hittar den i mönster 76-10. Lycka till!
10.01.2017 - 11:47
![]() Mary-ann wrote:
Mary-ann wrote:
I'm having trouble understanding the part of the pattern that says "At the same time on the 2nd row of Pattern 2 dec 9 sts by K tog the 9th and 10th sts of each repeat of chart = 170 sts." I have 17 repeats of the chart across this row. Dec every repeat would reduce the stitch count to 162 sts. The same issue occurs each time instructions say to dec or inc. Can anyone help me understand?
12.03.2015 - 21:03DROPS Design answered:
Dear Mary-Ann, you will dec only in 8 repetitions (in 1st size) so that you dec only 8 sts - dec evenly around (ex approx. every 2 repetition). Happy knitting!
13.03.2015 - 09:33
|
|||||||||||||
DROPS 76-11 |
|||||||||||||
|
|
|||||||||||||
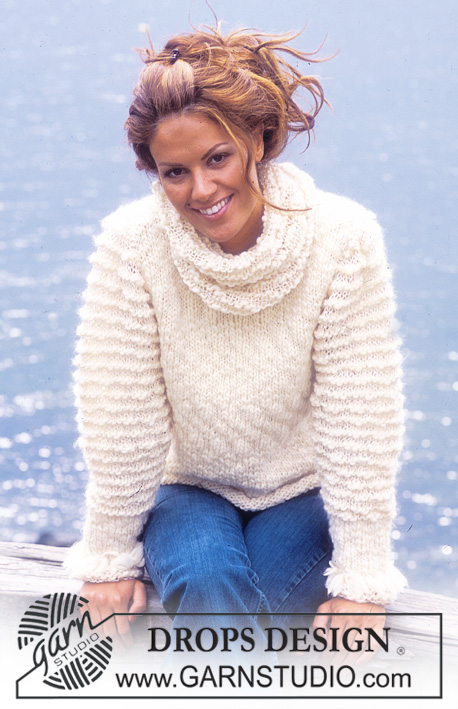
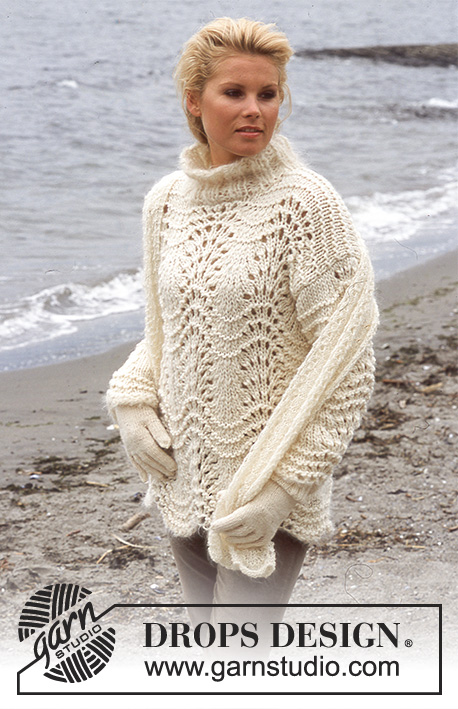
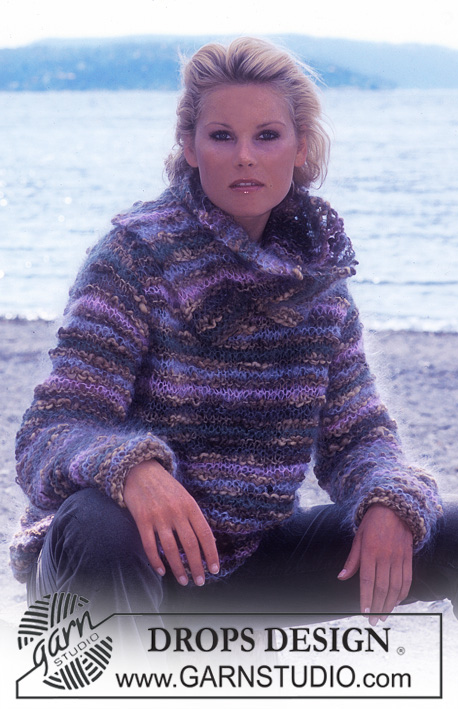
DROPS Cardigan in Alaska, Vienna and Glitter.
DROPS 76-11 |
|||||||||||||
|
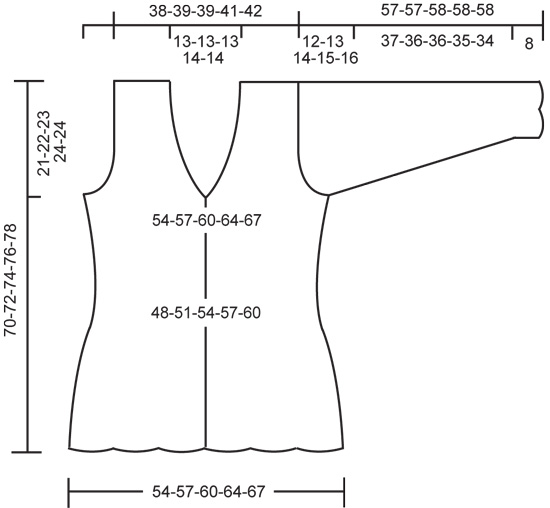
Gauge: Alaska: 15 sts x 19 rows in stockinette st = 10 x 10 cm. Vienna: 14 sts x 24 rows in garter st = 10 x 10 cm Pattern: See chart. The pattern is seen from the right side. Pattern 2 is knit in stripes - with and without Glitter – see the explanation below. = knit (as seen from the right side) = purl (as seen from the right side) = yo = knit (from right side): slip 1 as if to knit, K 2 tog, psso. Buttonbands: The button bands are knit in garter st throughout. Buttonholes: Make buttonholes along right button band. 1 buttonhole = bind off the 3rd st from edge and cast on 1 new st over the bound off st on the next row. Make buttonholes when the piece measures (note: the last buttonhole is made when 2 rows garter st remain on button bands in V-neck shaping): Size S: 16, 22, 28, 34, 40 and 46 cm. Size M: 17, 23, 29, 35, 41 and 47 cm. Size L: 18, 24, 30, 36, 42 and 48 cm. Size XL: 19, 25, 31, 37, 43 and 49 cm. Size XXL: 20, 26, 32, 38, 44 and 50 cm. Body: Cast on 169-179-189-199-209 sts on circular needles with Vienna. Purl 1 row (= right side) but K the 4 edge sts on all rows in garter st to finished measurements for button bands. Put a marker 44-47-49-52-54 sts in from each edge for the sides = 81-85-91-95-101 sts between markers for back. Change to 1 strand Alaska + 1 strand Glitter and continue with Pattern 1 (1st row of chart = wrong side), keeping button bands in garter st. Make buttonholes on right button band - see instructions above. After Pattern 1 has been repeated 4 times take away Glitter strand and continue with 1 strand Alaska. After 2 repeats with only Alaska (= a total of 6 repeats of Pattern 1) continue with Pattern 2 as follows: * 10 rows with 1 strand Alaska, then 4 rows with 1 strand Alaska + 1 strand Glitter, then 10 rows with 1 strand Alaska *. Repeat stripe pattern from * - * (there will be 20 rows without Glitter between 4 rows with Glitter). At the same time on the 2nd row of Pattern 2 dec 8-9-9-10-10 sts by K tog the 9th and 10th sts of each repeat of chart = 161-170-180-189-199 sts. When the piece measures 32 cm dec 8-8-9-9-10 sts by K tog the 8th and 9th sts of each repeat of chart, but start in the 2nd repeat = 153-162-171-180-189 sts. When the piece measures 37 cm inc 8-9-9-10-10 sts by inc 1 st after the 8th st in each repeat of chart - start in 2nd repeat. Inc by pulling up sts from the previous row and then knitting the pulled up st = 161-171-180-190-199 sts. When the piece measures 42 cm inc 8-8-9-9-10 sts in the same manner as previous inc row, but start in the 1st repeat of chart = 169-179-189-199-209 sts. Read the entire next section before knitting: When the piece measures 47-48-49-50-51 cm put the 4 edge sts at each center front edge on a st holder. Now shape armhole and neck, continuing in pattern as established. V-neck: Shape V-neck at each side at the center front edge. Dec 1 st every 4 rows a total of 9-10-9-11-10 times. Armhole: At the same time when the piece measures 49-50-51-52-54 cm bind off 6 sts at each side for armhole (= 3 sts at each side of markers). Knit each piece separately. Right front: Continue to shape V-neck and at the same time bind off for armhole at the side every other row: 3 sts 1-1-2-2-2 times, 2 sts 2-2-2-3-4 times and 1 st 2-3-3-2-2 times. After all armhole and neck shaping is complete 19-20-20-20-21 sts remain on shoulder. Bind off when piece measures 70-72-74-76-78 cm. Left front: Shape armhole and neck as on right front, reversing shaping. Back: = 75-79-85-89-95 sts. Bind off for armhole at each side as on front = 57-59-59-61-63 sts remain. When the piece measures 68-70-72-74-76 cm bind off the center 17-17-17-19-19 sts for the neck. On the next row dec 1 st at each neck edge = 19-20-20-20-21 sts remain on each shoulder. Bind off remaining sts when the piece measures 70-72-74-76-78 cm. Sleeve: Read the entire sleeve pattern before knitting. Cast on 42-42-42-42-42 sts with Vienna and P 1 row (right side). Change to 1 strand Alaska + 1 strand Glitter and knit Pattern 1 one time (1st row = wrong side), then drop Glitter and knit Pattern 1 one time with only 1 strand Alaska. Then continue with Pattern 2 as on Body: * 10 rows with 1 strand Alaska, then 4 rows with 1 strand Alaska + 1 strand Glitter, then 10 rows with 1 strand Alaska *, repeat the pattern from * - *. At the same time after Pattern 1 (the piece measures approx. 9 cm) inc 1 st at each side a total of 9-10-12-13-13 times: Size S: alternately every 7th and 8th row. Size M: every 7th row. Size L: alternately every 5th and 6th row. Sizes XL + XXL: every 5th row = 60-62-66-68-68 sts. When the piece measures 45-44-44-43-42 cm bind off for sleeve cap at each side every other row: 3 sts 1 time, 2 sts 2-2-3-3-2 times and 1 st 4-5-6-7-9 times, then bind off 2 sts at each side until the piece measures 56-56-57-57-57 cm, then bind off 3 sts 1 time at each side. Bind off the remaining sts, the piece measures approx. 57-57-58-58-58 cm. Assembly: sew shoulder seams. Note: for sizes M + XL the pattern will not match up on shoulder. For sizes S + L + XXL the pattern will match up on shoulder. Collar: The collar is knit separately and sewn to neckband. Put the 4 edge sts of right side on needles. Knit garter st back and forth on needles with Vienna, at the same time inc 1 st inside outermost st at each side (2 sts increased on the row) a total of 8 times: Size S: every 4th row. Sizes M + L + XL: alternately every 4th and 6th row. Size XXL: every 6th row = 20 sts. Continue with garter st on these 20 sts until collar measures approx. 23-24-25-26-27 cm from where button bands end. Put 1 marker at neck edge of collar. Continue with garter st over the 20 sts as follows: * 2 rows garter st over all sts, 2 rows garter st over only the outer 15 sts *, repeat from * - * until the collar measures approx. 6.5-6.5-6.5-7-7 cm from the marker = center back of the neck. Bind off. Knit the collar on left side in the same way. Sew the collar together at center back . Sew the collar to neckband. Sew sleeve seams using edge sts as seam allowance. Sew in sleeves and buttons. |
|||||||||||||
Diagram explanations |
|||||||||||||
|
|||||||||||||
 |
|||||||||||||
 |
|||||||||||||
Have you finished this pattern?Tag your pictures with #dropspattern or submit them to the #dropsfan gallery. Do you need help with this pattern?You'll find 25 tutorial videos, a Comments/Questions area and more by visiting the pattern on garnstudio.com. © 1982-2026 DROPS Design A/S. We reserve all rights. This document, including all its sub-sections, has copyrights. Read more about what you can do with our patterns at the bottom of each pattern on our site. |
|||||||||||||


With over 40 years in knitting and crochet design, DROPS Design offers one of the most extensive collections of free patterns on the internet - translated to 17 languages. As of today we count 324 catalogues and 12290 patterns translated into English (UK/cm). 12290
We work hard to bring you the best knitting and crochet have to offer, inspiration and advice as well as great quality yarns at incredible prices! Would you like to use our patterns for other than personal use? You can read what you are allowed to do in the Copyright text at the bottom of all our patterns. Happy crafting!
Post a comment to pattern DROPS 76-11
We would love to hear what you have to say about this pattern!
If you want to leave a question, please make sure you select the correct category in the form below, to speed up the answering process. Required fields are marked *.