Comments / Questions (14)
![]() Angelika wrote:
Angelika wrote:
Klopt het dat je aan de linker en rechter zijde van de hals na de ruches moet minderen? Moet je hier iet meerderen?
13.11.2012 - 19:07DROPS Design answered:
Nee, het patroon is correct. Je moet inderdaad eerst minderen en later meerderen.
14.11.2012 - 13:41
![]() Kristin Risborg wrote:
Kristin Risborg wrote:
Stilig jakke.
26.01.2011 - 19:46
![]() DULHOSTE wrote:
DULHOSTE wrote:
J'attends avec impatience les explications de ce très joli gilet si doux et féminin !
25.01.2011 - 14:30
![]() Lena Linder wrote:
Lena Linder wrote:
Underbar! Vill göra så fort mönstret kommer!
23.01.2011 - 21:30
![]() Anna wrote:
Anna wrote:
Ser jätteskön ut!
22.01.2011 - 21:46
![]() Jacqueline Sörenson wrote:
Jacqueline Sörenson wrote:
Underbar tröja som jag skall sticka så fort mönstret kommer ut.
20.01.2011 - 09:52
![]() Eldri wrote:
Eldri wrote:
Jeg titter og venter på at denne skal komme. Lekker!
16.01.2011 - 11:55
![]() Dominique wrote:
Dominique wrote:
Veste très confortable et utilisable à toutes saisons.
15.01.2011 - 19:50
![]() Helle wrote:
Helle wrote:
Hvilke lækker jakke, den glæder jeg mig til at strikke
13.01.2011 - 17:56
![]() Marianne Herrström wrote:
Marianne Herrström wrote:
Fantastiskt fin kofta, jag hoppas verkligen att ni tar med den i vår.
13.01.2011 - 08:55
Gentle Hug#gentlehugjacket |
|
 |
 |
Knitted DROPS jacket, worked top down with extra width in ”Symphony”. Size: S - XXXL.
DROPS 128-20 |
|
|
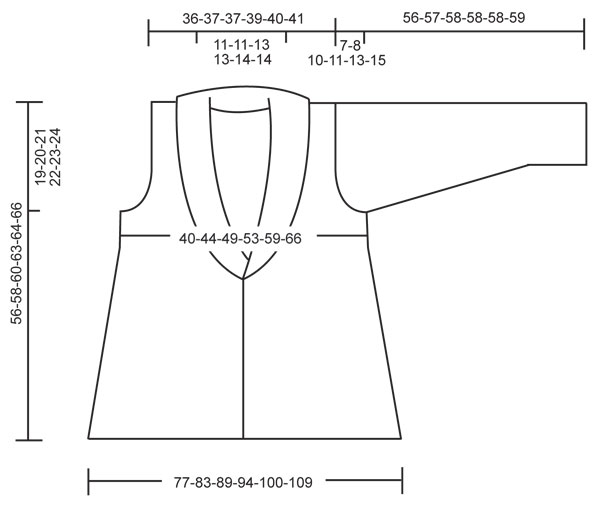
GARTER ST (back and forth on circular needle): K all rows. GARTER ST (in the round on double pointed needles): 1 ridge = 2 rounds * K 1 round and P 1 round *, repeat from *-*. SHORT ROWS: Work short rows over the outermost 6 sts towards mid front as follows: Left front piece (= from RS): K 6 sts from RS, turn and P 6 sts from WS. K 4 sts, turn and P 4 sts from WS, K 2 sts, turn and P 2 sts from WS. Right front piece (= from WS): P 6 sts from WS, turn and K 6 sts from RS. P 4 sts, turn and K 4 sts from RS. P 2 sts, turn and K 2 sts from RS. DECREASE TIP: Dec 1 st in the collar by K/P tog 9th and 10th st from mid front. MEASURING TIP: Because of the weight of the yarn all measurements must be done by holding the piece up otherwise the garment will be too long when worn. INCREASE TIP 1: Inc 1 st by working 2 sts in the outermost st on needle. INCREASE TIP 2: Inc by making 1 YO on each side of the 2 sts in stocking st in each side. Beg 1 st before marker as follows: 1 YO, 1 st in stocking st, marker, 1 st in stocking st, 1 YO. P YOs from WS on next row to make holes. BUTTON HOLE: Cast off for button hole on right front band. 1 button hole = cast off 5th band st from mid front. On next row cast on 1 new st over the cast off st. -------------------------------------------------------- Worked top down, starting at top of shawl collar. Front and back piece is worked back and forth separately down to and with armhole. Then all sts are slipped on the same circular needle. Then work back and forth over all sts until finished measurements. READ MEASURING TIP! LEFT COLLAR/FRONT PIECE: Worked back and forth on circular needle. Cast on 24-25-26-27-28-29 sts on circular needle size 7 mm with Symphony for collar. 1st row = from RS: Work 8 sts in GARTER ST - see explanation above, work the remaining sts in stocking st, work back from WS (the 8 sts in garter st = front band). Work next row from RS as follows: * Work SHORT ROWS over the outermost 6 band sts towards mid front - see explanation above! When the short rows have been worked 1 time vertically, work 4 rows back and forth over all sts with 8 sts in garter st on front band and the remaining sts in stocking st *, repeat from *-* until piece measures 8-8-9-9-10-10 cm in the shorter side - adjust after 1 whole repetition of short rows. Now cast on 17-18-17-18-18-19 new sts for shoulder at the end of the next row from RS = 41-43-43-45-46-48 sts. Now measure piece from here. Continue in stocking st and short rows over band sts as before. REMEMBER THE KNITTING TENSION! Read all of the following section before continuing: When piece measures 5 cm (measured from shoulder), dec 1 st inside band sts in collar - READ DECREASE TIP! Repeat dec every 3rd row (of the rows worked over all sts) a total of 14-15-16-17-18-19 times. AT THE SAME TIME when piece measures 18-18-16-15-12-9 cm, inc 1 st at the end of row towards the side from RS (do not inc in Size S) - READ INCREASE TIP 1! Repeat inc at the end of every row towards the side (= from RS) a total of 0-2-5-7-10-14 times, then cast on 6 new sts at the end of next row from RS in all sizes (dec for collar is not done yet but continued later). P 1 row from WS. Now piece measures approx. 19-20-21-22-23-24 cm. Put piece aside. RIGHT COLLAR/FRONT PIECE: Cast on and work as left front piece but reversed, i.e. the 8 sts in garter st are worked at the end of row from RS and the short rows beg from WS - see explanation above! Cast on new sts for shoulder and in the side from WS, finish from RS. Put piece aside. BACK PIECE: Left shoulder: Worked back and forth on circular needle. Cast on 17-18-17-18-18-19 sts on circular needle size 7 mm with Symphony. Work in stocking st. When piece measures 2 cm, inc 1 st towards the neck at the end of next row from RS = 18-19-18-19-19-20 sts. P 1 row from WS. Cut the thread and put piece aside. Right shoulder: Cast on and work as left shoulder. When piece measures 2 cm, inc 1 st towards the neck at the end of next row from WS. Work 1 row from RS. Then cast on 14-14-16-16-18-18 sts for neck at the end of next row from WS = 32-33-34-35-37-38 sts. Slip sts from left shoulder on to same needle = 50-52-52-54-56-58 sts. Continue in stocking st, start from RS. When piece measures 18-18-16-15-12-9 cm, inc 1 new st at the end of the next 2 rows (do not inc in Size S). Repeat inc at the end of every row in each side a total of 0-2-5-7-10-14 times, then work 2 rows without inc = 50-56-62-68-76-86 sts. Now piece measures approx. 19-20-21-22-23-24 cm. BODY: Slip sts from each front piece on to same circular needle as back piece, now work back and forth over all sts, beg from mid front. Insert a marker in the middle of the 6 new sts cast on last on front piece in each side = 56-62-68-74-82-92 sts between markers on back piece. Continue in stocking st and with short rows on front band and dec in collar as before. When all dec are done, there are 116-128-138-150-164-184 sts on needle. After last dec in collar, work the 8 sts towards mid front in each side in garter st, without short rows. AT THE SAME TIME when piece measures 28-29-30-31-33-34 cm, cast off for 1 BUTTON HOLE on right front band - see explanation above! AT THE SAME TIME when piece measures 29-30-31-32-33-34 cm, inc 1 st on each side of marker in each side from RS - READ INCREASE TIP 2! Repeat inc on every row from RS until finished measurements (= approx. 26-27-28-29-29-30 rows with inc). AT THE SAME TIME when piece measures 55-57-59-62-63-65 cm, K 4 rows over all sts. Now there are approx. 220-236-250-266-280-304 sts on needle. LOOSELY cast off. Now piece measures approx. 56-58-60-63-64-66 cm. SLEEVE: Worked in the round on double pointed needles. Cast on 30-32-34-36-38-40 sts on double pointed needles size 7 mm. Work 4 rounds in GARTER ST - see explanation above! Insert a marker in the piece. Then work in stocking st. When piece measures 8 cm, inc 1 st on each side of marker. Repeat inc every 5-4½-4-4-3-3 cm a total of 8-9-10-10-11-12 times = 46-50-54-56-60-64 sts. When piece measures 49-49-48-47-45-44 cm (NOTE! Shorter measurements in the larger sizes because of longer sleeve cap and broader shoulder width) cast off 6 sts mid under sleeve (cast off 3 sts on each side of marker). Then continue back and forth on needle and cast off for sleeve cap at the beg of every row in each side as follows: 2 sts 2 times, 1 st 1-2-3-4-6-8 times. Then cast off 2 sts in each side until piece measures 55-56-57-57-57-58 cm, then cast off 3 sts 1 time in each side. Cast off. Now piece measures approx. 56-57-58-58-58-59 cm. ASSEMBLY: Sew the shoulder seams. Sew in the sleeves. Sew collar tog mid back and sew on to back of neck. Sew the button on to the left front band. |
|
 |
|
Have you finished this pattern?Tag your pictures with #dropspattern #gentlehugjacket or submit them to the #dropsfan gallery. Do you need help with this pattern?You'll find 20 tutorial videos, a Comments/Questions area and more by visiting the pattern on garnstudio.com. © 1982-2026 DROPS Design A/S. We reserve all rights. This document, including all its sub-sections, has copyrights. Read more about what you can do with our patterns at the bottom of each pattern on our site. |
|


Post a comment to pattern DROPS 128-20
We would love to hear what you have to say about this pattern!
If you want to leave a question, please make sure you select the correct category in the form below, to speed up the answering process. Required fields are marked *.