Gentle Hug

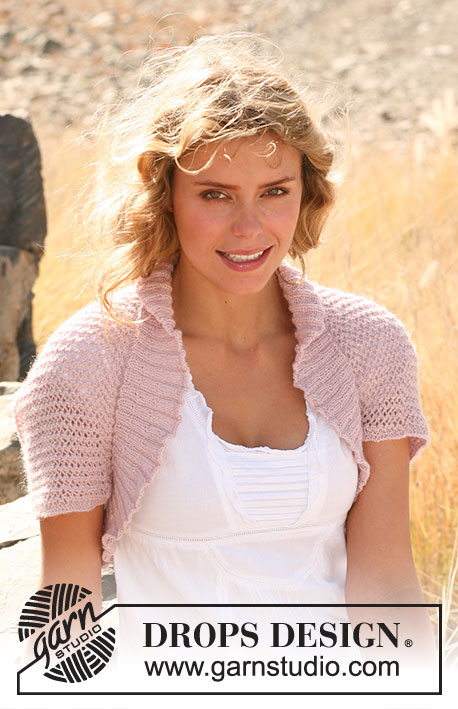
Knitted DROPS jacket, worked top down with extra width in ”Symphony”. Size: S - XXXL.

DROPS 128-20
DROPS design: Pattern no WW-041
--------------------------------------------------------
Size: S - M - L - XL - XXL - XXXL
Finished measurements:
Bust: 80-88-98-106-118-132 cm / 31½"-34½"-38½"-41 3/4"-46½"-52"
Full length: 56-58-60-63-64-66 cm / 22"-22 3/4"-23½"-24 3/4"-25 1/4"-26"

Materials: DROPS SYMPHONY from Garnstudio
Color no 17, gray brown: 550-600-650-750-800-900 g

DROPS DOUBLE POINTED NEEDLES AND CIRCULAR NEEDLE (40 and 80 cm / 16'' and 32'') size 7 mm / US 10½ - or size needed to get 14 sts x 19 rows in stockinette st = 10 x 10 cm / 4'' x 4''.

DROPS MOTHER-OF-PEARL BUTTON NO 540: 1 piece in all sizes

-------------------------------------------------------

Alternative Yarn – See how to change yarns here
Yarn Groups A to F – Use the same pattern and change the yarn here
Yarn usage using an alternative yarn – Use our yarn converter here

-------------------------------------------------------

DROPS Super Sale

SAVE 30% on 6 cotton favorites!
Valid until 04.12.2024

Pattern instructions

NOTE: This pattern is written in American English. All measurements in charts are in cm. For conversion from inches to cm - click here. There are different terms for crocheting in American and British English. If this pattern includes crochet, click for "crochet terms" here. For this pattern in British English, please click here.
GARTER ST (back and forth on circular needle): K all rows.

GARTER ST (in the round on double pointed needles): 1 ridge = 2 rounds: * K 1 round and P 1 round *, repeat from *-*.

SHORT ROWS:
Work short rows over the outermost 6 sts towards mid front as follows:
Left front piece (= from RS):
K 6 sts from RS, turn and P 6 sts from WS. K 4 sts, turn and P 4 sts from WS, K 2 sts, turn and P 2 sts from WS.
Right front piece (= from WS):
P 6 sts from WS, turn and K 6 sts from RS. P 4 sts, turn and K 4 sts from RS. P 2 sts, turn and K 2 sts from RS.

DECREASE TIP:
Dec 1 st in the collar by K/P tog 9th and 10th st from mid front.

MEASURING TIP:
Because of the weight of the yarn all measurements must be done by holding the piece up otherwise the garment will be too long when worn.

INCREASE TIP 1:
Inc 1 st by working 2 sts in the outermost st on needle.

INCREASE TIP 2:
Inc by making 1 YO on each side of the 2 sts in stockinette st in each side. Beg 1 st before marker as follows: 1 YO, 1 st in stockinette st, marker, 1 st in stockinette st, 1 YO. P YOs from WS on next row to make holes.

BUTTON HOLE:
Bind off for button hole on right front band. 1 button hole = bind off 5th band st from mid front. On next row cast on 1 new st over the bound off st.
--------------------------------------------------------
Worked top down, starting at top of shawl collar. Front and back piece is worked back and forth separately down to and with armhole. Then all sts are slipped on the same circular needle. Then work back and forth over all sts until finished measurements. READ MEASURING TIP!

LEFT COLLAR/FRONT PIECE:
Worked back and forth on circular needle.
Cast on 24-25-26-27-28-29 sts on circular needle size 7 mm / US 10½ with Symphony for collar. 1st row = from RS: Work 8 sts in GARTER ST - see explanation above, work the remaining sts in stockinette st, work back from WS (the 8 sts in garter st = front band). Work next row from RS as follows: * Work SHORT ROWS over the outermost 6 band sts towards mid front - see explanation above! When the short rows have been worked 1 time vertically, work 4 rows back and forth over all sts with 8 sts in garter st on front band and the remaining sts in stockinette st *, repeat from *-* until piece measures 8-8-9-9-10-10 cm / 3 1/8''-3 1/8''-3½''-3½''-4''-4''in the shorter side - adjust after 1 whole repetition of short rows. Now cast on 17-18-17-18-18-19 new sts for shoulder at the end of the next row from RS = 41-43-43-45-46-48 sts. Now measure piece from here. Continue in stockinette st and short rows over band sts as before. REMEMBER THE GAUGE!
Read all of the following section before continuing:
When piece measures 5 cm / 2'' (measured from shoulder), dec 1 st inside band sts in collar - READ DECREASE TIP! Repeat dec every 3rd row (of the rows worked over all sts) a total of 14-15-16-17-18-19 times. AT THE SAME TIME when piece measures 18-18-16-15-12-9 cm / 7"-7"-6 1/4"-6"-4 3/4"-3½", inc 1 st at the end of row towards the side from RS (do not inc in Size S) - READ INCREASE TIP 1! Repeat inc at the end of every row towards the side (= from RS) a total of 0-2-5-7-10-14 times, then cast on 6 new sts at the end of next row from RS in all sizes (dec for collar is not done yet but continued later). P 1 row from WS. Now piece measures approx. 19-20-21-22-23-24 cm / 7½''-8''-8¼''-8¾''-9''-9½''. Put piece aside.

RIGHT COLLAR/FRONT PIECE:
Cast on and work as left front piece but reversed, i.e. the 8 sts in garter st are worked at the end of row from RS and the short rows beg from WS - see explanation above! Cast on new sts for shoulder and in the side from WS, finish from RS. Put piece aside.

BACK PIECE:
Left shoulder:
Worked back and forth on circular needle.
Cast on 17-18-17-18-18-19 sts on circular needle size 7 mm / US 10½ with Symphony. Work in stockinette st. When piece measures 2 cm / 3/4'', inc 1 st towards the neck at the end of next row from RS = 18-19-18-19-19-20 sts. P 1 row from WS. Cut the yarn and put piece aside.
Right shoulder: Cast on and work as left shoulder. When piece measures 2 cm / 3/4'', inc 1 st towards the neck at the end of next row from WS. Work 1 row from RS. Then cast on 14-14-16-16-18-18 sts for neck at the end of next row from WS = 32-33-34-35-37-38 sts. Slip sts from left shoulder on to same needle = 50-52-52-54-56-58 sts. Continue in stockinette st, start from RS. When piece measures 18-18-16-15-12-9 cm / 7"-7"-6 1/4"-6"-4 3/4"-3½", inc 1 new st at the end of the next 2 rows (do not inc in Size S). Repeat inc at the end of every row in each side a total of 0-2-5-7-10-14 times, then work 2 rows without inc = 50-56-62-68-76-86 sts. Now piece measures approx. 19-20-21-22-23-24 cm / 7½''-8''-8¼''-8¾''-9''-9½''.

BODY:
Slip sts from each front piece on to same circular needle as back piece, now work back and forth over all sts, beg from mid front. Insert a marker in the middle of the 6 new sts cast on last on front piece in each side = 56-62-68-74-82-92 sts between markers on back piece. Continue in stockinette st and with short rows on front band and dec in collar as before. When all dec are done, there are 116-128-138-150-164-184 sts on needle. After last dec in collar, work the 8 sts towards mid front in each side in garter st, without short rows. AT THE SAME TIME when piece measures 28-29-30-31-33-34 cm / 11"-11 3/8"-11 3/4"-12 1/4"-13"-13 3/8", bind off for 1 BUTTON HOLE on right front band - see explanation above! AT THE SAME TIME when piece measures 29-30-31-32-33-34 cm / 11 3/8''-11¾''-12¼''-12½''-13''-13 3/8'', inc 1 st on each side of marker in each side from RS - READ INCREASE TIP 2! Repeat inc on every row from RS until finished measurements (= approx. 26-27-28-29-29-30 rows with inc). AT THE SAME TIME when piece measures 55-57-59-62-63-65 cm / 21 5/8"-22½"-23 1/4"-24 3/8"-24 3/4"-25½", K 4 rows over all sts. Now there are approx. 220-236-250-266-280-304 sts on needle. LOOSELY bind off. Now piece measures approx. 56-58-60-63-64-66 cm / 22"-22 3/4"-23½"-24 3/4"-25 1/4"-26".

SLEEVE:
Worked in the round on double pointed needles. Cast on 30-32-34-36-38-40 sts on double pointed needles size 7 mm / US 10½. Work 4 rounds in GARTER ST - see explanation above! Insert a marker in the piece. Then work in stockinette st. When piece measures 8 cm / 3 1/8'', inc 1 st on each side of marker. Repeat inc every 5-4½-4-4-3-3 cm / 2"-1 3/4"-1½"-1½"-1 1/8"-1 1/8" a total of 8-9-10-10-11-12 times = 46-50-54-56-60-64 sts. When piece measures 49-49-48-47-45-44 cm / 19 1/4"-19 1/4"-19"-18½"-17 3/4"-17 1/4" (NOTE! Shorter measurements in the larger sizes because of longer sleeve cap and wider shoulder width) bind off 6 sts mid under sleeve (bind off 3 sts on each side of marker). Then continue back and forth on needle and bind off for sleeve cap at the beg of every row in each side as follows: 2 sts 2 times, 1 st 1-2-3-4-6-8 times. Then bind off 2 sts in each side until piece measures 55-56-57-57-57-58 cm / 21 5/8"-22"-22½"-22½"-22½"-22 3/4", then bind off 3 sts 1 time in each side. Bind off. Now piece measures approx. 56-57-58-58-58-59 cm / 22"-22½"-22 3/4"-22 3/4"-22 3/4"-23 1/4".

ASSEMBLY:
Sew the shoulder seams. Sew in the sleeves. Sew collar tog mid back and sew on to back of neck. Sew the button on to the left front band.

Diagram

All measurements in charts are in cm.

diagram measurements
Do you have a question? See a list of frequently asked questions (FAQ)

Knitting tension is what determines the final measurements of your work, and is usually measured per 10 x 10 cm. It is provided like so: number of stitches in width x number of rows in height - eg: 19 stitches x 26 rows = 10 x 10 cm.

The knitting tension is very individual; some people knit/crochet loosely while others work tightly. You adjust the knitting tension with the needle size, which is why the suggested needle size only serve as a guide! You need to adjust this (up or down) to ensure that YOUR knitting tension matches the knitting tension provided in the pattern. If you work with a different knitting tension than provided you will have a different yarn consumption, and your work will have different measurements than what the pattern suggests.

The knitting tension also determines which yarns can replace each other. As long as you achieve the same knitting tension you can replace one yarn with another.

See DROPS lesson: How to measure your tension/gauge

See DROPS video: How to make a gauge tension swatch

The required amount of yarn is provided in grams, eg: 450 g. To calculate how many balls you’ll need you first need to know how many grams are in 1 ball (25g, 50g or 100g). This information is available if you click on the individual yarn quality on our pages. Divide the amount required with the amount of each ball. For example, if each ball is 50g (the most common amount), the calculation will be as follows: 450 / 50 = 9 balls.

The important thing when changing from one yarn to another is that the knitting/crochet tension remains the same. This is so that the measurements of the finished piece will be the same as on the sketch provided. It is easier to achieve the same knitting tension using yarns from the same yarn group. It is also possible to work with multiple strands of a thinner yarn to achieve the knitting tension of a thicker one. Please try our yarn converter. We recommend you to always work a test swatch.

Please NOTE: when changing yarn the garment might have a different look and feel to the garment in the photo, due to individual properties and qualities of each yarn.

See DROPS lesson: Can I use a different yarn than the one mentioned in the pattern?

All our yarns are categorised into yarn groups (from A to F) according to thickness and knitting tension – group A contains the thinnest yarns and group F the thickest. This makes it easier for you to find alternative yarns to our patterns, should you wish to switch yarn. All yarns within the same group have a similar knitting tension and can easily replace each other. However, different yarn qualities have different structures and properties which will give the finished work a unique look and feel.

Click here for an overview of the yarns in each yarn group

At the top of all our patterns you’ll find a link to our yarn converter, which is a helpful tool should you wish to use a different yarn than suggested. By filling in the yarn quality you wish to replace, the amount (in your size) and number of strands, the converter will present good alternative yarns with the same knitting tension. Additionally it will tell you how much you’ll require in the new qualities and whether you’ll need to work with multiple strands. Most skeins are 50g (some are 25g or 100g).

If the pattern is worked with multiple colours, every colour will have to be converted separately. Similarly, if the pattern is worked with several strands of different yarns (for example 1 strand Alpaca and 1 strand Kid-Silk) you will have to find alternatives for each, individually.

Click here to see our yarn converter

Since different yarns have different qualities and textures we have chosen to keep the original yarn in our patterns. However, you can easily find options among our available qualities by using our yarn converter, or simply pick a yarn from the same yarn group.

It is possible that some retailers still have discontinued yarns in stock, or that someone has a few skeins at home that they would like to find patterns for.

The yarn converter will provide both alternative yarn as well as required amount in the new quality.

If you think it's hard to decide what size to make, it can be a good idea to measure a garment you own already and like the size of. Then you can pick the size by comparing those measures with the ones available in the pattern's size chart.

You'll find the size chart at the bottom of the pattern.

See DROPS lesson: How to read size chart

The needle size provided in the pattern serves only as a guide, the important thing is to follow the knitting tension. And since knitting tension is very individual, you will have to adjust the needle size to ensure that YOUR tension is the same as in the pattern – maybe you’ll have to adjust 1, or even 2 needle sizes, up or down to achieve the correct tension. For this, we recommend that you work test swatches.

Should you work with a different knitting tension than the one provided, the measurements of the finished garment might deviate from the measurement sketch.

See DROPS lesson: How to measure your tension/gauge

See DROPS video: How to make a gauge tension swatch

Working a garment top-down provides more flexibility and room for personal adjustment. For example it is easier to try the garment on while working, as well as making adjustments to length of yoke and shoulder caps.

The instructions are carefully explaining every step, in the correct order. Diagrams are adjusted to the knitting direction and are worked as usual.

The diagram depicts all rows/rounds, and every stitch seen from the right side. It is read from bottom to top, from right to left. 1 square = 1 stitch.

When working back and forth, every other row is worked from the right side and every other row is worked from the wrong side. When working from the wrong side, the diagram will have to be worked reversed: from left to right, knit stitches are purled, purl stitches are knit etc.

When working in the round every round is worked from the right side and the diagram are worked from right to left on all rounds.

See DROPS lesson: How to read knitting diagrams

The diagram depicts all rows/rounds, and every stitch seen from the right side. It is worked from bottom to top, from right to left.

When working back and forth every other row is worked from the right side: from right to left and every other row is worked from the wrong side: from left to right.

When working in the round, every row in the diagram are worked from the right side, from right to left.

When working a circular diagram you start in the middle and work your way outwards, counter clockwise, row by row.

The rows usually start with a given number of chain stitches (equivalent to the height of the following stitch), this will either be depicted in the diagram or explained in the pattern.

See DROPS lesson: How to read crochet diagrams

Instructions for working several diagrams after each other on the same row/round, will often be written like so: “work A.1, A.2, A.3 a total of 0-0-2-3-4 times". This means you work A.1 once, then A.2 is worked once, and A.3 is repeated (in width) the number of times provided for your size – in this case like so: S = 0 times, M = 0 times, L=2 times, XL= 3 times and XXL = 4 times.

The diagrams are worked as usual: begin with the first row in A.1, then work the first row in A.2 etc.

See DROPS lesson: How to read knitting diagrams

See DROPS lesson: How to read crochet diagrams

The total width of the garment (from wrist-to-wrist) will be larger in the larger sizes, despite the actual sleeves being shorter. The larger sizes have longer sleeve caps and wider shoulders, so there will be a good fit in all sizes.

The measurement sketch/schematic drawing provides information regarding the full length of the garment. If it’s a jumper or a jacket the length is measured from the highest point on the shoulder (usually closest to the neckline), and straight down to the bottom of the garment. It is NOT measured from the tip of shoulder. Similarly, the length of yoke is measured from the highest point on the shoulder and down to where yoke is split into body and sleeves.

See DROPS lesson: How to read a schematic drawing

Diagrams are often repeated on the round or in height. 1 repeat is the diagram the way it appears in the pattern. If it says to work 5 repeats of A.1 in the round, then you work A.1 a total of 5 times after/next to each other in the round. If it says to work 2 repeats of A.1 vertically/in height you work the entire diagram once, then begin again at the start and work the entire diagram one more time.

Chain stitches are slightly narrower than other stitches and to avoid working the cast-on edge too tight, we simply chain more stitches to begin with. The stitch count will be adjusted on the following row to fit the pattern and measurement sketch.

The rib edge is more elastic and will contract slightly compared to, for example, stocking stitch. By increasing before the rib edge, you avoid a visible difference in width between the rib edge and the rest of the body.

It’s very easy to cast off too tightly, and by making yarn overs while casting off (and simultaneously casting these off) you avoid a too tight cast off edge.

See DROPS video: How to bind off with yarn overs (yo)

To achieve an even increase (or decrease) you can increase on, for example: every 3rd and 4th row alternately, like so: work 2 rows and increase on the 3rd row, work 3 rows and increase on the 4th. Repeat this until the increase is complete.

See DROPS lesson: Increase or decrease 1 st on every 3rd and 4th row alternately

Should you prefer to work in the round instead of back and forth, you may of course adjust the pattern. You’ll need to add steeks mid-front (usually 5 stitches), and follow the instructions. When you would normally turn and work from the wrong side, simply work across the steek and continue in the round. At the end you’ll cut the piece open, pick up stitches to work bands, and cover the cut edges.

See DROPS video: How to knit steeks and cut open

Should you prefer to work back and forth instead of in the round, you may of course adjust the pattern so you work the pieces separately and then assemble them at the end. Divide the stitches for the body in 2, add 1 edge stitch in each side (for sewing) and work the front and back pieces separately.

See DROPS lesson: Can I adapt a pattern for circular needles into straight needles?

Pattern repeats can vary slightly in the different sizes, in order to get the correct proportions. If you’re not working the exact same size as the garment in the photo, yours might deviate slightly. This has been carefully developed and adjusted so that the complete impression of the garment is the same in all sizes.

Make sure to follow instructions and diagrams for your size!

If you have found a pattern you like which is available in women’s size it’s not very difficult to convert it to men’s size. The biggest difference will be the length of sleeves and body. Start working on the women size that you think would fit across the chest. The additional length will be worked right before you cast off for the armhole/sleeve cap. If the pattern is worked top-down you can add the length right after the armhole or before the first decrease on sleeve.

Regarding additional yarn amount, this will depend on how much length you add, but it is better with a skein too many than too few.

All yarns will have excess fibres (from production) that might come off as lint or shedding. Brushed yarns (ie hairier yarns) have more of these loose, excess fibres, causing more shedding.

Shedding also depends on what is worn under or over the garment, and whether this pulls at the yarn fibres. It’s therefore not possible to guarantee that there will be no shedding

Below are some tips on how to get the best result when working with hairier yarns:

1. When the garment is finished (before you wash it) shake it vigorously so the looser hairs come off. NOTE: do NOT use a lint roller, brush or any method that pulls at the yarn.

2. Place the garment in a plastic bag and put it in your freezer - the temperature will cause the fibres to become less attached to each other, and excess fibres will come off easier.

3. Leave in the freezer for a few hours before taking it out and shaking it again.

4. Wash the garment according to the instructions on the yarn label.

Pilling is a natural process that happens to even the most exclusive of fibers. It's a natural sign of wear and tear that is hard to avoid, and that is most visible in high friction areas of your garment like a sweater's arms and cuffs.

You can make your garment look as new by removing the pilling, using a fabric comb or a pill/lint remover.

Still can't find the answer you need? Then scroll down and leave your question so one of our experts can try to help you. This will be done normally within 5 to 10 working days.
In the meantime, you can read the questions and answers that others have left to this pattern or join the DROPS Workshop on Facebook to get help from fellow knitters/crocheters!

You might also like...

Post a comment to pattern DROPS 128-20

We would love to hear what you have to say about this pattern!

If you want to leave a question, please make sure you select the correct category in the form below, to speed up the answering process. Required fields are marked *.

Comments / Questions (14)

country flag Angelika wrote:

Klopt het dat je aan de linker en rechter zijde van de hals na de ruches moet minderen? Moet je hier iet meerderen?

13.11.2012 - 19:07

DROPS Design answered:

Nee, het patroon is correct. Je moet inderdaad eerst minderen en later meerderen.

14.11.2012 - 13:41

country flag Kristin Risborg wrote:

Stilig jakke.

26.01.2011 - 19:46

country flag DULHOSTE wrote:

J'attends avec impatience les explications de ce très joli gilet si doux et féminin !

25.01.2011 - 14:30

country flag Lena Linder wrote:

Underbar! Vill göra så fort mönstret kommer!

23.01.2011 - 21:30

country flag Anna wrote:

Ser jätteskön ut!

22.01.2011 - 21:46

country flag Jacqueline Sörenson wrote:

Underbar tröja som jag skall sticka så fort mönstret kommer ut.

20.01.2011 - 09:52

country flag Eldri wrote:

Jeg titter og venter på at denne skal komme. Lekker!

16.01.2011 - 11:55

country flag Dominique wrote:

Veste très confortable et utilisable à toutes saisons.

15.01.2011 - 19:50

country flag Helle wrote:

Hvilke lækker jakke, den glæder jeg mig til at strikke

13.01.2011 - 17:56

country flag Marianne Herrström wrote:

Fantastiskt fin kofta, jag hoppas verkligen att ni tar med den i vår.

13.01.2011 - 08:55