
Popular categories
Looking for a yarn?


Comments / Questions (137)
![]() Sylvia wrote:
Sylvia wrote:
Bij de start van Linker Voorkant staat " denk erom ook af te kanten voor de armsgaten aan de zijkant.". Als ik het uittel, ben ik al klaar met minderen voor het armsgat, 10nld voordat ik bij het linkervoorpand ben. (Op 46cm is het armsgat klaar)
28.07.2015 - 20:32DROPS Design answered:
Hoi Sylvia. Het hangt van je maat af - het is alleen extra informatie om je te helpen als je nog niet klaar bent met de armsgaten ;-)
29.07.2015 - 13:37
![]() Martina wrote:
Martina wrote:
Guten Tag, ich habe eine Frage zum Diagramm des Musters. Zeigt das Muster nur die Hinreihen oder Hin- und Rückreihen? Danke für eine Info, Martina
26.02.2015 - 09:29DROPS Design answered:
Grundsätzlich zeigen unsere Diagramme immer alle R, also Hin- UND Rück-R, soweit es nicht anders angegeben ist. Viel Spaß beim Stricken dieses tollen Pullis!
03.03.2015 - 17:18
![]() Lusson Martine wrote:
Lusson Martine wrote:
Je ne comprend pas pour le modeles drops 114-8 by drops c'est un pull avec un dos et un devant et sur les explications je me retrouve avec un devant droit et gauche comme si cela etait un gilet je ne comprend pas j'attends votre reponse j'ai fait le dos vite merci
22.02.2015 - 23:08DROPS Design answered:
Bonjour Mme Lusson, on tricote le devant jusqu'à l'encolure V, puis on termine chaque côté séparément: le côté gauche (sous "devant gauche" et le côté droit (sous "devant droit"). Bon tricot!
23.02.2015 - 10:46
![]() Flo wrote:
Flo wrote:
J'ai réalisé ce pull pour ma fille, il est superbe et très douillet. Je l'ai moi aussi rallongé un peu. Attention, il faut vraiment tricoter très lâche pour obtenir le bon échantillon, même avec du 3,5. Je l'ai lavé en machine (la mienne comporte un programme "lavage à la main") et il n'a pas bougé !
30.01.2015 - 09:34
![]() Sirius Boessenkool wrote:
Sirius Boessenkool wrote:
Made this sweater, it's redicilously pretty, and insanely warm. I found it to be way to short for autumn/winter though, and since I had quite some yarn left over for some reason, I took up stitches again around the bottom after I finished and added about 10 cm to make it into a proper long sweater. LOVE it! Also; not half as complicated as it seemed :).
30.10.2014 - 13:56
![]() Matilde wrote:
Matilde wrote:
Buenos días! Tengo problemas con la manga larga: ¿cómo es que cuando se llega al punto C la cantidad de puntos es de 8 más que al inicio? ¿En qué momento se aumentan estos puntos? Muchas gracias.
29.08.2014 - 15:43DROPS Design answered:
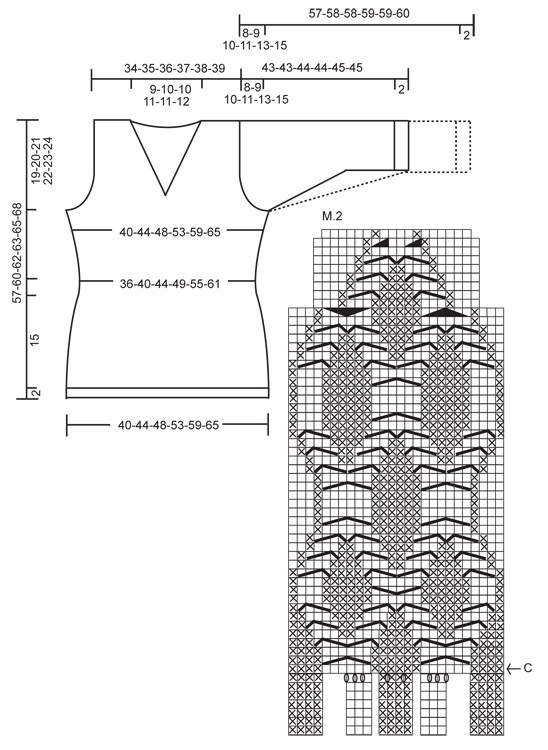
Hola Matilde. Si te fijas en el diagrama M.2, en la fila anterior a la de la flecha C hay 8 HEB (lazadas) - son aum necesarios para trabajar el diagrama a partir de la flecha C.
30.08.2014 - 20:07
![]() Bonnie wrote:
Bonnie wrote:
LEFT FRONT PIECE: It says to dec 1 st for neck inside 15 st in rib on every 4th row. I am not sure how to do this. The ribbing looks like it doesn't change in the picture. Could you explicitly tell me how to make these decreases in the rib while maintaining the rib. Thank you.
08.06.2014 - 20:37DROPS Design answered:
Dear Bonnie, you will decrease for left front piece before the 15 sts in rib, ie work your sts until 17 sts remain towards neckline, dec 1 st, work 15 sts in rib. Happy knitting!
10.06.2014 - 09:36Heather wrote:
The pattern is in sizes S...xxxl but what measurements do those fit . please, so i don't pick the wrong size.
16.05.2014 - 20:18DROPS Design answered:
Dear Heather, you will find at the bottom of the pattern a measurement chart with all measures from size S to XXXL, taken flat from side to side. Compare these to a similar garment you have and like the shape to find the matching size. Happy knitting!
17.05.2014 - 09:24
![]() Rivana wrote:
Rivana wrote:
Merci , je vais vérifier ;-) Bon tricot à vous aussi
12.05.2014 - 08:55
![]() Rivana wrote:
Rivana wrote:
Bonjour, je suis perdue à la fin: j'ai suis bien arrivée à la fin des manches; j'ai bien rabattu les 2 mailles de chaque côté jusqu'à 24cm du marqueur et puis les 4 mailles de chaque côté .... mais je n'ai pas 43 cm de manche :-( il manque au moins 8cm ! S'il vous plaît , éclairez moi si vous pouvez ;-) Merci d'avance!
10.05.2014 - 12:50DROPS Design answered:
Bonjour Rivana, avez-vous vérifié votre tension en hauteur ? Si vous n'avez pas les 32 rangs = 10 cm, il vous faudra sans doute ajuster les diminutions de l'arrondi de la manche. Bon tricot!
12.05.2014 - 08:50
|
||||||||||||||||||||||||||||||||||
Viking Knots#vikingknotssweater |
||||||||||||||||||||||||||||||||||
 |
 |
|||||||||||||||||||||||||||||||||
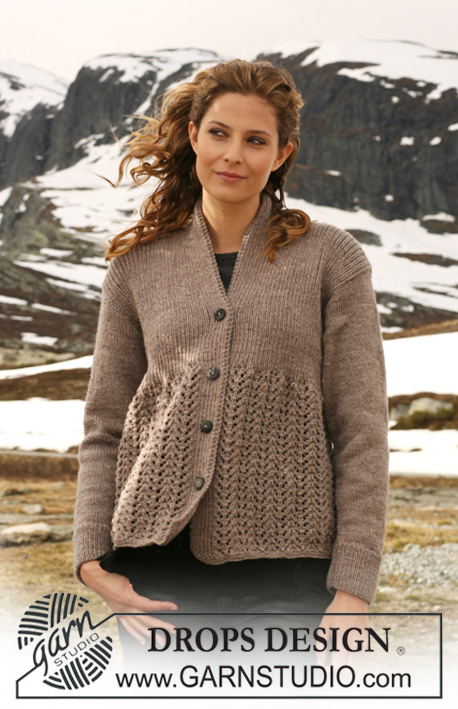
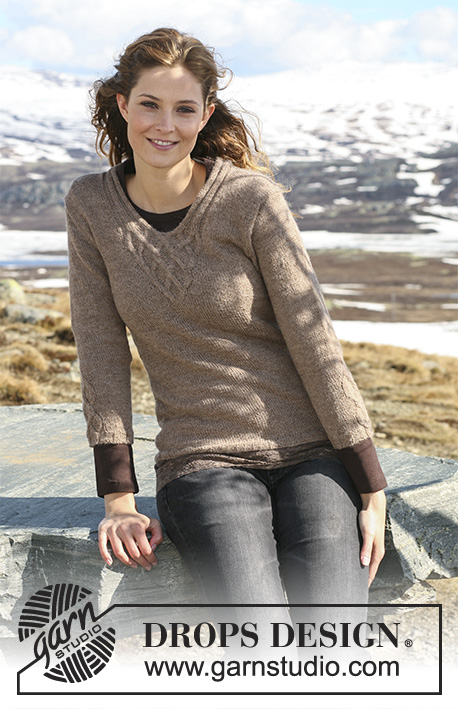
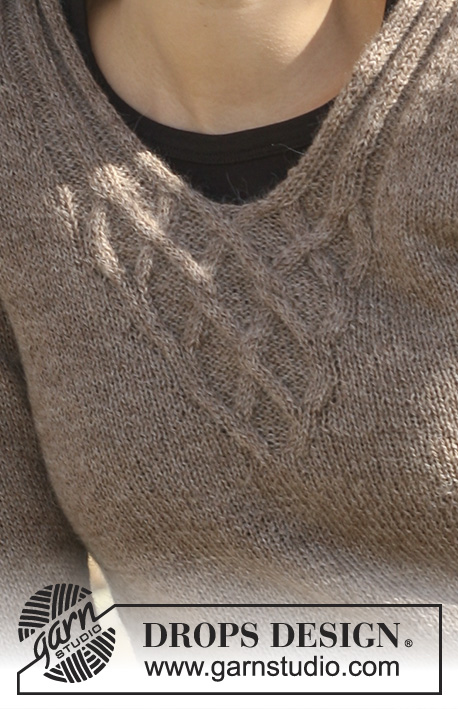
DROPS jumper with cables in ”Alpaca” with 3/4 sleeves or long sleeves. Size S - XXXL.
DROPS 114-8 |
||||||||||||||||||||||||||||||||||
|
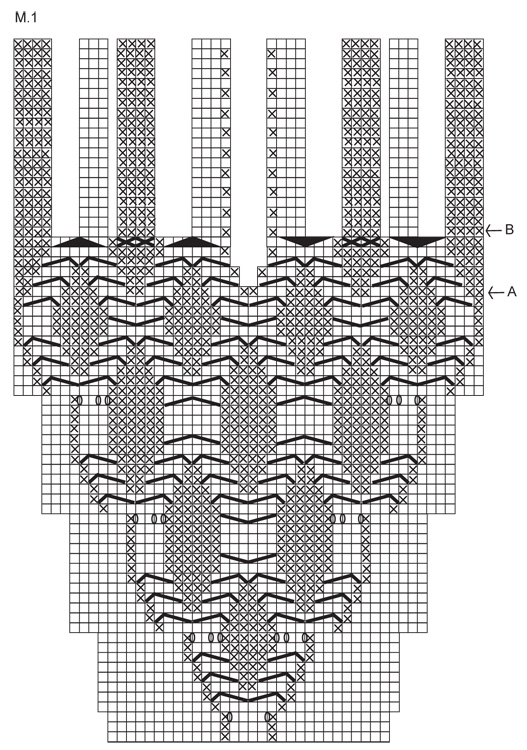
PATTERN: See diagram M.1 and M.2. Diagram shows the pattern from RS. -------------------------------------------------------- BACK PIECE: Worked back and forth on needle. Cast on 107-121-135-142-163-177 sts (includes 1 edge st each side) on needle size 2.5 mm with Alpaca. Work rib as follows (first row = RS): 1 edge st, * K3, P4 *, repeat from *-* and finish with 1 edge st. When rib measures 2 cm K 1 row from RS, AT THE SAME TIME dec 9-13-17-12-19-19 sts evenly = 98-108-118-130-144-158 sts. Change to needle size 3 mm. P 1 row from WS and continue in stocking st with 1 edge st each side. When piece measures 9 cm dec 1 st each side, repeat the dec on every 2 cm a total of 5 times = 88-98-108-120-134-148 sts. When piece measures 20-21-21-20-20-21 cm inc 1 st each side, repeat the inc on every 3-3-3.5-4-4.5-4.5 cm a total of 5 times = 98-108-118-130-144-158 sts. When piece measures 38-40-41-41-42-44 cm cast off 4 sts each side for armhole and cast off for armhole each side on every other row: 4 sts 0-0-0-1-1-2 times, 2 sts 2-3-5-6-8-9 times and 1 st 0-2-2-1-2-2 times = 82-84-86-88-92-94 sts. Continue in stocking st on all sts. When piece measures 54-57-59-60-62-65 cm cast off the middle 32-34-34-36-38-40 sts for neck and complete each shoulder separately. Cast off 1 st on neckline on every other row 2 times = 23-23-24-24-25-25 sts left on shoulder. Cast off loosely when piece measures 57-60-62-63-65-68 cm. FRONT PIECE: Cast on and work like back piece until piece measures 20-21-21-20-20-21 cm. On next row inc 1 st each side, repeat the inc on every 3-3-3.5-4-4.5-4.5 cm a total of 5 times = 98-108-118-130-144-158 sts. Continue in stocking st with 1 edge st each until piece measures 33-34-35-36-39-40 cm. Now continue as follows (from RS): 1 edge st, 33-38-43-49-56-63 stocking sts, M.1 (= 30 sts), 33-38-43-49-56-63 stocking sts and 1 edge st. AT THE SAME TIME when piece measures 38-40-41-41-42-44 cm cast off for armhole each side as described for back piece. Continue up to arrow-A in M.1. On next row from RS cast off for neck as follows: work the first 24 sts of M.1, cast off 2 sts (= mid front) and work the remaining 24 sts of M.1 (work remaining sts in stocking st as before). Insert a marker in piece, and now complete each side separately. LEFT FRONT PIECE: Continue back and forth on needle in stocking st and M.1 as before – remember to cast off for armhole at the side! AT THE SAME TIME on next row from mid front dec 1 st for neck. Continue to arrow-B in diagram for M.1. Now continue with 15 sts rib as shown in M.1, work remaining sts in stocking st as before. AT THE SAME TIME dec 1 st for neck inside the 15 sts in rib, and repeat the dec on every 4th row 3-4-4-5-6-7 times = 38-38-39-39-40-40 sts. Continue until piece measures 11-12-12-13-13-14 cm from marker (adjust to length of armhole on back piece). Now cast off 23-23-24-24-25-25 sts from shoulder towards neckline = 15 sts left on needle. Continue back and forth on needle in rib as before on these 15 sts. Cast off loosely with K over K and P over P after approx 7-7-7-8-8-8 cm (measured from shoulder). RIGHT FRONT PIECE: Like left front piece but mirrored. ASSEMBLY: Sew shoulder seams. 3/4 SLEEVES: Worked back and forth on needle. LEFT SLEEVE: Cast on 65-65-72-72-72-79 sts on needle size 2.5 mm with Alpaca. Work rib as follows (first row = RS): 1 edge st, * P4, K3 *, repeat from *-* on 21-21-28-28-28-28 sts, M.2 (= 18 sts), K3, *P4, K3 *, repeat from *-* on the next 21-21-21-21-21-28 sts and 1 edge st. Continue like this up to Arrow-C in M.2. There are now 73-73-80-80-80-87 sts on needle. Change to needle size 3 mm. Continue as follows (from RS): 1 edge st, 21-21-28-28-28-28 stocking sts, M.2 (= 26 sts), 24-24-24-24-24-31 stocking sts and 1 edge st. Work 1 vertical repeat of M.2 like this = 65-65-72-72-72-79 sts on needle. Insert a marker, and now measure piece from here. Continue in stocking st with 1 edge st each side. AT THE SAME TIME when piece measures approx 2 cm from marker inc 1 st each side, repeat the inc on every 1.5-1-1-0.5-0.5-0.5 cm a total of 8-11-11-14-17-17 times = 81-87-94-100-106-113 sts. When piece measures 17-16-16-15-14-12 cm from marker (less for the larger sizes because of longer sleeve cap and wider shoulder) cast off 4 sts each side. Cast off for sleeve cap at the beg of every row: 2 sts 4-5-5-5-4-4 times each side and 1 st 3-3-5-5-11-14 times each side, then 2 sts each side until piece measures 24-24-25-25-26-26 cm, now cast off 4 sts each side 1 time, and cast off remaining sts. Piece measures a total of approx 43-43-44-44-45-45 cm. RIGHT SLEEVE: Cast on 65-65-72-72-72-79 sts on needle size 2.5 mm with Alpaca. Work rib as follows (first row = from RS): 1 edge st, * K3, P4 *, repeat from *-* on 21-21-21-21-21-28 sts, K3, M.2 (= 18 sts), * K3, P4 *, repeat from *-* on the next 21-21-28-28-28-28 sts and 1 edge st. Continue like this up to Arrow-C in M.2. There are now 73-73-80-80-80-87 sts on needle. Change to needle size 3 mm and continue as follows (from RS): 1 edge st, 24-24-24-24-24-31 stocking sts, M.2 (= 26 sts), 21-21-28-28-28-28 stocking sts and 1 edge st. Work 1 vertical repeat of M.2 like this = 65-65-72-72-72-79 sts on needle. Insert a marker, and now measure piece from here. Continue as described for Left Sleeve. LONG SLEEVES: Worked back and forth on needle. LEFT SLEEVE: Cast on 58-58-65-65-65-72 sts on needle size 2.5 mm with Alpaca. Work rib as follows (first row = RS): 1 edge st, * P4, K3 *, repeat from *-* on 21-21-21-21-21-28 sts, M.2 (= 18 sts), K3, * P4, K3 *, repeat from *-* on the next 14-14-21-21-21-21 sts and 1 edge st. Continue like this up to Arrow-C in M.2. There are now 66-66-73-73-73-80 sts on needle. Change to needle size 3 mm and continue as follows (from RS): 1 edge st, 21-21-21-21-21-28 stocking sts, M.2 (= 26 sts), 17-17-24-24-24-24 stocking sts and 1 edge st. Work 1 vertical repeat of M.2 like this = 58-58-65-65-65-72 sts on needle. Insert a marker, and now measure piece from here. Continue in stocking st with 1 edge st each side. AT THE SAME TIME when piece measures approx 1-2-2-1-1-1 cm from marker inc 1 st each side, repeat the inc on every 2.5-1.5-1.5-1.5-1-1 cm a total of 12-15-15-18-21-21 times = 82-88-95-101-107-114 sts. When piece measures 31-31-30-30-28-27 cm from marker (less for the larger sizes because of longer sleeve cap and wider shoulder) cast off for 4 sts each side for sleeve cap and cast off for sleeve cap at the beg of every row: 2 sts 4-5-5-5-4-4 times each side and 1 st 3-3-5-5-11-14 times each side, then cast off 2 sts each side until piece measures 38-39-39-40-40-41 cm, now cast off 4 sts each side 1 time, and cast off remaining sts. Piece measures a total of approx 57-58-58-59-59-60 cm. RIGHT SLEEVE: Cast on 58-58-65-65-65-72 sts on needle size 2.5 mm with Alpaca. Work rib as follows (first row = RS): 1 edge st, * K3, P4 *, repeat from *-* on 14-14-21-21-21-21 sts, K3, M.2 (= 18 sts), * K3, P4 *, repeat from *-* on the next 21-21-21-21-21-28 sts and 1 edge st. Continue like this up to Arrow-C in M.2. There are now 66-66-73-73-73-80 sts on needle. Change to needle size 3 mm and continue as follows (from RS): 1 edge st, 17-17-24-24-24-24 stocking sts, M.2 (= 26 sts), 21-21-21-21-21-28 stocking sts and 1 edge st. Work 1 vertical repeat of M.2 like this = 58-58-65-65-65-72 sts on needle. Insert a marker, and now measure piece from here. Continue as described for Left Sleeve. ASSEMBLY: Sew shoulder seams. Set in sleeves. Sew sleeve and side seams inside 1 edge st. Sew rib on neck tog mid back and sew to back piece. |
||||||||||||||||||||||||||||||||||
Diagram explanations |
||||||||||||||||||||||||||||||||||
|
||||||||||||||||||||||||||||||||||
 |
||||||||||||||||||||||||||||||||||
 |
||||||||||||||||||||||||||||||||||
Have you finished this pattern?Tag your pictures with #dropspattern #vikingknotssweater or submit them to the #dropsfan gallery. Do you need help with this pattern?You'll find 18 tutorial videos, a Comments/Questions area and more by visiting the pattern on garnstudio.com. © 1982-2026 DROPS Design A/S. We reserve all rights. This document, including all its sub-sections, has copyrights. Read more about what you can do with our patterns at the bottom of each pattern on our site. |
||||||||||||||||||||||||||||||||||


With over 40 years in knitting and crochet design, DROPS Design offers one of the most extensive collections of free patterns on the internet - translated to 17 languages. As of today we count 324 catalogues and 12290 patterns translated into English (UK/cm). 12290
We work hard to bring you the best knitting and crochet have to offer, inspiration and advice as well as great quality yarns at incredible prices! Would you like to use our patterns for other than personal use? You can read what you are allowed to do in the Copyright text at the bottom of all our patterns. Happy crafting!
Post a comment to pattern DROPS 114-8
We would love to hear what you have to say about this pattern!
If you want to leave a question, please make sure you select the correct category in the form below, to speed up the answering process. Required fields are marked *.