
Popular categories
Looking for a yarn?


Comments / Questions (77)
![]() Brigitte Csok wrote:
Brigitte Csok wrote:
Sehr schönes Muster, aber für mich, kompliziert beschrieben. Die zwei Maschen Krausrippe an der untere Kante sind überflüssig, und schaut nicht schön aus( ich habe es leider so gestrickt). Ich habe von der Kante die 104 M aufgenomen, bei mir ensteht aber keine Wulst. Was mache ich falsch? Ich bin Ihnen sehr dankbar, für eine schnelle Antwort. Mit freundlichen Grüße, Brigitte Csok
22.01.2013 - 06:48DROPS Design answered:
Guten Tag Frau Csok, der Wulst entsteht indem Sie nicht aus der Randmasche sondern aus der Maschen neben der Krausrippe aufnehmen.
22.01.2013 - 09:34
![]() Maryse Levesque wrote:
Maryse Levesque wrote:
Je ne réussis pas à tricoter ce modèle comme on le voit sur la photo. Le relief entre les deux parties n'est pas expliqué et la torsade n'est pas aussi définie. Manque-t-il des explications?
02.12.2012 - 15:28DROPS Design answered:
Bonjour Madame Levesque, cette bordure relief est obtenue en relevant les mailles à 1 m du bord, dans la m jersey env à côté de la torsade avant/après la m lis. Bon tricot !
03.12.2012 - 09:48Maryse Levesque wrote:
J'adore ce modèle mais après plusieurs essais je n'arrive pas au même résultat que la photo. La torsade n'est pas aussi définie et le relief entre les deux parties n'est pas expliqué. J'adore votre site et je suis très déçue de ne pas pouvoir réussir ce modèle.
02.12.2012 - 02:31
![]() Kesvashy wrote:
Kesvashy wrote:
28506 23944
02.10.2012 - 13:46
![]() Harriet Kline wrote:
Harriet Kline wrote:
I love this cable pattern! I lost my instructions and have looked for months to find it again. Thank you! Thank you, for keeping it on the web!
28.08.2012 - 23:19
![]() Marinella wrote:
Marinella wrote:
Sto eseguendo lo scaldacollo e nella spiegazione diagramma c'è un errore nella quarta fila bisogna modificare l'intreccio corretto è passare una maglia a rovescio sul ferro ausiliario sul dietr del lavoro lavorere 3 maglie dritto 1 maglia rovescio dal ferro ausiliario nella spiegazione diagramma sia l' intreccio a destra e a sinistra è sempre uguale quindi è sbagliato grazie e a presto e complimenti per i vs modelli
01.03.2012 - 11:38
![]() Alice wrote:
Alice wrote:
Je suis au dernier rang de la bordure du bonnet, avant de coudre bord à bord. "Tricoter 1 rang sur toutes les mailles sur l'envers et rabattre": Il faut tricoter en maille endroit ou en maille envers. C'est pas précisé. Merci pour votre réponse
28.02.2012 - 14:07DROPS Design answered:
Bonjour Alice, il faut tricoter 1 rang end sur l'envers sur toutes les mailles, l'indication manquante a été ajoutée, merci. Bon tricot !
28.02.2012 - 15:49
![]() DROPS Design NL wrote:
DROPS Design NL wrote:
Hoi Martha. Gaat het om het breien van de teltekening M.1? Voor dit patroon moet je de eerste nld op de verkeerde kant breien. Dus 1e rij is de 1e nld en de verkeerde kant, brei van links naar rechts. 2e nld is de 2e rij, brei van rechts naar links, enz. Was dat het probleem? Gr. Tine
07.12.2010 - 11:47
![]() Martha wrote:
Martha wrote:
Hallo Ik probeer dit patroon te volgen maar snap niet wat de teruggaande naald moet doen met vriendelijke groet Martha
06.12.2010 - 17:39
![]() Mullier wrote:
Mullier wrote:
Bonjour, après avoir réalisé 2 fois ce bonnet 114-5, je n'arrive pas à avoir le relief (bourrelet) à la reprise des mailles. Sur la photo nous voyons très bien cette petite bosse à la jonction de la bande torsadée avec le dessus du bonnet. Ne manquerait-il pas un détail dans vos explications. Bien cordialement et sincères remerciements. Michèle
21.08.2010 - 23:12
|
|||||||||||||||||||
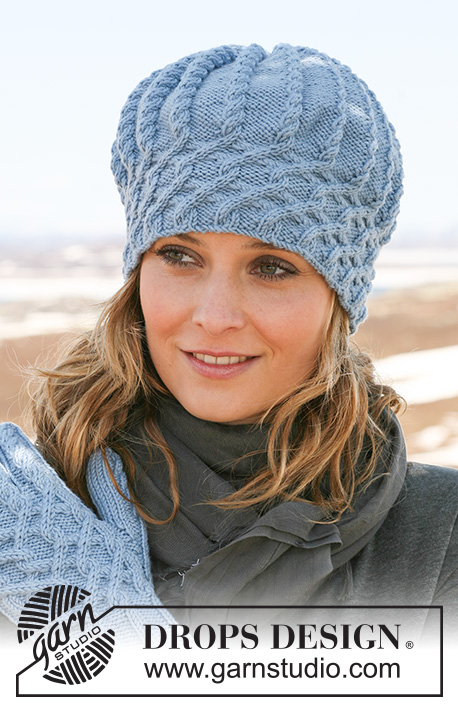
Alpine Twist Set#alpinetwistset |
|||||||||||||||||||
|
|
|||||||||||||||||||
DROPS hat with cables and neck warmer with cables and buttoned at front in ”Classic Alpaca” or "Puna".
DROPS 114-5 |
|||||||||||||||||||
|
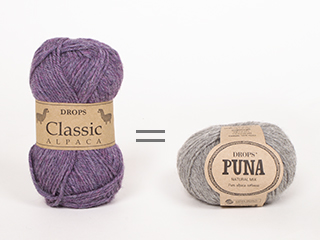
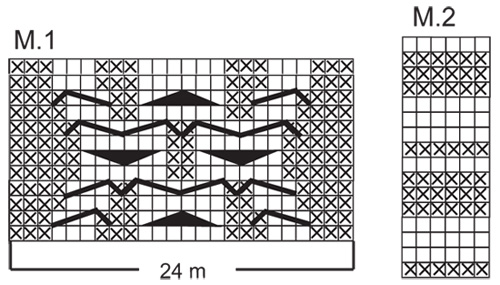
GARTER ST (back and forth on needle): K all rows. PATTERN: See diagram M.1 and M.2. Diagram shows the pattern from RS. -------------------------------------------------------- HAT: First work bottom edge back and forth on needle, then pick up sts in edge and continue in the round towards top of hat. EDGE: Worked back and forth on 2 double pointed needles from mid back to mid back. Cast on 23 sts on needle size 4 mm with Classic Alpaca or Puna. K 1 row from WS. NOTE: Work the bottom st (= last st on first row) in double thread throughout to make the edge firmer, i.e. have an extra ball of yarn and use this only for this st. Work next row as follows (from RS): 2 GARTER STS – see above - P3, inc 1 st in next st and K both sts, K1, P3, K1, inc 1 st in each of the next 2 sts and K all 4 sts, K1, P3, K1, inc 1 st in next st and K both sts, P3 and 1 garter st = 27 sts. Continue as follows: 1 garter st, M.1 (first row = WS) and 2 garter sts (= towards bottom edge). Continue in pattern like this until piece measures approx 48 cm, adjust to after the last but one row in M.1 (i.e. row from WS). Work next row as follows from RS: 2 garter sts, P3, K2 tog, K1, P3, K1, K2 tog, K2 tog, K1, P3, K1, K2 tog, P3 and 1 garter st = 23 sts. K 1 row on all sts from WS and then cast off. Sew tog, edge to edge, mid back. HAT: Pick up 104 sts with Classic Alpaca or Puna on circular needle size 4 mm along the side of edge with only 1 garter st – pick up inside this garter st (approx 21 sts on 10 cm). Work stocking st in the round. When piece measures 4 cm from where sts were picked up insert 8 markers in piece with 13 sts between each. On next round dec 1 st before each marker by K2 tog. Repeat the dec on every other round a total of 11 times = 16 sts. Cut the thread, pull through remaining sts, tighten and fasten. Hat measures approx 22 cm in total. -------------------------------------------------------- NECK WARMER: Worked from side to side back and forth on needle. Cast on 45 sts on needle size 4 mm with Classic Alpaca or Puna. Work GARTER ST (first row = RS) on all sts – see above – AT THE SAME TIME on row 5 make 1 buttonhole as follows: Work 37 sts, cast off 3 sts, work 5 sts. On next row cast on 3 new sts over cast off sts. After 10 rows garter st work next row as follows (from RS): 17 garter sts, P3, inc 1 st in next st and K both sts, K1, P3, K1, inc 1 st in each of the next 2 sts and K all 4 sts, K1, P3, K1, inc 1 st in next st and K both sts, P3 and 8 garter sts = 49 sts. Work next row as follows (= WS): 8 garter sts, M.1 (= 24 sts) and M.2 on 17 sts. Continue like this, AT THE SAME TIME (from next row) work shortened rows as follows: * 2 rows on all sts, 2 rows back and forth on the bottom 17 sts (= M.2) only *, repeat from *-* until piece measures approx 52 cm on the shorter side - adjust to after the last but one row in M.1 (i.e row from WS). Work next row as follows (from RS): 17 garter st, P3, K2 tog, K1, P3, K1, K2 tog, K2 tog, K1, P3, K1, K2 tog, P3 and 8 garter sts = 45 sts. Work 10 rows garter st on all sts, cast off. Sew on button mid in M.1 approx 6 cm from the edge. |
|||||||||||||||||||
Diagram explanations |
|||||||||||||||||||
|
|||||||||||||||||||
 |
|||||||||||||||||||
Have you finished this pattern?Tag your pictures with #dropspattern #alpinetwistset or submit them to the #dropsfan gallery. Do you need help with this pattern?You'll find 19 tutorial videos, a Comments/Questions area and more by visiting the pattern on garnstudio.com. © 1982-2026 DROPS Design A/S. We reserve all rights. This document, including all its sub-sections, has copyrights. Read more about what you can do with our patterns at the bottom of each pattern on our site. |
|||||||||||||||||||


With over 40 years in knitting and crochet design, DROPS Design offers one of the most extensive collections of free patterns on the internet - translated to 17 languages. As of today we count 324 catalogues and 12290 patterns translated into English (UK/cm). 12290
We work hard to bring you the best knitting and crochet have to offer, inspiration and advice as well as great quality yarns at incredible prices! Would you like to use our patterns for other than personal use? You can read what you are allowed to do in the Copyright text at the bottom of all our patterns. Happy crafting!
Post a comment to pattern DROPS 114-5
We would love to hear what you have to say about this pattern!
If you want to leave a question, please make sure you select the correct category in the form below, to speed up the answering process. Required fields are marked *.