
Popular categories
Looking for a yarn?


Comments / Questions (142)
![]() Esther Oz wrote:
Esther Oz wrote:
I’m still doing something wrong whenI start M2. 1 vertical repeat of M2 beg by arrow for my size mean if starting at xs, my first stitch is purl on fifth stitch of first row in M2 , and then each row I start from 5th stitch, correct? I also still don’t understand next section where it states 19 stockinette. Do I start from row 7 (5th stitch for xs) and go for 25 sts then finish in stockinette for round, then go back to where I left off starting from row 7?
03.10.2020 - 04:52DROPS Design answered:
Dear Mrs Oz, I'm sorry I'm not sure anymore which part of the pattern you have worked and where you are stuck. Did you already work the 22 rows of M.2 in height over all stitches? If this is done, you now continue working M.2 over the middle 25 sts on front piece only (when working these M.2 start now diag. on row 7 and repeat row 7 to 22 over previous M.2); Work remaining stitches in stockinette. Hope this helps. Happy kniting!
05.10.2020 - 08:57
![]() Esther Oz wrote:
Esther Oz wrote:
So does that mean I start every round with 19 stockinette to get me to the mid front?
02.10.2020 - 14:08DROPS Design answered:
Dear Mr Oz, correct, you have worked the lace pattern around the dress and now you work the lace pattern on mid front = you start now from the side with 19 sts stocking st until you will divide piece. Happy knitting!
02.10.2020 - 15:09
![]() Esther Oz wrote:
Esther Oz wrote:
So I got through vertical repeat of M2, and did 19 stockinette sts, and started from row 7 in M2. On row eight, I get to second round at 14 of 16 stockinette sts, do I just do last 2 stockinette at beginning of 2nd round? And am I repeating round starting with stockinette and M2 (from row 7) 4x7 times, increasing on each side on round 4?
01.10.2020 - 17:53DROPS Design answered:
Dear Mrs Oz, M.2 is now worked only over the middle 25 sts on mid front, starting on row 7 in M.2 repeat rows 7 to the end of diagram then repeat from row 7 again as long as you have to work M.2. At the same time, work all other sts in stocking stitch (back piece and sides) and increase on the sides starting on 4th round (= row 10 in M.2 when you start again from row 7 the first time).Happy knitting!
02.10.2020 - 08:16
![]() Esther Oz wrote:
Esther Oz wrote:
Sorry still confused. Do I read, after first row starting in my size, left to right and then right to left or for each row do I read right to left. Also, M2 is 16 sts across (= 1 row) Do I use a marker to know when I completed all 128 sts for a round?
01.10.2020 - 04:59DROPS Design answered:
Hi Esther, As you are working in the round, each row in the diagram is read from right to left (starting at the bottom). Happy knitting!
01.10.2020 - 07:21
![]() Esther Oz wrote:
Esther Oz wrote:
So I think I understand a little bit better. I’m suppose to start M2 from xs and continue the pattern going up for the 22 rows of the pattern. After I do the first row do I only go to xs each row or do I do the entire row after the first row of the pattern.
30.09.2020 - 23:22DROPS Design answered:
Dear Mrs Oz, yes right, when working M.2 the first time in height, the rounds will all start with the same stitch = the one with the arrow for your size. Happy knitting!
01.10.2020 - 10:17
![]() Esther Oz wrote:
Esther Oz wrote:
Sport I do not understand last response. I followed M2 pattern for xs for one round. Is that right. Then next explanation I didn’t understand. Do I do 19 stockinette sts and then rest of round start from row 7 of the pattern and then do row 7-22. ?
30.09.2020 - 18:38DROPS Design answered:
Dear Mrs Oz, you have to work diagram M.2 one time in height (= 22 rows), then work next round as explained: 19 sts stocking st, work row 7 in M.2 over the next 25 sts and work stocking st to the end of the round. Continue like this starting to increase on the sides of the dress on 4th round. Happy knitting!
01.10.2020 - 10:06
![]() Esther Oz wrote:
Esther Oz wrote:
I finished first round of M2 then says work next round as follows: 19 stockinette sts, M2 (continue from row 7 in chart and repeat from row 7-22) on sts mid front and stockinette st on remaining sts on round. Can you please explain. Thanks
30.09.2020 - 14:52DROPS Design answered:
Dear Mrs Oz, work first one whole repeat in A.2 in height (= the 22 rows) then work the lace pattern as explained: 19 sts in stocking st, then repeat M.2 from row 7 to 22 over the next 25 sts, and work stocking sts over remaining sts on round - on 4th of these rounds you will start increasing on the sides. Happy knitting!
30.09.2020 - 16:01
![]() Esther Oz wrote:
Esther Oz wrote:
Finished M1 decreases and got to 47 cm. Next need to start in M2 (for xs) how do I go from k2 tog, 1 yo to 1 yo, slip st as if to k, k1, psso? I see first stitch is knit, but if I follow I’m going to end in ago in next Set and start you in 2 nd st. Also what does it mean after 1 vertical repeat?
30.09.2020 - 07:05DROPS Design answered:
Dear Mrs Oz, start working diagram from the stitch with an arrow in your size and finish the diagram reading towards the left, then repeat all sts in diagram, ie work now whole diagram from first stitch to the last. Happy knitting!
30.09.2020 - 08:27
![]() Esther Oz wrote:
Esther Oz wrote:
When inserting markers in beginning of pattern and it says to “work” a certain number of stitches does this mean to knot between markers or does it mean to continue in M.1 while adding the stitches?
26.09.2020 - 06:41DROPS Design answered:
Dear Mrs Oz, just continue to work as before when inserting the markers. Happy knitting!
28.09.2020 - 09:18
![]() Esther Oz wrote:
Esther Oz wrote:
After I complete first part to 7” and it says to insert markers after working a number of stitches, i don’t understand when it says insert marker-3 “in last of these sts “ and says same thing with Marker -6. Is this different then just placing the markers after you work the number of stitches as indicated with the other markers?
25.09.2020 - 17:09DROPS Design answered:
Dear Mrs Oz, you insert a total of 6 markers, 4 of them are between stitches (= the 1st, 2nd, 4th and 5th marker = for the darts ) and 2 markers are inserted in a stitch (= the 3rd and 6th marker ) on the sides); Happy knitting!
28.09.2020 - 07:50
|
||||||||||||||||
Endless Summer#endlesssummerdress |
||||||||||||||||
|
|
||||||||||||||||
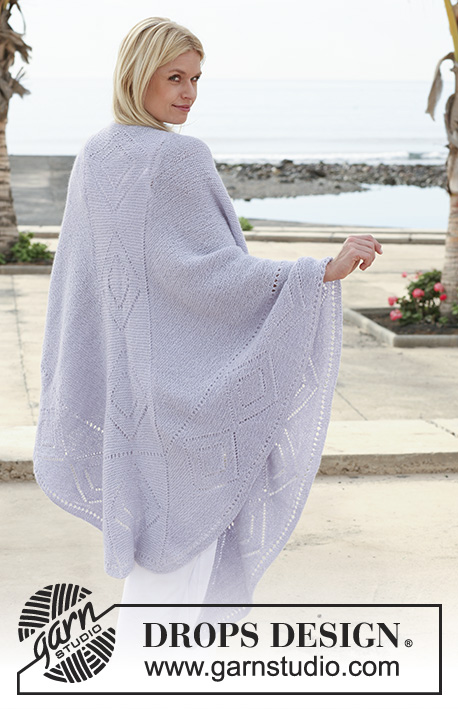
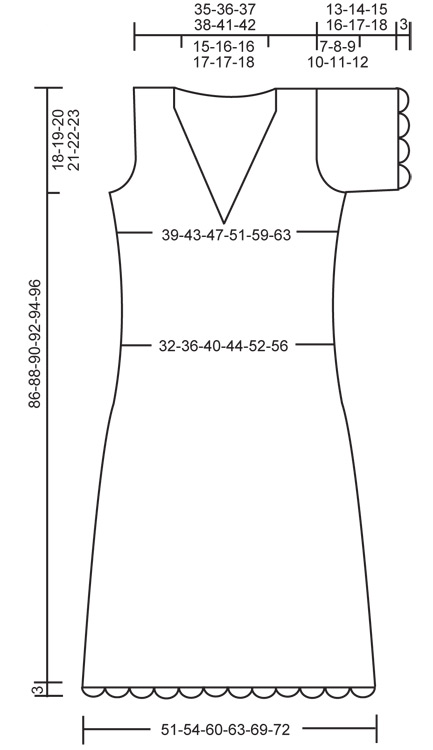
DROPS dress in ”Muskat” with lace pattern, short sleeves and crochet borders. Size XS - XXL.
DROPS 111-4 |
||||||||||||||||
|
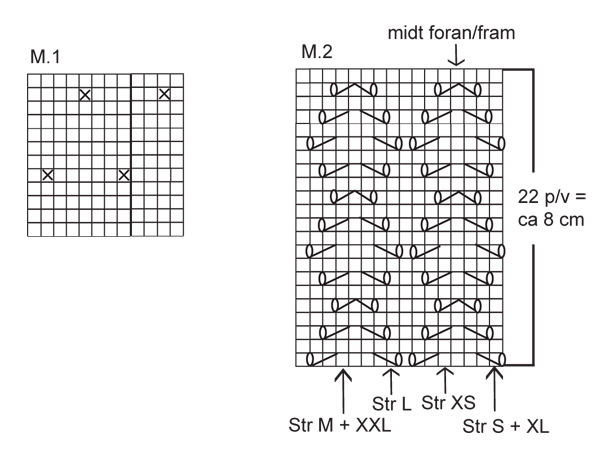
GARTER ST (in the round): K 1 round, P 1 round. GARTER ST (back and forth on needle): K all rows. PATTERN: See diagram M.1 and M.2 – the diagrams show the pattern from the RS. DECREASING TIP-1: Dec as follows before marker: K2 tog. Dec as follows after marker: slip 1 st as if to K, K1, psso. NOTE! Make sure not to shift P sts in M.1 when decreasing. DECREASING TIP-2: Make all dec from RS inside 9 pattern sts and 3 garter sts = 12 sts. Dec as follows before 12 sts: K2 tog. Dec as follows after 12 sts: slip 1 st as if to K, K1, psso. INCREASING TIP: Inc 1 st on each side of st with marker by making 1 YO. Work YO into back of loop on return row to avoid a hole. ---------------------------------------------------------- DRESS: Worked in the round on circular needle. Cast on 204-216-240-252-276-288 sts on circular needle size 4.5 mm with Muskat. P 1 round, K 1 round, P 1 round and continue in M.1. REMEMBER THE KNITTING TENSION! When piece measures 18-18-18-20-22-26 cm insert 6 markers in piece as follows: Work 32-34-38-40-44-46 sts, insert Marker-1, work 37-39-43-45-49-51 sts, insert Marker-2, work 33-35-39-41-45-47 sts, insert Marker-3 in the last of these sts (= the side), work 32-34-38-40-44-46 sts, insert Marker-4, work 37-39-43-45-49-51 sts, insert Marker-5, work 33-35-39-41-45-47 sts, insert Marker-6 in the last of these sts (= the other side). On next round dec 1 st on each side of Marker-3 and -6 (i.e. at the sides) – SEE DECREASING TIP-1 – and repeat the dec on every 6th round a total of 13-12-14-13-11-10 times. AT THE SAME TIME when doing the 8-7-9-8-6-5 dec, also dec 1 st by the other markers as follows: AFTER Marker-1 and Marker-4 and BEFORE Marker-2 and Marker-5 – SEE DECREASING TIP-1. Repeat these dec on every 6th round (i.e. on the same rounds as dec at the sides) a total of 6 times. When all dec are complete there are 128-144-160-176-208-224 sts on round. Continue in M.1 until piece measures approx 47-48-49-50-51-52 cm – adjust to after at least 2 rounds stocking st. Now remove Marker-1, -2, -4 and -5. Continue in M.2 – beg by arrow for your size at bottom of diagram so that st mid front = arrow at top of diagram. After 1 vertical repeat of M.2 work next round as follows: 19-23-27-31-39-43 stocking sts, M.2 (continue from row 7 in chart and repeat from row 7-22) on 25 sts mid front and stocking st on remaining sts on round. AT THE SAME TIME on round 4 inc 1 st on each side of the markers at sides – SEE INCREASING TIP – and repeat the inc on every 4 round a total of 7 times = 156-172-188-204-236-252 sts. When piece measures approx 67-68-69-70-71-72 cm (adjust so that next round is a round with YO) work 4 rounds garter st – see above – on 7 sts mid front, with remaining sts as before. On next round cast off the middle st at front for split and on the same round cast off 7 sts each side for armhole (= st with marker + 3 sts on each side of this). Now complete each piece separately. LEFT FRONT PIECE: = 35-39-43-47-55-59 sts. Continue with 3 garter sts towards neckline, 9 sts of M.2 and stocking st on remaining sts. AT THE SAME TIME dec for neckline and armhole as follows: NECKLINE: Dec 1 st on neckline inside 12 sts – SEE DECREASING TIP-2 - and repeat the dec on every other row a total of 9-10-10-10-10-11 times and then on every 4th row 5-5-5-6-6-6 times. ARMHOLE: Cast off for armhole at the beg of every row from the side: 3 sts 0-0-1-1-2-2 times, 2 sts 0-1-1-2-3-4 times and 1 st 1-2-2-3-3-4 times. When all dec are complete there are 20-20-21-21-24-24 sts left on shoulder. Cast off when piece measures 86-88-90-92-94-96 cm. RIGHT FRONT PIECE: Like left front piece, but mirrored. BACK PIECE: = 71-79-87-95-111-119 sts. Continue in stocking at and cast off for armhole each side as described for front piece = 69-71-73-75-81-83 sts. When piece measures 83-85-87-89-91-93 cm work 4 rows garter st on the middle 35-37-37-39-39-41 sts, with remaining sts in stocking st. Now cast off the middle 29-31-31-33-33-35 sts for neck and complete each shoulder separately. Continue in stocking st with 3 garter sts towards neckline and cast off when piece measures 86-88-90-92-94-96 cm. SLEEVE: Worked back and forth on needle. Cast on 62-62-68-68-74-80 sts (includes 1 edge st each side) on needle size 4.5 mm with Muskat. Work 4 rows garter st and continue in M.1 with 1 edge st each side. When piece measures 2 cm inc 1 st each side, and repeat the inc on every other row a total of 2-4-3-5-5-4 times, work inc sts in stocking st = 66-70-74-78-84-88 sts. When piece measures 6 cm cast off for sleeve cap each side at the beg of every row: 4 sts 1 time, 2 sts 3 times and 1 st 1-2-4-5-6-8 times, then 2 sts each side until piece measures 12-13-14-15-16-17 cm, now cast off 4 sts each side 1 time and cast off remaining sts, piece measures approx 13-14-15-16-17-18 cm. ASSEMBLY: Sew shoulder seams. Sew sleeve seams inside 1 edge st and set in sleeves. CROCHET BORDERS: Crochet a border with crochet hook size 4 mm and Muskat round sleeve edges and along bottom edge of dress as follows: ROUND 1: 1 dc in first st, * 4 ch, skip 2 sts, 1 dc in next st *, repeat from *-*, and finish with 1 sl st in first dc from beg of round. ROUND 2: Work sl sts to the middle of the first ch-loop, 1 dc round ch-loop, * 2 ch, 1 dc round next ch-loop, 5 ch, 1 dc round next ch-loop *, repeat from *-* but fasten the last loop with 1 sl st in first dc from beg of round. ROUND 3: Crochet 1 dc in each of the small ch-loops and crochet 1 dc, 5 tr and 1 dc in each of the large ch-loops, finish round with 1 sl st in first dc. Crochet a border round neckline with crochet hook size 4 mm and Muskat as follows – beg mid back: 1 dc in first st, * 1 picot (= 4 ch, 1 st in first ch), skip approx 1.5 cm, 1 dc in next st *, repeat from *-* and finish round with 1 sl st in first dc from beg of round. |
||||||||||||||||
Diagram explanations |
||||||||||||||||
|
||||||||||||||||
 |
||||||||||||||||
 |
||||||||||||||||
Have you finished this pattern?Tag your pictures with #dropspattern #endlesssummerdress or submit them to the #dropsfan gallery. Do you need help with this pattern?You'll find 27 tutorial videos, a Comments/Questions area and more by visiting the pattern on garnstudio.com. © 1982-2026 DROPS Design A/S. We reserve all rights. This document, including all its sub-sections, has copyrights. Read more about what you can do with our patterns at the bottom of each pattern on our site. |
||||||||||||||||


With over 40 years in knitting and crochet design, DROPS Design offers one of the most extensive collections of free patterns on the internet - translated to 17 languages. As of today we count 324 catalogues and 12290 patterns translated into English (UK/cm). 12290
We work hard to bring you the best knitting and crochet have to offer, inspiration and advice as well as great quality yarns at incredible prices! Would you like to use our patterns for other than personal use? You can read what you are allowed to do in the Copyright text at the bottom of all our patterns. Happy crafting!
Post a comment to pattern DROPS 111-4
We would love to hear what you have to say about this pattern!
If you want to leave a question, please make sure you select the correct category in the form below, to speed up the answering process. Required fields are marked *.