
Popular categories
Looking for a yarn?


Comments / Questions (127)
![]() Nathalie wrote:
Nathalie wrote:
Bonjour, je ne comprends pas les explications pour les diminutions des devants : il est noté de diminuer 12 m côté emmanchure, puis 1 m tous les 2 rangs 13 fois, et en même temps 2 m ts les 2 rangs côté col jusqu'à ce que toutes les mailles soient rabattues, ce qui fait d'une part une forme de pointe et non pas une épaule, et de plus je n'ai pas assez de mailles pour diminuer 13 fois côté emmanchure ! Qu'ai-je mal compris svp ? Merci.
17.11.2025 - 19:49
![]() Nathalie wrote:
Nathalie wrote:
Bonjour, je ne comprends pas les explications pour les diminutions des devants : il est noté de diminuer 12 m côté emmanchure, puis 1 m tous les 2 rangs 13 fois, et en même temps 2 m ts les 2 rangs côté col jusqu'à ce que toutes les mailles soient rabattues, ce qui fait d'une part une forme de pointe et non pas une épaule, et de plus je n'ai pas assez de mailles pour diminuer 13 fois côté emmanchure ! Qu'ai-je mal compris svp ? Merci.
17.11.2025 - 19:47DROPS Design answered:
Bonjour Nathalie, vous obtiendrez bien la forme du schéma et de la photo, rappelez-vous que vous devrez en même temps mettre les mailles du col en attente et rabattre les mailles en début de rang à partir de l'encolure. Bon tricot!
18.11.2025 - 08:41
![]() Corbel Jocelyne wrote:
Corbel Jocelyne wrote:
Je suis perdu sur les devants. Quand on as 19 cm après kes augmentations est ce le cote emmanchures et doit on encore Continuer droit jusqu'à diminution emmanchures ?
24.02.2025 - 17:38DROPS Design answered:
Bonjour Mme Corbel, lorsque vous tricotez le devant droit, le côté droit, vu sur l'endroit est le côté qui sera cousu au dos sur le côté gauche, vos augmentations sont terminées et vous tricotez maintenant sans diminuer ni augmenter jusqu'à 46 cm (biais du devant), vous augmentez alors pour le col= côté -2 = début de rang sur l'endroit. Puis, à 55 cm, vous rabattez pour l'emmanchure côté 1 = en début de rang sur l'envers. Bon tricot!
25.02.2025 - 09:39
![]() Ingmarie wrote:
Ingmarie wrote:
Har stickat alla delar, förstår inte monteringen, , och maskorna som sitter på en tråd för kragen ,ska dom stickas eller maskas av?
01.11.2021 - 09:44DROPS Design answered:
Hei Ingmarie. Under montering står det hvordan plagget skal monteres. Få en oversikt over hvor er: Side -1, Side-2, Rillene, Merketrådene i sidene og se på målskissen, da er det lettere å forstå hvordan plagget skal sys sammen. Men først skal maskene på tråden settes tilbake på pinnen og det strikkes 5-6 cm før det felles av. Se siste avsnitt under Høyre forstk. mvh DROPS Design
01.11.2021 - 13:30
![]() Margherita wrote:
Margherita wrote:
Grazie per la risposta ho comunque difficoltà a capire, cosa significa fino alla fine del lavoro? Dalla foto sembra che le diminuzioni terminino in corrispondenza del motivo a treccia e sul lato collo sembra che il motivo non subisca diminuzioni di sorta. La mia è una taglia M
15.03.2021 - 09:42DROPS Design answered:
Buonasera Margherita, le diminuzioni vanno lavorate fino alla fine. Buon lavoro!
15.03.2021 - 23:14
![]() Margherita wrote:
Margherita wrote:
Ho grossissime difficoltà con i calati per gli scalfi davanti, prima dice di intrecciare e poi di calare 1 maglia per giro ogni 2 ferri???? E le diminuzioni del collo? dall'immagine sembra che il motivo sul lato 2 continui senza diminuzioni fino alla spalla
14.03.2021 - 13:49DROPS Design answered:
Buonasera Margherita, le spiegazioni sono corrette, deve intrecciare il numero di maglie indicato e poi proseguire con le diminuzioni fino alla fine del lavoro. Buon lavoro!
14.03.2021 - 19:45
![]() Mariangela wrote:
Mariangela wrote:
Buongiorno Arrivati allo scalfo manica bisogna calare tutti i punti in un unico ferro e in un unica soluzione? Grazie
28.12.2020 - 09:45DROPS Design answered:
Buongiorno Mariangela, no, deve diminuire ogni 2 ferri come indicato per le diverse taglie. Buon lavoro!
28.12.2020 - 10:10
![]() Kathryn Foster wrote:
Kathryn Foster wrote:
This is such a wonderful sweater! Do you have an image for the back of the sweater - photo and drawing? Do you also have an image/photo of the side of the sweater? We are trying to figure out how the wrap integrates into the body and the sleeve. Thank you for your help!
23.08.2019 - 21:02DROPS Design answered:
Dear Mrs Foster, there are no other picture from this pattern sorry. Back piece is simply worked in stocking stitch with ribbing in the middle (after a ribbed edging at the bottom). Front pieces are worked bottom up inceasing/decreasing to get the correct shape. Happy knitting!
26.08.2019 - 08:33
![]() Chastrusse wrote:
Chastrusse wrote:
Arrivée à l emmanchure vous dites Dim 12 mailles et en même temps 1m mousse et 13 fois 1 Dim après ce point mousse et de l autre côté rab les mailles 2 par 2 je n y arrive pas pouvez vous m expliquer
22.08.2019 - 16:43DROPS Design answered:
Bonjour Mme Chastrusse, on rabat 12 m pour l'emmanchure, puis on continue avec 1 m point mousse côté emmanchure en diminuant côté emmanchure 1 maille tous les 2 rangs à 1 m point mousse du bord. Bon tricot!
23.08.2019 - 09:02
![]() Nathalie Pourias wrote:
Nathalie Pourias wrote:
Modèle un peu complexe au départ, mais finalement au fur et à mesure ça prend forme.
01.07.2019 - 14:27
|
||||||||||||||||
Sweet Snuggle |
||||||||||||||||
|
|
||||||||||||||||
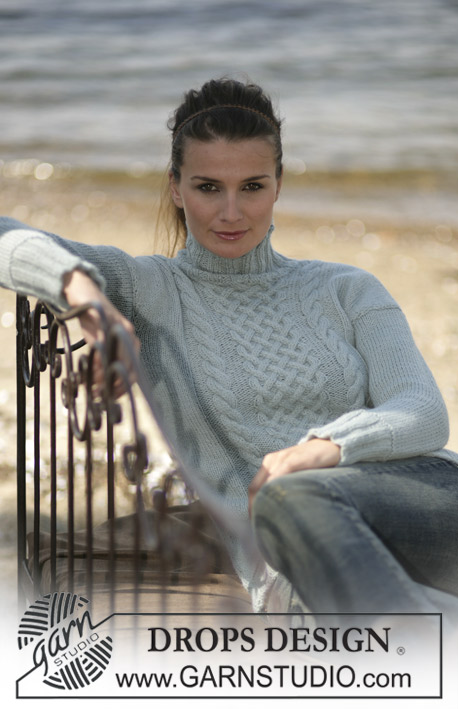
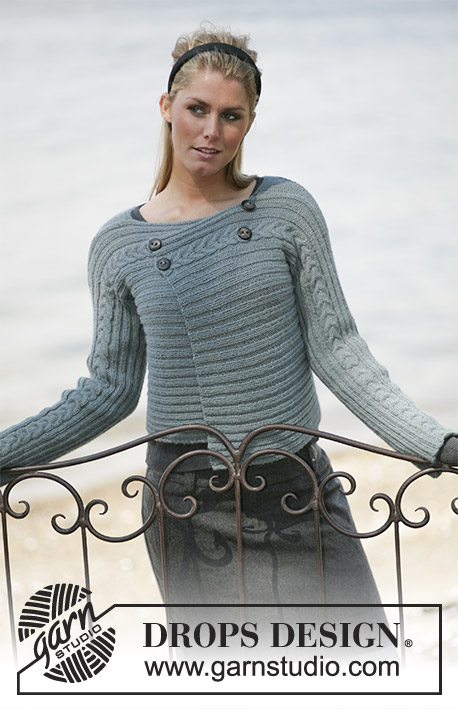
DROPS Jumper with cable pattern and wrap-round at front in Alpaca and Vivaldi
DROPS 96-1 |
||||||||||||||||
|
Knitting Tension: 16 stitches x 20 rows on needle size 5 mm and 1 thread of each quality in stocking stitch = 10 x 10 cm Measurement tips: Place piece flat on table when measuring. Rib: *K3, P5*, repeat from *-*. Pattern: See diagrams M.1 and M.2. Increasing tips (applies to collar): All increases are done from the RS. Inc within 1 garter st by making a yo, on the return row knit into back of yo to avoid creating a hole. Decreasing tips (applies to armhole): Dec as follows before 1 st: K2 tog Dec as follows after 1 st: slip 1 st as if to knit, K1, psso. Back: Cast on 61-69-77-85-93 sts (incl 1 edge st each side, knitted in garter sts throughout) on needle size 4.5 mm with 1 thread of each yarn quality (double thread). Knit 6 cm Rib with 1 edge st and 3 garter sts each side. Change to needle size 5 mm and continue as follows: 1 edge st, 19-19-19-27-27 sts in stocking sts, 21-29-37-29-37 sts in Rib, 19-19-19-27-27 sts in stocking sts, 1 edge st. When back measures 10 cm, inc 1 st on both sides of the rib sts on every 4 cm a total of 5 times – knit the inc sts in stocking sts = 71-79-87-95-103 sts. When piece measures 29-30-31-32-33 cm dec for armhole each side on every other row as follows: 3 sts 1-1-1-2-2 times, 2 sts 1-2-3-3-4 times and 1 st 2-3-4-4-5 times = 57-59-61-63-65 sts. When piece measures 46-48-50-52-54 cm cast off the middle 13-13-15-15-17 sts for neck and dec 1 st on neckline on next row = 21-22-22-23-23 sts left on each shoulder. Cast off when back measures 48-50-52-54-56 cm. Right Front: Knitted diagonally! Read all of the following section + measuring tips before continuing. Cast on 20-26-26-32-32 sts on needle size 5 mm with 1 thread of each yarn quality (= double thread). Knit 2 rows garter sts (1st row = WS). Continue as follows: 4 sts in garter sts, M.1 (see arrow for appropriate size). NB! As 1st row is knitted from the WS, begin at arrow and knit pattern in diagram from left to right. Left side of diagram (= towards lower edge) = Side 1. Inc the other side (= towards side seam) = Side 2 – incorporate new sts in M.1 as you go along. Inc on every other row (at beginning of row): 1 st 4-4-6-5-7 times, 2 sts 7-8-7-10-9 times, 3 sts 3-3-3-2-2 times and 4 sts 1 time = 51-59-59-67-67 sts. Piece now measures approx 15-16-17-18-19 cm. Continue in pattern until finished measurements. At the same time when piece measures 38-40-42-44-46 cm inc 1 st on Side 2 for collar – see Increasing tips – on every other row a total of 12-13-14-15-16 times and knit new sts in garter sts = 16-17-18-19-20 sts in garter sts towards mid front. At the same time when piece measures 41-45-48-51-55 cm dec on Side 1 on every other row: 1 st 7-8-8-9-9 times. Piece now measures approx 48-53-56-60-64 cm. Insert a marking thread in Side 1 (marking the side seam). On next row cast off 6-12-12-18-18 sts on Side 1 for armhole. Knit 1 st towards armhole in garter sts and dec 1 st within this on every other row – see decreasing tips – until finished measurements. At the same time when piece measures approx 50-53-57-61-64 cm put the 16-17-18-19-20 sts in garter sts towards mid front on a thread for collar and cast off from collar towards shoulder as follows: 2 sts on every other row until all sts have been cast off. Piece measures approx 60-64-68-72-76 cm from cast-on row to top of shoulder. Put sts from thread back on needle and knit 5-5-6-6-6 cm garter sts. Cast off. Left Front: Cast on and knit as right front, but mirrored – knit M.2 instead of M.1, see start arrow for appropriate size. NB! As 1st row is knitted from the WS begin by arrow for appropriate size and knit pattern in diagram from left to right until there are 4 sts left on row, these are knitted in garter sts throughout. Sleeves: Cast on 42-42-42-50-50 sts (incl 1edge st each side) on needle size 4.5 mm with 1 thread of each yarn quality (= double thread). Knit 12 cm Rib with 1 edge st each side. Continue in stocking sts and when piece measures 13 cm inc 1 st each side on every 5.5-4-3-3.5-2.5 cm a total of 7-9-11-9-11 times = 56-60-64-68-72 sts. When sleeve measures 49-47-46-44-43 cm dec for sleeve cap each side on every other row as follows: 3 sts 1 time, 2 sts 3 times, 1 st 1-2-3-5-6 times and then 2 sts each side until piece measures 56 cm. Now dec 3 sts each side and cast off remaining sts on next row. Sleeve measures approx 57 cm. To make up: Join shoulders. Place right front piece over the left front piece on back piece as follows: the 4 garter sts at the top of Side 1 on right front piece over the 4 garter sts at the start of sloping edge on Side 2 on left front piece and the 4 garter sts at the start of sloping edge on Side 2 on right front piece over the 4 garter sts on Side 1 on left front piece. Sew side seams up to marking threads on front pieces – sew through all 3 layers by the sts in garter sts. Sew collar mid back and attach to neckline with the seam on the WS. Sew sleeve seams and sew in sleeves. |
||||||||||||||||
Diagram explanations |
||||||||||||||||
|
||||||||||||||||
 |
||||||||||||||||
 |
||||||||||||||||
Have you finished this pattern?Tag your pictures with #dropspattern or submit them to the #dropsfan gallery. Do you need help with this pattern?You'll find 21 tutorial videos, a Comments/Questions area and more by visiting the pattern on garnstudio.com. © 1982-2026 DROPS Design A/S. We reserve all rights. This document, including all its sub-sections, has copyrights. Read more about what you can do with our patterns at the bottom of each pattern on our site. |
||||||||||||||||


With over 40 years in knitting and crochet design, DROPS Design offers one of the most extensive collections of free patterns on the internet - translated to 17 languages. As of today we count 324 catalogues and 12290 patterns translated into English (UK/cm). 12290
We work hard to bring you the best knitting and crochet have to offer, inspiration and advice as well as great quality yarns at incredible prices! Would you like to use our patterns for other than personal use? You can read what you are allowed to do in the Copyright text at the bottom of all our patterns. Happy crafting!
Post a comment to pattern DROPS 96-1
We would love to hear what you have to say about this pattern!
If you want to leave a question, please make sure you select the correct category in the form below, to speed up the answering process. Required fields are marked *.