
Popular categories
Looking for a yarn?


Comments / Questions (10)
![]() Anne wrote:
Anne wrote:
I am very confused with this pattern. Are the armholes meant to be a weird shape? I can’t work out the drop shoulder? The bands at the front seem to look more v shape than a round neck. My 7 stitches of the front bands don’t look right. I just can’t see how my neckband will look like the photos. I am up to my third buttonhole & not sure where l have gone wrong??
10.04.2026 - 13:55DROPS Design answered:
Hi Anne, Sorry this pattern is causing you problems. If you click on "Videos" at the top of the page, we have videos showing you how to work European shoulders and how to shape the armholes. Regards, Drops Team.
11.04.2026 - 07:54
![]() Mila wrote:
Mila wrote:
Hallo, lieber Drops- Team! Ich stricke die Jacke in Größe L und bin zum Ärmelauffassen gekommen. Bis jetzt ist alles glatt gegangen, allerdings die Ärmelmaschen sind wesentlich mehr als die gewünschten 80 geworden. Was mache ich falsch? Danke!
01.02.2026 - 11:03DROPS Design answered:
Liebe Mila, Sie sollten versuchen, die 80 Maschen zu erreichen. Wenn Sie sich den Ärmel in mehrere Abschnitte unterteilen (mit Markierungsfäden), fällt es Ihnen vielleicht leichter, die richtige Anzahl an Maschen aufzufassen. Gutes Gelingen!
18.02.2026 - 20:40
![]() Caroline wrote:
Caroline wrote:
Hi, for the bands with i-cord, I'm assuming the garter stitches are only worked at the beginning of RS rows and at the end of WS rows. Is this correct? (The explanation implies that garter stitches are worked at the start and end of each row.) Thank you so much!
29.12.2025 - 03:10
![]() Sofie wrote:
Sofie wrote:
Hej jeg er igang med bagstykket og har lige færdiggjort de sidste udtagninger til ærmegabet - der står i opskriften at jeg skal strikke videre til arbejdet måler 15 cm mål fra markøren yderst. Her bliver jeg i tvivl om jeg skal rykke min markør op til her hvor jeg har afsluttet udtagningerne til ærmegabet og så strikke 15 cm - eller om jeg skal måle fra der hvor jeg satte min markør tidligere på mit arbejde med bagstykket. Mvh Sofie Brag
06.10.2025 - 08:13DROPS Design answered:
Hei Sofie. Det skal måles fra merket du satte ytterst langs ermehullet. mvh DROPS Design
20.10.2025 - 11:35
![]() Francine wrote:
Francine wrote:
Comment la longueur des manches peut-elle être de plus en plus petite alors que les tailles du gilet augmentent?
08.09.2025 - 02:04DROPS Design answered:
Bonjour Francine, les manches sont plus courtes dans les grandes tailles car les épaules sont plus larges, si vous regardez l'envergure totale de l'ouvrage, d'un poignet à l'autre, il sera plus long en XXXL qu'en S. Bon tricot!
11.09.2025 - 12:22
![]() Nina wrote:
Nina wrote:
Hej. Jeg er igang med højre forstykke, hvor der står man skal lukke af til knaphul. Der står luk af til knaphul når tøjet er på, hvordan skal det forstås, man har det jo ikke på.
26.08.2025 - 18:44DROPS Design answered:
Hej Nina. "Luk af til knaphul på højre forkant (når tøjet er på)". Det er bare en forklaring på, hvilken side knaphullerne skal være på. Mvh DROPS Design
27.08.2025 - 08:43
![]() Åsa wrote:
Åsa wrote:
Är på höger framstycke. Börjat på ”ökning till hals” Står VARV2 (=avigsidan): Sticka 7 aviga maskor???? Upprepa varv 1 och 2 totalt 6 gånger osv. Jag måste väl sticka varvet ut på avigan? Inte 7 maskor?
21.08.2025 - 11:40DROPS Design answered:
Hei Åsa. Ja, det må det være. Oppskriften er oversendt Design avd for den dobbeltsjekk. mvh DROPS Design
15.09.2025 - 13:37
![]() Emmanuelle wrote:
Emmanuelle wrote:
Je viens de commencer le gilet taille L ; j’ai tricoté le DOS sur 11 cm puis les AUGMENTATIONS POUR LES EMMANCHURES , et j’ai mis le marqueur après la dernière augmentation du dos je ne comprends pas si après avoir fini le DOS j’aurais du tricoter 11 cm en jersey à partir du marqueur en plus du DOS, puis faire ensuite les AUGMENTATIONS POUR LES EMMANCHURES, ou si les 11 cm c’est depuis le début de l’ouvrage , et on fait ensuite les augmentations pour les emmanchures 😊
13.07.2025 - 10:26DROPS Design answered:
Bonjour Emmanuelle, vous faites les augmentations pour les epaules dos, ensuite vous mettez 1 marqueur sur un côté; on va désormais mesurer à partir d’ici. Maintenant vous tricotez 11 cm en jersey (tout droit) - mesurer à partir du marqueur. Ensuite vous faites les augmentations pour former les emmanchures. Bon tricot!
13.07.2025 - 19:12
![]() Anja Schmid wrote:
Anja Schmid wrote:
Hallo! Bei der Zunahme für den Armausschnitt (Größe M) müsste ich deutlich mehr als die verlangten 5 Zunahmereihen stricken um auf die Maschenzahl von 102 zu kommen. Ist das ein Druckfehler? Viele Grüße, Anja Schmid
08.06.2025 - 13:56DROPS Design answered:
Liebe Frau Schmid, in M wird man nur 5 Mal 2 Maschen in jeder 2. Reihe zunehmen, es waren 80 Maschen + 2 M x 5 Mal = 90 Maschen - in die 4. Größe sind es 88 M + 2 M x 7 Mal= 102 Maschen. Oder misverstehe ich Ihre Frage?
09.06.2025 - 10:04
![]() Jorunn Lien Johnsen wrote:
Jorunn Lien Johnsen wrote:
Strikker Foggy Autumn Cardigan nå. Har problem med å skjønne mønsteret til stolpen, øke med de 12 maskene nederst?? 1. og andre pinne som det står i mønsteret, de skal vel strikkes over alle maskene, også de 12 ekstra ? Skjønner heller ikkje strikking av knapphullene. Hjelp!!mvh Jorunn
25.03.2025 - 15:53DROPS Design answered:
Hej Jorunn, vi kan ikke se hvor langt du er kommet i opskriften. Hvor er du, hvor mange masker har du, hvilken størrelse og hvad er det du ikke forstår :)
27.03.2025 - 13:45
|
|
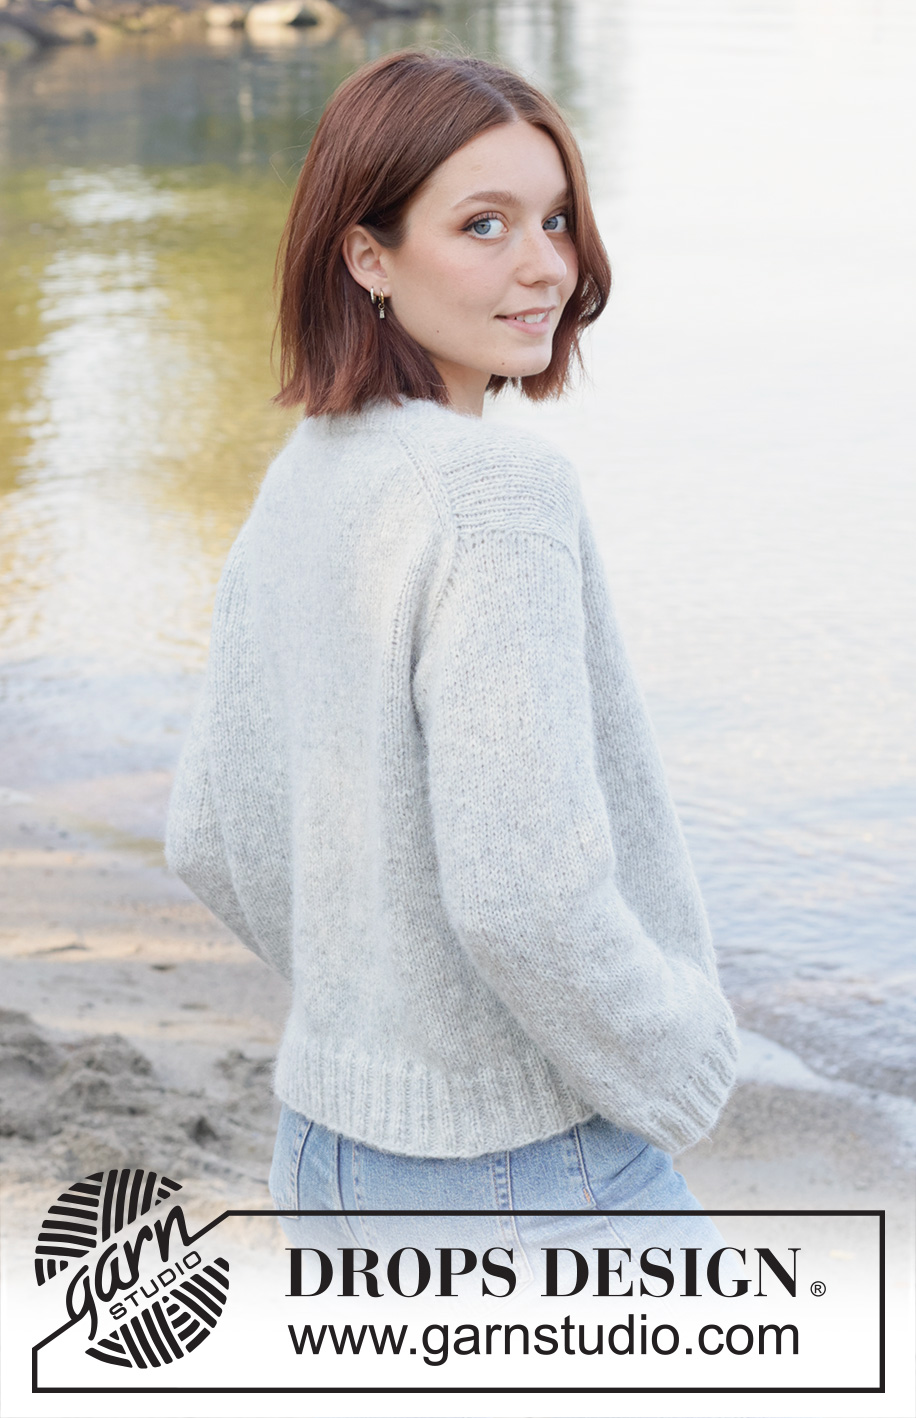
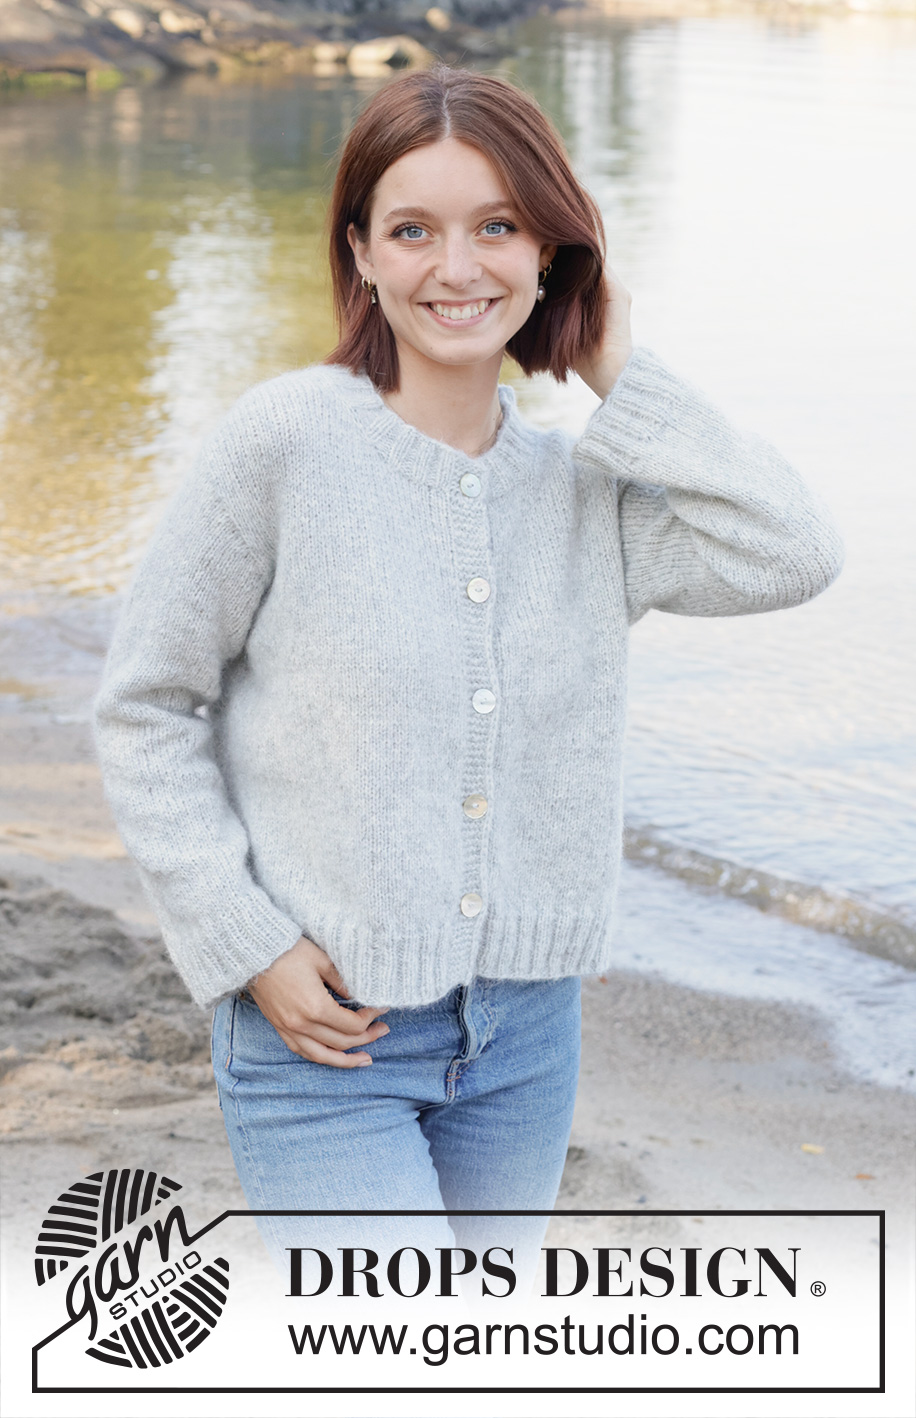
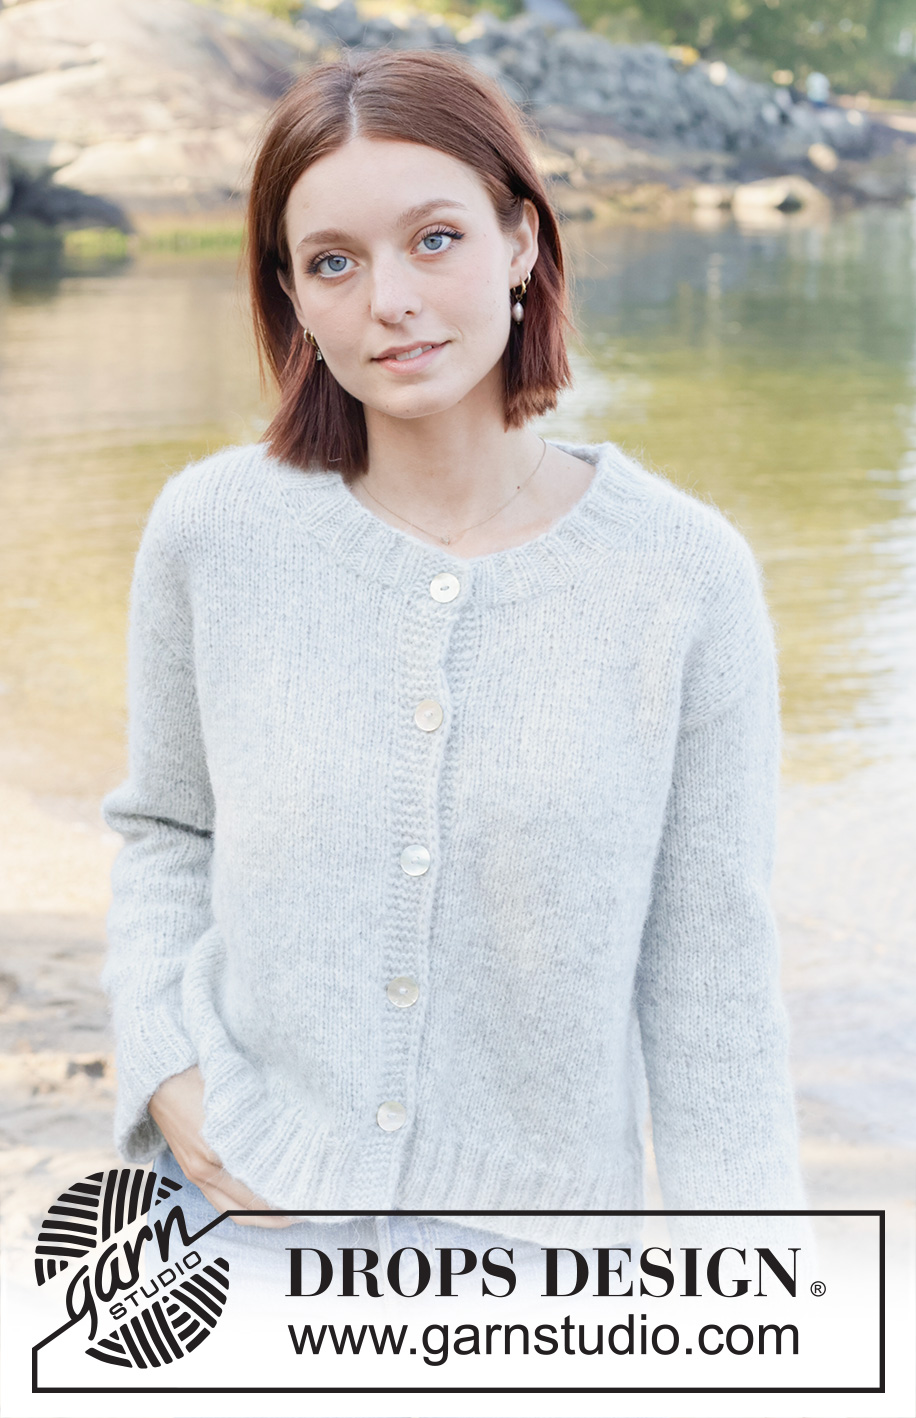
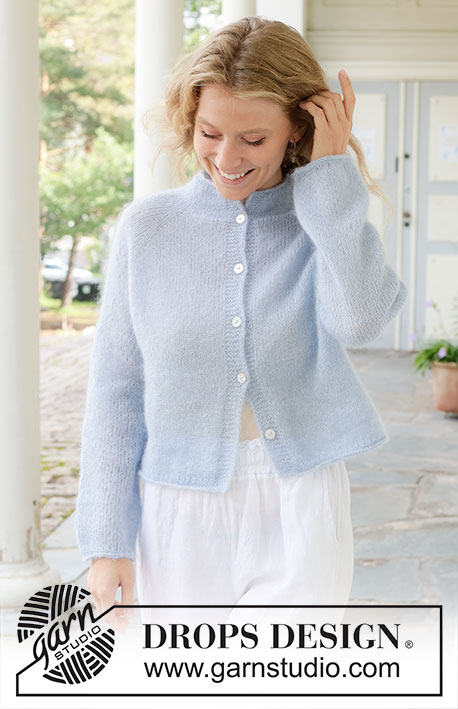
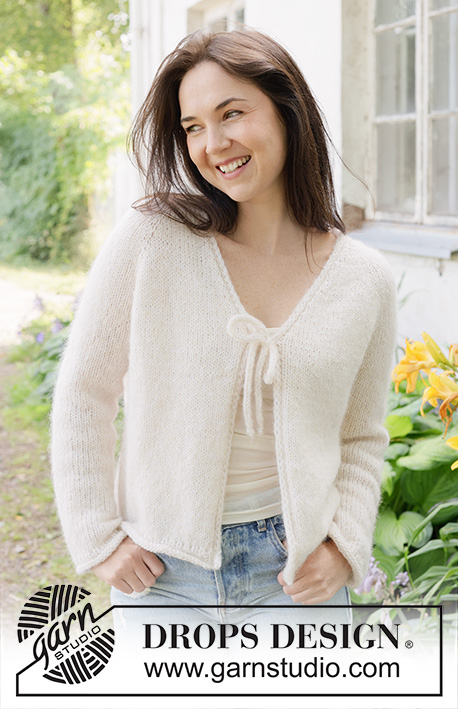
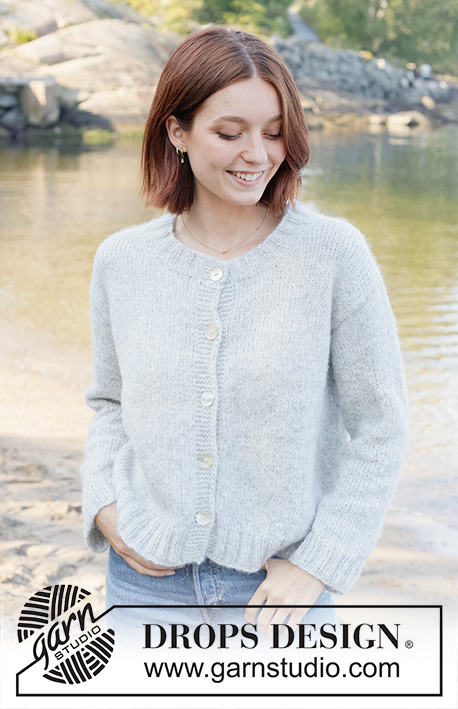
Sky Whisper Cardigan#skywhispercardigan |
|
 |
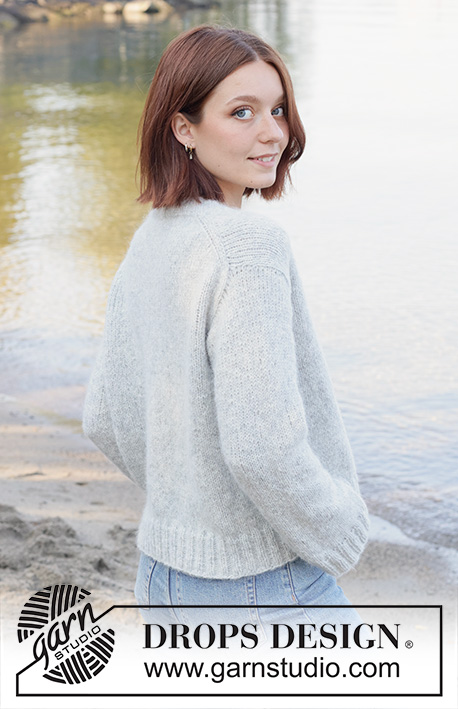 |
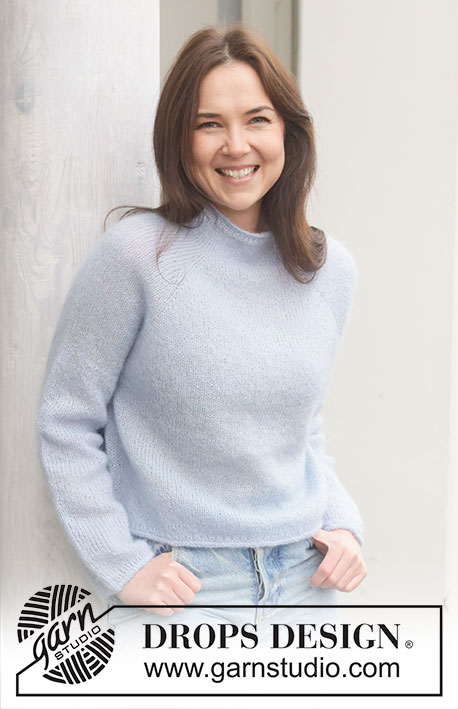
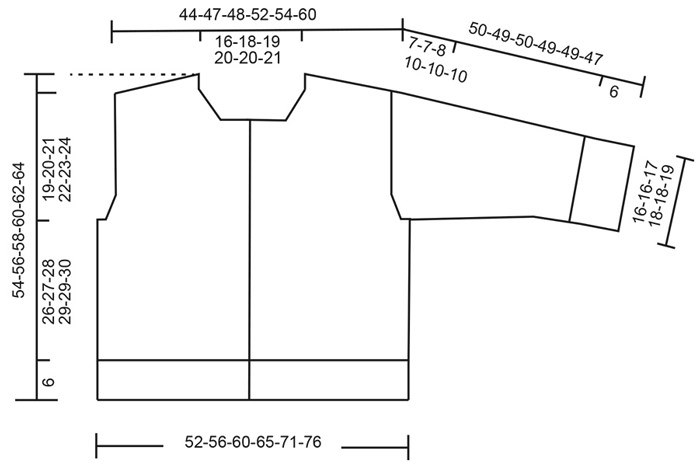
Knitted jacket in DROPS Air. The piece is worked top down in stocking stitch, with European/diagonal shoulders. Sizes S - XXXL.
DROPS 259-19 |
|
|
------------------------------------------------------- EXPLANATIONS FOR THE PATTERN: ------------------------------------------------------- GARTER STITCH (worked back and forth): Knit all rows, from both the right and wrong side. 1 ridge in height = knit 2 rows. INCREASE TIP-1: INCREASE 1 STITCH TOWARDS THE LEFT - from RIGHT SIDE: Use left needle to pick up yarn between 2 stitches from row below, pick up yarn from the front and knit in the stitch loop that is on the back of the needle. INCREASE 1 STITCH TOWARDS THE RIGHT - from RIGHT SIDE: Use left needle to pick up yarn between 2 stitches from row below, pick up yarn from the back and knit in the stitch loop that is on the front side of the needle. . INCREASE TIP-2: INCREASE 1 STITCH TOWARDS THE RIGHT - from WRONG SIDE: Use left needle to pick up yarn between 2 stitches from row below, pick up yarn from the back and purl in the stitch loop that is on the front side of the needle. INCREASE 1 STITCH TOWARDS THE LEFT - from WRONG SIDE: Use left needle to pick up yarn between 2 stitches from row below, pick up yarn from the front and purl in the stitch loop that is on the back side of the needle. BANDS WITH I-CORD BEGINNING OF ROW: Slip 1 stitch purl-wise with strand in front, knit 1, work 5 garter stitches. END OF ROW: Work until there are 7 stitches left on the row, work 5 garter stitches, slip 1 stitch purl-wise with strand in front, knit 1. Work in the same way from both the right and wrong side. BUTTONHOLES: Work the buttonholes on the right front piece from the right side (when the garment is worn) and when there are 5 stitches left on the row. ROW 1 (right side): Make 1 yarn over, knit 2 together, knit 1, slip 1 purl-wise with strand in front, knit 1. ROW 2 (wrong side): Work the band as before, knit the yarn over to leave a hole. The first buttonhole is worked when the front piece measures 9½-10-8-8½-9-9 cm from the cast-on stitches for the neck. Then work the other 3-3-4-4-4-4 buttonholes with 9-9½-8-8-8½ -9 cm between each one. The bottom buttonhole is worked in the transition between the stocking stitch and rib. The top buttonhole is worked on the neck. KNITTING TIP: When working short rows, there will be a small hole after each turn. This hole can be closed by tightening the strand or using the technique German Short Rows as follows: Slip the first stitch purl-wise, take the strand over the right needle and tighten well from the back (2 loops on the needle). These loops are worked together on the next row. DECREASE TIP (mid-under sleeve): Decrease 1 stitch on each side of the marker-thread as follows: Work until there are 3 stitches left before the marker-thread, knit 2 together, knit 2 (marker-thread sits between these 2 stitches), slip 1 stitch knit-wise, knit 1 and pass the slipped stitch over the knitted stitch (2 stitches decreased). ------------------------------------------------------- START THE PIECE HERE: ------------------------------------------------------- JACKET – SHORT OVERVIEW OF THE PIECE: The pattern uses both long and short needles; start with the length which fits the number of stitches and change when necessary. The piece is started back and forth, casting on stitches at the back of the neck and working the back piece top down, while increasing stitches on each side for the shoulders, which become slightly diagonal. The back piece is worked as far as the armholes. The front pieces are worked, knitting up stitches along each back shoulder, increasing for the neckline and working down to the armholes. The front and back pieces are joined on the same circular needle and the body finished back and forth. Stitches are knitted up around the armholes for the sleeves, which are started back and forth for the sleeve cap, then finished in the round. The neck is worked to finish. BACK PIECE: Cast on 30-32-34-36-36-38 stitches with circular needle size 5 mm and DROPS Air. ROW 1 (wrong side): Purl. ROW 2 (right side): Read INCREASE TIP-1, knit 3, increase 1 stitch towards the left, knit until there are 3 stitches left, increase 1 stitch towards the right, knit 3. ROW 3 (wrong side): Read INCREASE TIP-2, purl 3, increase 1 stitch towards the right, purl until there are 3 stitches left, increase 1 stitch towards the left, purl 3 Work ROWS 2 and 3 a total of 11-12-12-13-14-16 times (= 22-24-24-26-28-32 worked rows). After the last increase there are 74-80-82-88-92-102 stitches. Insert 1 marker outermost on one side; the piece is now measured from here! Remember to maintain the knitting tension. Continue with stocking stitch until the piece measures 9-10-11-11-10-11 cm measured along the armhole, from the marker. Now increase on each side for the armholes. INCREASE FOR ARMHOLES: ROW 1 (right side): Remember INCREASE TIP-1. Knit 3, increase 1 stitch towards the left, knit until there are 3 stitches left, increase 1 stitch towards the right, knit 3. ROW 2 (wrong side): Purl. Work ROWS 1 and 2 a total of 5-5-6-7-8-8 times (= 10-10-12-14-16-16 rows worked) = 84-90-94-102-108-118 stitches. Continue working until the piece measures 14-15-16-17-17-18 cm, measured along the armhole from the marker, and finishing after a row from the right side. Cut the strand, place the stitches on a stitch holder and work the left front piece along the left back shoulder. LEFT FRONT PIECE: Find the left back shoulder as follows: Lay the back piece flat, right side up, with the stitch holder towards you; left side of piece = left shoulder. Knit up stitches along the left back shoulder, starting from the right side by the neck and knitting up stitches towards the armhole as follows: ROW 1 (right side): Knit up 1 stitch in each worked row, inside the outermost stitch = 22-24-24-26-28-32 stitches. All measurements on the front piece are taken from this knitted up row. ROW 2 (wrong side): Purl. ROW 3 (right side): Knit. ROW 4 (wrong side): Purl. Repeat ROWS 3 and 4 until the piece measures 7-7-7-7-8-8 cm. Now increase for the neckline. INCREASE FOR NECKLINE: ROW 1 (right side): Knit 2, increase 1 stitch towards the left - remember INCREASE TIP-1, knit to end of row. ROW 2 (wrong side): Purl. Work ROWS 1 and 2 a total of 6 times (= 12 worked rows) = 28-30-30-32-34-38 stitches. On the next row from the wrong side, cast on 16-17-18-19-19-20 stitches at the end of the row = 44-47-48-51-53-58 stitches. Continue with stocking stitch and 7 band-stitches mid front, worked according to BANDS WITH I-CORD– read explanation above. INCREASE FOR ARMHOLE: When the piece measures 19-20-21-21-22-23 cm, increase for the armhole as follows: ROW 1 (right side): Work the 7 band-stitches, knit until there are 3 stitches left, increase 1 stitch towards the right, knit 3. ROW 2 (wrong side): Purl until there are 7 stitches left, work the 7 band-stitches. Work ROWS 1 and 2 a total of 5-5-6-7-8-8 times (10-10-12-14-16-16 worked rows) = 49-52-54-58-61-66 stitches. Continue working until the piece measures 24-25-26-27-29-30 cm, measured from the knitted-up row, finishing with a row from the right side. Cut the strand, place the stitches on a stitch holder and work the right front piece along the right back shoulder. RIGHT FRONT PIECE: Start from the right side, on the right back shoulder, and knit up stitches towards the neckline as follows: ROW 1 (right side): Knit up 1 stitch in each worked row, inside the outermost stitch = 22-24-24-26-28-32 stitches. All length measurements on the front piece are taken from this knitted up row. ROW 2 (wrong side): Purl. ROW 3 (right side): Knit. ROW 4 (wrong side): Purl. Repeat ROWS 3 and 4 until the piece measures 7-7-7-7-8-8 cm. Now increase for the neckline INCREASE FOR NECKLINE: ROW 1 (right side): Knit until there are 2 stitches left, increase 1 stitch towards the right - remember INCREASE TIP-1, knit 2. ROW 2 (wrong side): Purl. Work ROWS 1 and 2 a total of 6 times (= 12 worked rows) = 28-30-30-32-34-38 stitches. On the next row from the right side, cast on 16-17-18-19-19-20 stitches at the end of the row = 44-47-48-51-53-58 stitches. Continue with stocking stitch and 7 band-stitches mid front, worked according to bands with I-cord. NOTE! The buttonholes are worked on the right band – read explanation above. INCREASE FOR ARMHOLE: When the piece measures 19-20-21-21-22-23 cm, increase for the armhole as follows: ROW 1 (right side): Knit 3, increase 1 stitch towards the left, knit until there are 7 stitches left, work the 7 band-stitches. ROW 2 (wrong side): Work the 7 band-stitches, purl to end of row. Work ROWS 1 and 2 a total of 5-5-6-7-8-8 times (10-10-12-14-16-16 worked rows) = 49-52-54-58-61-66 stitches. Continue working until the piece measures 24-25-26-27-29-30 cm, measured from the knitted-up row, finishing with a row from the right side. The pieces are now joined for the body as follows: BODY: From the wrong side, work the 49-52-54-58-61-66 stitches on the right front piece, cast on 4-6-8-8-12-12 stitches (under sleeve), purl the 84-90-94-102-108-118 stitches on the back piece, cast on 4-6-8-8-12-12 stitches (under sleeve), work the 49-52-54-58-61-66 stitches from the left front piece = 190-206-218-234-254-274 stitches. Continue with stocking stitch and the band-stitches, back and forth across all stitches until the piece measures 26-27-28-29-29-30 cm from the bottom of the armhole. On the next row from the right side, work rib and increase 22-22-22-26-26-26 stitches (= 212-228-240-260-280-300 stitches) as follows: Change to circular needle size 4 mm, work the band as before, work rib (knit 2, purl 2 – remember to increase) until there are 9 stitches left, knit 2 and work the band as before. When the rib measures 6 cm, cast off. The jacket measures approx. 54-56-58-60-62-64 cm. SLEEVES: Lay the piece flat and insert 1 marker at the top of the armhole (NOTE! This is not the knitted-up row on the front piece but approx. 5-6 cm down the front piece). Knit up 64-70-80-78-86-90stitches around the armhole, using circular needle size 4 mm and starting in the middle of the cast-on stitches under the sleeve (make sure you have equal numbers of stitches on each side of the marker). Change to circular needle size 5 mm. Work stocking stitch and short rows back and forth as follows for the sleeve cap, starting mid-under the sleeve (to give the sleeve a better fit): ROW 1 (right side): Knit to 8-9-9-9-10-10 stitches past the marker on the shoulder, turn – read KNITTING TIP. ROW 2 (wrong side): Purl to 8-9-9-9-10-10 stitches past the marker, turn. ROW 3 (right side): Work to 2 stitches past the previous turn, turn. ROW 4 (wrong side): Work to 2 stitches past the previous turn, turn. Work rows 3 and 4 until you have turned a total of 8-8-9-11-11-11 times on each side. AFTER THE LAST TURN: After the last repeat of row 4, turn and knit to the beginning of the round (mid-under the sleeve). Insert 1 marker-thread mid-under the sleeve and allow it to follow your work onwards; it is used when decreasing under the sleeve. Work stocking stitch in the round for 1 cm. Now decrease 2 stitches under the sleeve – read DECREASE TIP. Decrease like this every 2nd round a total of 2-2-3-3-4-4 times, then every 4½-3½-2½-2½-2-1½ cm a total of 5-7-8-8-10-11 times (decreased 7-9-11-11-14-15 times in total) = 50-52-56-58-58-60 stitches. Continue working until the sleeve measures 44-43-44-43-43-41 cm from the top of the shoulder. Change to double pointed needles size 4 mm. Work rib (knit 2, purl 2), increasing 10-12-12-10-10-12 stitches evenly on the first round = 60-64-68-68-68-72 stitches. When the rib measures 6 cm, cast off. The sleeve measures approx. 50-49-50-49-49-47 cm. NECK: Knit up 96 to 120 stitches along the neckline with circular needle size 4 mm. The stitch count should be divisible by 4. Work the first row from the wrong side as follows: 7 band stitches as before, purl 2, * knit 2, purl 2 *, work from *-* until there are 9 stitches left, purl 2 and 7 band stitches. Work this rib back and forth for 2 cm, then work as follows from the right side: Slip 1 stitch purl-wise with the strand in front, knit 2, knit 2 together, make 1 yarn over, work as before to end of row. The last buttonhole has now been worked. Continue the bands and rib, casting off when the neck measures 4 cm. ASSEMBLY: Sew the buttons onto the left band. |
|
 |
|
Have you finished this pattern?Tag your pictures with #dropspattern #skywhispercardigan or submit them to the #dropsfan gallery. Do you need help with this pattern?You'll find 37 tutorial videos, a Comments/Questions area and more by visiting the pattern on garnstudio.com. © 1982-2026 DROPS Design A/S. We reserve all rights. This document, including all its sub-sections, has copyrights. Read more about what you can do with our patterns at the bottom of each pattern on our site. |
|


With over 40 years in knitting and crochet design, DROPS Design offers one of the most extensive collections of free patterns on the internet - translated to 17 languages. As of today we count 324 catalogues and 12290 patterns translated into English (UK/cm). 12290
We work hard to bring you the best knitting and crochet have to offer, inspiration and advice as well as great quality yarns at incredible prices! Would you like to use our patterns for other than personal use? You can read what you are allowed to do in the Copyright text at the bottom of all our patterns. Happy crafting!
Post a comment to pattern DROPS 259-19
We would love to hear what you have to say about this pattern!
If you want to leave a question, please make sure you select the correct category in the form below, to speed up the answering process. Required fields are marked *.