
Popular categories
Looking for a yarn?


Comments / Questions (33)
![]() Viktoria wrote:
Viktoria wrote:
Zwei Maschen kraus rechts, heisst das: Randmasche und dann 2 M kraus Re. Dann stimmen die M für das Muster nicht.
11.04.2026 - 13:01DROPS Design answered:
Liebe Viktoria, diese 2 Maschen kommen nicht extra zu der Maschenanzahl, aber sind inkl. gemeint, so stricken Sie: 2 M krausrechts, dann Rippenmuster (1 M re, 1 M links) bis 3 M übrig sind, noch 1 M re stricken (so ist das Rippenmuster symmetrisch) und 2 M krausrechts. Viel Spaß beim Stricken!
13.04.2026 - 08:53
![]() Samuela wrote:
Samuela wrote:
In Bezug auf meinen vorigen Kommentar: "Wenn A.1 zu Ende gestrickt wurde, glatt rechts weiterstricken, mit je 2 Maschen kraus rechts beidseitig. Bei einer Länge von 11 cm je 1 Masche beidseitig zunehmen". Sind die 11 cm ab Ende vom A.1-Teil (also zusätzlich) oder ab Anfang der Arbeit (inkl. Rippenmuster+A.1) zu rechnen? Danke für die Hilfe!
23.03.2026 - 20:57DROPS Design answered:
Liebe Samuela, die 11 cm messen Sie ab Anschlagskante, dh die sind die gesamte Höhe/L¨nage der Arbeit. Viel Spaß beim Stricken!
24.03.2026 - 08:51
![]() Samuela wrote:
Samuela wrote:
Hi! Ich habe den Vorderteil (Große S) bis zu den Abnahmen für die Armauschnitte gestrickt. Die Arbeit messt nun ca. 45 cm, laut Anleitung soll ich aber weiter glatt rechts stricken "bis die Arbeit eine Länge von 35 cm hat". Ist damit die Gesamtlänge bis dato gemeint, inkl. Rippenmuster und A.1? Vielen Dank
22.03.2026 - 23:23DROPS Design answered:
Liebe Samuela, nach 24 cm stricken Sie 4 Reihen Perlemuster über die 11 Maschen beidseitig, dann 2 Reihen (8 Maschen am Anfang von diesen beiden Reihen abketten), dann Abnahmen: 6 x in jeder 2. Reihe = 12 Reihen + 4 Mal in jeder 4. Reihe = 16 Reihen, so haben Sie insgesamt (4+2+12+16=34 Reihen gestrickt); mit 32 Reihen = ca 10 cm haben Sie ca 11 weitere cm gestrickt so 24+11=35 cm. Viel Spaß beim Stricken!
23.03.2026 - 15:59
![]() Begoña wrote:
Begoña wrote:
Al inicio de la labor, una vez montados los puntos, entiendo que la primera fila es la del derecho y la segunda sería del revés, entonces no entiendo como dice trabajar primera fila de revés por el lado del revés. No sé si es una cuestión de semántica que yo no lo tengo claro.
16.03.2026 - 18:00DROPS Design answered:
Hola Begoña, a veces trabajamos, después de la fila de montaje, una fila de revés por el lado revés, para que quede un borde diferente. En este caso, la diseñadora prefería este tipo de borde para esta prenda. Después comienzas a trabajar el patrón del elástico en una fila por el lado derecho, como de normal.
26.04.2026 - 20:39
![]() Zoe Mason-Chard wrote:
Zoe Mason-Chard wrote:
Hi , after all the decreasing for the front piece it measures 46 cm but still doesn't seem long enough before the final eyelet rows yet the pattern states to work until 42 cm ?
20.09.2025 - 16:41DROPS Design answered:
Hi Zoe, you can always adjust the pattern to meet your expectations. Pattern itself in only the guide. Happy knitting!
20.09.2025 - 20:55
![]() Lori wrote:
Lori wrote:
Beautiful, I would love to wear this
26.07.2025 - 23:32
![]() Maria wrote:
Maria wrote:
Hei! Kuinka voisin tehdä topin pienemmässä koossa, sillä s-koko oli minulle liian suuri?
08.04.2025 - 20:38DROPS Design answered:
Hei, kokeile voisitko neuloa topin puolta tai yhtä numeroa pienemmillä puikoilla. Topista tulee tällöin hieman tiheämpi.
09.04.2025 - 15:51
![]() Louise wrote:
Louise wrote:
Hei! Jeg forstår ikke helt hvordan jeg skal gjøre det når jeg kommer til strikk 13 og 14 pinne i A1. Strikker strl S og har 62 m på pinnen minus 6 masker (3 i hver side med perlestrikk). Da er det igjen 56 m, men mønsteret går over 6 masker som ikke går opp. Får 9 hele rapporter (18 hull), men sitter igjen med kun 2 masker før 3 m perlestrikk på enden av pinnen Hvordan løse dette, eller hva gjør jeg evt feil? Takk
08.04.2025 - 09:55DROPS Design answered:
Hej Louise, hvis du vil, så kan du starte med 2 ret inden hulmønsteret, så får du et par glatstrikkede masker på hver side :)
10.04.2025 - 08:36
![]() Jill wrote:
Jill wrote:
Hello! I was wondering is there any reason why this couldn't be knit in the round with the exception of the side vent?
03.04.2025 - 14:46DROPS Design answered:
Dear Jill, we try to get different kind of pattern, including with seams for knitters who rather work back and forth than in the round. You can then just adapt the pattern to work it in the round if you rather avoid seams. Happy knitting!
03.04.2025 - 15:58
![]() Alena wrote:
Alena wrote:
Hello! I`m not quite sure if i understand this section correctly: "Work next row as follows from right side: 2 stitches in garter stitch, A.1 until 2 stitches remain on needle and decrease at the same time 7-9-11-11-13-13 stitches evenly on first row" How should I divide odd number to left and right side of the front part? Or do I need to spread all decreases evenly throughout the first-after-rib row?
19.03.2025 - 06:22DROPS Design answered:
Dear Alena, you will find a "Increase/Decrease Calculator" tool just below Pattern instructions, remove the 4 edge stitches from the total amount of stitches on needle and add this number under "Number of stitches on the needle". Happy knitting!
19.03.2025 - 07:48
|
||||||||||||||||
Walking on Air Top#walkingonairtop |
||||||||||||||||
 |
 |
|||||||||||||||
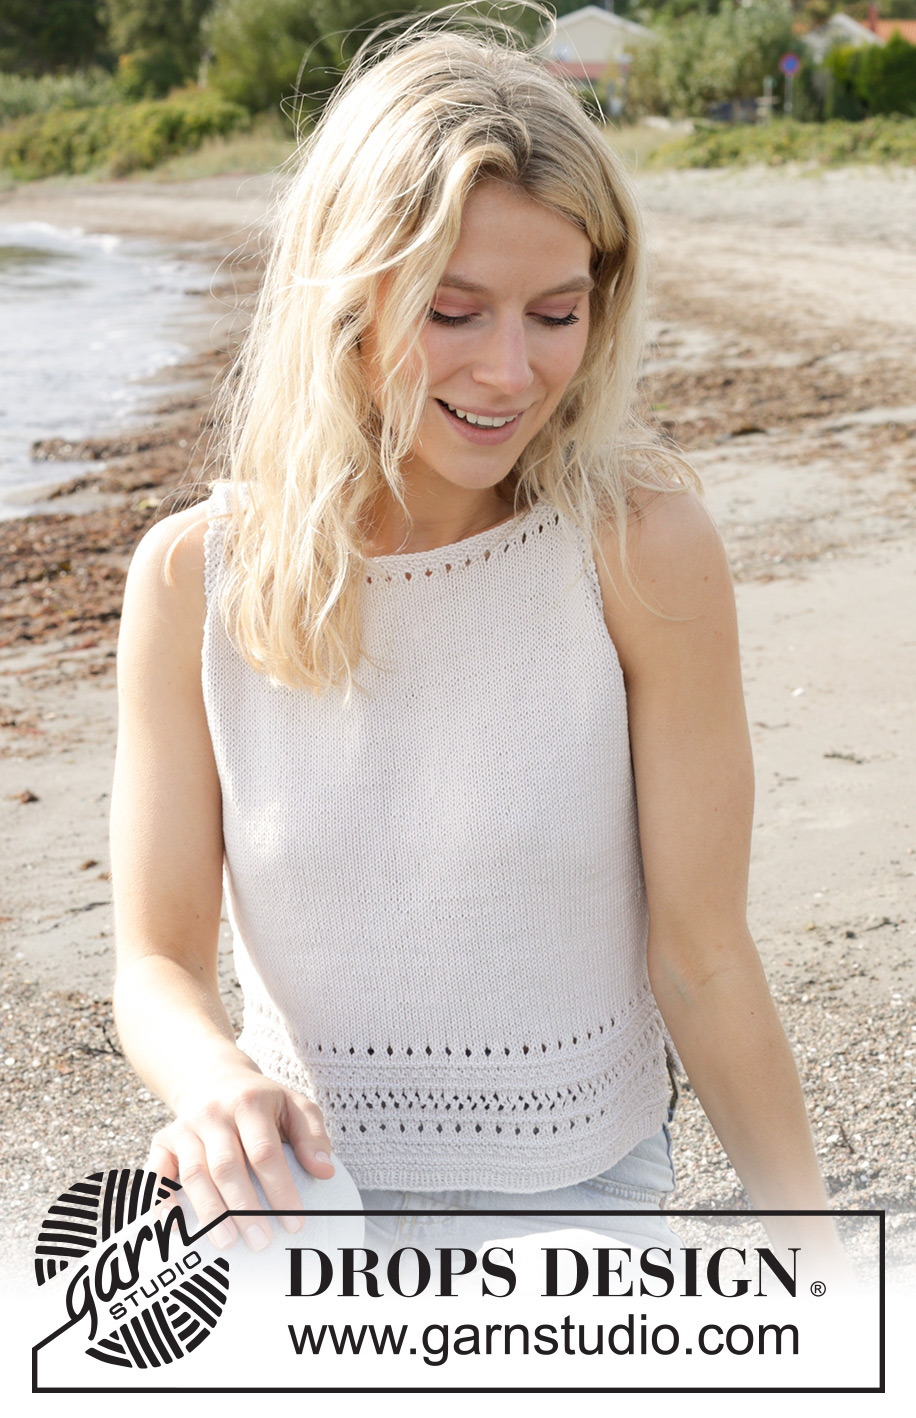
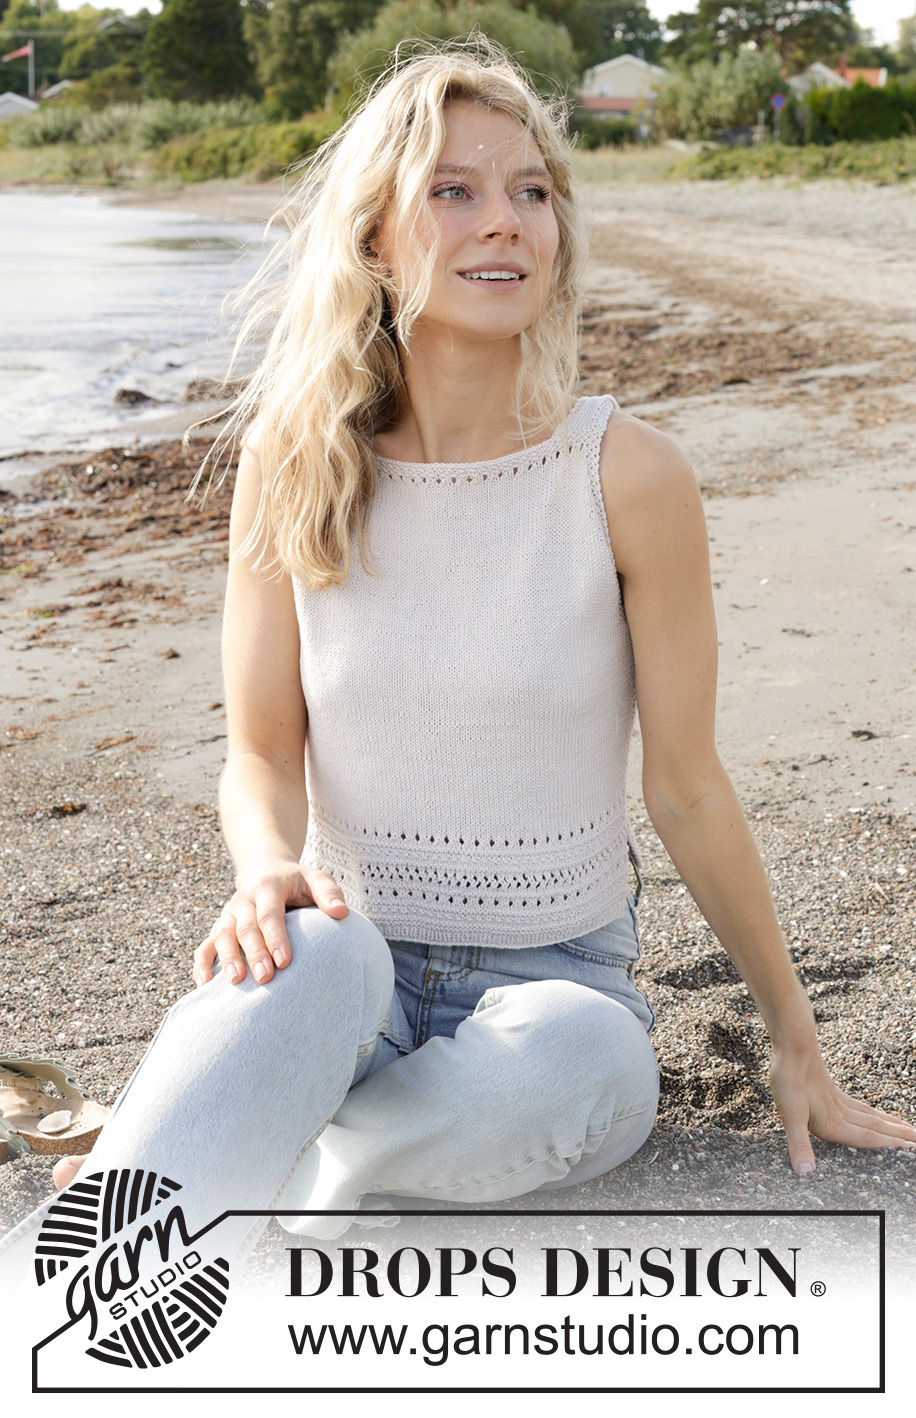
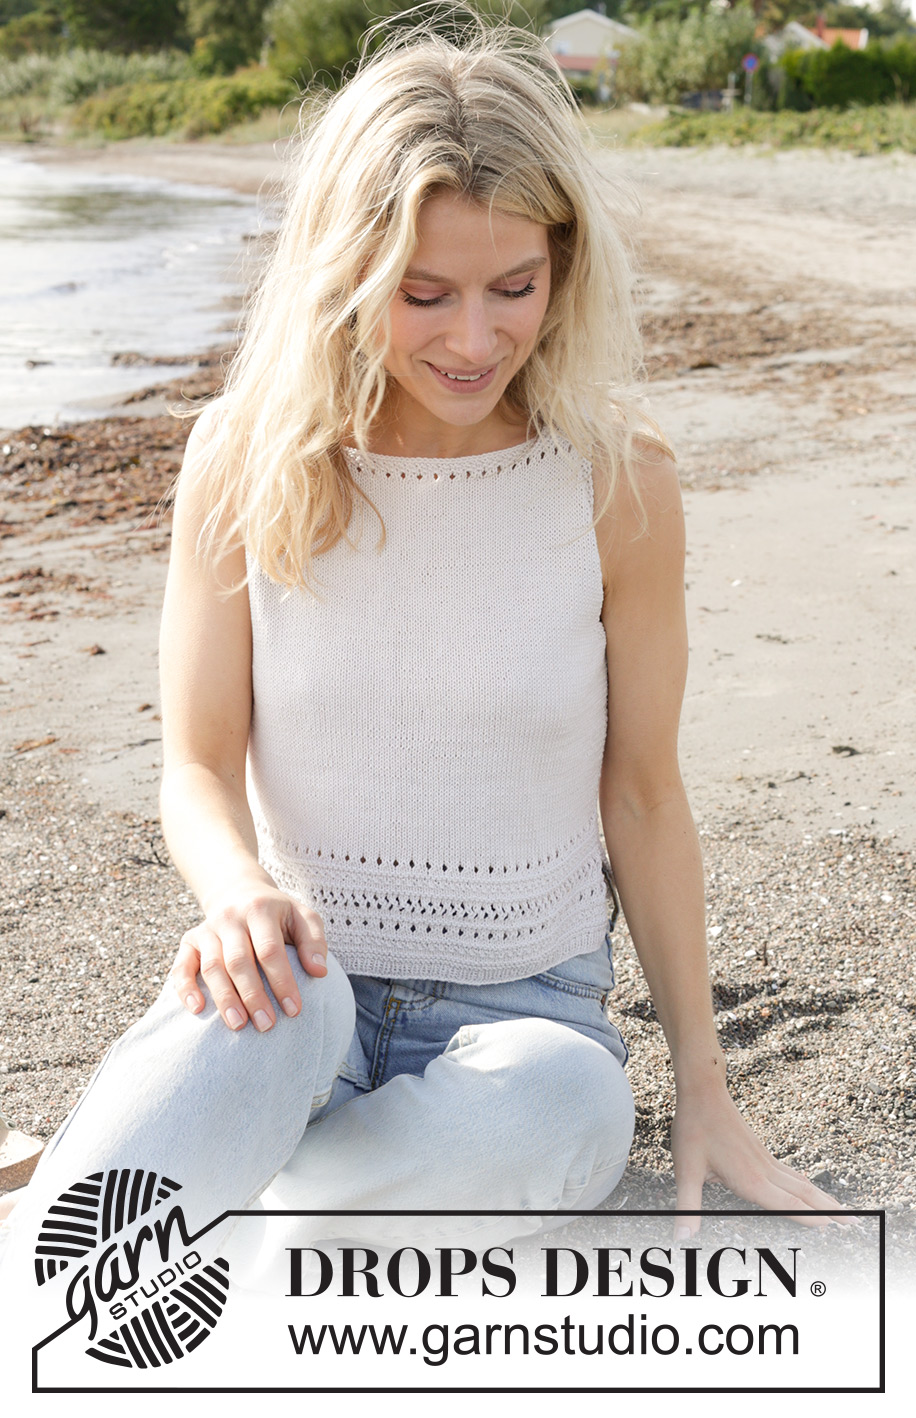
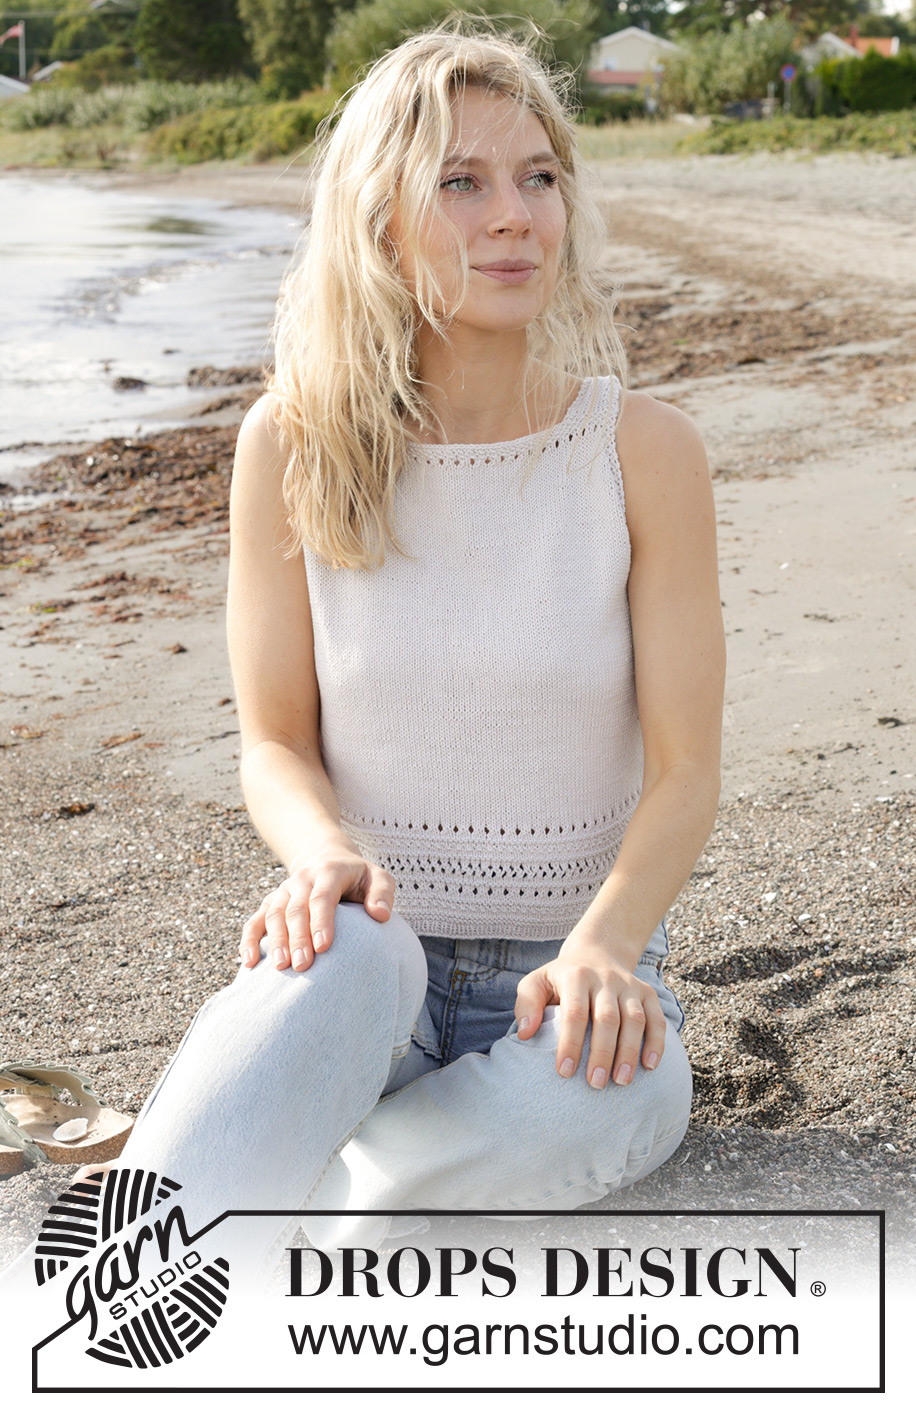
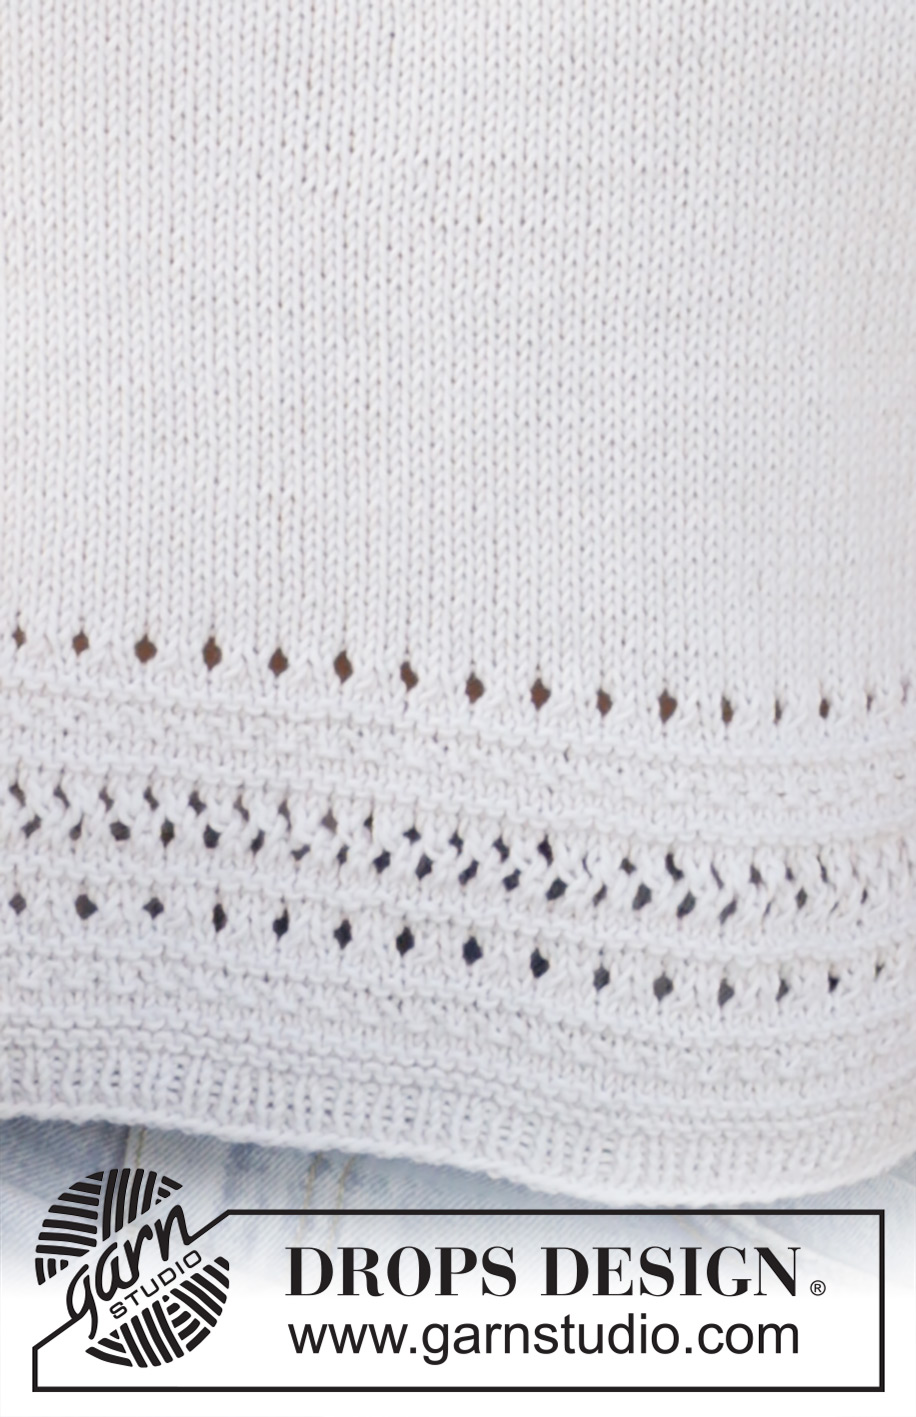
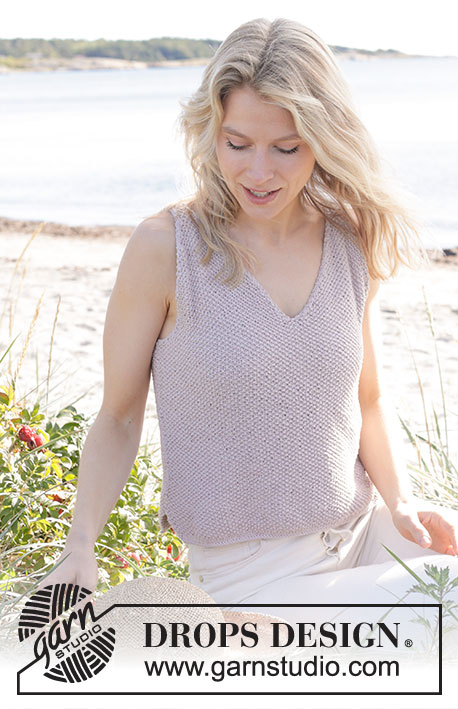
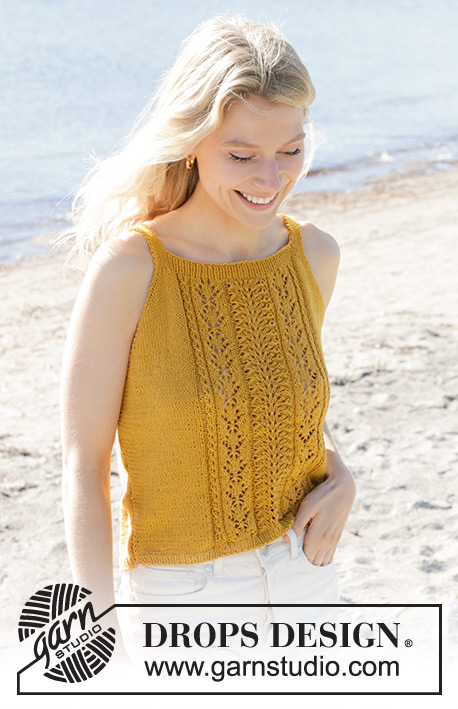
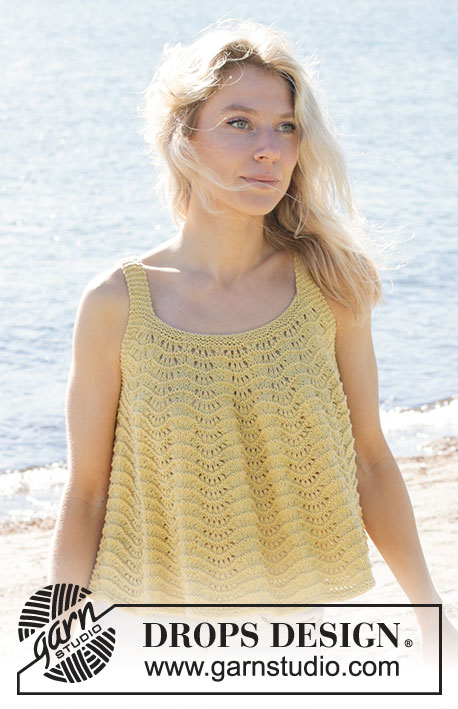
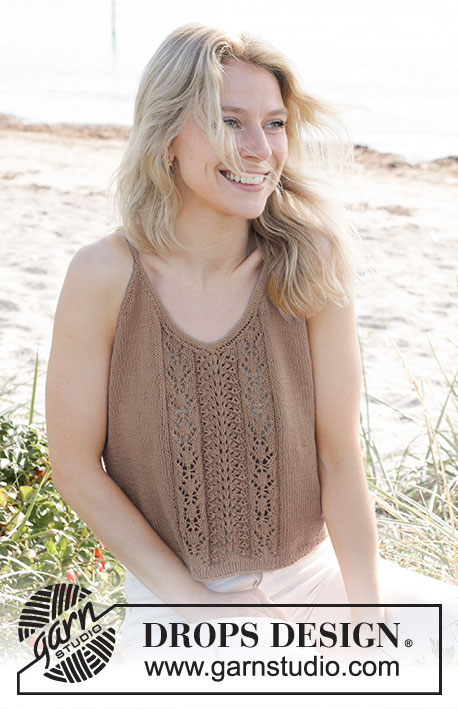
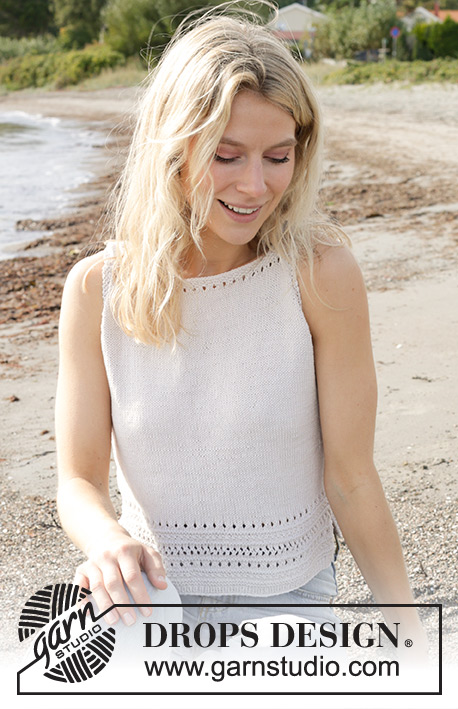
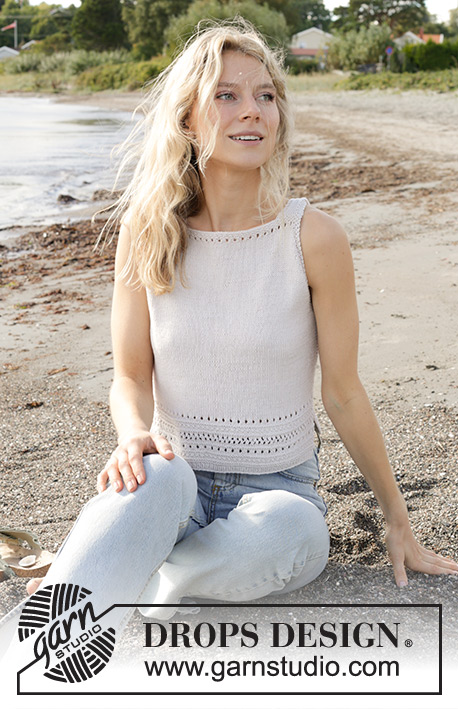
Knitted top top/singlet in DROPS Safran. Piece is knitted bottom up with lace pattern and stocking stitch. Size: S - XXXL
DROPS 241-19 |
||||||||||||||||
|
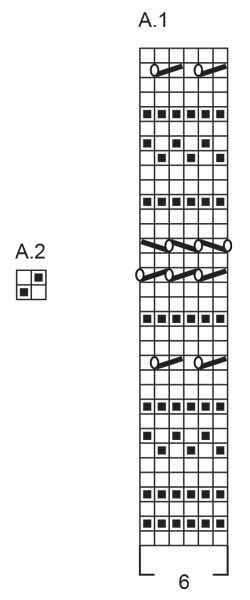
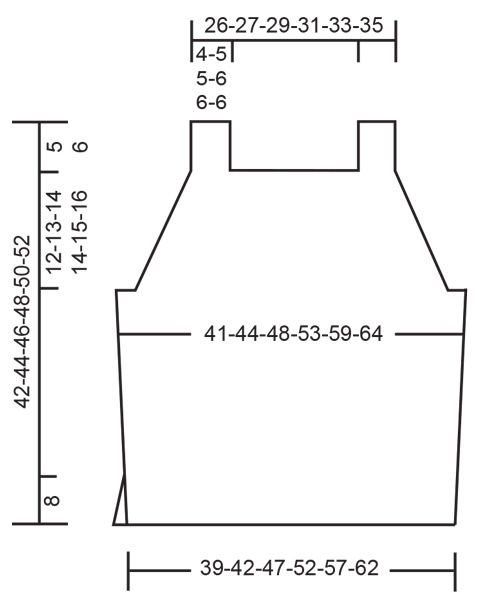
---------------------------------------------------------- EXPLANATION FOR THE PATTERN: ---------------------------------------------------------- GARTER STITCH (back and forth): Knit all rows. 1 ridge vertically = knit 2 rows. PATTERN: See diagrams A.1 and A.2. Diagrams show all rows in pattern seen from the right side. INCREASE TIP (applies in the sides on front and back piece): All increases are done from right side. Increase 1 stitch inside the outermost 4 stitches from the side by making 1 yarn over. On next row purl yarn over twisted to avoid hole. Then work the new stitches in stocking stitch. DECREASE TIP (applies to armholes): All decreases are done from the right side. DECREASE AS FOLLOWS AFTER 3 EDGE STITCHES IN MOSS STITCH: Slip 1 stitch knitwise, knit 1, pass slipped stitch over stitch worked (1 stitch decreased). DECREASE AS FOLLOWS BEFORE 3 EDGE STITCH IN MOSS STITCH: Work until 5 stitches remain, knit 2 together, 3 stitches in moss stitch (1 stitch decreased) ---------------------------------------------------------- START THE PIECE HERE: ---------------------------------------------------------- TOP - SHORT OVERVIEW OF THE PIECE: Work back piece and front piece back and forth on single pointed needles separately, bottom up. Work strap on front piece and sew to back piece. Sew the side seams. FRONT PIECE: Cast on 101-109-123-135-149-161 stitches on single pointed needles size 3 mm with DROPS Safran. Purl 1 row from wrong side. Then work 4 rows rib (knit 1/purl 1) with 2 stitches in GARTER STITCH in each side - read explanation above Switch to single pointed needle size 3.5 mm. Work next row as follows from right side: 2 stitches in garter stitch, A.1 until 2 stitches remain on needle and decrease at the same time 7-9-11-11-13-13 stitches evenly on first row, finish with 2 stitches in garter stitch = 94-100-112-124-136-148 stitches. Continue pattern like this. REMEMBER THE KNITTING TENSION! When A.1 has been worked, work in stocking with 2 stitches in garter stitch in each side. When piece measures 11 cm, increase 1 stitch in each side - read INCREASE TIP. Increase like this every 5 cm 2-3-2-2-3-3 times in total = 98-106-116-128-142-154 stitches. When piece measures 24-25-26-27-28-29 cm, work 4 rows in moss stitch (A.2) over the outermost 11-11-13-13-15-17 stitches in each side (work the other stitches as before). After the 4 rows in moss stitch cast off 8-8-10-10-12-15 stitches for armholes at the beginning of the next 2 rows = 82-90-96-108-118-124 stitches. Work in stocking stitch with 3 stitches in moss stitch in each side. When 2 rows in stocking stitch have been worked after cast off for armholes, decrease 1 stitch for armholes in each side on next row from right side - remember DECREASE TIP. Decrease like this every other row (every row from right side) 6-10-8-16-17-19 times in total in each side, then every 4th row (every other row from right side) 4-3-5-1-2-1 time in total in each side = 62-64-70-74-80-84 stitches. Work in stocking stitch with 3 stitches in moss stitch in each side until piece measures 35-37-39-40-42-44 cm. Then work row 13 and 14 in A.1 (simple eyelet row). Switch to single pointed needles size 3 mm. Work 4 rows in moss stitch back and forth over all stitches. Now work straps as follows from right side: 3 stitches in moss stitch, 4-6-6-8-8-8 stitches in stocking stitch, 3 stitches in moss stitch, then slip these stitches on a thread for strap. Cast off 42-40-46-46-52-56 stitches for neck, work 3 stitches in moss stitch, work 4-6-6-8-8-8 stitches in stocking stitch, 3 stitches in moss stitch. Continue back and forth over these 10-12-12-14-14-14 stitches until strap measures approx. 10-10-10-12-12-12 cm (half of length belongs to back piece). Cast off knitting from right side. Work the other strap the same way. BACK PIECE: Cast on the same number of stitches as on front piece, and work the same way as on front piece, but instead of working straps cast off all stitches after 4 rows in moss stitch at the top. Piece measures 37-39-41-42-44-46 cm. ASSEMBLY: Sew straps to back piece - at the edge in each side. Sew the side seams edge to edge in outer loops of edge stitches to get a flat seam - leave an opening of approx. 8 cm at bottom in each side for vents. |
||||||||||||||||
Diagram explanations |
||||||||||||||||
|
||||||||||||||||
 |
||||||||||||||||
 |
||||||||||||||||
Have you finished this pattern?Tag your pictures with #dropspattern #walkingonairtop or submit them to the #dropsfan gallery. Do you need help with this pattern?You'll find 24 tutorial videos, a Comments/Questions area and more by visiting the pattern on garnstudio.com. © 1982-2026 DROPS Design A/S. We reserve all rights. This document, including all its sub-sections, has copyrights. Read more about what you can do with our patterns at the bottom of each pattern on our site. |
||||||||||||||||


With over 40 years in knitting and crochet design, DROPS Design offers one of the most extensive collections of free patterns on the internet - translated to 17 languages. As of today we count 324 catalogues and 12290 patterns translated into English (UK/cm). 12290
We work hard to bring you the best knitting and crochet have to offer, inspiration and advice as well as great quality yarns at incredible prices! Would you like to use our patterns for other than personal use? You can read what you are allowed to do in the Copyright text at the bottom of all our patterns. Happy crafting!
Post a comment to pattern DROPS 241-19
We would love to hear what you have to say about this pattern!
If you want to leave a question, please make sure you select the correct category in the form below, to speed up the answering process. Required fields are marked *.