
Popular categories
Looking for a yarn?


Comments / Questions (81)
![]() Ilona wrote:
Ilona wrote:
Hei, miksi taka kappaleen A.6 piirroksessa kuviot eivät mene samassa linjassa (siis ne kaksi kolmiota)? Ja miksi myös kavennusten kohdalta kolmion kärjet vetävät oikealta puolelta katsottuna vasemmalle? Silmukka määrät ovat oikein ja kuviota olen seurannut oikein. En itse keksi mikä pielessä? Yt: Ilona
15.03.2026 - 19:35DROPS Design answered:
Hei, kysymykseesi on vaikea vastata näkemättä neuletta, mutta voit pyytää apua lähimmältä DROPS lankoja myyvältä liikkeeltä, he voivat auttaa sinua paikan päällä.
24.03.2026 - 19:24
![]() Iryna wrote:
Iryna wrote:
Hello. Could you please advise what positive ease this pattern is designed for? I want to make it for a bust circumference of 92 cm, and I don't understand what size would fit better.
12.02.2026 - 20:49DROPS Design answered:
Hi Iryna, please see the lesson Drops HERE. Happy knitting!
08.04.2026 - 09:52
![]() Nicoletta wrote:
Nicoletta wrote:
Ho usato la lana del modello. Lho lavata in lavatrice con detersivo delicato e programma lana ma è raddoppiata di volume..lunga e larghissima..mi dispiace molto perché era proprio bella. Ora è importabile. Perché è avvenuto ciò?
16.01.2026 - 21:17DROPS Design answered:
Buongiorno Nicoletta, a link text link trova delle indicazioni per la cura e il lavaggio dei capi. In questo caso, dal momento che si tratta di una combinazione di filati, avrebbe dovuto seguire le istruzioni per il filato più delicato, quindi Kid-Silk e lavare il capo a mano. Buon lavoro!
17.01.2026 - 08:43
![]() Krysia wrote:
Krysia wrote:
Bonjour, je ne comprends pas bien pour la dernière instruction concernant l'encolure Il est écrit : "En commençant à une des épaules, relever sur l'endroit, à 1 maille lisière du bord, 88 à 128 mailles avec la petite aiguille circulaire 4" Ma question est "combien de mailles on relève pour la taille XXL ? " Merci par avance
03.10.2025 - 21:31DROPS Design answered:
Bonjour Krysia, le nombre de mailles dépend de votre tension en hauteur et n'est pas plus important que ça tant qu'il reste dans les données indiquées, soit entre 88 et 128 mailles et que votre nombre de mailles est divisible par 4, s'il ne l'est pas, vous pouvez ajuster en augmentant/diminuant à intervalles réguliers au 1er tour. Dans cette leçon, nous montrons, en photo, comment tricoter un col pour ce type d'ouvrage, cela pourra peut-être vous aider. Bon tricot!
06.10.2025 - 07:14
![]() Silvia wrote:
Silvia wrote:
No entiendo la 5ª fila del esquema A9
24.04.2025 - 22:56DROPS Design answered:
Hola Silvia, cuando trabajes la vuelta 5 de A.9 comienzas con 1 hebra, 3 derechos, 1 hebra, deslizar 1 punto, 2 puntos juntos de derecho, pasar el punto deslizado sobre el punto trabajado. Como trabajas una disminución sobre 3 puntos y solo tienes 2 puntos en la repetición, el 1º punto de la siguiente repetición del diagrama en la vuelta 4 se usa para la disminución. Del mismo modo, en la última repetición de la vuelta, usarás el 1º punto de la vuelta para la disminución.
26.04.2025 - 20:39
![]() Roshanka Supipi wrote:
Roshanka Supipi wrote:
Hi. I'm usually wear size XS. and the chest measurement in this finishing project for the size S is 41". Which is too big for myself(finish chest measuresment 35" will be pefrect for me) How can I make it smaller using size S cast on stitches? I'm planing to do it on 4mm knitting needles. Still Didn't start to do the gauge swatch though. And I'm still unable to understand the gauge and the choosing needle size. Do I need to size up the needle or size down?
21.02.2025 - 09:11DROPS Design answered:
Dear Mrs Supipi, you will find some patterns in size XS with the same tension here - they might help you to adjust to the required size/measurements. Tension is here worked with larger needle size, ie with needle size 5 mm. Happy knitting!
21.02.2025 - 13:58
![]() Henar wrote:
Henar wrote:
Hola, ya he terminado el cuerpo del jersey, pero tengo muchas dudas a la hora de continuar con las mangas. Estoy tejiendo la talla S. Según el patrón, tengo que levantar 40 puntos a lo largo del frente, más 28 en la parte de atrás, pero esta cantidad de puntos a levantar no coincide con el número de puntos de la sisa, que es mucho mayor ¿he hecho algo mal?
13.01.2025 - 12:32DROPS Design answered:
Hola Henar, normalmente no recoges todos los puntos, ya que si no tirarías mucho de la labor. Por lo tanto, se suelen recoger 3 de cada 4 puntos, aproximadamente, pero esto puede variar según el patrón. Puedes calcular el número de puntos que tienes y cada cuando tienes que saltar algún punto para recoger alrededor de toda la sisa como se indica, pero no todos los puntos
19.01.2025 - 14:06
![]() Mestric wrote:
Mestric wrote:
Bonjour, j'aime beaucoup ce modèle, mais est ce que ce serait possible d'avoir un peu plus de details sur la façon de relever les mailles pour tricoter les épaules ? Merci d'avance
28.09.2024 - 18:48DROPS Design answered:
Bonjour Mme Mestric, tout à fait, consultez l'onglet Vidéos ou bien Leçons tout en haut de page (à droite de l'onglet Explications où vous retrouvez la liste des fournitures). Vous y trouverez des vidéos et des leçons montrant notamment comment relever les mailles des épaules des devants. Bon tricot!
30.09.2024 - 08:06
![]() Silje Enghaug wrote:
Silje Enghaug wrote:
Hei! Jeg holder på med MØNSTER ERME på Venstre erme. Jeg strikker i størrelse M. Skal jeg strikke A.4 i 10 cm fra jeg begynte på settpinner, altså 10 cm + 4cm fra før settpinner, eller 10 cm totalt fra jeg plukket opp masker?
11.09.2024 - 22:06DROPS Design answered:
Hei Silje. Når ermet måler 2 cm fra der arbeidet ble satt sammen, felles det 2 masker midt under ermet. Så strikkes det 6 cm, gjør en ny felling, strikk 6 cm til og gjør en nye felling. Fell slik totalt 6 ganger = 56 masker på pinnen. Strikk videre til arbeidet måler 40 cm (i str,. M måler arbeidet ca 40 cm ved siste felling). Det gjenstår ca 8 cm til ferdig mål. Usikker på hva du mener med 10 cm fra du begynte med settpinner. mvh DROPS Design
16.09.2024 - 09:55
![]() Carmen Müller wrote:
Carmen Müller wrote:
Ich berichtige mich selbst. : -) Ich habe MS 8 gestrickt, hätte aber MS 7 stricken müssen. Dann passt auch alles....
01.06.2024 - 10:45
|
||||||||||||||||||||||||||||
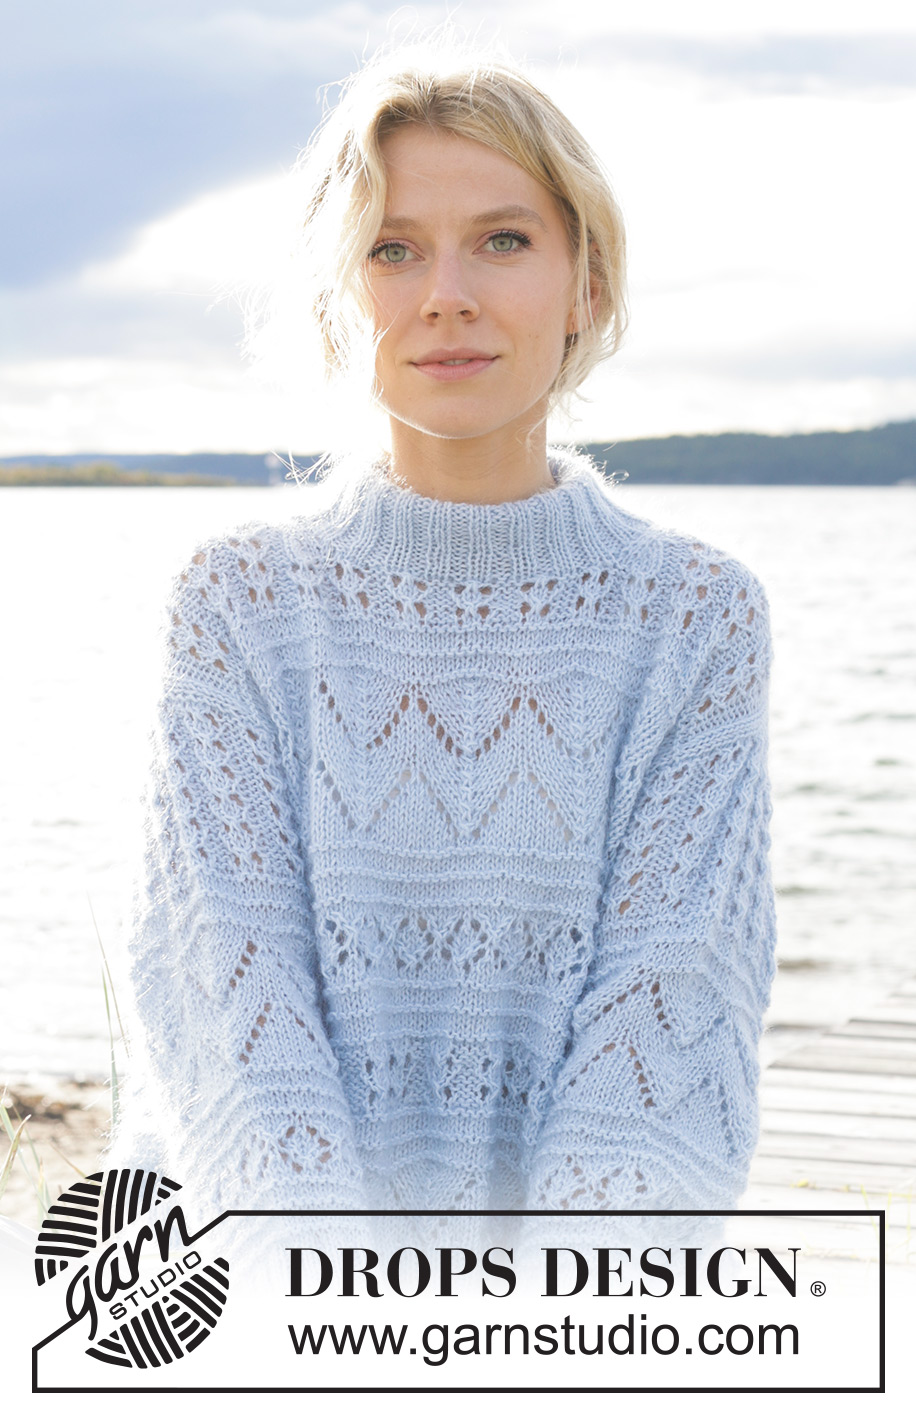
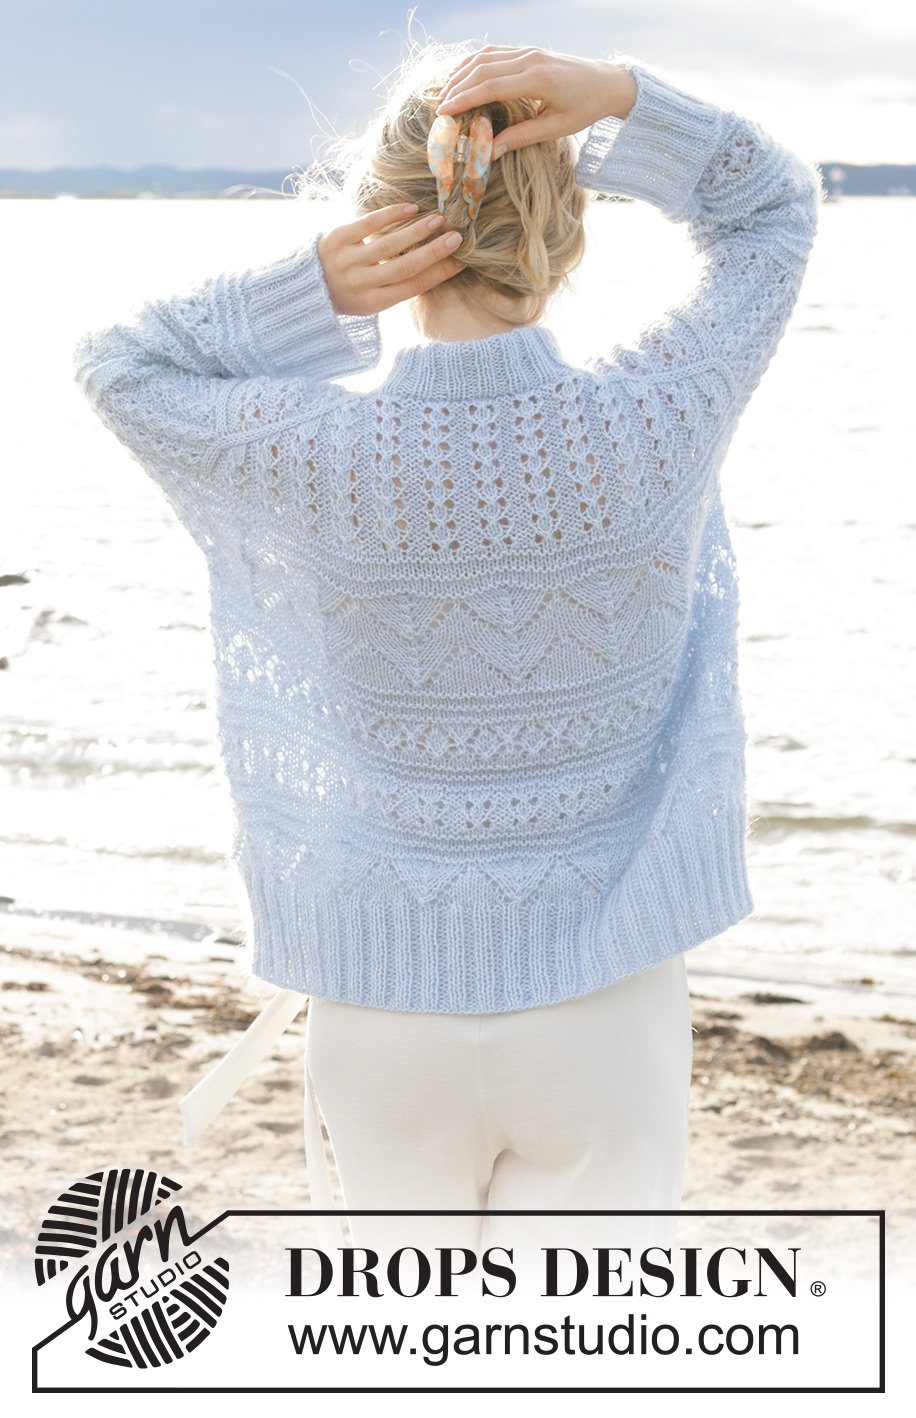
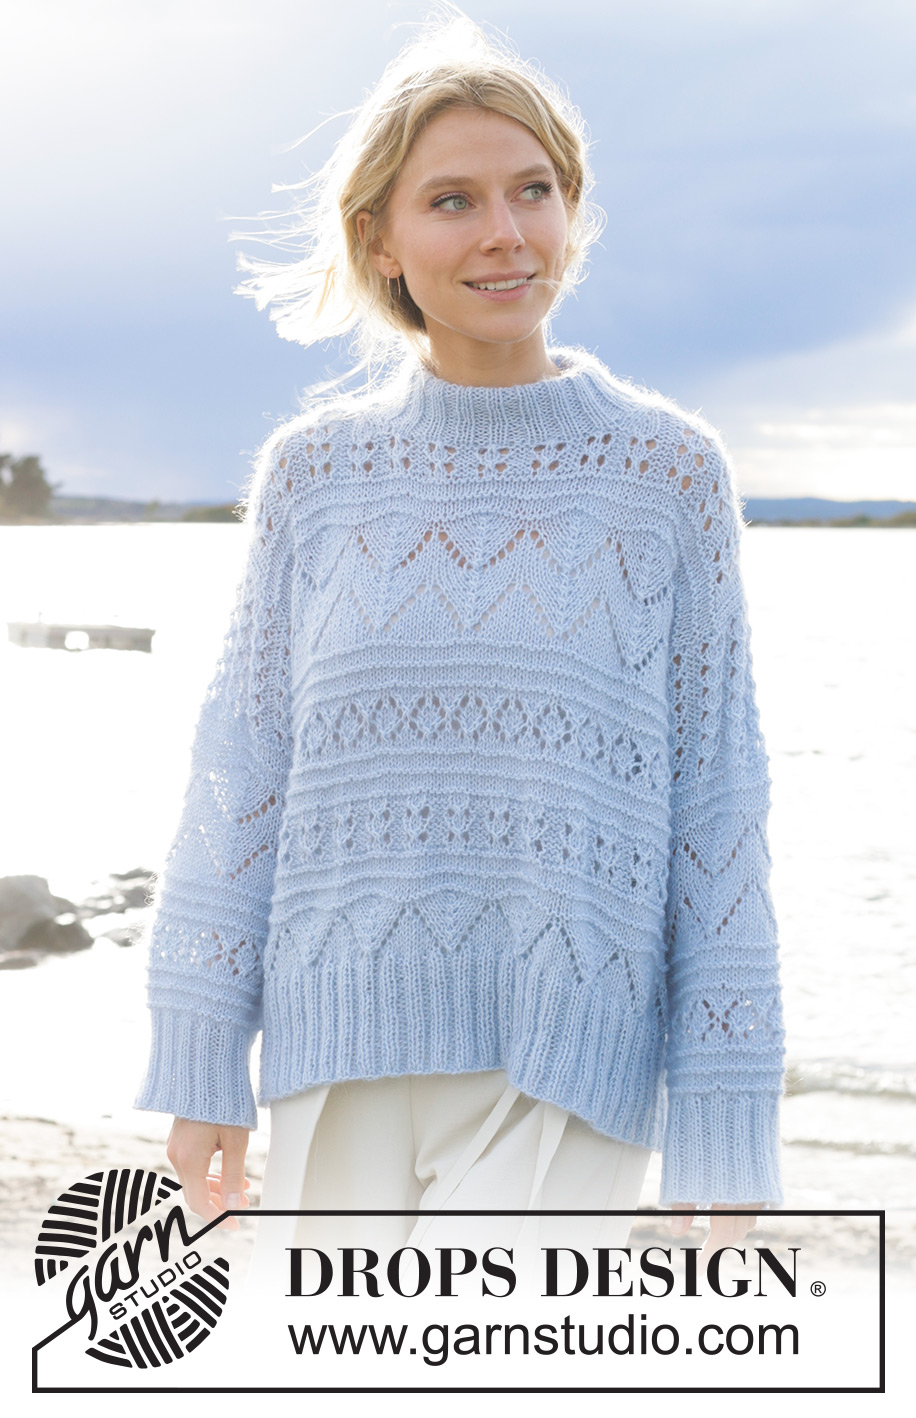
Blue Porcelain#blueporcelainsweater |
||||||||||||||||||||||||||||
 |
 |
|||||||||||||||||||||||||||
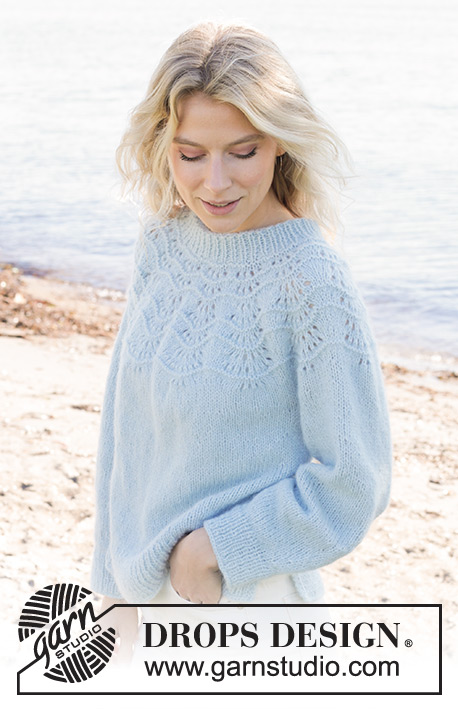
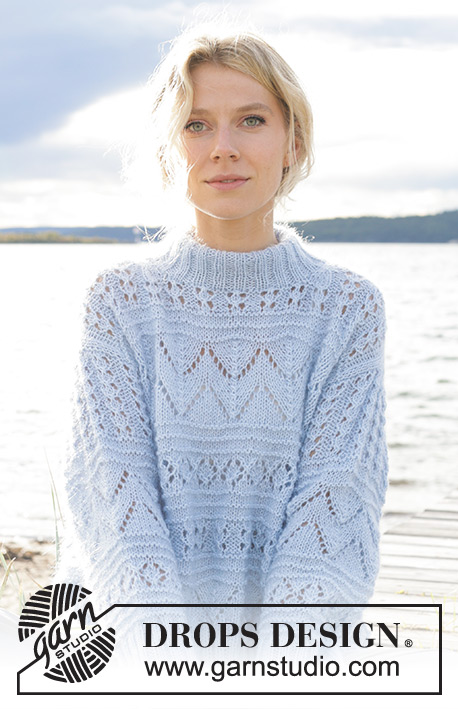
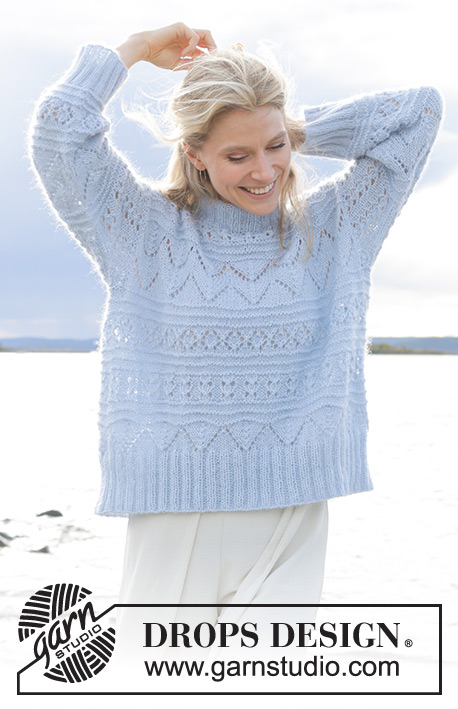
Knitted jumper in DROPS BabyMerino and DROPS Kid-Silk. The piece is worked top down with European/diagonal shoulders and lace pattern. Sizes S - XXXL.
DROPS 241-1 |
||||||||||||||||||||||||||||
|
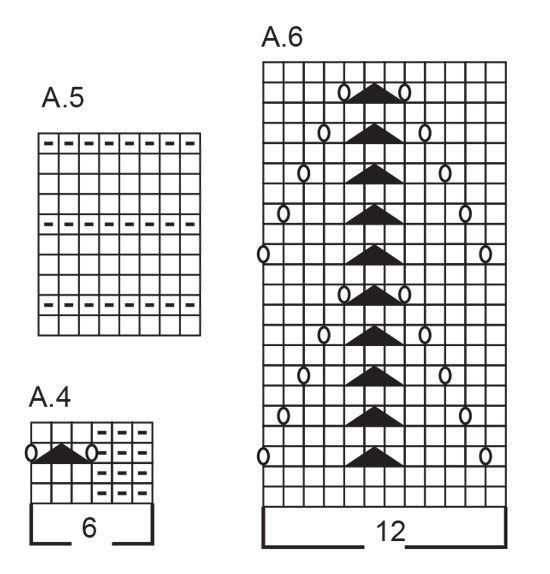
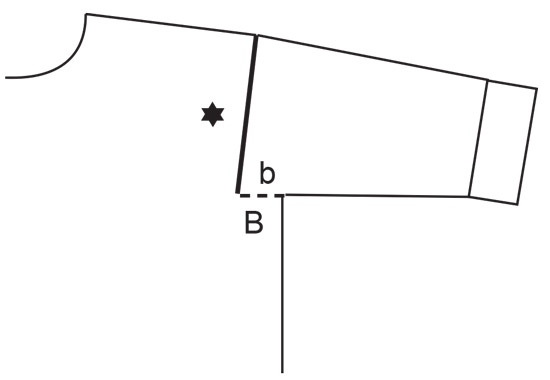
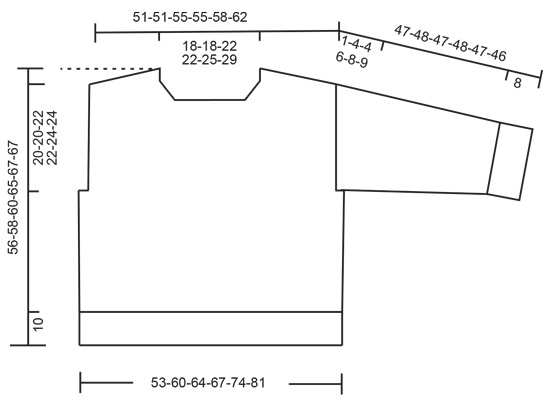
------------------------------------------------------- EXPLANATIONS FOR THE PATTERN: ------------------------------------------------------- INCREASE TIP FROM THE RIGHT SIDE: Increase towards the left AFTER MARKER: Use left needle to pick up yarn between 2 stitches from row below, pick up yarn from the front and knit in the stitch loop that is on the back of the needle. Increase towards the right BEFORE MARKER: Use left needle to pick up yarn between 2 stitches from row below, pick up yarn from the back and knit in the stitch loop that is on the front side of the needle. INCREASE TIP FROM THE WRONG SIDE: Increase towards the right AFTER MARKER: Use left needle to pick up yarn between 2 stitches from row below, pick up yarn from the back and purl in the stitch loop that is on the front side of the needle. Increase towards the left BEFORE MARKER: Use left needle to pick up yarn between 2 stitches from row below, pick up yarn from the front and purl in the stitch loop that is on the back side of the needle. DECREASE TIP (for sleeves): Decrease 1 stitch on either side of the marker-thread mid under sleeve as follows: Work until there are 3 stitches left before the marker-thread, knit 2 together, knit 2 (marker-thread sits between these 2 stitches), slip 1 stitch as if to knit, knit 1 and pass the slipped stitch over the knitted stitch. PATTERN SLEEVE: NOTE! When working A.9 and A.6, the marker-thread on top of the sleeve matches the middle stitch in the repeat of the pattern. Work A.4 for 10 cm. Work A.5 Work A.6. Work A.5 Work A.9. Work A.5 Work stocking stitch until the sleeve measures 39-40-39-40-39-38 cm. ------------------------------------------------------- START THE PIECE HERE: ------------------------------------------------------- JUMPER – SHORT OVERVIEW OF THE PIECE: The top of the back piece is worked back and forth on circular needle as far as the armholes. Stiches are knitted up along each shoulder, increases made for the neck and the front piece worked back and forth on circular needle as far as the armholes. The front and back pieces are joined and the body is continued in the round on circular needle. Stiches are knitted up around the armholes and the sleeves worked back and forth to start with, then continued in the round with short circular needle/double pointed needles. The neck is worked in the round to finish. BACK PIECE: Cast on 35-35-41-41-47-53 stitches with circular needle size 5 mm and 1 strand of each quality (2 strands). Purl 1 row from the wrong side. Insert 1 marker, inside 3 stitches on each side. Keep them inside these 3 stitches as working onwards. Work as follows from the right side: 3 stocking stitches, increase towards the left AFTER the marker at the beginning of the row - read INCREASE TIP FROM THE RIGHT SIDE, work A.1, A.2 over the next 24-24-30-30-36-42 stitches, A.3, increase to the right BEFORE the marker at the end of the row - remember INCREASE TIP FROM THE RIGHT SIDE, 3 stocking stitches. On the next row (wrong side) increase in the same way – read INCREASE TIP FROM THE WRONG SIDE. Continue the pattern and increase both from the right and wrong side a total of 26 times in all sizes. The increased stitches are shown in A.1 and A.3. REMEMBER THE KNITTING TENSION! After the last increase there are 87-87-93-93-99-105 stitches and the piece measures approx. 12 cm from cast-on edge. Insert 1 marker here (see arrow in diagram A.1). The piece is now measured from here! Finish A.1, A.2 and A.3 (with 3 stocking stitches on each side). Now work as follows from the right side: 3 stocking stitches, A.4 until there are 6 stitches left on the row, work the first 3 stitches in A.4, so the pattern is symmetrical and 3 stocking stitches. Work A.4 1-1-2-2-3-3 times in height. Work A.5 over all stitches 1 time in height. Continue as follows from the right side: 1-1-4-4-1-4 stocking stitches, work A.6 until there are 2-2-5-5-2-5 stitches left, 2-2-5-5-2-5 stocking stitches. Work A.6 1 time in height. The piece measures approx. 16-16-18-18-20-20 cm, measured from the marker by the arrow in A.1, down the armhole. Cut the yarn, put stitches on a thread or on an extra needle and work the front piece. FRONT PIECE: Start on the left shoulder (when the garment is worn). Wind out approx. 50 cm cm yarn-end and use it to knit up stitches (this way you can pick up stitches from right side and then continue working from right side without cutting the strand afterwards). Knit up 26 stitches inside the outermost stitch (knit up 1 stitch in each stitch) along left shoulder on back piece. Work the first row from the right side as follows: 3 stocking stitches, insert 1 marker here, work A.7. Continue this pattern. On row 9 in the diagram begin to increase for the neck at the beginning of each row from the right side – remember INCREASE TIP FROM THE RIGHT SIDE, increasing after the 3 stocking stitches. Increase 1 stitch 4 times = 30 stitches. Finish A.7 (last row is from the wrong side). Cut the yarn, put stitches on a thread or on an extra needle. Work right shoulder as explained below. Wind out approx. 50 cm cm yarn-end and use it to knit up stitches. Knit up 26 stitches along the right shoulder on the back piece, inside the outermost stitch (knit up 1 stitch in each stitch). Work the first row from the right side as follows: A.8, insert 1 marker here, 3 stocking stitches. Continue this pattern. On row 9 in the diagram begin to increase for the neck at the end of each row from the right side – remember INCREASE TIP FROM THE RIGHT SIDE, increasing before the 3 stocking stitches. Increase 1 stitch 4 times = 30 stitches. Finish A.8 (last row is from the wrong side). Work the next row as follows from the right side (continue the pattern as before but now working A.4 over A.7 and A.8): Work pattern over the 30 stitches from the right front piece, cast on 27-27-33-33-39-45 stitches for the neck and work pattern over the 30 stitches from the left front piece = 87-87-93-93-99-105 stitches. Work 1 row back from the wrong side; the new stitches are worked in A.4. Work as follows from the right side: 3 stocking stitches, continue A.4 until there are 6 stitches left on the row, work the first 3 stitches in A.4, 3 stocking stitches. Work A.4 a total of 2-2-3-3-4-4 times in height. Now work A.5 over all stitches 1 time in height. Continue as follows from the right side: 1-1-4-4-1-4 stocking stitches, A.6 until there are 2-2-5-5-2-5 stitches left, 2-2-5-5-2-5 stitches in stocking stitch. Work A.6 1 time in height. The piece measures approx. 24-24-26-26-28-28 cm, measured down the armhole. Now join the back and front pieces as follows: BODY: Work the 87-87-93-93-99-105 front piece stitches on the needle and cast on 3-12-12-21-27-30 stitches at the end of the row (side), work stocking stitch over the 87-87-93-93-99-105 stitches from the back piece, cast on 3-12-12-21-27-30 stitches at the end of the row = 180-198-210-228-252-270 stitches. Work A.5 in the round (starting on round 2 as round 1 has already been worked). After A.5 work A.9 over all stitches. When A.9 is finished in height, work A.5. When A.5 is finished in height work A.4 over all stitches. Work A.4 two times in height. Work A.5; on the last round in A.5 increase 0-6-6-0-0-6 stitches evenly spaced = 180-204-216-228-252-276 stitches. Work A.6 over all stitches, finishing after either a complete or a half repeat in height, when the piece measures approx. 48-48-50-55-57-57 cm measured from the top of the shoulder. Knit 1 round and increase 60-68-76-76-84-92 stitches evenly spaced = 240-272-292-304-336-368 stitches. Change to circular needle size 4 mm. Work rib (knit 2, purl 2) for 8-10-10-10-10-10 cm. Cast off. The jumper measures approx. 56-58-60-65-67-67 from the top of the shoulder. LEFT SLEEVE: Use circular needle size 5 mm and knit up 40-40-44-44-48-48 stitches from the right side, from the bottom of the armhole up to the shoulder along the front piece then 28-28-30-30-32-32 stitches from the shoulder down to the bottom of the armhole on the back piece = 68-68-74-74-80-80 stitches. Insert 1 marker-thread in the middle of the round – it is used when working out where to start the pattern. Work back and forth as follows: 1 stocking stitch, A.4 until there is 1 stitch left, 1 stocking stitch. Continue this pattern for 1-4-4-6-8-9 cm. Now join the piece and continue in the round with short circular needle/double pointed needles size 5 mm. Insert a marker-thread mid under sleeve. Start the round at the marker-thread mid under the sleeve and work PATTERN SLEEVES. NOTE! When working patterns A.9 and A.6, the marker-thread matches the middle stitch in the pattern. When the sleeve measures 2 cm, decrease 2 stitches under the sleeve – read DECREASE TIP. NOTE! The pattern will not always fit under the sleeve when decreasing; the stitches which do not fit are worked in stocking stitch. Decrease like this every 5½-6-4½-5-3-3 cm a total of 7-6-8-7-10-9 times = 54-56-58-60-60-62 stitches. Continue working until the sleeve measures 39-40-39-40-39-38 cm. There is approx. 8 cm left. Try the jumper on and work to desired length. Knit 1 round and increase 14-16-14-16-16-18 stitches evenly spaced = 68-72-72-76-76-80 stitches. Change to double pointed needles size 4 mm and work rib (knit 2, purl 2) for 8 cm. Cast off a little loosely. The sleeve measures approx. 47-48-47-48-47-46 cm from where the stitches were picked up. RIGHT SLEEVE: Work in the same way as the left sleeve but knit up 28-28-30-30-32-32 stitches from the bottom of the armhole and up the back piece to the shoulder, then 40-40-44-44-48-48 stitches from the shoulder and down the front piece to the bottom of the armhole. Sew the bottom of each armhole – see sketch. NECK: Start on one shoulder and knit up from the right side, inside 1 edge stitch, 88 to 128 stitches with short circular needle size 4 mm. The stitch-number must be divisible by 4. Work rib in the round (knit 2, purl 2) for 10 cm. Cast off a little loosely. Fold the neck to the inside and fasten with a stitch in each side. |
||||||||||||||||||||||||||||
Diagram explanations |
||||||||||||||||||||||||||||
|
||||||||||||||||||||||||||||
 |
||||||||||||||||||||||||||||
 |
||||||||||||||||||||||||||||
 |
||||||||||||||||||||||||||||
 |
||||||||||||||||||||||||||||
 |
||||||||||||||||||||||||||||
Have you finished this pattern?Tag your pictures with #dropspattern #blueporcelainsweater or submit them to the #dropsfan gallery. Do you need help with this pattern?You'll find 33 tutorial videos, a Comments/Questions area and more by visiting the pattern on garnstudio.com. © 1982-2026 DROPS Design A/S. We reserve all rights. This document, including all its sub-sections, has copyrights. Read more about what you can do with our patterns at the bottom of each pattern on our site. |
||||||||||||||||||||||||||||


With over 40 years in knitting and crochet design, DROPS Design offers one of the most extensive collections of free patterns on the internet - translated to 17 languages. As of today we count 324 catalogues and 12290 patterns translated into English (UK/cm). 12290
We work hard to bring you the best knitting and crochet have to offer, inspiration and advice as well as great quality yarns at incredible prices! Would you like to use our patterns for other than personal use? You can read what you are allowed to do in the Copyright text at the bottom of all our patterns. Happy crafting!
Post a comment to pattern DROPS 241-1
We would love to hear what you have to say about this pattern!
If you want to leave a question, please make sure you select the correct category in the form below, to speed up the answering process. Required fields are marked *.