
Popular categories
Looking for a yarn?


Comments / Questions (46)
![]() Marjo Bottema wrote:
Marjo Bottema wrote:
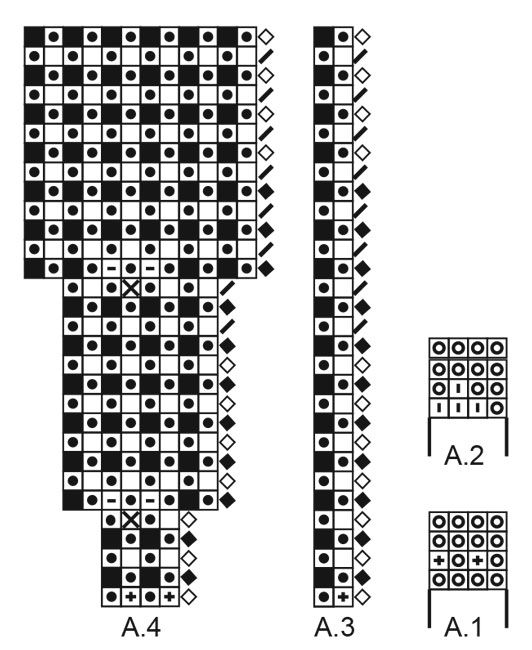
U heeft al eerder een vraag van mij beantwoord, maar dit was niet wat ik bedoelde. Bij het A4 en bij het A3 schema wordt begonnen met een vierkantje op de punt (diamantje?) als je die recht bereid kom je uit op veel meer steken, terwijl er staat (voor maat XL) bij 190 steken herhaal je het patroon 19 x, het is mij niet duidelijk wat ik met dat diamantje moet, wel of niet breien, kunt u me helpen svp
09.01.2026 - 13:36DROPS Design answered:
Dag Marjo,
Het diamantje geeft aan in welke kleur je de betreffende naald breit. Het is dus niet een steek. Alle hokjes zijn steken.
10.01.2026 - 17:13
![]() Susanne Schmaus wrote:
Susanne Schmaus wrote:
Hallo Drops Team, möchte den Pullover mit einem waschmaschinen festen Garn nach stricken. Welches Garn würden Sie mir empfehlen? LG Susanne
07.01.2026 - 20:40DROPS Design answered:
Liebe Frau Schmaus, Sie können eine Superwash Wolle - siehe hier stricken - benutzen Sie den Garnumrechner um die neue Garnmenge kalkulieren zu lassen. Viel Spaß beim Stricken!
08.01.2026 - 09:42
![]() Marjo Bottema wrote:
Marjo Bottema wrote:
Ik ben bezig met deze trui en moet nu beginnen met de Engelse patentsteek. Ik heb nu al een aantal malen gelezen, maar kom er niet uit wat ik met het vierkantje de punt moet beginnen, kunt u mij dat duidelijk maken?
06.01.2026 - 16:25DROPS Design answered:
Dag Marjo,
Je maakt 1 omslag en dan haal je 1 steek af alsof je deze averecht gaat breien, dus deze steek gaat van de linker naar de rechter naald.
07.01.2026 - 09:49
![]() Amanda wrote:
Amanda wrote:
Hello I am struggling to understand this instruction 'Work * A.4 (= 4 stitches), A.3 over 8-6-6-6-6-6 stitches (= 4-3-3-3-3-3 times in width) *, work from *-* over all stitches (= 14-17-18-19-21-23 times in width). Can you provide a more detailed explanation, I am working on size XL. Thank you
14.08.2025 - 16:01DROPS Design answered:
Hi Amanda, When working your size, you use the 4th number in each series. So you work A.4 first on the round, then work A.3 across 6 stitches (repeat A.3 x 3). Repeat these instructions 19 times on the round (across all stitches). Hope this helps. Regards, Drops team.
15.08.2025 - 06:47
![]() Susanna Piecha wrote:
Susanna Piecha wrote:
Hallo, ich benötige mal wieder Hilfe. Wenn bei dem Mikado Pullover die Muster A3 und A4 beendet sind soll eine Reihe rechte Maschen gestrickt werden. Müssen die Umschläge als einzelne Masche gesehen werden oder werden sie wie im Muster zusammengestrickt? Vielen Dank
16.01.2025 - 11:30DROPS Design answered:
Liebe Frau Piecha, die Umschläge werden im Patentmuster gestrickt, aber da es nur Zunahmen sind sollen Sie als linke oder rechte Maschen gestrickt werden = der Umschlag links oder rechts stricken (und nicht links oder rechts zusammen mit der abgehobenen Maschen) - in diesem Video zeigen wir, wie man solche Zunahmen strickt. Viel Spaß beim Stricken!
16.01.2025 - 17:32
![]() Susanna Piecha wrote:
Susanna Piecha wrote:
Hallo, der Mikado Pullover ist wirklich sehr schön, doch bei der Ankeitung A3 und A4 komme ich nicht weiter. Wird beim Umschlag und 1 Masche links abheben der Faden vor oder hinter der links abgehobenen Masche geführt? Danke
05.01.2025 - 20:26DROPS Design answered:
Liebe Frau Piecha, könnte Ihnen dieses Video helfen? Hier zeigt man, wie man Patentmuster mit 2 Farben strickt (hier ist ein Video für die Zunahmen im Patentmuster). Viel Spaß beim Stricken!
06.01.2025 - 10:53
![]() Roxanne wrote:
Roxanne wrote:
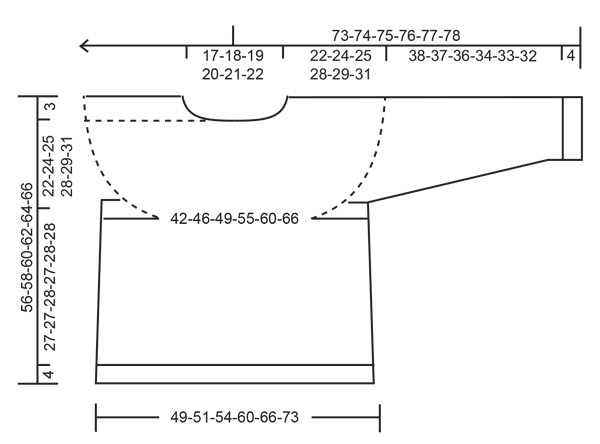
Actually, having had a closer look, I think the schematic drawings at the bottom must be showing measurements in inches. For example, a 22 inch neckline for 3xl makes more sense than a 22 cm one. Can you please confirm? Many thanks.
12.09.2024 - 09:36
![]() Roxanne wrote:
Roxanne wrote:
Can you please let me know if the diagrams at the bottom, showing the numbers for each section of the pattern, are always in inches or centimeters? Thank you.
11.09.2024 - 22:04DROPS Design answered:
Dear Roxanne, the measurements on the schematic drawings ath the bottom of patterns are given in centimeters. I hope this helps! Happy Crafting!
12.09.2024 - 03:02
![]() Susanne wrote:
Susanne wrote:
Ich habe diesen Pullover mit etwas geänderten Farben gestrickt= Grundton perlgrau und statt Curry habe ich Einhorn genommen, er ist wundervoll geworden! Ein toller leichter wärmender Begleiter, aber dennoch nie schwitzig! Toll!
15.07.2024 - 21:50
![]() Sylvie Braud wrote:
Sylvie Braud wrote:
Que veut dire les deux mailles deA3 au dessus des 6 mailles Je bloque toujours pour commencer le diagramme A3 eA4 Vous remerciant Je fais ce modèle en taille L
19.11.2023 - 23:00DROPS Design answered:
Bonjour Mme Braud, A.3 se tricote sur 2 mailles, quand on doit tricoter A.3 au-dessus de 6 mailles, on va tricoter 3 fois les 2 mailles de A.3 (= 6 mailles du diagramme A.3). Bon tricot!
20.11.2023 - 11:28
|
||||||||||||||||||||||||||||||||||
Mikado#mikadosweater |
||||||||||||||||||||||||||||||||||
 |
 |
|||||||||||||||||||||||||||||||||
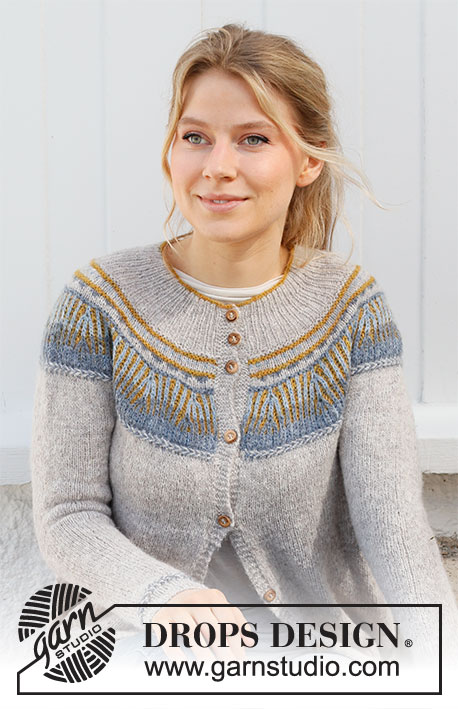
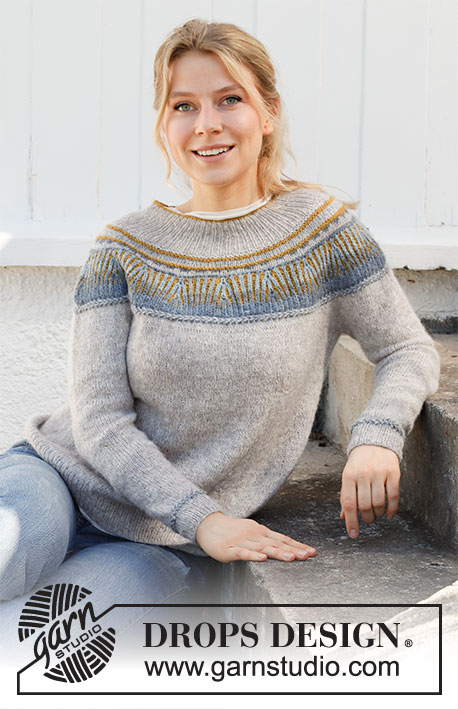
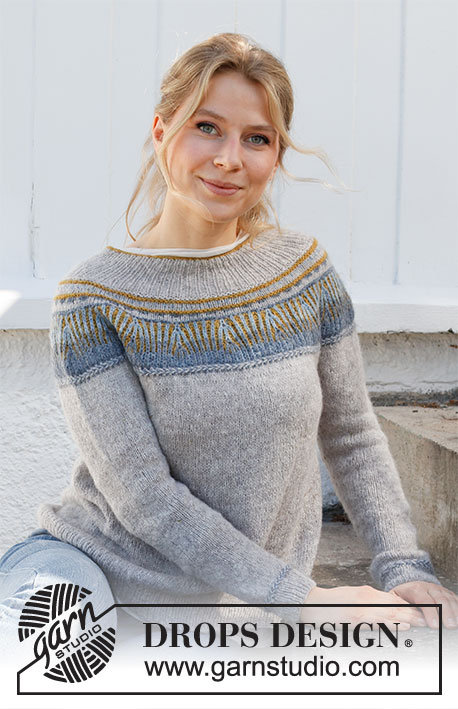
Knitted jumper in DROPS Sky. The piece is worked top down with round yoke, 2-coloured English rib and Latvian cables. Sizes S - XXXL.
DROPS 216-7 |
||||||||||||||||||||||||||||||||||
|
------------------------------------------------------- EXPLANATIONS FOR THE PATTERN: ------------------------------------------------------- PATTERN: See diagrams A.1 to A.4. Diagrams A.1 and A.2 are worked in stocking stitch with 2-coloured pattern. Diagrams A.3 and A.4 are worked in 2-coloured English rib. INCREASE TIP-1 (evenly spaced): To work out how to increase evenly, count the total number of stitches on the needle (e.g. 122 stitches) and divide by the number of increases to be made (e.g. 14) = 8.7. In this example, increase by making 1 yarn over after approx. each 9th stitch. On the next round work the yarn overs twisted to avoid holes. LATVIAN CABLE: ROUND 1: * Knit 1 with jeans blue, knit 1 with light beige *, work from *-* to end of round. ROUND 2: Bring both strands to the front of the piece (towards you). Take the jeans blue strand to the back, purl 1 and bring the strand to the front. Take the light beige strand under the jeans blue strand and then to the back of the piece, purl 1 and bring the strand to the front. Continue like this, purling alternately with jeans blue and light beige, but always take the strand UNDER the strand from the last stitch worked. ROUND 3: Work as round 2, but now always take the strand OVER the strand from the last stitch worked. INCREASE TIP-2 (for sides of body): Work until there are 2 stitches left before the marker thread, make 1 yarn over, knit 4 (marker thread sits between these 4 stitches) make 1 yarn over. On the next round work the yarn overs twisted to avoid holes. Then work the new stitches in stocking stitch DECREASE TIP (for sleeves): Decrease 1 stitch on either side of the marker thread as follows: Work until there are 3 stitches left before the marker thread, knit 2 together, knit 2 (marker thread sits between these 2 stitches), slip 1 stitch as if to knit, knit 1 and pass the slipped stitch over the knitted stitch (2 stitches decreased). CASTING-OFF TIP: To avoid the cast-off edge being tight you can cast off with a larger size needle. If the edge is still tight, make 1 yarn over after approx. each 4th stitch at the same time as casting off; the yarn overs are cast off as normal stitches. ------------------------------------------------------- START THE PIECE HERE: ------------------------------------------------------- JUMPER – SHORT OVERVIEW OF THE PIECE: The neck and yoke are worked in the round with circular needle, from mid back and top down. The yoke is divided for body and sleeves and the body is continued in the round with circular needle. The sleeves are worked with double pointed needles, top down. NECK: Cast on 118-122-126-134-140-146 stitches with circular needle size 3 mm and curry. Knit 1 round. Change to light beige (cut the curry strand). Work rib (= knit 1, purl 1) for 7-8-8-9-9-10 cm, from cast on edge. Change to circular needle size 4 mm. YOKE: ROUND 1: Knit and increase 14-14-18-18-22-26 stitches evenly spaced – read INCREASE TIP-1 = 132-136-144-152-162-172 stitches. ROUND 2: Purl. Change to curry, cut the light beige strand. ROUND 3: Knit and increase 20-20-20-20-26-28 stitches evenly spaced = 152-156-164-172-188-200 stitches. ROUND 4: Purl. ROUND 5: Work A.1 (= 4 stitches = 38-39-41-43-47-50 times in width). REMEMBER THE KNITTING TENSION! When A.1 has been worked 1 time in height continue as follows: Change to curry (you do not need to cut the light beige strand as it will soon be used again). ROUND 1: Knit and increase 12-12-12-16-20-28 stitches evenly spaced = 164-168-176-188-208-228 stitches. ROUND 2: Purl. ROUND 3: Work A.2 (= 4 stitches = 41-42-44-47-52-57 times in width). When A.2 has been worked 1 time in height, the piece measures approx. 12-13-13-14-14-15 cm. Work stocking stitch with light beige until the piece measures 12-13-13-14-15-17 cm. Continue as follows: Change to jeans blue (cut the light beige strand) and change to circular needle size 3 mm. ROUND 1: Knit and increase 4-2-4-2-2-2 stitches evenly spaced = 168-170-180-190-210-230 stitches. ROUND 2: Purl. ROUND 3: Work * A.4 (= 4 stitches), A.3 over 8-6-6-6-6-6 stitches (= 4-3-3-3-3-3 times in width) *, work from *-* over all stitches (= 14-17-18-19-21-23 times in width). When A.3 and A.4 have been worked 1 time in height there are 280-306-324-342-378-414 stitches. Knit 1 round with jeans blue. Change to circular needle size 4 mm and work LATVIAN CABLE – read description above. The piece measures approx. 21-22-22-23-24-26 cm. Continue with light beige and stocking stitch. The increases are finished in sizes S-M-L, but continue as follows in sizes XL-XXL-XXXL. SIZES XL-XXL-XXXL: On the next round increase 12-14-12 stitches evenly spaced = 354-392-426 stitches. Repeat this increase after 2 cm = 366-406-438 stitches. ALL SIZES: = 280-306-324-366-406-438 stitches. Continue with stocking stitch until the piece measures 22-24-25-28-29-31 cm from the cast-on edge. Now divide the yoke for the body and sleeves on the next round as follows: Work 40-44-47-53-59-65 stitches in stocking stitch (= half back piece), place the next 60-64-68-76-84-88 stitches on a thread for the sleeve, cast on 8 stitches under the sleeve, work 80-90-94-108-120-132 stitches in stocking stitch (= front piece), place the next 60-64-68-76-84-88 stitches on a thread for the sleeve, cast on 8 stitches under the sleeve and work 40-44-47-53-59-65 stitches in stocking stitch (= half back piece). BODY: = 176-194-204-230-254-278 stitches. Insert 1 marker thread in the middle of the 8 stitches under each sleeve (= in the sides). Allow the threads to follow your work onwards; they will be used when increasing in the sides. Work stocking stitch in the round. When the piece measures 3 cm from the division, increase 1 stitch on each side of both marker threads (= 4 stitches increased) – read INCREASE TIP-2. Increase like this every 3-5-4-4-4-3 cm a total of 7-5-6-6-6-7 times = 204-214-228-254-278-306 stitches. When the piece measures 27-27-28-27-28-28 cm from the division, change to circular needle size 3 mm and work rib (= knit 1, purl 1) for 4 cm. Cast off with knit – read CASTING-OFF TIP. The jumper measures approx. 56-58-60-62-64-66 cm from the shoulder down. SLEEVE: The sleeve is worked in the round with stocking stitch and light beige. Place the 60-64-68-76-84-88 stitches from the thread on the one side of the piece on double pointed needles size 4 mm and knit up 1 stitch in each of the 8 stitches cast on under the sleeve = 68-72-76-84-92-96 stitches. Insert a marker thread in the middle of the 8 stitches under the sleeve. Work stocking stitch in the round. When the piece measures 2 cm from the division, decrease 1 stitch on each side of the marker thread (= 2 stitches decreased) – read DECREASE TIP! Decrease like this every 2½-2½-2-1½-1½-1 cm a total of 12-13-14-17-20-21 times = 44-46-48-50-52-54 stitches. When the sleeve measures 37-36-35-33-32-31 cm from the division, work Latvian cable. Work 2 rounds of stocking stitch. Change to double pointed needles size 3 mm and work rib (knit 1, purl 1) over all stitches. Cast off with knit when the rib measures 4 cm. The sleeve measures approx. 42-41-40-38-37-36 cm from the division. Work the other sleeve in the same way. |
||||||||||||||||||||||||||||||||||
Diagram explanations |
||||||||||||||||||||||||||||||||||
|
||||||||||||||||||||||||||||||||||
 |
||||||||||||||||||||||||||||||||||
 |
||||||||||||||||||||||||||||||||||
Have you finished this pattern?Tag your pictures with #dropspattern #mikadosweater or submit them to the #dropsfan gallery. Do you need help with this pattern?You'll find 27 tutorial videos, a Comments/Questions area and more by visiting the pattern on garnstudio.com. © 1982-2026 DROPS Design A/S. We reserve all rights. This document, including all its sub-sections, has copyrights. Read more about what you can do with our patterns at the bottom of each pattern on our site. |
||||||||||||||||||||||||||||||||||


With over 40 years in knitting and crochet design, DROPS Design offers one of the most extensive collections of free patterns on the internet - translated to 17 languages. As of today we count 324 catalogues and 12290 patterns translated into English (UK/cm). 12290
We work hard to bring you the best knitting and crochet have to offer, inspiration and advice as well as great quality yarns at incredible prices! Would you like to use our patterns for other than personal use? You can read what you are allowed to do in the Copyright text at the bottom of all our patterns. Happy crafting!
Post a comment to pattern DROPS 216-7
We would love to hear what you have to say about this pattern!
If you want to leave a question, please make sure you select the correct category in the form below, to speed up the answering process. Required fields are marked *.