
Popular categories
Looking for a yarn?


Comments / Questions (92)
![]() Linda wrote:
Linda wrote:
Det står i oppskriften at en skal strikke to riller over et vist antall masker på midten, men når en skal strikke forstykke og bakstykke for seg selv, skal en fortsette med de rillene på midten?
18.12.2025 - 21:34DROPS Design answered:
Hei Linda. Det strikkes 2 riller over de midterste maskene i hver side (under ermene), om du ser på bildet (der modellen løfter armen), ser du rillene. mvh DROPS Design
22.12.2025 - 09:38
![]() Audrey wrote:
Audrey wrote:
Where does the pattern indicate the finished size measurements? I read they are at the bottom of the pattern but I do not see them there.
20.11.2025 - 08:16DROPS Design answered:
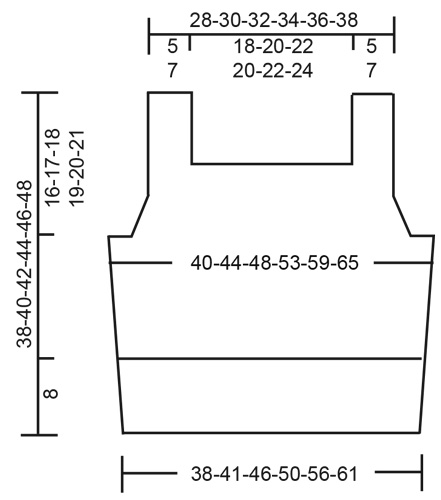
Dear Audrey, you will find all finished measurements for each size in the chart at the bottom of the page; read more about chart, measurements and sizes here. Happy knitting!
20.11.2025 - 10:27
![]() Annika wrote:
Annika wrote:
Fin!
24.06.2025 - 13:12
![]() Libby wrote:
Libby wrote:
I’m currently knitting the straps and the only length stated is for the entire piece - do you have a suggested strap length by itself? I feel like if the rest of the front piece varied from the pattern then I can no longer judge when to stop the straps (especially when only knitting one side first)
26.05.2025 - 12:41DROPS Design answered:
Dear Libby, we only have here the total length of piece, so that you can measure from where you stopped towards the measurement for your size to get the height of the strap. You can also count for your size the number of rows required for decreasing + the 3 cm ribbing - remove this from the total length to get the approximate length for straps. Happy knitting!
26.05.2025 - 14:26
![]() Hanna wrote:
Hanna wrote:
Hi I just have a question about the back part of the piece. If I am decreasing every 4th row, and decreasing the same amount as in the front, won't the back piece be twice as long? Is that supposed to be the case? This does not appear to be the case in the diagram, so I am a little confused.
22.05.2025 - 12:57DROPS Design answered:
Dear Hanna, correct, back piece will be higher than front piece as you will decrease the same number of times than on front piece but on every 4th row instead of on every 2nd row. Happy knitting!
22.05.2025 - 15:49
![]() Luna wrote:
Luna wrote:
So, when I start working back and forth. Should I have 4 sts (for the garter stitch edge) then SKPO, knit til the last 6 sts where 4 sts is for the garter stitch and then K2tog? Is this the correct way to decrease? Or should it be K2tog then the last 4 sts for the garter edge.
18.05.2025 - 20:47DROPS Design answered:
Hi Luna, The 4 garter stitches are the first 4 stitches and the last 4 stitches on each row. You decrease as you say, after the first 4 stitches at the beginning of the row, then before the last 4 stitches at the end of the row. Regards, Drops Team.
19.05.2025 - 06:57
![]() Luna wrote:
Luna wrote:
Please explain when do I start to cast off. So, I have a marker for both sides. Should I start to cast off after each marker? I have one marker as from BOR and the other which marks the side.
18.05.2025 - 20:04DROPS Design answered:
Dear Luna, you mean for armholes? From the beginning of the row cast off the first 3, 5, 8 or 10 sts (see size), work the next stitches as stated until 3,5,8 or 10 sts remain before next marker then cast off the next 6,10,16 or 20 sts, work until 3,5,8or 10 sts remain before end of the round and cast off these stitches, cut the yarn and pull it through the last stitch. Now work the 62-90 sts on front piece back and forth (back piece will be worked afterwards). Happy knitting!
19.05.2025 - 08:44
![]() Anna Eriksson wrote:
Anna Eriksson wrote:
Jag har svårt att förstå vilken storlek jag ska sticka. Brukar vara s och ibland m, hur räknar jag ut lättast vilken storlek jag ska sticka? Är det bystmåttet som avses i diagrammet (där jag antar att halva måttet står)?
06.05.2025 - 06:46DROPS Design answered:
Hei Anna. Se på målene som er oppgitt på målskissen til toppen, finn frem en topp du allerede har og liker passformen på og sammenlign med målene i målskissen med din topp for å finne den størrelsen du ønsker å strikke etter. Målene 40-44-48-53-59-65 er brystmålene på toppen, og ja, det er halve målet. mvh DROPS Design
12.05.2025 - 08:53
![]() Ali wrote:
Ali wrote:
Hello I would like some advice/help on the front piece: Work 2 edge stitches in garter stitch, * knit 2, purl 2 *, work from *-* 1-1-1-2-2-2 times in total, knit 2 and 2 stitches in garter stitch, then cast off the next 34-38-42-38-42-46 stitches for neck (cast off with knit over knit and purl over purl) So I have to work 2 in garter stitch then do I knit a few more or directly cast off the 34 stitches (for size S)? And is there a special technique for casting off purl and knit?
25.03.2025 - 23:11DROPS Design answered:
Hi Ali, You cast off the correct number of stitches straight away after the 2 garter stitches. Here is a video showing how to cast off in rib: https://www.garnstudio.com/video.php?id=228&lang=en Happy knitting!
26.03.2025 - 06:55
![]() Ali wrote:
Ali wrote:
Hello I would like some advice/help on the front piece: Work 2 edge stitches in garter stitch, * knit 2, purl 2 *, work from *-* 1-1-1-2-2-2 times in total, knit 2 and 2 stitches in garter stitch, then cast off the next 34-38-42-38-42-46 stitches for neck (cast off with knit over knit and purl over purl) So I have to work 2 in garter stitch then do I knit a few more or directly cast off the 34 stitches (for size S)? And is there a special technique for casting off purl and knit stitches?
25.03.2025 - 23:11DROPS Design answered:
Dear Ali, in size S you first work: 2 sts in garter stitch, K2, P2, K2, 2 sts in garter stitch = 10 sts for first shoulder, then cast off the next 34 sts and work the last 10 sts with 2 sts in garter stitch, K2, P2, K2, 2 sts in garter stitch. See how to cast off in rib here or find more techniques to cast off here. Happy knitting!
26.03.2025 - 08:36
|
|
Spiced Breeze#spicedbreezetop |
|
 |
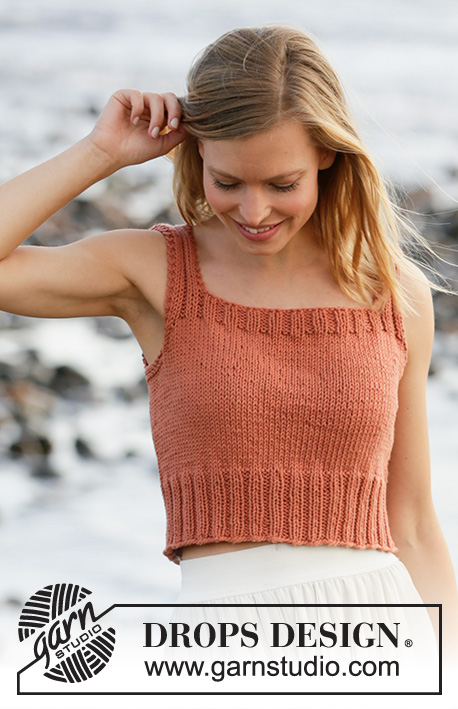 |
Knitted top in DROPS Paris. Piece is knitted in stocking stitch with edges in rib. Size: S - XXXL
DROPS 211-15 |
|
|
---------------------------------------------------------- EXPLANATION FOR THE PATTERN: ---------------------------------------------------------- GARTER STITCH (worked in the round): 1 ridge vertically = 2 rounds, i.e. knit 1 round and purl 1 round. GARTER STITCH (back and forth): Knit all rows. 1 ridge vertically = knit 2 rows. DECREASE TIP (applies to armholes): Decrease for armhole inside 2 edge stitches in garter stitch. All decreases are done from the right side. Decrease as follows after 2 edge stitches in garter stitch: Slip 1 stitch knitwise, knit 1, pass slipped stitch over stitch worked (= 1 stitch decreased). Decrease as follows before 2 edge stitches in garter stitch: Begin 2 stitches before the 2 edge stitches and knit 2 together (= 1 stitch decreased). ---------------------------------------------------------- START THE PIECE HERE: ---------------------------------------------------------- TOP - SHORT OVERVIEW OF THE PIECE: Worked in the round on circular needle, from the bottom and up to armholes. Then work front and back piece back and forth on circular needle separately. Then sew the shoulder seams. BODY: Cast on 136-148-164-180-200-220 stitches on circular needle size 4.5 mm with Paris. Knit 1 round. Then work rib in the round (= knit 2/purl 2) for 8 cm. Insert 1 marker thread at beginning of round and 1 marker thread after 68-74-82-90-100-110 stitches. Marker threads mark the sides on body. Switch to circular needle size 5 mm and work in stocking stitch in the round. REMEMBER THE KNITTING TENSION! When piece measures 21-22-23-24-25-26 cm, , work 2 ridges in GARTER STITCH - read explanation above, over the middle 10-10-14-14-20-24 stitches in each side (marker threads are in the middle of these 10-10-14-14-20-24 stitches - work the other stiches in stocking stitch). On first round after the 2 ridges cast off for armholes as follows: Cast off 3-3-5-5-8-10 stitches, work 62-68-72-80-84-90 stitches in stocking stitch, cast off 6-6-10-10-16-20 stitches (marker thread is in the middle of these 6-6-10-10-16-20 stitches), work 62-68-72-80-84-90 stitches in stocking stitch, and cast off the remaining 3-3-5-5-8-10 stitches. Cut the yarn. Finish front and back piece separately. FRONT PIECE: = 62-68-72-80-84-90 stitches. Begin from wrong side and continue with stocking stitch back and forth and 2 edge stitches in garter stitch in each side. AT THE SAME TIME on first row from right side, decrease 1 stitch in each side for armholes - read DECREASE TIP. Decrease like this on every other row (i.e. every row from right side) 4-5-5-7-7-8 times in total in each side = 54-58-62-66-70-74 stitches remain. After last decrease for armholes, purl 1 row from wrong side with 2 edge stitches in garter stitch in each side. Switch to circular needle size 4.5 mm and work next row from right side as follows: 2 edge stitches in garter stitch, * knit 2, purl 2 *, repeat from *-* until 4 stitches remain, knit 2 and finish with 2 edge stitches in garter stitch. Continue rib like this for 3 cm. On next row from right side cast off for neck as follows: Work 2 edge stitches in garter stitch, * knit 2, purl 2 *, work from *-* 1-1-1-2-2-2 times in total, knit 2 and 2 stitches in garter stitch, then cast off the next 34-38-42-38-42-46 stitches for neck (cast off with knit over knit and purl over purl), work 2 stitches in garter stitch, * knit 2, purl 2 *, work from *-* 1-1-1-2-2-2 times in total, knit 2 and finish 2 edge stitches in garter stitch. There are now 10-10-10-14-14-14 stitches remain in each side for shoulder strap. Finish the shoulder straps separately. SHOULDER STRAP: = 10-10-10-14-14-14 stitches. Work rib back and forth as before with 2 edge stitches in garter stitch in each side until entire piece measures 38-40-42-44-46-48 cm from cast-on edge (or desired length). Cast off. Work the other shoulder strap the same way. BACK PIECE: = 62-68-72-80-84-90 stitches. Begin from wrong side and continue with stocking stitch back and forth and 2 edge stitches in garter stitch in each side. AT THE SAME TIME on first row from right side, decrease 1 stitch in each side for armholes - read DECREASE TIP. Decrease like this on every 4th row (not on every other row on front piece) 4-5-5-7-7-8 times in total in each side = 54-58-62-66-70-74 stitches. After last decrease for armholes, purl 1 row from wrong side with 2 edge stitches in garter stitch in each side. Switch to circular needle size 4.5 mm and work next row from right side as follows: 2 edge stitches in garter stitch, * knit 2, purl 2 *, repeat from *-* until 4 stitches remain, knit 2 and finish with 2 edge stitches in garter stitch. Continue rib like this for 3 cm. On next row from right side cast off for neck as follows: Work 2 edge stitches in garter stitch, * knit 2, purl 2 *, work from *-* 1-1-1-2-2-2 times in total, knit 2 and 2 stitches in garter stitch, then cast off the next 34-38-42-38-42-46 stitches for neck (cast off with knit over knit and purl over purl), work 2 stitches in garter stitch, * knit 2, purl 2 *, work from *-* 1-1-1-2-2-2 times in total, knit 2 and finish 2 edge stitches in garter stitch. There are now 10-10-10-14-14-14 stitches remain in each side for shoulder strap. Work shoulder straps separately the same way as on front piece. ASSEMBLY: Sew the shoulder seams. |
|
 |
|
Have you finished this pattern?Tag your pictures with #dropspattern #spicedbreezetop or submit them to the #dropsfan gallery. Do you need help with this pattern?You'll find 21 tutorial videos, a Comments/Questions area and more by visiting the pattern on garnstudio.com. © 1982-2026 DROPS Design A/S. We reserve all rights. This document, including all its sub-sections, has copyrights. Read more about what you can do with our patterns at the bottom of each pattern on our site. |
|


With over 40 years in knitting and crochet design, DROPS Design offers one of the most extensive collections of free patterns on the internet - translated to 17 languages. As of today we count 324 catalogues and 12290 patterns translated into English (UK/cm). 12290
We work hard to bring you the best knitting and crochet have to offer, inspiration and advice as well as great quality yarns at incredible prices! Would you like to use our patterns for other than personal use? You can read what you are allowed to do in the Copyright text at the bottom of all our patterns. Happy crafting!
Post a comment to pattern DROPS 211-15
We would love to hear what you have to say about this pattern!
If you want to leave a question, please make sure you select the correct category in the form below, to speed up the answering process. Required fields are marked *.