
Popular categories
Looking for a yarn?


Comments / Questions (166)
![]() Anne wrote:
Anne wrote:
Miten vartalon 10 ja 10 päätetyt ja hihojen päätetyt 10 silmukkaa., viimeistellään lopussa
08.05.2024 - 22:27
![]() Anne wrote:
Anne wrote:
Miten vartalo-osan päätetyt10 ja 10 silmukkaa , sekä hihojen päätetyt 10 silmukkaa huolitellaan lopussa.
08.05.2024 - 22:22DROPS Design answered:
Hei, nämä silmukat ommellaan yhteen = kainalosaumat.
09.05.2024 - 12:45
![]() Nadia wrote:
Nadia wrote:
Buongiorno, per una taglia xs qual è la proporzione di maglie? Grazie mille
03.05.2024 - 10:03DROPS Design answered:
Buonasera Nadia, per un'assistenza così personalizzata può rivolgersi al suo rivenditore DROPS di fiducia. Buon lavoro!
03.05.2024 - 16:25
![]() Wietske wrote:
Wietske wrote:
Goedenavond, ik ben bezig met de eerste helft van de halsrand, maar ik begrijp niet wat ik met de 4 eerste steken moet doen die op de hulpdraad staan.
14.04.2024 - 19:23DROPS Design answered:
Dag Wietske,
Je breit de vier steken die op de naald staan heen en weer waarbij je de laatste steek van die 4 steeds samen breit met de steken die je op een hulpdraad hebt gezet. Na 4 keer heen en weer breien zijn de steken die op de hulpdraad stonden allemaal samengebreid.
15.04.2024 - 21:16
![]() Carola Kaandorp wrote:
Carola Kaandorp wrote:
De instructie voor de halsrand snapte ook ik niet. Heb de trui inmiddels mooi afgewerkt. Voegde een markeerdraad middenachter in en volgde de instructie vanaf “Brei als volgt aan de goede kant”, waarbij ik de instructie negeerde om steken op een hulpdraad te zetten.
01.04.2024 - 18:11
![]() Annarosa wrote:
Annarosa wrote:
Per favore, aiutatemi. Non riesco a capire come terminare il collo. Devo mettere un segnapunti a metà dietro. E poi? Cosa vuol dire mettere da parte gli ultimi 4 punti? E lavorare i primi 4? Forse è una domanda stupida, ma non sono molto esperta e non riesco a finire. Grazie per l'aiuto
26.03.2024 - 23:20DROPS Design answered:
Buonasera Annarosa, deve mettere in sospeso le ultime 4 maglie su un fermamaglie o un filo di scarto, e deve lavorare sulle prime 4. Buon lavoro!
28.03.2024 - 19:13
![]() Journeau wrote:
Journeau wrote:
Bonjour j’aimerais faire ce modèle en lace et kid Silk mais je vois que la lace n’est plus dispo. Par quoi peut elle être remplacée?
11.02.2024 - 16:17DROPS Design answered:
Bonjour Mme Journeau, utilisez notre convertisseur pour voir les alternatives possibles et les quantités correspondantes; n'oubliez pas de bien faire votre échantillon au préalable. Bon tricot!
12.02.2024 - 08:51
![]() Journeau wrote:
Journeau wrote:
Bonjour j’aimera faire ce modèle en laine drops lace et kid Silk mais je vois que la lace n’est plus disponible. Par quoi peut on la remplacer? Merci pour votre réponse Anne Journeau
11.02.2024 - 16:16
![]() Piia wrote:
Piia wrote:
Mikä on puseron ympärysmitta koossa XL ja XXL? Ohjeessa on vain silmukka määrä. Noin mitta käy.
31.01.2024 - 15:36DROPS Design answered:
Mitat löytyvät ohjeen alapuolella olevasta mittapiirroksesta. Koon XL ympärys on 112 cm ja koon XXL ympärys on 124 cm.
08.02.2024 - 18:07
![]() Annette wrote:
Annette wrote:
Ich komme beim V Ausschnitt nicht weiter.Es wird in Hin- und Rückreihen gestrickt,also wird die Arbeit geteilt.Dann habe ich aber am Rückenteil einen riesen Schlitz.
15.01.2024 - 15:57DROPS Design answered:
Liebe Annette, die Passe wird zuerst in Runden gestrickt, aber dann nach 6 bis 12 cm (siehe Grösse) wird man für den V-Ausschnitt auch abnehmen, d.h. Am ende der letzten Runde schneiden Sie den Faden (die Reihen werden nicht mehr in der Mitte vom Rückenteil anfangen) und jetzt beginnen Sie in Hin- und rückreihen in der Mitte vorne mit den letzten Maschen A.1 stricken Sie die 4 Maschen A.2, dann stricken Sie die ganze Hin-Reihe mit Abnahmen wie zuvor, und enden die Reihe mit A.3. So stricken Sie weiter, mit Raglan- und V-Halsausschnitt- Abnahmen. Viel Spaß beim stricken!
15.01.2024 - 16:33
|
||||||||||
December Moon#decembermoonsweater |
||||||||||
 |
 |
|||||||||
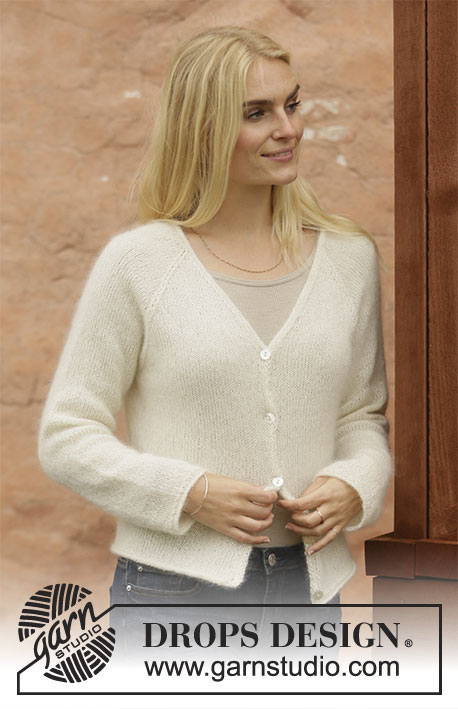
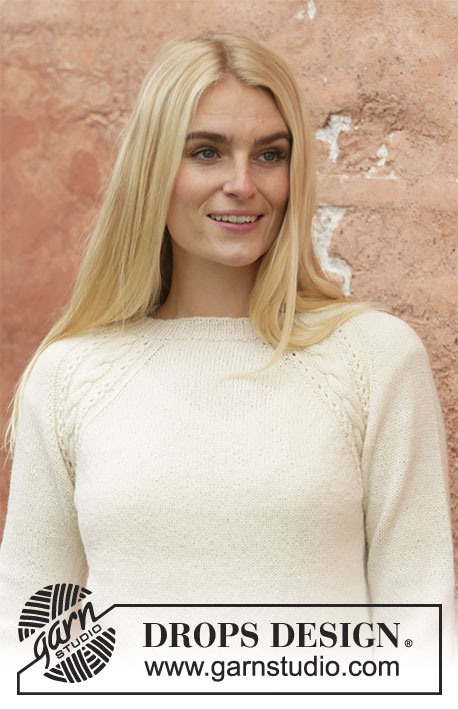
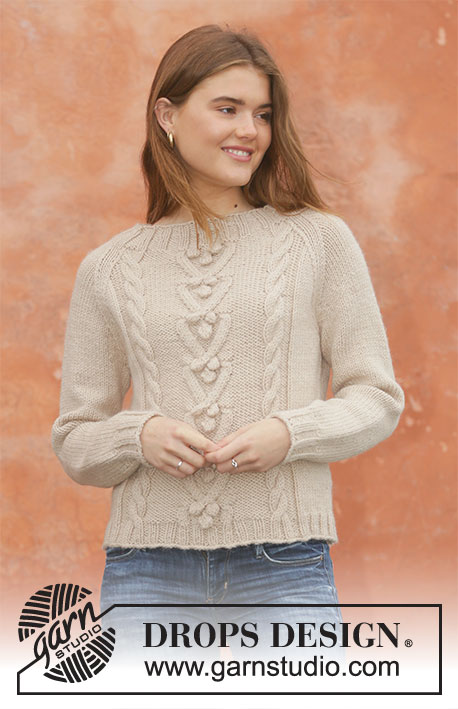
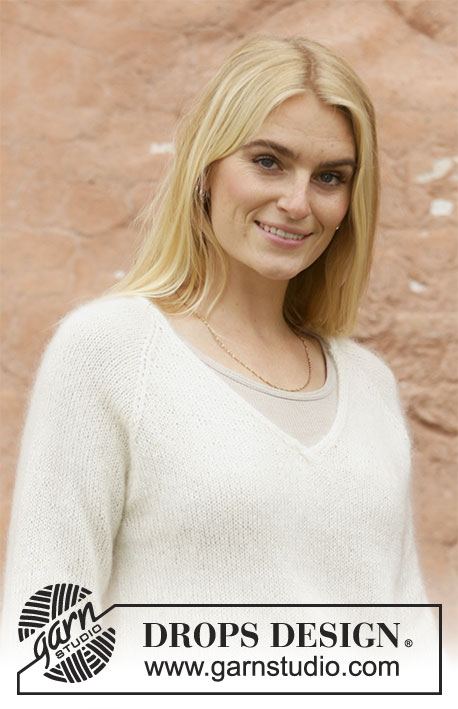
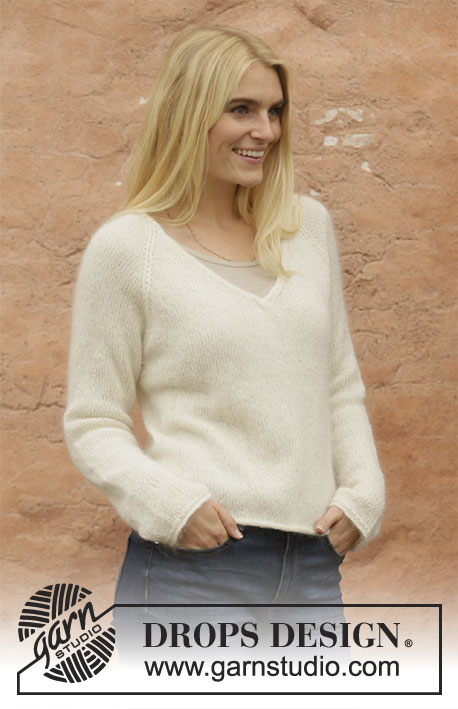
Knitted jumper with raglan and V-neck in DROPS Lace and DROPS Kid-Silk or DROPS Sky. Size: S - XXXL
DROPS 206-12 |
||||||||||
|
---------------------------------------------------------- EXPLANATION FOR THE PATTERN: ---------------------------------------------------------- PATTERN: See diagrams A.1 to A.3. Diagrams show all rows in pattern seen from the right side. INCREASE TIP (applies to sleeves): Work until 2 stitches remain before marker thread, 1 yarn over, knit 4 (marker thread is in the middle of these stitches), 1 yarn over. On next round knit yarn overs twisted to avoid holes. Then work the new stitches in stocking stitch. RAGLAN: All decreases are done from the right side! Decrease 1 stitch on each side of marker thread as follows: Work until 2 stitches remain before marker thread, knit 2 together, marker thread is here, slip 1 stitch knitwise, knit 1, pass slipped stitch over stitch worked. Repeat at each of the remaining marker threads (= 8 stitches decreased). V-NECK: Decrease for V-neck on front piece. All decreases are done from the right side! Decrease as follows after A.2: Slip 1 stitch knitwise, knit 1, pass slipped stitch over (= 1 stitch decreased). Decrease as follows before A.3: Work until 2 stitches remain before A.3, knit the next 2 stitches together (= 1 stitch decreased). ---------------------------------------------------------- START THE PIECE HERE: ---------------------------------------------------------- JUMPER - SHORT OVERVIEW OF THE PIECE: Worked in the round on circular needle up to V-neck, then work back and forth until yoke is done. Finish by working the neck edges. Work sleeves in the round on double pointed needles/a short circular needle. BODY: Cast on 184-200-220-236-260-288 stitches on circular needle size 4.5 mm with 1 strand Lace + 1 strand Kid-Silk (= 2 strands) or 1 strand Sky. Work rolling edge as follows: Knit 1 round. Switch to circular needle size 4 mm and knit 3 rounds. Work next round as follows: * Knit 1, purl 1 *, repeat from *-* the entire round. Now work in stocking stitch in the round. REMEMBER THE KNITTING TENSION! When piece measures 31-31-31-31-30-30 cm, cast off stitches for armholes as in each side as follows: Work the first 42-46-50-54-59-64 stitches on round (= half back piece), cast off the next 8-8-10-10-12-16 stitches for sleeve, work the next 84-92-100-108-118-128 stitches (= front piece), cast off the next 8-8-10-10-12-16 stitches for armhole, work the remaining 42-46-50-54-59-64 stitches. Put piece aside and work the sleeves. SLEEVE: Cast on 50-52-54-56-56-60 stitches on circular needle size 4.5 mm with 1 strand Lace + 1 strand Kid-Silk (= 2 strands) or 1 strand Sky. Work rolling edge as follows: Knit 1 round. Switch to double pointed needles size 4 mm and knit 3 rounds. Work next round as follows: * Knit 1, purl 1 *, repeat from *-* the entire round. Work in stocking stitch in the round. When piece measures 10-10-10-8-9-9 cm, increase 2 stitches under sleeve - read INCREASE TIP! Increase like this every 3½-2½-2-2-1½-1½ cm 10-13-16-17-18-18 times in total = 70-78-86-90-92-96 stitches. When sleeve measures 46-45-44-43-40-39 cm (shorter measurements in the larger sizes because of longer yoke), cast off the middle 8-8-10-10-12-16 stitches under sleeve (= 4-4-5-5-6-8 stitches on each side of marker thread) = 62-70-76-80-80-80 stitches. Put piece aside and knit another sleeve the same way. YOKE: Slip sleeves on to same circular needle as body where armholes were cast off = 292-324-352-376-396-416 stitches. Now insert 4 marker threads in the piece between front piece, back piece and sleeves, but displace marker threads so that there are 1-1-1-2-4-6 stitches in each side of front piece and back piece on each side of sleeves. I.e. there are 82-90-98-104-110-116 stitches for front and back piece, and 64-72-78-84-88-92 stitches for each sleeve. Start round mid back and continue in the round with stocking stitch. AT THE SAME TIME on first round begin decrease for raglan, and when piece measures 6-7-8-9-11-12 cm from where sleeves were slipped onto same circular needle as body, work V-neck on front piece: RAGLAN: Decrease for RAGLAN - read explanation above. Decrease like this every 4th round 2-1-1-1-3-4 times and every other round/row 22-27-30-33-33-34 times (= 24-28-31-34-36-38 times). V-NECK: When yoke measures 6-7-8-9-11-12 cm, work A.1 over the middle 8 stitches on front piece – adjust so that first row in A.1 is worked on a round with decreases (for raglan). When A.1 has been worked vertically, work back to beginning of round mid back. Cut the yarn. Now divide front piece in the middle of A.1, and work back and forth, start from right side, at V-neck on front piece as follows: Work A.2 over the first 4 stitches from division in the middle of front piece, decrease 1 stitch for V-NECK – read explanation above, work stocking stitch (continue decrease for raglan as before) until 6 stitches remain towards division in the middle of front piece in opposite side, decrease 1 stitch – remember V-NECK, work A.3 over the last 4 stitches. Continue back and forth like this, and decrease for V-neck every other row 7-6-7-5-6-6 times and every 4th row 5-6-6-8-8-9 times (= 12-12-13-13-14-15 stitches in total decreased for V-neck in each side). When all decreases for V-neck and raglan are done, there are 76-76-78-78-80-82 stitches on needle. Work next row from right side as follows: Knit the first 3 stitches, purl the next 2 stitches together (= 1 stitch decreased), knit until 5 stitches remain on needle, purl the next 2 stitches together (= 1 stitch decreased), knit the last 3 stitches = 74-74-76-76-78-80 stitches. Work 1 row from wrong side with knit over knit and purl over purl. Jumper measures approx. 54-56-58-60-62-64 cm from shoulder and down. NECK EDGE: Insert a marker thread mid back. Slip the last 4 stitches on needle on a stitch holder, and work back and forth over the first 4 stitches for neck edge, at the same time work neck edge together with the remaining stitch on sleeve and neck line on back piece as follows: Work as follows from right side: ROW 1: Knit the first 3 stitches, knit the next 2 stitches together (= 1 stitch decreased). ROW 2: Turn and purl the 4 stitches. ROW 3: Knit the first 3 stitches, knit the next 3 stitches together (= 2 stitches decreased). ROW 4: Turn and purl the 4 stitches. ROWS 5-8: Work the same way as on 3rd and 4th row. Repeat rows 1-8 until you reach the marker thread mid back in the neck. Cast off the 4 stitches on neck edge. Slip the 4 stitches from stitch holder on 4 mm needles and work from wrong side as follows: ROW 1: Purl the first 3 stitches, purl the next 2 stitches together (= 1 stitch decreased). ROW 2: Turn and knit the 4 stitches. ROW 3: Purl the first 3 stitches, purl the next 3 stitches together (= 2 stitches decreased). ROW 4: Turn and knit the 4 stitches. ROWS 5-8: Work the same way as on 3rd and 4th row. Repeat rows 1-8 until reach the marker thread mid back in the neck. Cast off the 4 stitches on neck edge. Sew cast-off edge together on the 2 neck edges mid back in the neck. Fasten off. |
||||||||||
Diagram explanations |
||||||||||
|
||||||||||
 |
||||||||||
Have you finished this pattern?Tag your pictures with #dropspattern #decembermoonsweater or submit them to the #dropsfan gallery. Do you need help with this pattern?You'll find 31 tutorial videos, a Comments/Questions area and more by visiting the pattern on garnstudio.com. © 1982-2026 DROPS Design A/S. We reserve all rights. This document, including all its sub-sections, has copyrights. Read more about what you can do with our patterns at the bottom of each pattern on our site. |
||||||||||


With over 40 years in knitting and crochet design, DROPS Design offers one of the most extensive collections of free patterns on the internet - translated to 17 languages. As of today we count 324 catalogues and 12290 patterns translated into English (UK/cm). 12290
We work hard to bring you the best knitting and crochet have to offer, inspiration and advice as well as great quality yarns at incredible prices! Would you like to use our patterns for other than personal use? You can read what you are allowed to do in the Copyright text at the bottom of all our patterns. Happy crafting!
Post a comment to pattern DROPS 206-12
We would love to hear what you have to say about this pattern!
If you want to leave a question, please make sure you select the correct category in the form below, to speed up the answering process. Required fields are marked *.