
Popular categories
Looking for a yarn?


Comments / Questions (166)
![]() Jessica wrote:
Jessica wrote:
Hallo, ich hänge bei der Halsblende. Ich konnte die 1. Seite nun so weit stricken, bin mir jedoch unsicher wieso 4 Maschen still gelegt werden. Ich habe, wenn man die Markierung hinten in der Mitte anschaut, die 4 Maschen rechts still gelegt. Ich würde jetzt die 4 letzten Maschen auf der Nadel abketten und anschlissend die 4 Maschen wieder aufnehmen und die Halsblende auf der anderen Aussenseite des V-Ausschnittes anfangen. Wo ist nun mein Denkfehler? Danke für die Hilfe
22.12.2020 - 18:11DROPS Design answered:
Liebe Jessica, die 4 Maschen beidseitig werden dann nach und nach mit den anderen Maschen bis zur Mitte von Halsausschnitt Rückenteil gestrickt - stricken Sie die 3 ersten Maschen und die letzte mit der nächsten Maschen = 4 M auf der Nadel (und 1 M von der Vorderseite wurde damit gestrickt), bei der nächsten Hinreihe stricken Sie 3 M zusammen (die 4. + die 2 nächsten) und immer so weiterstricken, bei jeder Hinreihe stricken Sie 2 M zusammen mit der letzen Maschen bis alle Maschen bis mitten in der Halsauschnitt Rückenteil gestrickt werden. Dann die 4 M von der anderen Seite genauso stricken nur bei den Rückreihen zusammenstricken. Viel Spaß beim stricken!
23.12.2020 - 06:49
![]() Jessica wrote:
Jessica wrote:
Hallo, ich hänge bei der Halsblende. Ich konnte die 1. Seite nun so weit stricken, bin mir jedoch unsicher wieso 4 Maschen still gelegt werden. Ich habe, wenn man die Markierung hinten in der Mitte anschaut, die 4 Maschen rechts still gelegt. Ich würde jetzt die 4 letzten Maschen auf der Nadel abketten und anschlissend die 4 Maschen wieder aufnehmen und die Halsblende auf der anderen Aussenseite des V-Ausschnittes anfangen. Wo ist nun mein Denkfehler? Danke für die Hilfe
22.12.2020 - 18:10
![]() Nathalie wrote:
Nathalie wrote:
Bonjour, si j'ai bien compris la construction du pull , il se réalise en bottom up circulaire ? du moins pour le début du pull. Peut-on , avec ce modèle tricoter les manches dans une autre couleur en suivant la démarcation du raglan ? Merci bien
12.12.2020 - 16:44DROPS Design answered:
Bonjour Nathalie, ce pull se tricote effectivement de bas en haut, d'abord en rond jusqu'aux emmanchures, puis on tricote l'empiècement en rangs uniquement après 6 à 12 cm lorsque l'on va diviser l'ouvrage pour l'encolure -V, pendant ces 6 à 12 cm, on va encore tricoter en rond (le dos, le devant et les manches), changer de couleur à chaque manche risque d'être ici compliqué. Vous trouverez ici quelques informations pour adapter un modèle sur aiguilles droites. Bon tricot!
14.12.2020 - 08:17
![]() Christine wrote:
Christine wrote:
Merci beaucoup. J'ai tricoté beaucoup de vos modèles que je trouve très originaux. Les explications sont claires en général et les tutoriels bien utiles. Merci à vous.
11.12.2020 - 10:07
![]() Christine wrote:
Christine wrote:
Bonjour, Avant de passer commande je voudrais être sûre d'une chose : si je comprends bien, ce modèle se tricote soit à 2 laines (Lace+Silk) soit avec une seule laine (Sky) ? Pouvez-vous me confirmer ? Merci d'avance.
10.12.2020 - 16:23DROPS Design answered:
Bonjour Christine, c'est tout à fait exact. Bon tricot!
11.12.2020 - 06:51
![]() Eunice Ribeiro wrote:
Eunice Ribeiro wrote:
Adoro os trabalhos da drops , sao excelentes mas em Portugal a técnica É diferente... só mesmo quem tem muita experiencia e trico NESTE modelo206-12 cheguei ao decote em v! e bloquei !terei de fazer como sei deveriam apostar mais nos vídeos, para os modelos mais trabalhados. pensem nisso com carinho. :-)
12.11.2020 - 16:43
![]() Pascale wrote:
Pascale wrote:
Bonjour, puis j’ai un avoir le tuto en français du pull 206 12 ? Merci d’avance.
23.10.2020 - 17:46DROPS Design answered:
Bonjour Pascale, bien sûr :) tous nos modèles sont disponibles en français: cliquez sur le menu déroulant sous la photo et choisissez "français". Bon tricot!
26.10.2020 - 13:19
![]() Yolaine wrote:
Yolaine wrote:
Merci pour votre réponse. Effectivement, la baby alpaca silk a la même composition, mais pas du tout la même épaisseur, et pas le même prix...c'est dommage, je l'utilisais en double avec la brushed aplaca silk, et le résultat me convenait
19.10.2020 - 09:30
![]() Yolaine wrote:
Yolaine wrote:
Bonjour, je découvre que le fil lace est supprimé, allez-vous proposer un fil équivalent ? Car je l'ai beaucoup tricoté sur mes derniers ouvrages, et je l'apprécie bien. Merci
18.10.2020 - 10:08DROPS Design answered:
Bonjour Yolaine, rien n'est actuellement prévu - toutefois DROPS BabyAlpaca Silk a la même composition que DROPS Lace, n'hésitez pas à bien faire votre échantillon au préalable pour être bien sûre d'avoir les bonnes mesures. Bon tricot!
19.10.2020 - 08:46
![]() Laurence wrote:
Laurence wrote:
Bonjour merci pour les réponses précédentes. J ai une demande de confirmation pour le raglan d après une réponse en allemand ci dessous: je fais tour 1 : diminution 8 mailles (2x4) ; tour 2, , 3 et 4 rien ; tour 5 , 7, 9 etc diminution 8 mailles ( ceci 33 fois ) . l explicatif dit diminuer 33 fois tous les 2 tours ce qui est exactement l inverse je ne vais pas diminuer 33x 8 mailles= 264 maille au rang 5 ça n a aucun sens . cordialement
07.10.2020 - 23:43DROPS Design answered:
Bonjour Laurence, pour le raglan vous diminuez 8 m à chaque tour de diminutions - cf RAGLAN- en XL: 1 x tous les 2 tours + 33 x tous les 2 tours et en XXL 3 x tous les 4 tours et 33 x tous les 2 tours, autrement dit vous allez diminuer au total en XL:34 x 8 m et en XXL 36 x 8 m au total - en même temps, vous diminuer pour l'encolure V; J'espère que ces indications vont vous aider. Bon tricot!
08.10.2020 - 10:39
|
||||||||||
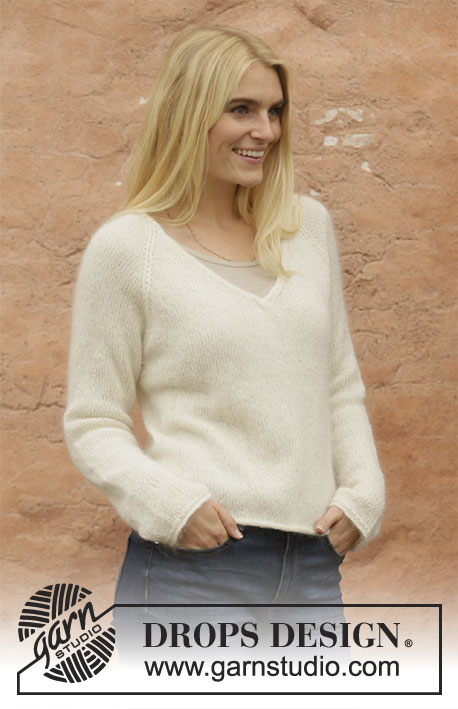
December Moon#decembermoonsweater |
||||||||||
 |
 |
|||||||||
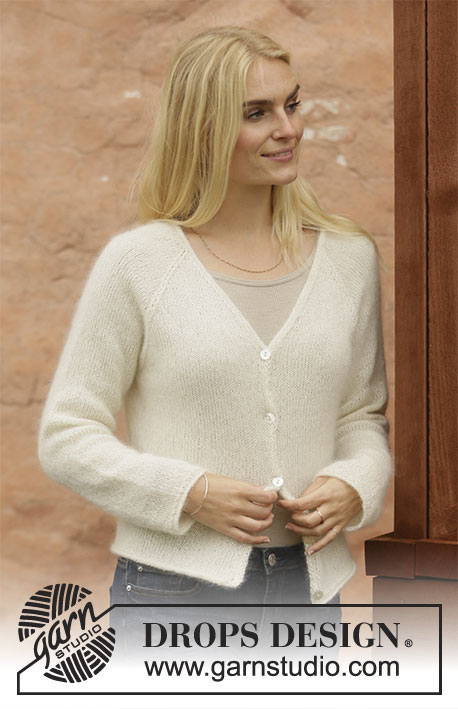
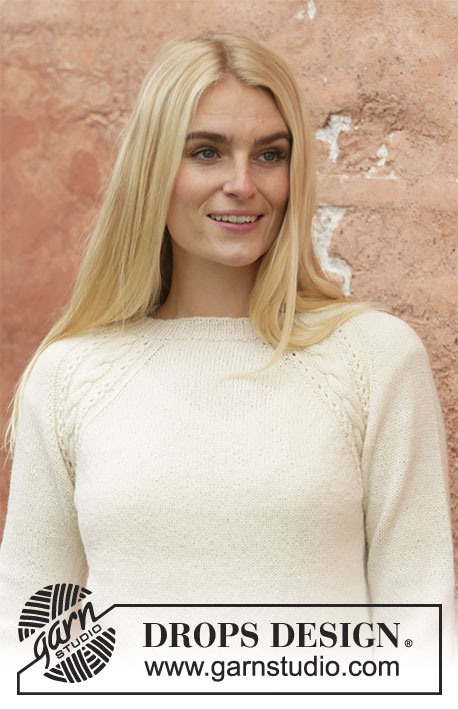
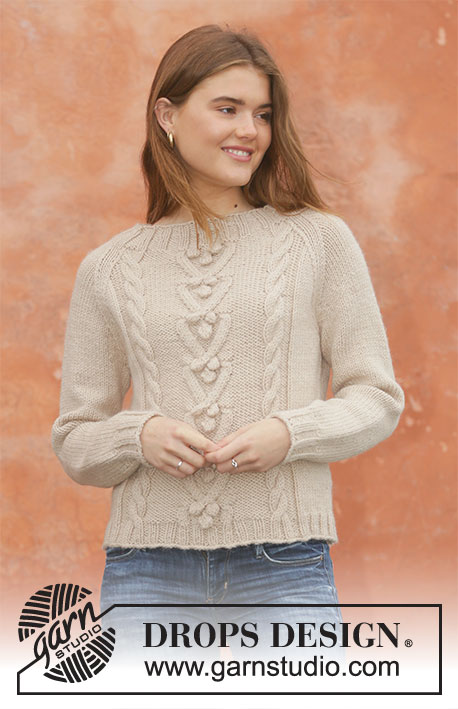
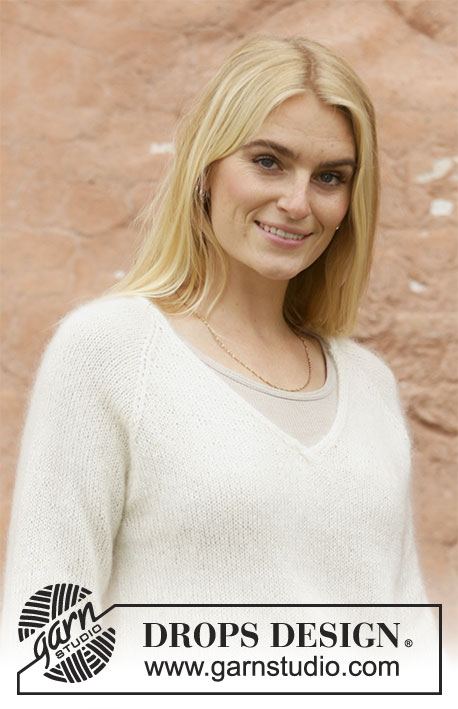
Knitted jumper with raglan and V-neck in DROPS Lace and DROPS Kid-Silk or DROPS Sky. Size: S - XXXL
DROPS 206-12 |
||||||||||
|
---------------------------------------------------------- EXPLANATION FOR THE PATTERN: ---------------------------------------------------------- PATTERN: See diagrams A.1 to A.3. Diagrams show all rows in pattern seen from the right side. INCREASE TIP (applies to sleeves): Work until 2 stitches remain before marker thread, 1 yarn over, knit 4 (marker thread is in the middle of these stitches), 1 yarn over. On next round knit yarn overs twisted to avoid holes. Then work the new stitches in stocking stitch. RAGLAN: All decreases are done from the right side! Decrease 1 stitch on each side of marker thread as follows: Work until 2 stitches remain before marker thread, knit 2 together, marker thread is here, slip 1 stitch knitwise, knit 1, pass slipped stitch over stitch worked. Repeat at each of the remaining marker threads (= 8 stitches decreased). V-NECK: Decrease for V-neck on front piece. All decreases are done from the right side! Decrease as follows after A.2: Slip 1 stitch knitwise, knit 1, pass slipped stitch over (= 1 stitch decreased). Decrease as follows before A.3: Work until 2 stitches remain before A.3, knit the next 2 stitches together (= 1 stitch decreased). ---------------------------------------------------------- START THE PIECE HERE: ---------------------------------------------------------- JUMPER - SHORT OVERVIEW OF THE PIECE: Worked in the round on circular needle up to V-neck, then work back and forth until yoke is done. Finish by working the neck edges. Work sleeves in the round on double pointed needles/a short circular needle. BODY: Cast on 184-200-220-236-260-288 stitches on circular needle size 4.5 mm with 1 strand Lace + 1 strand Kid-Silk (= 2 strands) or 1 strand Sky. Work rolling edge as follows: Knit 1 round. Switch to circular needle size 4 mm and knit 3 rounds. Work next round as follows: * Knit 1, purl 1 *, repeat from *-* the entire round. Now work in stocking stitch in the round. REMEMBER THE KNITTING TENSION! When piece measures 31-31-31-31-30-30 cm, cast off stitches for armholes as in each side as follows: Work the first 42-46-50-54-59-64 stitches on round (= half back piece), cast off the next 8-8-10-10-12-16 stitches for sleeve, work the next 84-92-100-108-118-128 stitches (= front piece), cast off the next 8-8-10-10-12-16 stitches for armhole, work the remaining 42-46-50-54-59-64 stitches. Put piece aside and work the sleeves. SLEEVE: Cast on 50-52-54-56-56-60 stitches on circular needle size 4.5 mm with 1 strand Lace + 1 strand Kid-Silk (= 2 strands) or 1 strand Sky. Work rolling edge as follows: Knit 1 round. Switch to double pointed needles size 4 mm and knit 3 rounds. Work next round as follows: * Knit 1, purl 1 *, repeat from *-* the entire round. Work in stocking stitch in the round. When piece measures 10-10-10-8-9-9 cm, increase 2 stitches under sleeve - read INCREASE TIP! Increase like this every 3½-2½-2-2-1½-1½ cm 10-13-16-17-18-18 times in total = 70-78-86-90-92-96 stitches. When sleeve measures 46-45-44-43-40-39 cm (shorter measurements in the larger sizes because of longer yoke), cast off the middle 8-8-10-10-12-16 stitches under sleeve (= 4-4-5-5-6-8 stitches on each side of marker thread) = 62-70-76-80-80-80 stitches. Put piece aside and knit another sleeve the same way. YOKE: Slip sleeves on to same circular needle as body where armholes were cast off = 292-324-352-376-396-416 stitches. Now insert 4 marker threads in the piece between front piece, back piece and sleeves, but displace marker threads so that there are 1-1-1-2-4-6 stitches in each side of front piece and back piece on each side of sleeves. I.e. there are 82-90-98-104-110-116 stitches for front and back piece, and 64-72-78-84-88-92 stitches for each sleeve. Start round mid back and continue in the round with stocking stitch. AT THE SAME TIME on first round begin decrease for raglan, and when piece measures 6-7-8-9-11-12 cm from where sleeves were slipped onto same circular needle as body, work V-neck on front piece: RAGLAN: Decrease for RAGLAN - read explanation above. Decrease like this every 4th round 2-1-1-1-3-4 times and every other round/row 22-27-30-33-33-34 times (= 24-28-31-34-36-38 times). V-NECK: When yoke measures 6-7-8-9-11-12 cm, work A.1 over the middle 8 stitches on front piece – adjust so that first row in A.1 is worked on a round with decreases (for raglan). When A.1 has been worked vertically, work back to beginning of round mid back. Cut the yarn. Now divide front piece in the middle of A.1, and work back and forth, start from right side, at V-neck on front piece as follows: Work A.2 over the first 4 stitches from division in the middle of front piece, decrease 1 stitch for V-NECK – read explanation above, work stocking stitch (continue decrease for raglan as before) until 6 stitches remain towards division in the middle of front piece in opposite side, decrease 1 stitch – remember V-NECK, work A.3 over the last 4 stitches. Continue back and forth like this, and decrease for V-neck every other row 7-6-7-5-6-6 times and every 4th row 5-6-6-8-8-9 times (= 12-12-13-13-14-15 stitches in total decreased for V-neck in each side). When all decreases for V-neck and raglan are done, there are 76-76-78-78-80-82 stitches on needle. Work next row from right side as follows: Knit the first 3 stitches, purl the next 2 stitches together (= 1 stitch decreased), knit until 5 stitches remain on needle, purl the next 2 stitches together (= 1 stitch decreased), knit the last 3 stitches = 74-74-76-76-78-80 stitches. Work 1 row from wrong side with knit over knit and purl over purl. Jumper measures approx. 54-56-58-60-62-64 cm from shoulder and down. NECK EDGE: Insert a marker thread mid back. Slip the last 4 stitches on needle on a stitch holder, and work back and forth over the first 4 stitches for neck edge, at the same time work neck edge together with the remaining stitch on sleeve and neck line on back piece as follows: Work as follows from right side: ROW 1: Knit the first 3 stitches, knit the next 2 stitches together (= 1 stitch decreased). ROW 2: Turn and purl the 4 stitches. ROW 3: Knit the first 3 stitches, knit the next 3 stitches together (= 2 stitches decreased). ROW 4: Turn and purl the 4 stitches. ROWS 5-8: Work the same way as on 3rd and 4th row. Repeat rows 1-8 until you reach the marker thread mid back in the neck. Cast off the 4 stitches on neck edge. Slip the 4 stitches from stitch holder on 4 mm needles and work from wrong side as follows: ROW 1: Purl the first 3 stitches, purl the next 2 stitches together (= 1 stitch decreased). ROW 2: Turn and knit the 4 stitches. ROW 3: Purl the first 3 stitches, purl the next 3 stitches together (= 2 stitches decreased). ROW 4: Turn and knit the 4 stitches. ROWS 5-8: Work the same way as on 3rd and 4th row. Repeat rows 1-8 until reach the marker thread mid back in the neck. Cast off the 4 stitches on neck edge. Sew cast-off edge together on the 2 neck edges mid back in the neck. Fasten off. |
||||||||||
Diagram explanations |
||||||||||
|
||||||||||
 |
||||||||||
Have you finished this pattern?Tag your pictures with #dropspattern #decembermoonsweater or submit them to the #dropsfan gallery. Do you need help with this pattern?You'll find 31 tutorial videos, a Comments/Questions area and more by visiting the pattern on garnstudio.com. © 1982-2026 DROPS Design A/S. We reserve all rights. This document, including all its sub-sections, has copyrights. Read more about what you can do with our patterns at the bottom of each pattern on our site. |
||||||||||


With over 40 years in knitting and crochet design, DROPS Design offers one of the most extensive collections of free patterns on the internet - translated to 17 languages. As of today we count 324 catalogues and 12290 patterns translated into English (UK/cm). 12290
We work hard to bring you the best knitting and crochet have to offer, inspiration and advice as well as great quality yarns at incredible prices! Would you like to use our patterns for other than personal use? You can read what you are allowed to do in the Copyright text at the bottom of all our patterns. Happy crafting!
Post a comment to pattern DROPS 206-12
We would love to hear what you have to say about this pattern!
If you want to leave a question, please make sure you select the correct category in the form below, to speed up the answering process. Required fields are marked *.