
Popular categories
Looking for a yarn?


Comments / Questions (70)
![]() Schneechen wrote:
Schneechen wrote:
Wie kann man eine Anleitung nur so kompliziert schreiben?? Ich glaube nicht, dass sich irgendjemand bei diesem Diagramm auskennt. Sind die Rückreihen eingezeichnet oder nicht, wann habe ich wieviele Maschen auf der Nadel und und und. Das geht sicher besser.
27.05.2022 - 18:48
![]() Michelle Dowdeswell wrote:
Michelle Dowdeswell wrote:
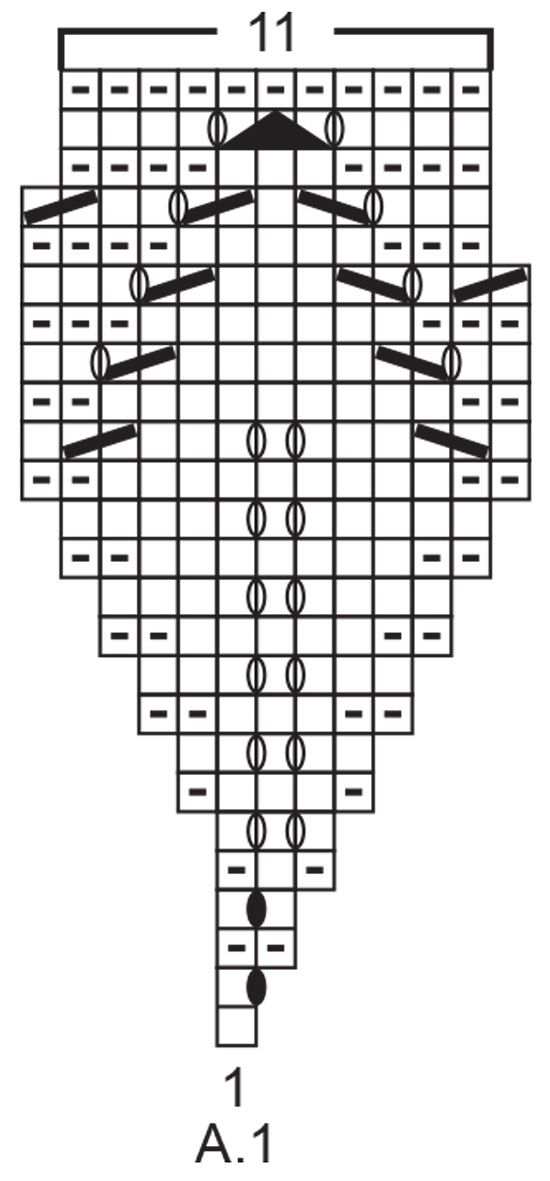
Hi I'm really struggling to read the pink petals hat chart, I've 7 stitches on the needle yet chart starts with 1. Would it be Purl all 1st row then k1, yo rep to end nxt row etc?
18.03.2022 - 18:31DROPS Design answered:
Dear Michelle, you work 7 repeats of A.1, one in each stitch. Happy knitting!
20.03.2022 - 19:49
![]() Marie Sirlin wrote:
Marie Sirlin wrote:
Je ne parviens pas à voir le diagramme (légende mais sans le diagramme) alors que j'ai rafraîchi la page. Merci d'avance pour votre réponse.
30.09.2021 - 12:34DROPS Design answered:
Bonjour Mme Sirlin, avez-vous vidé le cache de votre navigateur? Essayez avec un autre navigateur pour vérifier si ça fonctionne, car il devrait normalement s'afficher. Merci! Bon tricot!
01.10.2021 - 07:28
![]() Linn-Evy wrote:
Linn-Evy wrote:
Jeg fant feilen min etter mye om å men 😂😂
16.08.2021 - 21:58
![]() Linn-Evy wrote:
Linn-Evy wrote:
Hei! Tror jeg har funnet en feil i omg 20 på diagram A1. (Eller så leser jeg den feil) Er et mellomrom mellom de to maskene som skal strikkes sammen og kaste som kommer etter på. Jeg leser dette som en maske som skal strikkes rett, da går ikke resten av mønstret opp. Jeg sjekket diagrammet for jakken og der er det ikke dette mellomrommet på lignede omg. Så lurer egentlig på om jeg leser feil eller om det er en feil ?😂
16.08.2021 - 20:17DROPS Design answered:
Hei Linn-Evy. Så bra at du fant feilen din. God fornøyelse videre på denne kysen. mvh DROPS design
18.08.2021 - 13:24
![]() DeeDee wrote:
DeeDee wrote:
Strikker mindste størrelse Slår 7 m op og strikker dem vr 2. Række En ret omslag, en ret omslag osv til sidste maske - Ret og her forstår jeg så ikke hvordan jeg skal lave omslag og derefter strikke det vrang på pind 3
16.04.2021 - 00:05DROPS Design answered:
Hej, 2.pind (fra retsiden) starter med; 1 omslag, 1 ret, så du på 3.pind har 14 masker. 3. pind strikker du ret fra vrangen. God fornøjelse!
28.04.2021 - 15:10
![]() Mirjam Hakvoort wrote:
Mirjam Hakvoort wrote:
Ik kom telkens 1 steek te kort bij het breien van het mutsje. als ik 7 steken opgezet heb en er zoals ik het lees tussen 2 steken 1 bij maak kom ik uit op 6 keer meerderen in plaats van 7. hoe kan ik dit verhelpen zonder te smokkelen? mvrgr Mirjam
10.03.2021 - 09:19DROPS Design answered:
Dag Mirjam,
Als je in de tweede naald meerdert, moet je direct voor de eerste steek een meerdering maken en vervolgens voor iedere steek. Als het goed is heb je dan 14 steken op de naald. In de vierde naald maak je dan tussen de eeste twee steken een meerdering, tussen de volgende twee steken een meerdering enz, dus 1 recht, 1omslag, *2 recht, 1 omslag* herhaal *-* tot er 1 steek over is, 1 recht.
18.03.2021 - 11:01
![]() Maria wrote:
Maria wrote:
Kupilam przepiekne wloczki dla niemowlat. Przepiekne kolory o wspaniale sie ja przerabia. Dziekuje. Pozdrawiam. Maria
01.12.2020 - 22:34
![]() Susanna Christensen wrote:
Susanna Christensen wrote:
Hej hjæææælp 😣 jeg forstår det ikke.... Jeg strikker str 0-3 og har fået mønsteret til at gå fint op frem til mønsterpind 14, jeg har 77 m. P pinden og skal til at strikke mønsterpind 14, når jeg strikker pinden får jeg 5 masker i overskud hvad gør jeg forkert? Hilsen susanna den frustrerede....
20.11.2020 - 16:45DROPS Design answered:
Hej Susanne, hvis du sætter et mærke imellem hver rapport/diagram, så har du 7 x 11 masker = 77m. Da vil det være lettere for dig at holde styr på de 2 omslag midt i hver diagram. God fornøjelse!
24.11.2020 - 15:16
![]() Begoña wrote:
Begoña wrote:
¿Cómo adaptar este modelo a dos agujas empezando de abajo a arriba?
13.11.2020 - 12:53DROPS Design answered:
Hola Begonia! Esto puede ser dificil. Mira nuestros videos o contacta con la tienda. Buen trabajo!
19.11.2020 - 11:11
|
||||||||||||||||||||||
Pink Petals Hat#pinkpetalshat |
||||||||||||||||||||||
 |
 |
|||||||||||||||||||||
Knitted bonnet for babies with leaf pattern and garter stitch in DROPS BabyMerino. Sizes 0-24 months.
DROPS Baby 33-14 |
||||||||||||||||||||||
|
------------------------------------------------------- EXPLANATIONS FOR THE PATTERN: ------------------------------------------------------- RIDGE/GARTER STITCH (worked back and forth): Knit all rows. 1 ridge in height = Knit 2 rows. PATTERN: See diagram A.1. The diagram shows all rows in the pattern seen from the right side. ------------------------------------------------------- START THE PIECE HERE: ------------------------------------------------------- BONNET – SHORT OVERVIEW OF THE PIECE: The piece is worked back and forth with circular needle or double pointed needles, from mid back. Cast on 7-8-9 stitches with circular needle size 2.5 mm and Baby Merino. Start from the wrong side and work A.1 back and forth (= 7-8-9 repeats of A.1). When A.1 has been completed there are 77-88-99 stitches on the needle. Insert 1 marker – THE PIECE IS NOW MEASURED FROM HERE! Work GARTER STITCH back and forth – see description above. When the piece measures 9-10-11 cm from the marker, cast off with a picot-edge as described below. CAST-OFF EDGE WITH PICOT: Cast off from the right side as follows: Knit 1, (* insert the right needle between the first 2 stitches on the left needle; i.e. between the stitches on the needle not through the stitches, make 1 yarn over the right needle and pull it between the 2 stitches and place it on the left needle *, work from *-* 2 more times, so there are 3 new stitches on the left needle. ** Knit the first stitch on the left needle, pass the first stitch on the right needle over the last stitch worked **), work from **-** a total of 5 times. Repeat from (-) along the whole edge until there is 1 stitch left on the left needle. Cut the strand and pull it through the last stitch. ASSEMBLY: Sew the bonnet together mid back, along A.1 – sew in the outermost loop of the outermost stitch so the seam is flat and continue the seam approx. 2 cm along the garter stitch section. Cut and fasten the strand. TIE-CORDS: Work back and forth with 2 double pointed needles size 2.5 mm. Knit up 4 stitches on the one side of the cast-off edge. Knit 4, * do not turn the piece, but push the stitches to the other end of the needle, take the strand behind these 4 stitches, tighten and knit the 4 stitches again from the right side *, work from *-* until the cord measures 22-24-26 cm, cast off and fasten the strand. Work the other cord in the same way on the other side of the cast-off edge. |
||||||||||||||||||||||
Diagram explanations |
||||||||||||||||||||||
|
||||||||||||||||||||||
 |
||||||||||||||||||||||
Have you finished this pattern?Tag your pictures with #dropspattern #pinkpetalshat or submit them to the #dropsfan gallery. Do you need help with this pattern?You'll find 18 tutorial videos, a Comments/Questions area and more by visiting the pattern on garnstudio.com. © 1982-2026 DROPS Design A/S. We reserve all rights. This document, including all its sub-sections, has copyrights. Read more about what you can do with our patterns at the bottom of each pattern on our site. |
||||||||||||||||||||||


With over 40 years in knitting and crochet design, DROPS Design offers one of the most extensive collections of free patterns on the internet - translated to 17 languages. As of today we count 324 catalogues and 12290 patterns translated into English (UK/cm). 12290
We work hard to bring you the best knitting and crochet have to offer, inspiration and advice as well as great quality yarns at incredible prices! Would you like to use our patterns for other than personal use? You can read what you are allowed to do in the Copyright text at the bottom of all our patterns. Happy crafting!
Post a comment to pattern DROPS Baby 33-14
We would love to hear what you have to say about this pattern!
If you want to leave a question, please make sure you select the correct category in the form below, to speed up the answering process. Required fields are marked *.